2017 NISSAN ARMADA brake light
[x] Cancel search: brake lightPage 6 of 36
4
PREDICTIVE FORWARD COLLISION WARNING (PFCW)
(if so equipped)
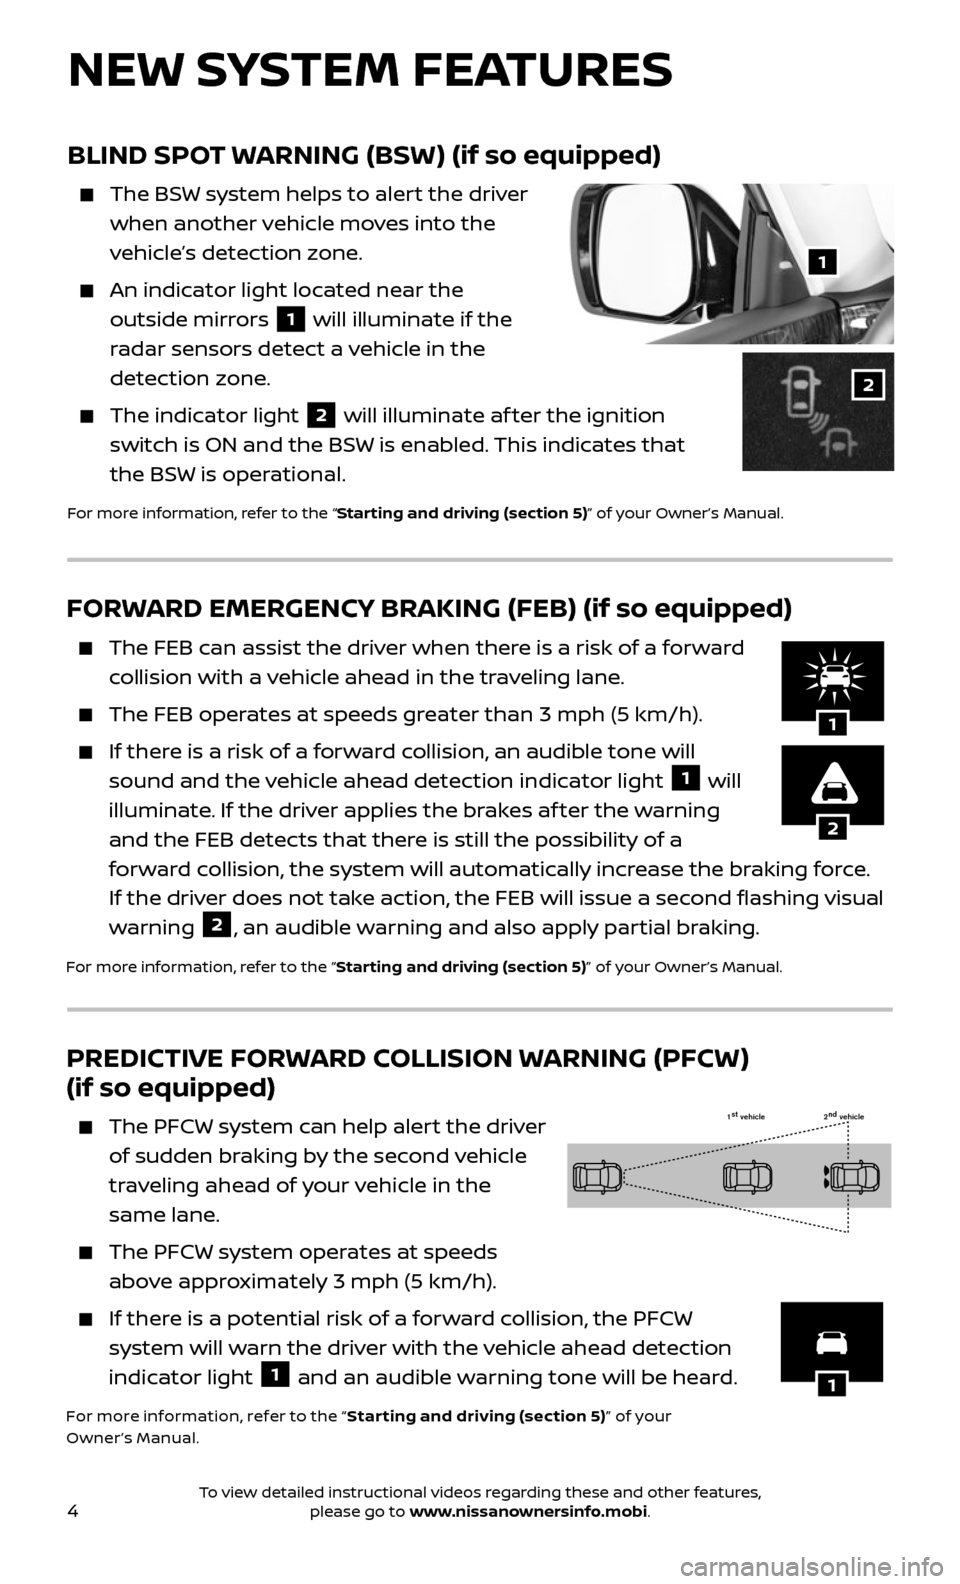
The PFCW system can help alert the driver
of sudden braking by the second vehicle
traveling ahead of your vehicle in the
same lane.
The PFCW system operates at speeds
above approximately 3 mph (5 km/h).
If there is a potential risk of a forward collision, the PFCW
system will warn the driver with the vehicle ahead detection
indicator light 1 and an audible warning tone will be heard.
For more information, refer to the “ Star ting and driving (section 5)” of your
Owner’s Manual.
1 st
vehicle 2nd
vehicle
1
NEW SYSTEM FEATURES
FORWARD EMERGENCY BRAKING (FEB) (if so equipped)
The FEB c an assist the driver when there is a risk of a forward
collision with a vehicle ahead in the traveling lane.
The FEB oper ates at speeds greater than 3 mph (5 km/h).
If there is a risk of a forward collision, an audible tone will
sound and the vehicle ahead detection indicator light 1 will
illuminate. If the driver applies the brakes af ter the warning
and the FEB detects that there is still the possibility of a
forward collision, the system will automatically increase the braking force.
If the driver does not take action, the FEB will issue a second flashing visual
warning
2, an audible warning and also apply partial braking.
For more information, refer to the “Starting and driving (section 5)” of your Owner’s Manual.
2
1
BLIND SPOT WARNING (BSW) (if so equipped)
The BSW system helps to alert the driver
when another vehicle moves into the
vehicle’s detection zone.
An indicator light located near the
outside mirrors
1 will illuminate if the
radar sensors detect a vehicle in the
detection zone.
The indic ator light 2 will illuminate af ter the ignition
switch is ON and the BSW is enabled. This indicates that
the BSW is operational.
For more information, refer to the “Starting and driving (section 5)” of your Owner’s Manual.
1
2
To view detailed instructional videos regarding these and other features, please go to www.nissanownersinfo.mobi.
Page 7 of 36
5
LANE DEPARTURE WARNING (LDW) AND LANE DEPARTURE
PREVENTION (LDP) (if so equipped)
The LDW system can help alert the driver when the vehicle is traveling too
close to either the lef t or the right side of a traveling lane.
The system will operate when the vehicle is driven at speeds of
approximately 45 mph (70 km/h) and above and only when the lane
markings are clearly visible on the road.
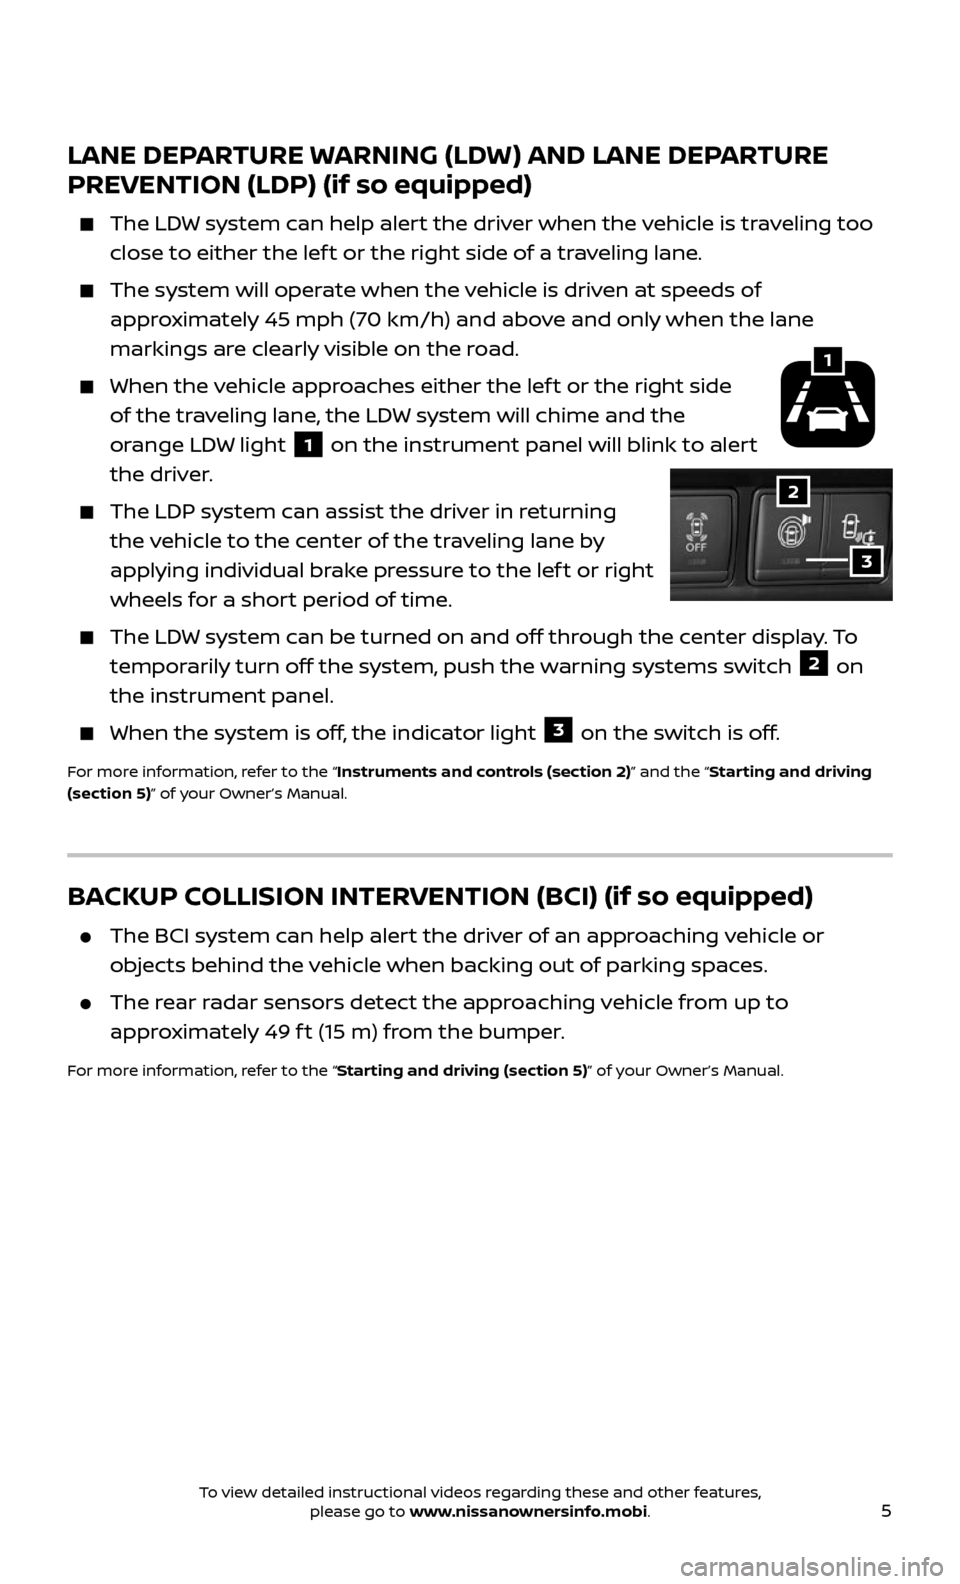
When the vehicle approaches either the lef t or the right side
of the traveling lane, the LDW system will chime and the
orange LDW light
1 on the instrument panel will blink to alert
the driver.
The LDP system c an assist the driver in returning
the vehicle to the center of the traveling lane by
applying individual brake pressure to the lef t or right
wheels for a short period of time.
The LDW system can be turned on and off through the center display. To
temporarily turn off the system, push the warning systems switch 2 on
the instrument panel.
When the system is off , the indicator light 3 on the switch is off.
For more information, refer to the “Instruments and controls (section 2)” and the “Starting and driving
(section 5)” of your Owner’s Manual.
1
2
3
BACKUP COLLISION INTERVENTION (BCI) (if so equipped)
The BCI system can help alert the driver of an approaching vehicle or
objects behind the vehicle when backing out of parking spaces.
The rear radar sensors detect the approaching vehicle from up to
approximately 49 f t (15 m) from the bumper.
For more information, refer to the “Starting and driving (section 5)” of your Owner’s Manual.
To view detailed instructional videos regarding these and other features, please go to www.nissanownersinfo.mobi.
Page 11 of 36
9
NISSAN INTELLIGENT KEY® SYSTEM
The Nissan Intelligent Key® System allows you to lock or unlock the vehicle,
open the lif tgate and start the engine. It is important to make sure the
Intelligent Key is with you (that is, in your pocket or purse).
REMOTE ENGINE START* (if so equipped)
The remote engine start operating range is approximately 200 f t (60 m)
from the vehicle. The effective operating range may be shorter due to
environmental conditions or obstacles between you and the vehicle.
For the remote engine start to function, the vehicle must be in the P (PARK)
position with the ignition off and all the doors closed and locked.
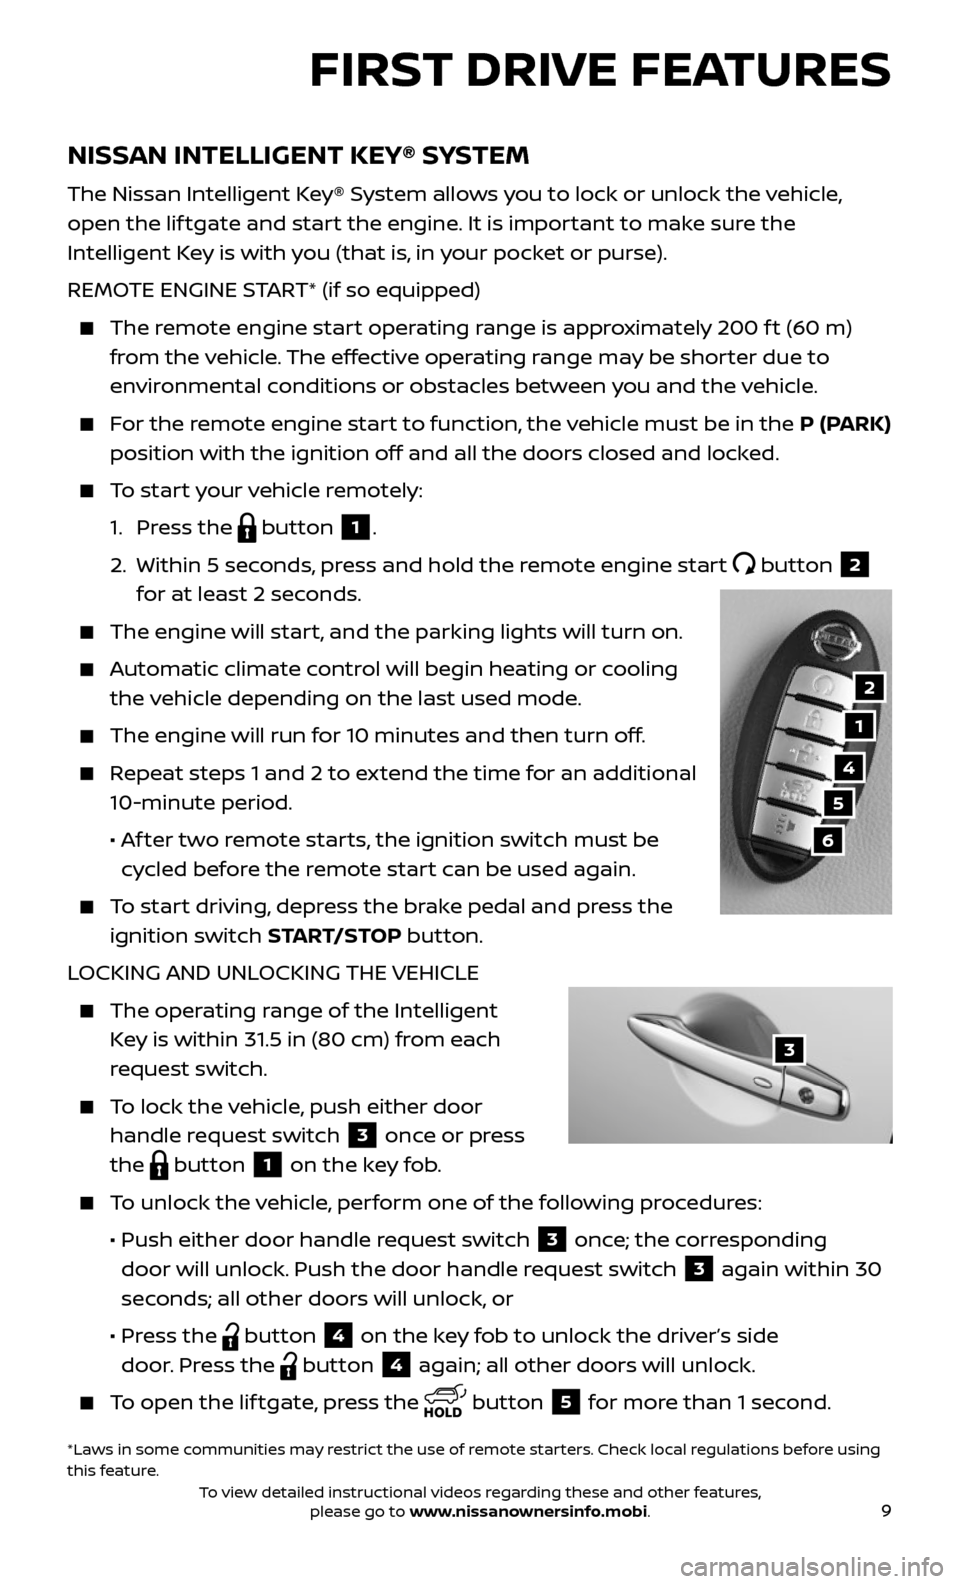
To start your vehicle remotely:
1. Press the button 1.
2. Within 5 sec onds, press and hold the remote engine start button 2
for at least 2 seconds.
The engine wil l start, and the parking lights will turn on.
Automatic climate control will begin heating or cooling
the vehicle depending on the last used mode.
The engine will run for 10 minutes and then turn off.
Repeat steps 1 and 2 to extend the time for an additional
10-minute period.
• Af ter two remote starts, the ignition switch must be
cycled before the remote start can be used again.
To start driving, depress the brake pedal and press the
ignition switch START/STOP button.
LOCKING AND UNLOCKING THE VEHICLE
The oper ating range of the Intelligent
Key is within 31.5 in (80 cm) from each
request switch.
To lock the vehicle, push either door
handle request switch 3 once or press
the
button 1 on the key fob.
To unlock the vehicle, perform one of the following procedures:
• Push either door hand le request switch 3 once; the corresponding
door will unlock. Push the door handle request switch
3 again within 30
seconds; all other doors will unlock, or
• Press the button 4 on the key fob to unlock the driver’s side
door. Press the
button 4 again; all other doors will unlock.
To open the lif tgate, press the button 5 for more than 1 second.
FIRST DRIVE FEATURES
1
4
5
6
*Laws in some communities may restrict the use of remote starters. Check local regulations before using
this feature.
2
3
To view detailed instructional videos regarding these and other features, please go to www.nissanownersinfo.mobi.
Page 12 of 36
10
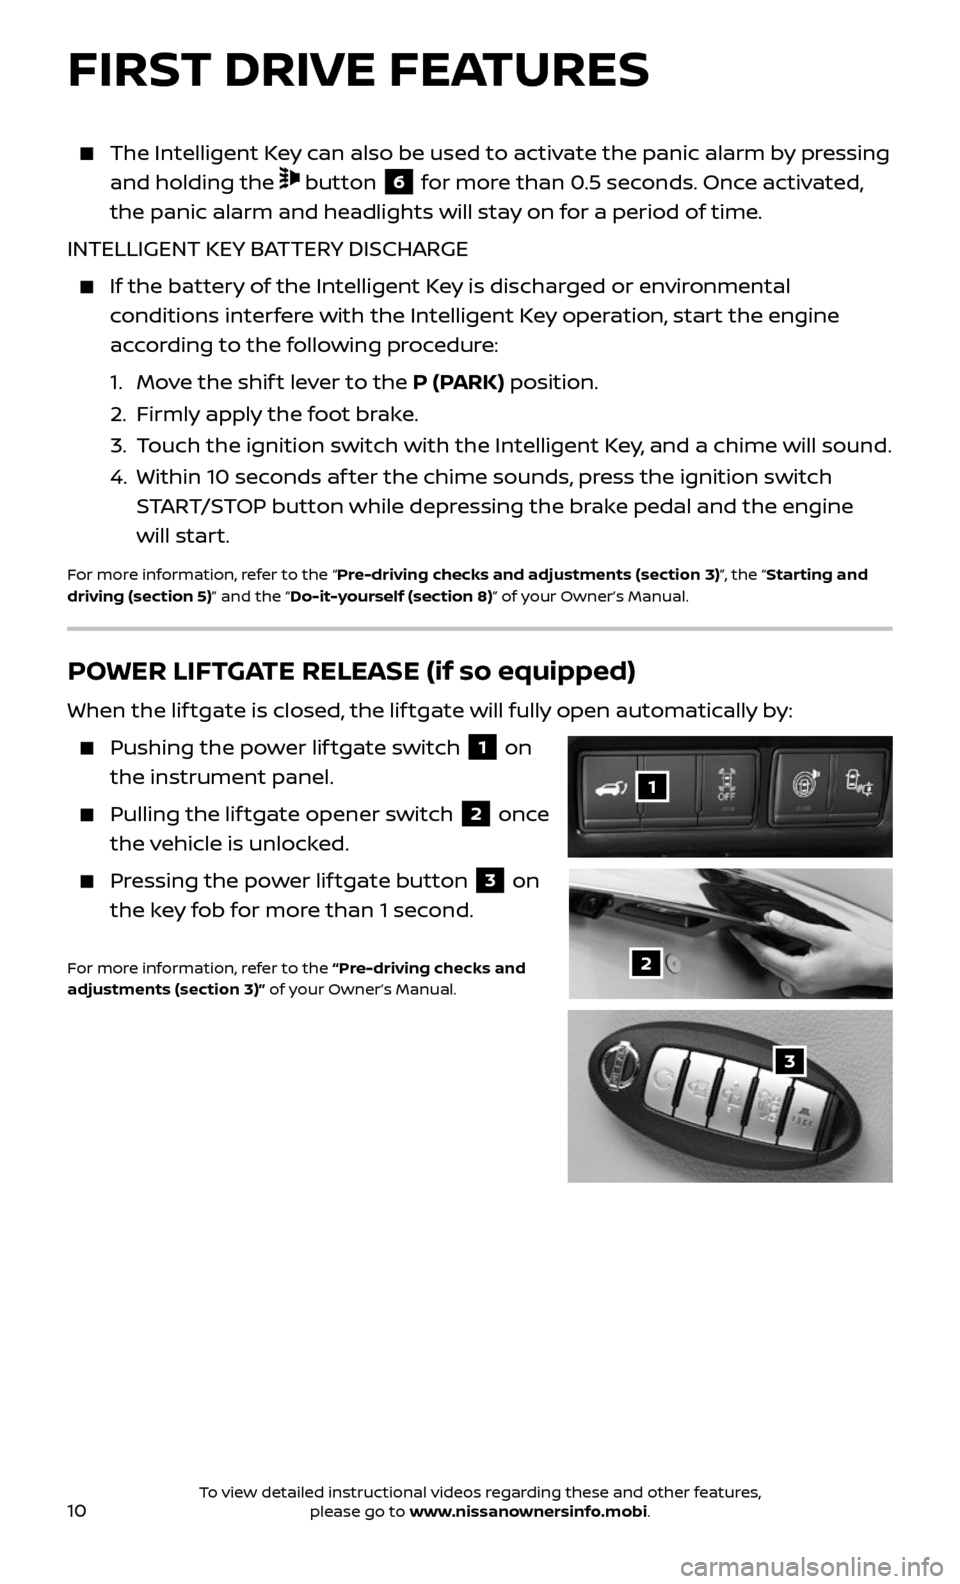
The Intelligent Key can also be used to activate the panic alarm by pressing
and holding the button 6 for more than 0.5 seconds. Once activated,
the panic alarm and headlights will stay on for a period of time.
INTELLIGENT KEY BATTERY DISCHARGE
If the bat tery of the Intelligent Key is discharged or environmental
conditions interfere with the Intelligent Key operation, start the engine
according to the following procedure:
1. Move the shif t lever to the P (PARK) position.
2. Firml y apply the foot brake.
3. Touch the ignition switch with the Intelligent Key, and a chime will sound.
4. Within 10 sec onds af ter the chime sounds, press the ignition switch
START/STOP button while depressing the brake pedal and the engine
will start.
For more information, refer to the “Pre-driving checks and adjustments (section 3)”, the “Starting and
driving (section 5)” and the “Do-it-yourself (section 8)” of your Owner’s Manual.
FIRST DRIVE FEATURES
POWER LIFTGATE RELEASE (if so equipped)
When the lif tgate is closed, the lif tgate will fully open automatically by:
Pushing the power lif tgate switch 1 on
the instrument panel.
Pulling the lif tgate opener switch 2 once
the vehicle is unlocked.
Pressing the power lif tgate button 3 on
the key fob for more than 1 second.
For more information, refer to the “Pre-driving checks and
adjustments (section 3)” of your Owner’s Manual.2
1
3
To view detailed instructional videos regarding these and other features, please go to www.nissanownersinfo.mobi.
Page 15 of 36
13
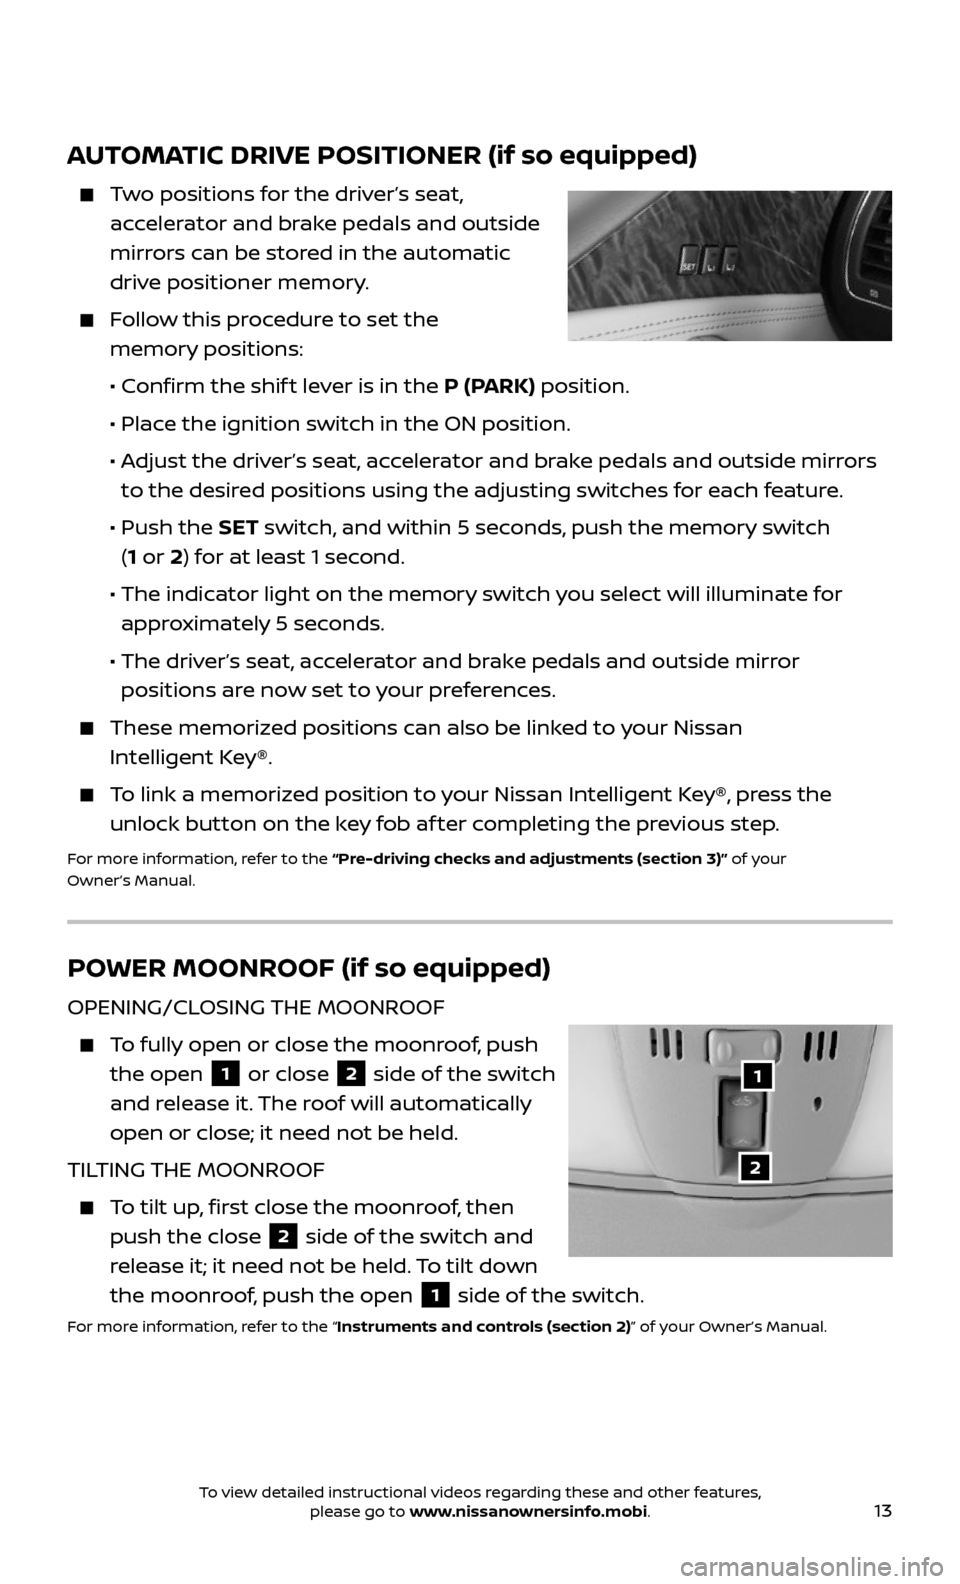
AUTOMATIC DRIVE POSITIONER (if so equipped)
Two positions for the driver’s seat,
accelerator and brake pedals and outside
mirrors can be stored in the automatic
drive positioner memory.
Follow this procedure to set the
memory positions:
• Confirm the shif t lever is in the P (PARK) position.
• Place the ignition switch in the ON position.
• Adjust the driver’s seat, accelerator and brake pedals and outside mirrors
to the desired positions using the adjusting switches for each feature.
• Push the SET switch, and within 5 seconds, push the memory switch
(1 or 2) for at least 1 second.
• The indic ator light on the memory switch you select will illuminate for
approximately 5 seconds.
• The driver’s seat, accelerator and brake pedals and outside mirror
positions are now set to your preferences.
These memoriz ed positions can also be linked to your Nissan
Intelligent Key®.
To link a memorized position to your Nissan Intelligent Key®, press the
unlock button on the key fob af ter completing the previous step.
For more information, refer to the “Pre-driving checks and adjustments (section 3)” of your
Owner’s Manual.
POWER MOONROOF (if so equipped)
OPENING/CLOSING THE MOONROOF
To fully open or close the moonroof, push
the open 1 or close 2 side of the switch
and release it. The roof will automatically
open or close; it need not be held.
TILTING THE MOONROOF
To tilt up, first close the moonroof, then
push the close 2 side of the switch and
release it; it need not be held. To tilt down
the moonroof, push the open
1 side of the switch.
For more information, refer to the “Instruments and controls (section 2)” of your Owner’s Manual.
1
2
To view detailed instructional videos regarding these and other features, please go to www.nissanownersinfo.mobi.
Page 22 of 36
20
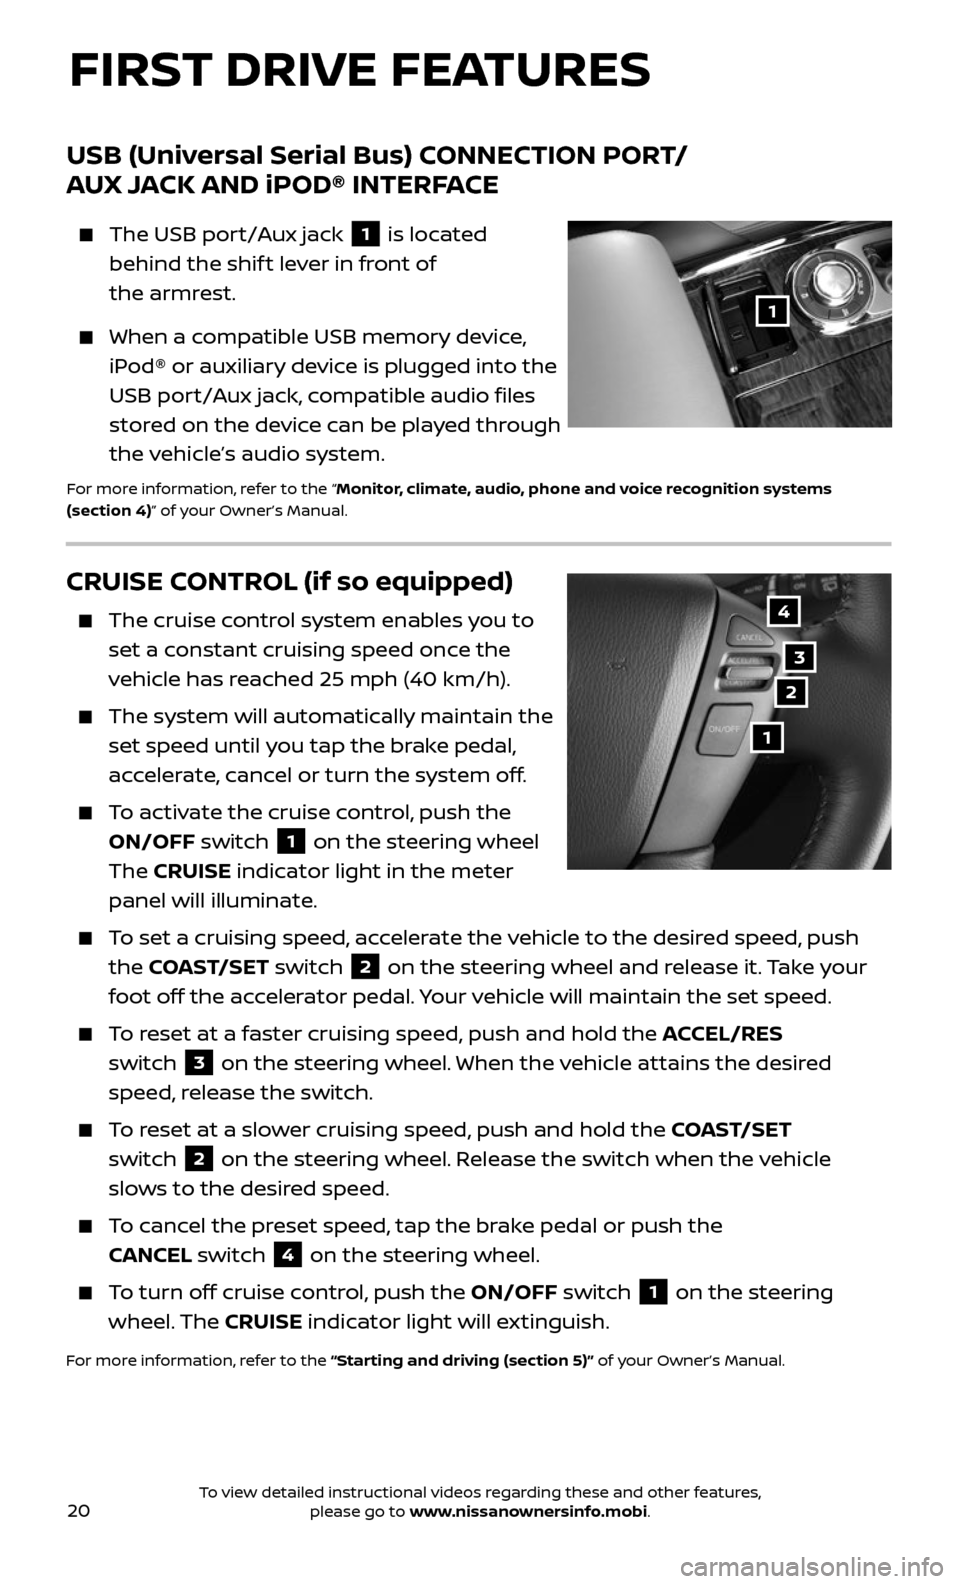
CRUISE CONTROL (if so equipped)
The cruise control system enables you to
set a constant cruising speed once the
vehicle has reached 25 mph (40 km/h).
The system wil l automatically maintain the
set speed until you tap the brake pedal,
accelerate, cancel or turn the system off.
To activate the cruise control, push the
ON/OFF switch 1 on the steering wheel
The CRUISE indicator light in the meter
panel will illuminate.
To set a cruising speed, accelerate the vehicle to the desired speed, push
the COAST/SET switch 2 on the steering wheel and release it. Take your
foot off the accelerator pedal. Your vehicle will maintain the set speed.
To reset at a faster cruising speed, push and hold the ACCEL/RES
switch
3 on the steering wheel. When the vehicle attains the desired
speed, release the switch.
To reset at a slower cruising speed, push and hold the COAST/SET
switch
2 on the steering wheel. Release the switch when the vehicle
slows to the desired speed.
To cancel the preset speed, tap the brake pedal or push the
CANCEL switch
4 on the steering wheel.
To turn off cruise control, push the ON/OFF switch 1 on the steering
wheel. The CRUISE indicator light will extinguish.
For more information, refer to the “Starting and driving (section 5)” of your Owner’s Manual.
4
3
2
1
USB (Universal Serial Bus) CONNECTION PORT /
AUX JACK AND iPOD® INTERFACE
The USB port/Aux jack 1 is located
behind the shif t lever in front of
the armrest.
When a compatible USB memory device,
iPod® or auxiliary device is plugged into the
USB port/Aux jack, compatible audio files
stored on the device can be played through
the vehicle’s audio system.
For more information, refer to the “Monitor, climate, audio, phone and voice recognition systems
(section 4)” of your Owner’s Manual.
1
FIRST DRIVE FEATURES
To view detailed instructional videos regarding these and other features, please go to www.nissanownersinfo.mobi.
Page 23 of 36
21
INTELLIGENT CRUISE CONTROL (ICC)
(if so equipped)
VEHICLE-TO-VEHICLE DISTANCE
CONTROL MODE
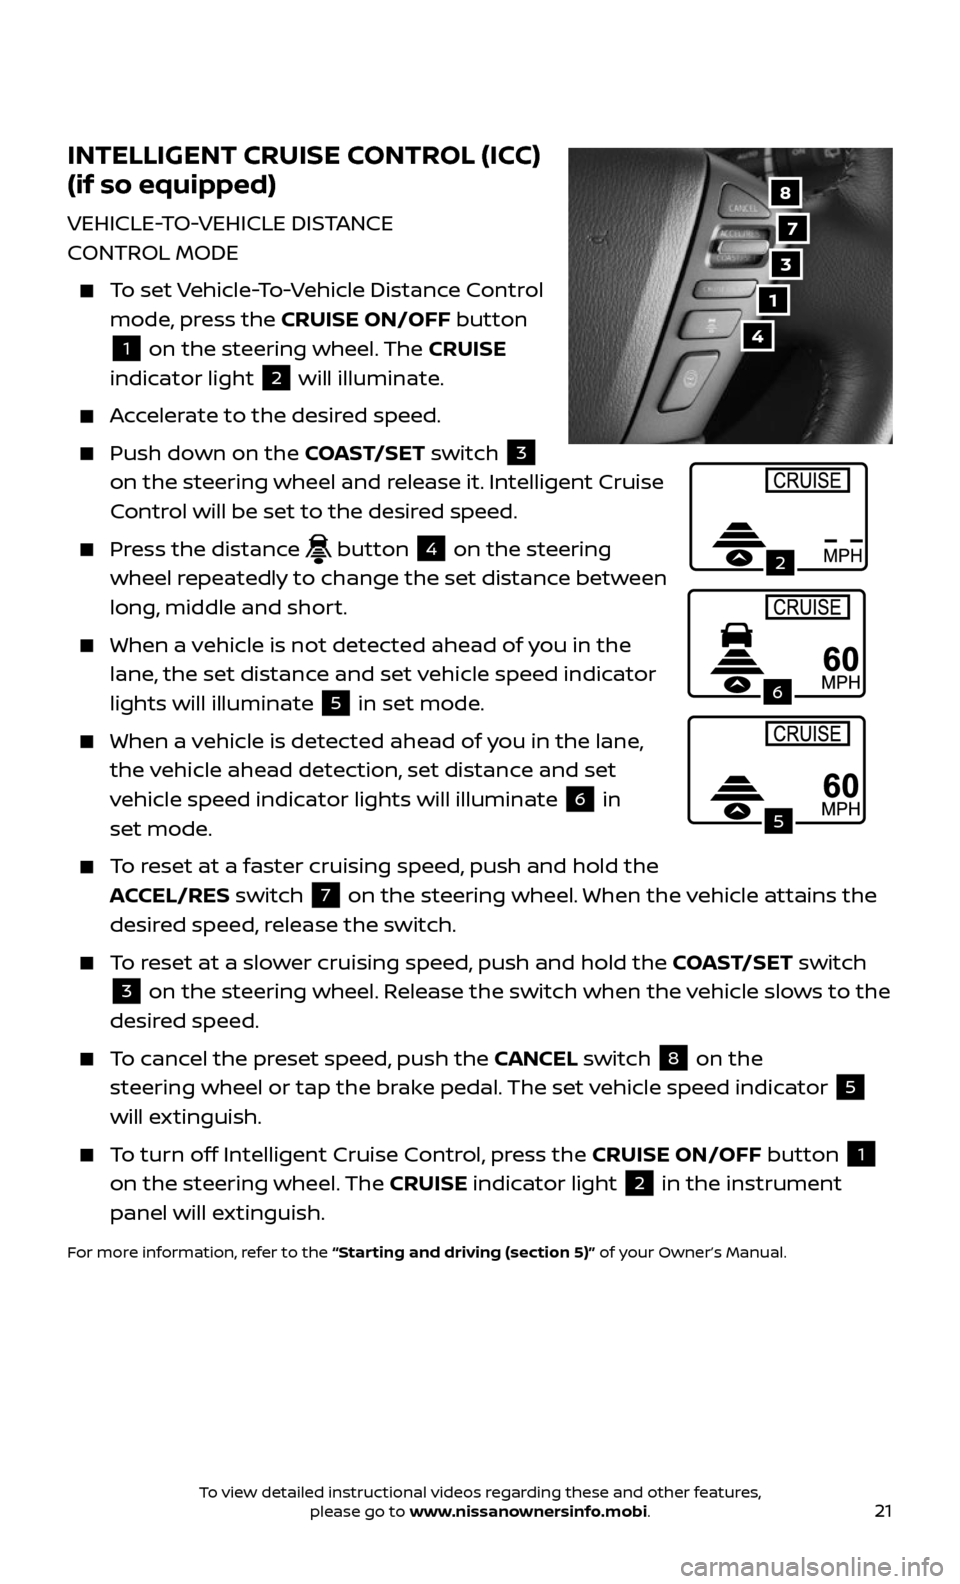
To set Vehicle-To-Vehicle Distance Control
mode, press the CRUISE ON/OFF button
1 on the steering wheel. The CRUISE
indicator light 2 will illuminate.
Accelerate to the desired speed.
Push down on the COAST/SET switch 3
on the steering wheel and release it. Intelligent Cruise
Control will be set to the desired speed.
Press the distance button 4 on the steering
wheel repeatedly to change the set distance between
long, middle and short.
When a v ehicle is not detected ahead of you in the
lane, the set distance and set vehicle speed indicator
lights will illuminate
5 in set mode.
When a vehicle is detected ahead of you in the lane,
the vehicle ahead detection, set distance and set
vehicle speed indicator lights will illuminate
6 in
set mode.
To reset at a faster cruising speed, push and hold the
ACCEL/RES switch 7 on the steering wheel. When the vehicle attains the
desired speed, release the switch.
To reset at a slower cruising speed, push and hold the COAST/SET switch
3 on the steering wheel. Release the switch when the vehicle slows to the
desired speed.
To cancel the preset speed, push the CANCEL switch 8 on the
steering wheel or tap the brake pedal. The set vehicle speed indicator
5
will extinguish.
To turn off Intelligent Cruise Control, press the CRUISE ON/OFF button 1
on the steering wheel. The CRUISE indicator light 2 in the instrument
panel will extinguish.
For more information, refer to the “Starting and driving (section 5)” of your Owner’s Manual.
7
3
8
4
1
2
5
6
To view detailed instructional videos regarding these and other features, please go to www.nissanownersinfo.mobi.
Page 31 of 36
29
6 Multi-Function Controller
a. ENTER button– Press to select the highlighted item on the screen. If
this button is pressed while a map is displayed, the map menu screen
is displayed.
b. Main dir ectional buttons – Press to move across the map, highlight an
item on the screen or adjust a setting.
c. Additional directional buttons – Press to move across the map or
highlight an item on the character input screen.
d. C enter dial – Turn the dial to highlight an item on the screen, adjust a
setting or adjust the map scale.
7 Information (INFO) – Press to display the vehicle, traffic (if so equipped),
weather (if so equipped) or voice recognition information.
8 S TAT U S – Press multiple times to display audio information with either
the air conditioner status, fuel economy or navigation directions.
9 SETTING – Press to access the system settings.
10 BACK – Press to return to the previous screen. In a settings screen, this
button can also be used to apply the setting. In a character input screen,
this button can also delete the characters that have been entered.
11 VOICE – Press to hear the current voice guidance for a programed route.
For more information, refer to your Navigation System Owner’s Manual.
DVD ENTERTAINMENT SYSTEM
(if so equipped)
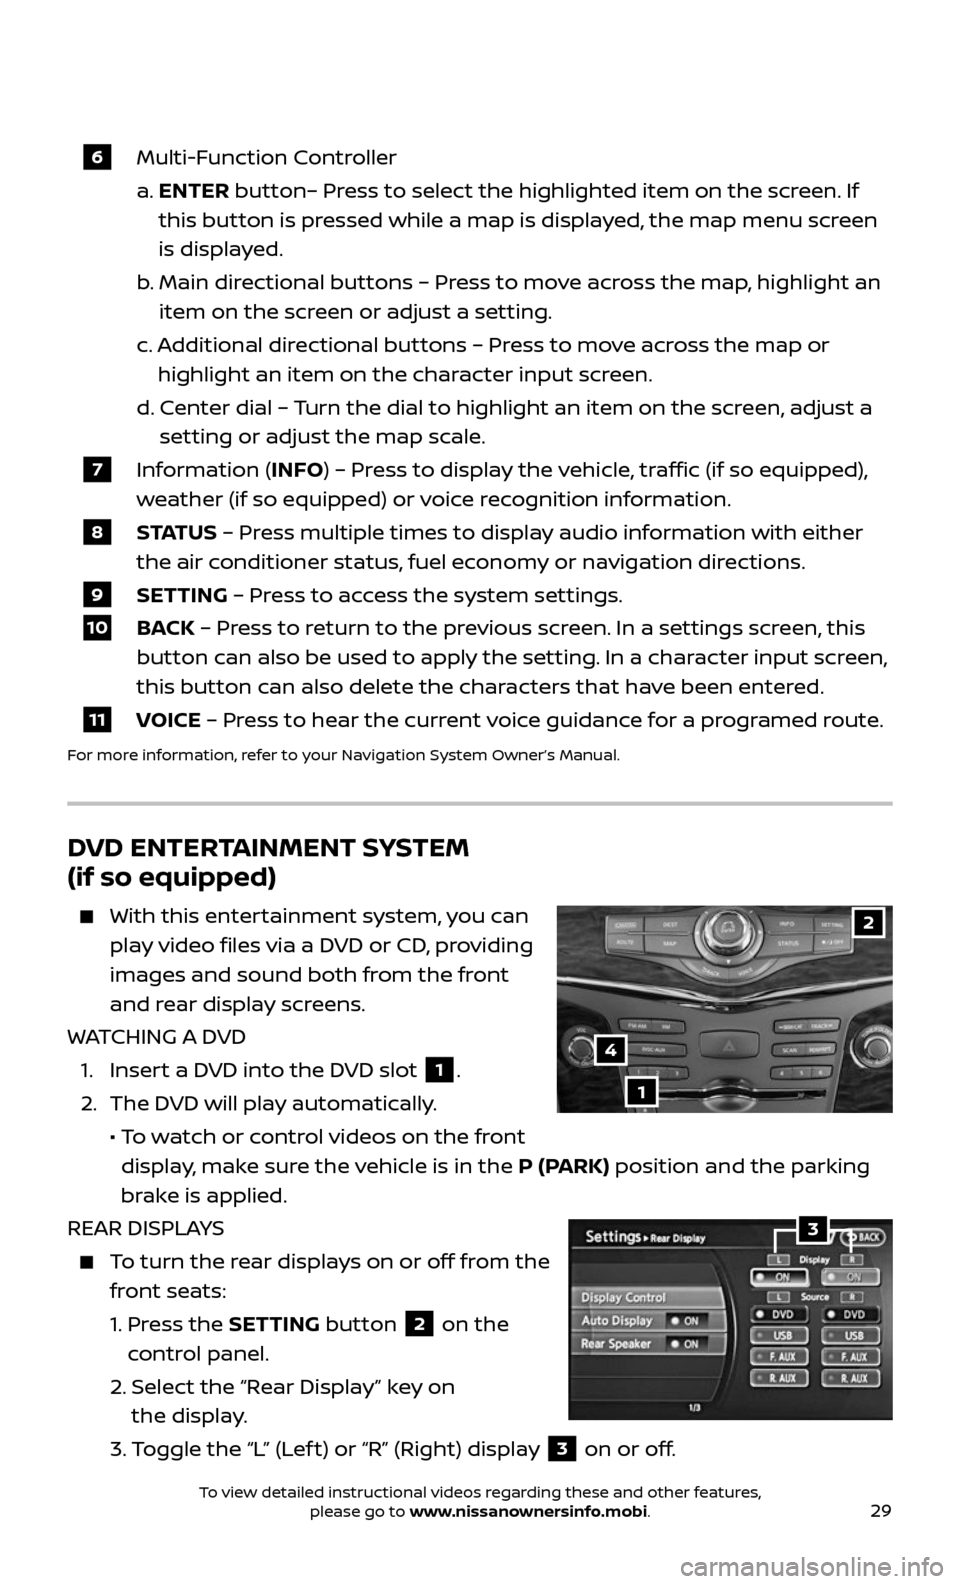
With this enter tainment system, you can
play video files via a DVD or CD, providing
images and sound both from the front
and rear display screens.
WATCHING A DVD
1. Insert a DVD into the DVD slot 1.
2. The DVD will play automatically.
• To watch or control videos on the front
display, make sure the vehicle is in the P (PARK) position and the parking
brake is applied.
REAR DISPLAYS
To turn the rear displays on or off from the
front seats:
1. Press the SETTING button 2 on the
control panel.
2. Selec t the “Rear Display” key on
the display.
3. Toggle the “L” (Lef t) or “R” (Right) display 3 on or off.
2
1
4
3
To view detailed instructional videos regarding these and other features, please go to www.nissanownersinfo.mobi.