2017 NISSAN ARMADA check engine
[x] Cancel search: check enginePage 486 of 614
To shut off the engine in an emergency situation
while driving, perform the following procedure:
.Rapidly push the push-button ignition switch
3 consecutive times in less than 1.5
seconds, or
. Push and hold the push-button ignition
switch for more than 2 seconds.TIRE PRESSURE MONITORING SYS-
TEM (TPMS)
This vehicle is equipped with the Tire Pressure
Monitoring System (TPMS) . It monitors tire
pressure of all tires except the spare. When
the low tire pressure warning light is lit and the
CHECK TIRE PRESSURE warning appears in
the vehicle information display, one or more of
your tires is significantly under-inflated. If the
vehicle is being driven with low tire pressure, the
TPMS will activate and warn you of it by the low
tire pressure warning light. This system will
activate only when the vehicle is driven at
speeds above 16 MPH (25 km/h) . For more
details, see “Warning lights, indicator lights and
audible reminders” (P.2-10) , “TIRE PRESSURE
information” (P.4-10) and “Tire Pressure Mon-
itoring System (TPMS)” (P.5-5) .
WARNING
.If the low tire pressure warning light
illuminates or LOW PRESSURE in-
formation is displayed on the moni-
tor screen while driving, avoid
sudden steering maneuvers or
abrupt braking, reduce vehicle
speed, pull off the road to a safe
location and stop the vehicle as soon as possible. Driving with un-
der-inflated tires may permanently
damage the tires and increase the
likelihood of tire failure. Serious
vehicle damage could occur and
may lead to an accident and could
result in serious personal injury.
Check the tire pressure for all four
tires. Adjust the tire pressure to the
recommended COLD tire pressure
shown on the Tire and Loading
Information label to turn the low
tire pressure warning light OFF. If
the light still illuminates while driv-
ing after adjusting the tire pressure,
a tire may be flat. If you have a flat
tire, replace it with a spare tire as
soon as possible.
. Since the spare tire is not equipped
with the TPMS, when a spare tire is
mounted or a wheel is replaced, the
TPMS will not function and the low
tire pressure warning light will flash
for approximately 1 minute. The
light will remain on after 1 minute.
Have your tires replaced and/or
TPMS system reset as soon as
possible. It is recommended you
visit a NISSAN dealer for these
services.
In case of emergency6-3
EMERGENCY ENGINE SHUT OFF FLAT TIRE
Page 496 of 614
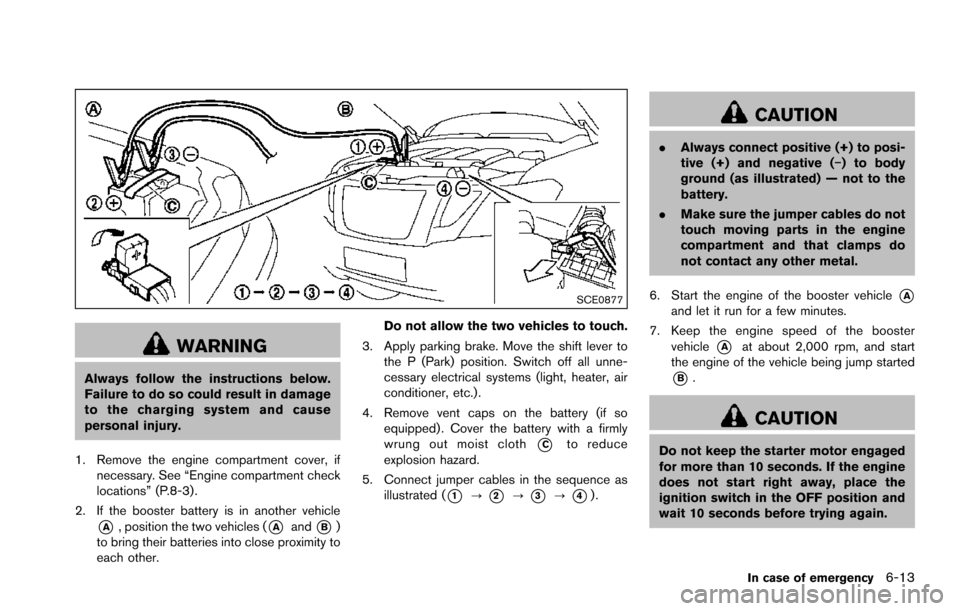
SCE0877
WARNING
Always follow the instructions below.
Failure to do so could result in damage
to the charging system and cause
personal injury.
1. Remove the engine compartment cover, if necessary. See “Engine compartment check
locations” (P.8-3).
2. If the booster battery is in another vehicle
*A, position the two vehicles (*Aand*B)
to bring their batteries into close proximity to
each other. Do not allow the two vehicles to touch.
3. Apply parking brake. Move the shift lever to the P (Park) position. Switch off all unne-
cessary electrical systems (light, heater, air
conditioner, etc.) .
4. Remove vent caps on the battery (if so equipped) . Cover the battery with a firmly
wrung out moist cloth
*Cto reduce
explosion hazard.
5. Connect jumper cables in the sequence as illustrated (
*1?*2?*3?*4).
CAUTION
.Always connect positive (+) to posi-
tive (+) and negative (�í) to body
ground (as illustrated) — not to the
battery.
. Make sure the jumper cables do not
touch moving parts in the engine
compartment and that clamps do
not contact any other metal.
6. Start the engine of the booster vehicle
*Aand let it run for a few minutes.
7. Keep the engine speed of the booster vehicle
*Aat about 2,000 rpm, and start
the engine of the vehicle being jump started
*B.
CAUTION
Do not keep the starter motor engaged
for more than 10 seconds. If the engine
does not start right away, place the
ignition switch in the OFF position and
wait 10 seconds before trying again.
In case of emergency6-13
Page 498 of 614
conditioner temperature control to maximum
hot and fan control to high speed.
3. If engine overheating is caused by climbing a long hill on a hot day, run the engine at a
fast idle (approximately 1,500 rpm) until the
temperature gauge indication returns to
normal.
4. Get out of the vehicle. Look and listen for steam or coolant escaping from the radiator
before opening the hood. (If steam or
coolant is escaping, turn off the engine.)
Do not open the hood further until no steam
or coolant can be seen.
5. Open the engine hood.
WARNING
If steam or water is coming from the
engine, stand clear to prevent getting
burned.
6. Visually check drive belts for damage or looseness. Also check if the cooling fan is
running. The radiator hoses and radiator
should not leak water. If coolant is leaking or
the cooling fan does not run, stop the
engine.
WARNING
Be careful not to allow your hands, hair,
jewelry or clothing to come into contact
with, or get caught in, engine belts or
the engine cooling fan. The engine
cooling fan can start at any time.
7. After the engine cools down, check the coolant level in the reservoir tank with the
engine running. Add coolant to the reservoir
tank if necessary. Have your vehicle re-
paired. It is recommended you visit a
NISSAN dealer for this service.
In case of emergency6-15
Page 516 of 614
8 Do-it-yourself
Maintenance precautions ........................................................ 8-2
Engine compartment check locations .................................. 8-3VK56VD engine ................................................................... 8-3
Engine cooling system ............................................................. 8-4 Checking engine coolant level ......................................... 8-5
Changing engine coolant .................................................. 8-5
Engine oil ........................................................................\
............ 8-6 Checking engine oil level .................................................. 8-6
Changing engine oil and filter .......................................... 8-6
Automatic Transmission Fluid (ATF) ..................................... 8-8
Power steering fluid .................................................................. 8-8
Brake fluid ........................................................................\
........... 8-9
Window washer fluid ............................................................ 8-10
Battery ........................................................................\
............... 8-11 Jump starting ..................................................................... 8-13
Variable voltage control system .......................................... 8-13
Drive belts ........................................................................\
........ 8-13
Spark plugs ........................................................................\
..... 8-14 Replacing spark plugs .................................................... 8-14
Air cleaner ........................................................................\
........ 8-15 Windshield wiper blades ..................................................... 8-16
Cleaning ........................................................................\
... 8-16
Replacing ........................................................................\
. 8-16
Rear window wiper blades ................................................. 8-17
Brakes ........................................................................\
.............. 8-17 Self-adjusting brakes .................................................... 8-17
Brake pad wear warning .............................................. 8-17
Brake booster ................................................................. 8-18
Fuses ........................................................................\
................ 8-18 Engine compartment ..................................................... 8-19
Passenger compartment .............................................. 8-20
Intelligent Key battery replacement ................................... 8-21
Lights ........................................................................\
................ 8-24
Headlights ........................................................................\
8-25
Exterior and interior lights ............................................ 8-26
Wheels and tires ................................................................... 8-30
Tire pressure ................................................................... 8-30
Tire labeling ..................................................................... 8-34
Types of tires ................................................................... 8-36
Tire chains ....................................................................... 8-36
Changing wheels and tires .......................................... 8-37
Page 518 of 614
difficulties or excessive emissions, and could
affect your warranty coverage.If in doubt
about any servicing, it is recommended
you have it done by a NISSAN dealer.
JVC0965X
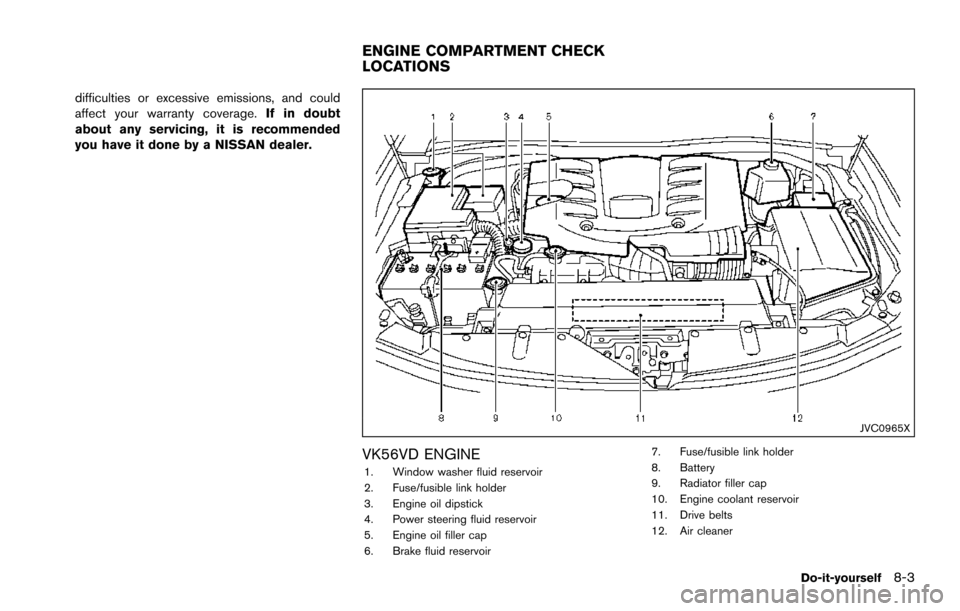
VK56VD ENGINE1. Window washer fluid reservoir
2. Fuse/fusible link holder
3. Engine oil dipstick
4. Power steering fluid reservoir
5. Engine oil filler cap
6. Brake fluid reservoir 7. Fuse/fusible link holder
8. Battery
9. Radiator filler cap
10. Engine coolant reservoir
11. Drive belts
12. Air cleaner
Do-it-yourself8-3
ENGINE COMPARTMENT CHECK
LOCATIONS
Page 520 of 614
JVM0733X
CHECKING ENGINE COOLANT LEVEL
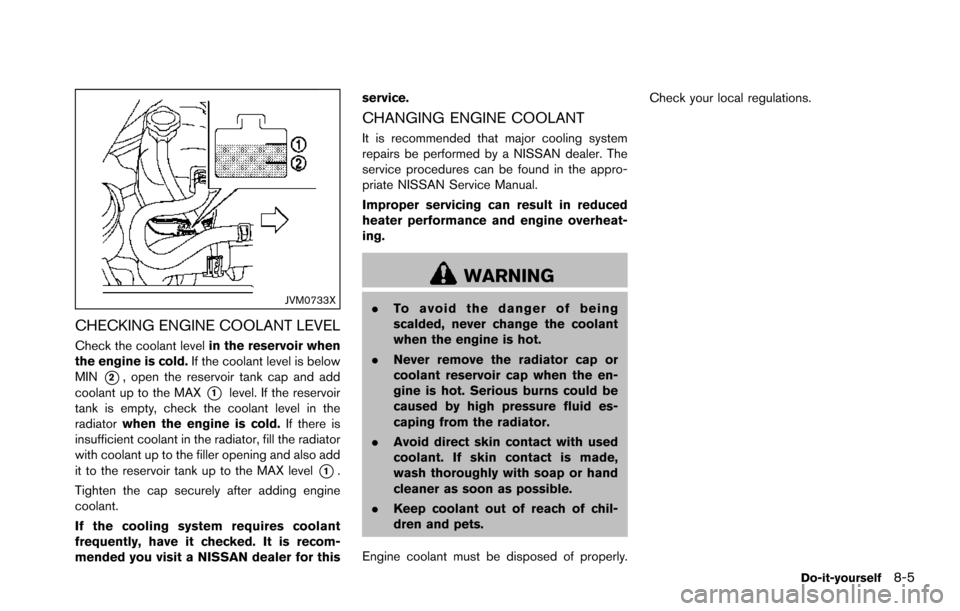
Check the coolant levelin the reservoir when
the engine is cold. If the coolant level is below
MIN
*2, open the reservoir tank cap and add
coolant up to the MAX
*1level. If the reservoir
tank is empty, check the coolant level in the
radiator when the engine is cold. If there is
insufficient coolant in the radiator, fill the radiator
with coolant up to the filler opening and also add
it to the reservoir tank up to the MAX level
*1.
Tighten the cap securely after adding engine
coolant.
If the cooling system requires coolant
frequently, have it checked. It is recom-
mended you visit a NISSAN dealer for this service.
CHANGING ENGINE COOLANT
It is recommended that major cooling system
repairs be performed by a NISSAN dealer. The
service procedures can be found in the appro-
priate NISSAN Service Manual.
Improper servicing can result in reduced
heater performance and engine overheat-
ing.
WARNING
.
To avoid the danger of being
scalded, never change the coolant
when the engine is hot.
. Never remove the radiator cap or
coolant reservoir cap when the en-
gine is hot. Serious burns could be
caused by high pressure fluid es-
caping from the radiator.
. Avoid direct skin contact with used
coolant. If skin contact is made,
wash thoroughly with soap or hand
cleaner as soon as possible.
. Keep coolant out of reach of chil-
dren and pets.
Engine coolant must be disposed of properly. Check your local regulations.
Do-it-yourself8-5
Page 521 of 614
8-6Do-it-yourself
JVM0728X
CHECKING ENGINE OIL LEVEL
1. Park the vehicle on a level surface and applythe parking brake.
2. Run the engine until it reaches operating temperature.
3. Turn off the engine. Wait more than 15
minutes for the oil to drain back into
the oil pan.
4. Remove the dipstick and wipe it clean. Reinsert it all the way.
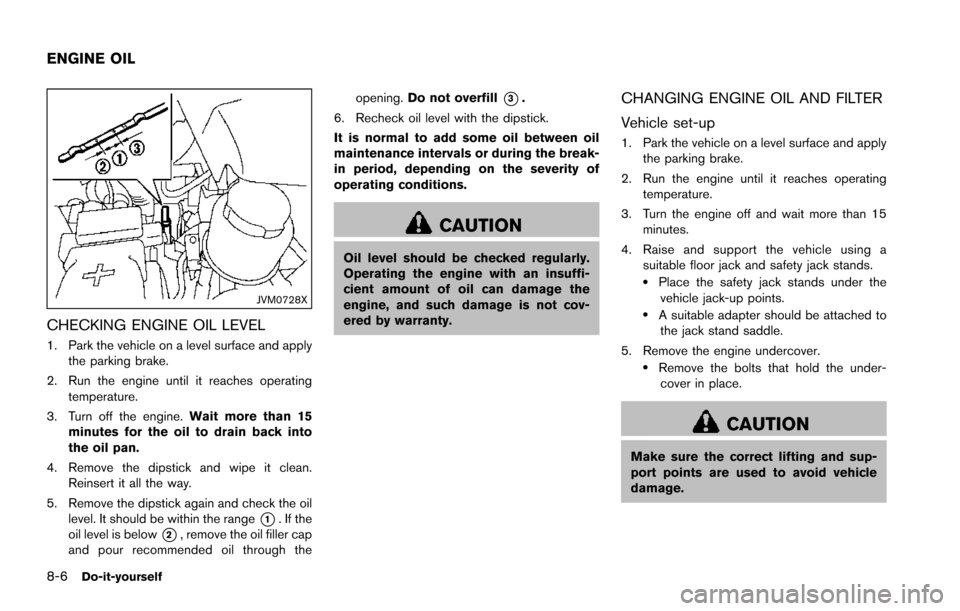
5. Remove the dipstick again and check the oil level. It should be within the range
*1. If the
oil level is below
*2, remove the oil filler cap
and pour recommended oil through the opening.
Do not overfill
*3.
6. Recheck oil level with the dipstick.
It is normal to add some oil between oil
maintenance intervals or during the break-
in period, depending on the severity of
operating conditions.
CAUTION
Oil level should be checked regularly.
Operating the engine with an insuffi-
cient amount of oil can damage the
engine, and such damage is not cov-
ered by warranty.
CHANGING ENGINE OIL AND FILTER
Vehicle set-up
1. Park the vehicle on a level surface and apply the parking brake.
2. Run the engine until it reaches operating temperature.
3. Turn the engine off and wait more than 15 minutes.
4. Raise and support the vehicle using a suitable floor jack and safety jack stands.
.Place the safety jack stands under the
vehicle jack-up points.
.A suitable adapter should be attached tothe jack stand saddle.
5. Remove the engine undercover.
.Remove the bolts that hold the under- cover in place.
CAUTION
Make sure the correct lifting and sup-
port points are used to avoid vehicle
damage.
ENGINE OIL
Page 522 of 614
SDI2528
Engine oil and filter
1. Place a large drain pan under the drain plug.
2. Remove the oil filler cap.
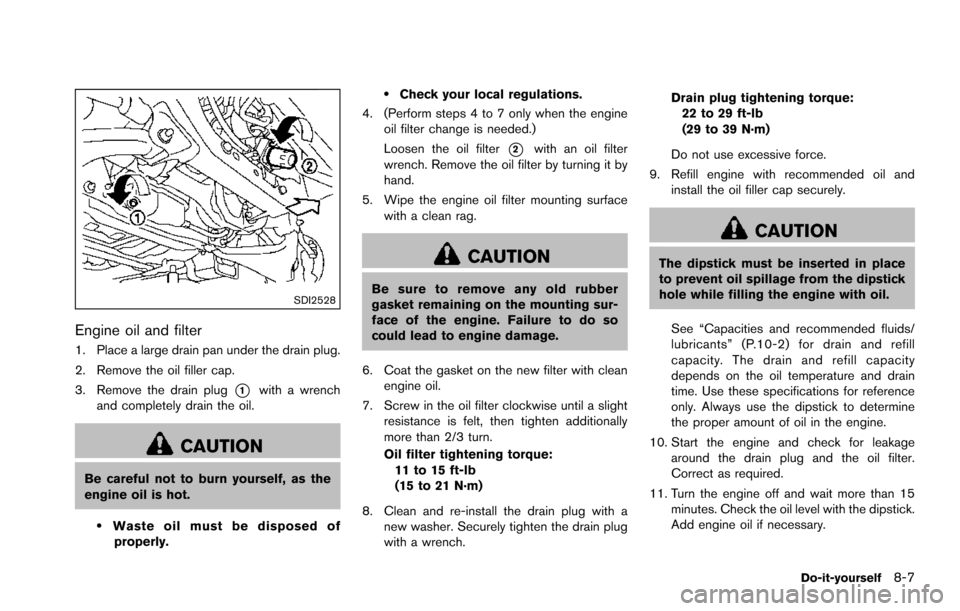
3. Remove the drain plug
*1with a wrench
and completely drain the oil.
CAUTION
Be careful not to burn yourself, as the
engine oil is hot.
.Waste oil must be disposed of properly.
.Check your local regulations.
4. (Perform steps 4 to 7 only when the engine oil filter change is needed.)
Loosen the oil filter
*2with an oil filter
wrench. Remove the oil filter by turning it by
hand.
5. Wipe the engine oil filter mounting surface with a clean rag.
CAUTION
Be sure to remove any old rubber
gasket remaining on the mounting sur-
face of the engine. Failure to do so
could lead to engine damage.
6. Coat the gasket on the new filter with clean engine oil.
7. Screw in the oil filter clockwise until a slight resistance is felt, then tighten additionally
more than 2/3 turn.
Oil filter tightening torque:11 to 15 ft-lb
(15 to 21 N·m)
8. Clean and re-install the drain plug with a new washer. Securely tighten the drain plug
with a wrench. Drain plug tightening torque:
22 to 29 ft-lb
(29 to 39 N·m)
Do not use excessive force.
9. Refill engine with recommended oil and install the oil filler cap securely.
CAUTION
The dipstick must be inserted in place
to prevent oil spillage from the dipstick
hole while filling the engine with oil.
See “Capacities and recommended fluids/
lubricants” (P.10-2) for drain and refill
capacity. The drain and refill capacity
depends on the oil temperature and drain
time. Use these specifications for reference
only. Always use the dipstick to determine
the proper amount of oil in the engine.
10. Start the engine and check for leakage around the drain plug and the oil filter.
Correct as required.
11. Turn the engine off and wait more than 15 minutes. Check the oil level with the dipstick.
Add engine oil if necessary.
Do-it-yourself8-7