2017 NISSAN ARMADA window
[x] Cancel search: windowPage 193 of 614
3-32Pre-driving checks and adjustments
Defrosting outside mirrors (if so
equipped)
The outside mirrors will be heated when the rear
window defroster switch is operated. (See “Rear
window and outside mirror defroster switch”
(P.2-36) .)
SPA2738
Power foldable outside mirrors
CAUTION
.Do not touch the mirrors while they
are moving. Your hand may be
pinched, and the mirror may mal-
function.
. Do not drive with the mirrors stored.
You will be unable to see behind the
vehicle.
. If the mirrors were folded or un-
folded by hand, there is a chance
that the mirror will move forward or backward during driving. If the mir-
rors were folded or unfolded by
hand, be sure to adjust them again
electrically before driving.
The outside mirror remote control operates
when the ignition switch is in the ACC or ON
position.
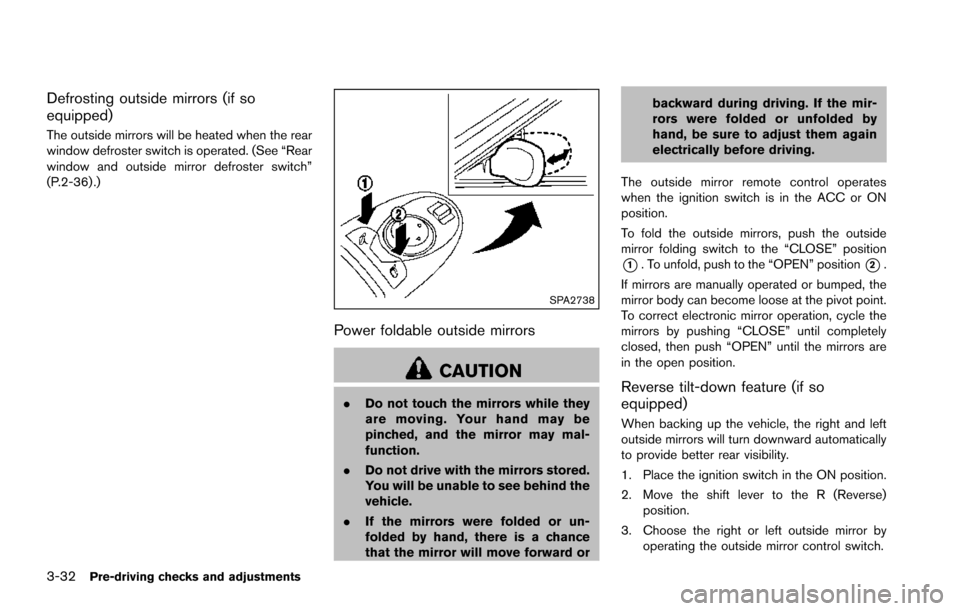
To fold the outside mirrors, push the outside
mirror folding switch to the “CLOSE” position
*1. To unfold, push to the “OPEN” position*2.
If mirrors are manually operated or bumped, the
mirror body can become loose at the pivot point.
To correct electronic mirror operation, cycle the
mirrors by pushing “CLOSE” until completely
closed, then push “OPEN” until the mirrors are
in the open position.
Reverse tilt-down feature (if so
equipped)
When backing up the vehicle, the right and left
outside mirrors will turn downward automatically
to provide better rear visibility.
1. Place the ignition switch in the ON position.
2. Move the shift lever to the R (Reverse) position.
3. Choose the right or left outside mirror by operating the outside mirror control switch.
Page 218 of 614
.(Previous)
Select the “
” key to display the previous
file.
Setting the Image Viewer:
The Image Viewer setting display will appear
when selecting the “Settings” key on the full
screen display. The following settings are
available for the full screen display.
. Slideshow Speed
Select the “Slideshow Speed” key. From the
following display, select the changing time
from 5, 10, 30, 60 seconds or “No Auto
Change”.
. Slideshow Order
Select the “Slideshow Order” key. From the
following display, select “Random” or “Order
List”. For “Order List”, the image order is the
order of the files as stored on the USB
memory.
Operating tips:
. Only files that meet the following conditions
will be displayed.
— Image type: JPEG
— File Extensions: *.jpg, *jpeg
— Maximum Resolution: 2048 61536
pixels — Maximum Size: 2 MB
— Colors: 32768 (15 bit)
— Maximum File Name lengths: 253 Bytes
— Maximum Folders: 500
— Maximum Images per Folder: 1024
. If an electronic device (such as a digital
camera) is directly connected to the vehicle
using a USB cable, no image will be
displayed on the screen.
. If the file name is too long, some file names
may not be entirely displayed.
. When the total number of characters in the
file name exceeds 100 or if 1 file name in a
directory exceeds 100 characters, all files
will show a shortened 8-character version.
The image will still be displayed when
selected.WARNING
Failure to follow the warnings and
instructions for proper use of the Rear-
View Monitor system could result in
serious injury or death.
.The RearView Monitor is a conve-
nience but it is not a substitute for
proper backing. Always turn and
look out the windows, and check
mirrors to be sure that it is safe to
move before operating the vehicle.
Always back up slowly.
. The system is designed as an aid to
the driver in showing large station-
ary objects directly behind the vehi-
cle, to help avoid damaging the
vehicle.
. The distance guide line and the
vehicle width line should be used
as a reference only when the vehicle
is on a level paved surface. The
distance viewed on the monitor is
for reference only and may be
different than the actual distance
between the vehicle and displayed
objects.
Monitor, heater, air conditioner, audio, phone and voice recognition systems4-21
REARVIEW MONITOR (if so
equipped)
Page 224 of 614
.When strong light is directly coming on the
camera, objects may not be displayed
clearly.
. Vertical lines may be seen in objects on the
screen. This is due to strong reflected light
from the bumper.
. The screen may flicker under fluorescent
light.
. The colors of objects on the RearView
Monitor may differ somewhat from the actual
color of objects.
. Objects on the monitor may not be clear in a
dark environment.
. There may be a delay when switching to the
RearView Monitor.
. If dirt, rain or snow accumulates on the
camera, the RearView Monitor may not
display object clearly. Clean the camera.
. Do not use wax on the camera window.
Wipe off any wax with a clean cloth
dampened with mild detergent diluted with
water.
JVH1497X
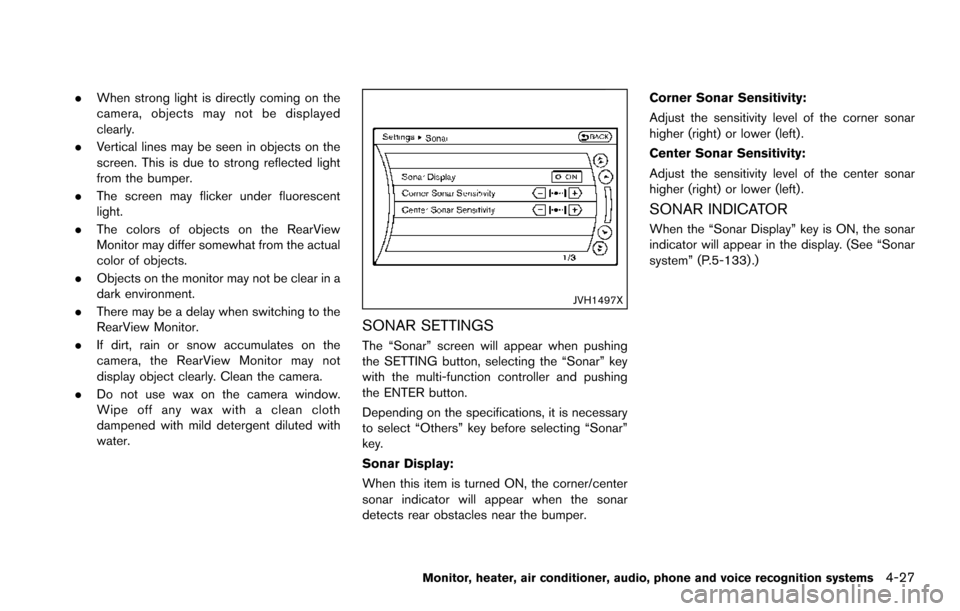
SONAR SETTINGS
The “Sonar” screen will appear when pushing
the SETTING button, selecting the “Sonar” key
with the multi-function controller and pushing
the ENTER button.
Depending on the specifications, it is necessary
to select “Others” key before selecting “Sonar”
key.
Sonar Display:
When this item is turned ON, the corner/center
sonar indicator will appear when the sonar
detects rear obstacles near the bumper. Corner Sonar Sensitivity:
Adjust the sensitivity level of the corner sonar
higher (right) or lower (left) .
Center Sonar Sensitivity:
Adjust the sensitivity level of the center sonar
higher (right) or lower (left) .
SONAR INDICATOR
When the “Sonar Display” key is ON, the sonar
indicator will appear in the display. (See “Sonar
system” (P.5-133) .)
Monitor, heater, air conditioner, audio, phone and voice recognition systems4-27
Page 242 of 614
the ignition switch is placed in the ON position,
“Sonar is OFF” is displayed briefly.
Towing Mode:
When this item is turned ON, only the rear sonar
is OFF. The amber markers are displayed at the
rear corners of the vehicle icon.
Show Camera when Sonar Activate:
When this item is turned ON, the camera view is
automatically shown on the display in the case
that the distance to the objects measured by the
sonar is becoming short.
Sonar Sensitivity:
Adjust the sensitivity level of the sensor higher
(right) or lower (left) .
SONAR SYSTEM LIMITATIONS
WARNING
Listed below are the system limitations
for the sonar function. Failure to oper-
ate the vehicle in accordance with these
system limitations could result in ser-
ious injury or death.
.Inclement weather or ultrasonic
sources such as an automatic car
wash, a truck’ s compressed-air
brakes or a pneumatic drill may affect the function of the system,
including reduced performance or a
false activation.
. This function is designed as an aid
to the driver in detecting large
stationary objects to help avoid
damaging the vehicle.
. The system is not designed to pre-
vent contact with small or moving
objects.
. The system will not detect small
objects below the bumper, and may
not detect objects close to the
bumper or on the ground.
. The system may not detect the
following objects:
— Fluffy objects such as snow,
cloth, cotton, grass or wool.
— Thin objects such as rope, wire or chain.
— Wedge-shaped objects.
. If your vehicle sustains damage to
the bumper fascia, leaving it mis-
aligned or bent, the sensing zone
may be altered causing inaccurate
measurement of objects or false
alarms.
CAUTION
Excessive noise (such as audio system
volume or an open vehicle window) will
interfere with the tone and it may not be
heard.
SYSTEM TEMPORARILY UNAVAIL-
ABLE
When the amber markers are displayed at the
corners of the vehicle icon and the function
cannot be activated from the Camera setting
menu (the setting items are grayed out) , the
sonar system may be malfunctioning.
SYSTEM MAINTENANCE
CAUTION
Keep the surface of the sonar sensors
(located on the front and rear bumper
fascia) free from accumulations of
snow, ice and dirt. Do not scratch the
surface of the sonar sensors when
cleaning. If the sensors are covered,
the accuracy of the sonar function will
be diminished.
Monitor, heater, air conditioner, audio, phone and voice recognition systems4-45
Page 246 of 614
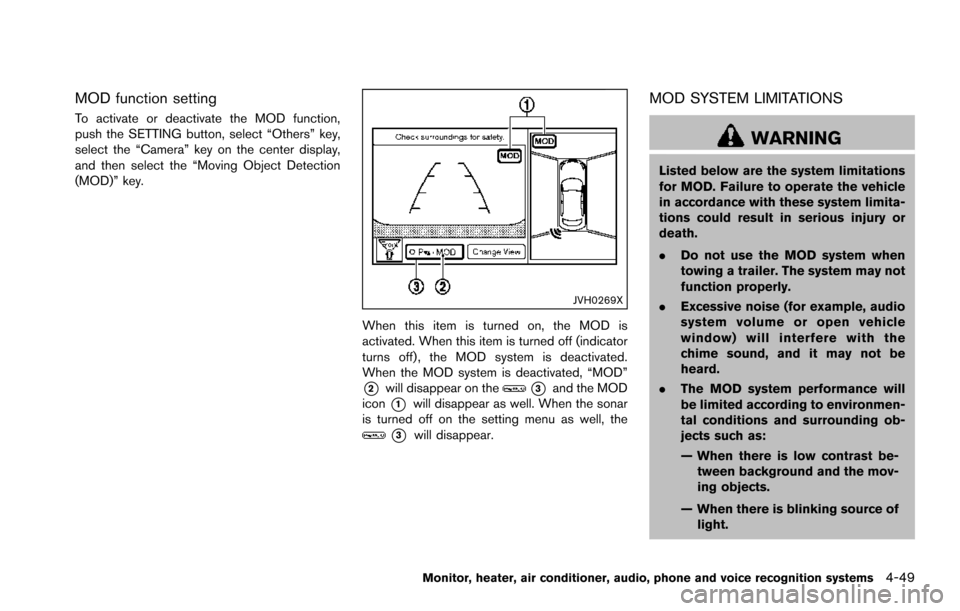
MOD function setting
To activate or deactivate the MOD function,
push the SETTING button, select “Others” key,
select the “Camera” key on the center display,
and then select the “Moving Object Detection
(MOD)” key.
JVH0269X
When this item is turned on, the MOD is
activated. When this item is turned off (indicator
turns off) , the MOD system is deactivated.
When the MOD system is deactivated, “MOD”
*2will disappear on the*3and the MOD
icon
*1will disappear as well. When the sonar
is turned off on the setting menu as well, the
*3will disappear.
MOD SYSTEM LIMITATIONS
WARNING
Listed below are the system limitations
for MOD. Failure to operate the vehicle
in accordance with these system limita-
tions could result in serious injury or
death.
. Do not use the MOD system when
towing a trailer. The system may not
function properly.
. Excessive noise (for example, audio
system volume or open vehicle
window) will interfere with the
chime sound, and it may not be
heard.
. The MOD system performance will
be limited according to environmen-
tal conditions and surrounding ob-
jects such as:
— When there is low contrast be-
tween background and the mov-
ing objects.
— When there is blinking source of light.
Monitor, heater, air conditioner, audio, phone and voice recognition systems4-49
Page 249 of 614
4-52Monitor, heater, air conditioner, audio, phone and voice recognition systems
JVH1313X
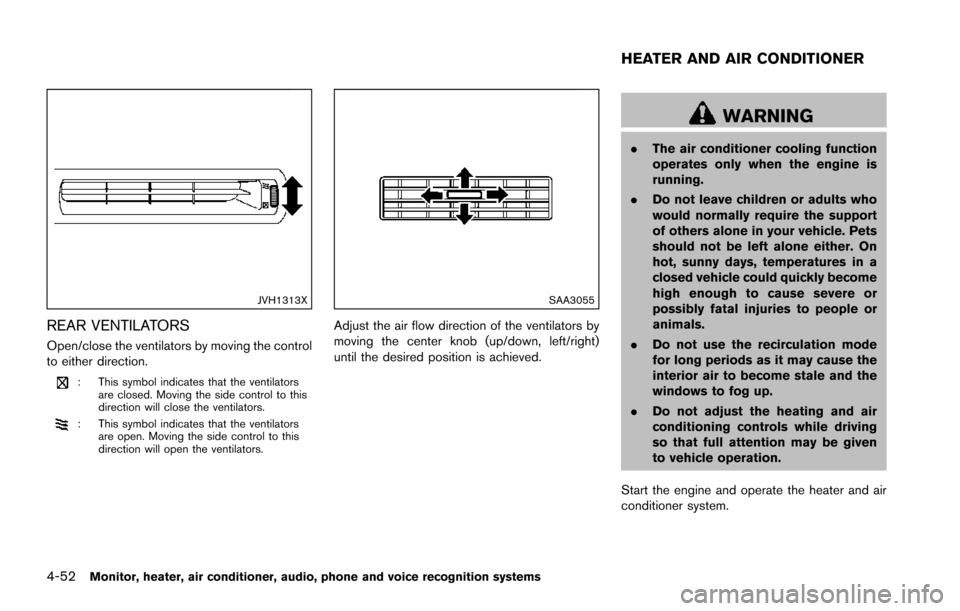
REAR VENTILATORS
Open/close the ventilators by moving the control
to either direction.
: This symbol indicates that the ventilatorsare closed. Moving the side control to this
direction will close the ventilators.
: This symbol indicates that the ventilatorsare open. Moving the side control to this
direction will open the ventilators.
SAA3055
Adjust the air flow direction of the ventilators by
moving the center knob (up/down, left/right)
until the desired position is achieved.
WARNING
.The air conditioner cooling function
operates only when the engine is
running.
. Do not leave children or adults who
would normally require the support
of others alone in your vehicle. Pets
should not be left alone either. On
hot, sunny days, temperatures in a
closed vehicle could quickly become
high enough to cause severe or
possibly fatal injuries to people or
animals.
. Do not use the recirculation mode
for long periods as it may cause the
interior air to become stale and the
windows to fog up.
. Do not adjust the heating and air
conditioning controls while driving
so that full attention may be given
to vehicle operation.
Start the engine and operate the heater and air
conditioner system.
HEATER AND AIR CONDITIONER
Page 251 of 614
4-54Monitor, heater, air conditioner, audio, phone and voice recognition systems
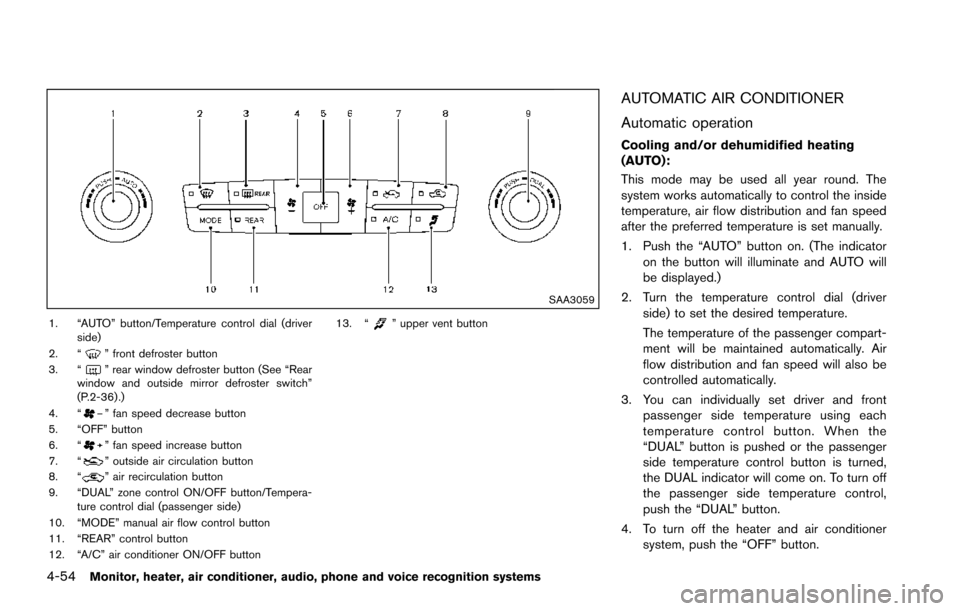
SAA3059
1. “AUTO” button/Temperature control dial (driverside)
2. “
” front defroster button
3. “” rear window defroster button (See “Rear
window and outside mirror defroster switch”
(P.2-36) .)
4. “
” fan speed decrease button
5. “OFF” button
6. “
” fan speed increase button
7. “” outside air circulation button
8. “” air recirculation button
9. “DUAL” zone control ON/OFF button/Tempera- ture control dial (passenger side)
10. “MODE” manual air flow control button
11. “REAR” control button
12. “A/C” air conditioner ON/OFF button 13. “
” upper vent button
AUTOMATIC AIR CONDITIONER
Automatic operation
Cooling and/or dehumidified heating
(AUTO):
This mode may be used all year round. The
system works automatically to control the inside
temperature, air flow distribution and fan speed
after the preferred temperature is set manually.
1. Push the “AUTO” button on. (The indicator
on the button will illuminate and AUTO will
be displayed.)
2. Turn the temperature control dial (driver side) to set the desired temperature.
The temperature of the passenger compart-
ment will be maintained automatically. Air
flow distribution and fan speed will also be
controlled automatically.
3. You can individually set driver and front passenger side temperature using each
temperature control button. When the
“DUAL” button is pushed or the passenger
side temperature control button is turned,
the DUAL indicator will come on. To turn off
the passenger side temperature control,
push the “DUAL” button.
4. To turn off the heater and air conditioner system, push the “OFF” button.
Page 252 of 614
A visible mist may be seen coming from the
ventilators in hot, humid conditions as the air is
cooled rapidly. This does not indicate a mal-
function.
Dehumidified defrosting or defogging:
1. Push the “
” front defroster button. (The
indicator light on the button will illuminate.)
2. Turn the temperature control dial to set the desired temperature.
. To quickly remove ice from the outside of the
windows, push the fan speed increase
button “
” and set it to the maximum
position.
. As soon as possible after the windshield is
clean, push the “AUTO” button to return to
the auto mode.
. When the “
” front defroster button is
pushed, the air conditioner will automatically
be turned on at outside temperatures above
238F( �í58C) to defog the windshield, and
the air recirculate mode will automatically be
turned off.
Outside air is drawn into the passenger
compartment to improve the defogging
performance.
Manual operation
Fan speed control:
Push the fan speed increase “
” or decrease
“” buttons to manually control the fan speed.
Push the “AUTO” button to return to automatic
control of the fan speed.
Temperature control:
Turn the temperature control dial to set the
desired temperature.
Air flow control:
Pushing the “MODE” manual air flow control
button selects the air outlet to:
: Air flows from center and side ventilators.
: Air flows from center and side ventilators and foot outlets.
: Air flows mainly from foot outlets.
: Air flows from defroster and foot outlets.
Air intake control:
. Push the “
” air recirculation button to
recirculate interior air inside the vehicle. The
“
” indicator light on the button will come
on. The air recirculation mode cannot be
activated when the air conditioner is in the
front defrosting mode “
”.
. Push the “
” outside air circulation button
to draw outside air into the passenger
compartment. The “
” indicator light on the button will come on.
. To control the air intake automatically, push
and hold either the “
” air recirculation
button or the “” outside air circulation
button (whichever indicator light is illumi-
nated) . The indicator lights (both air recir-
culation and outside air circulation buttons)
will flash twice, and then the air intake will
switch to automatic control.
Turning the system off
Push the OFF button.
Upper vent system
When the upper vent “” button is pushed,
the air flow against the driver’s or passenger’s
upper body becomes gentle. The indicator light
on the button will illuminate.
In this mode, air from the upper ventilator flows
in order to control the cabin temperature without
blowing air directly on the occupants.
Push the upper vent “
” button when you
want the air conditioner to work quickly.
To turn the system off, push the upper vent
“
” button to turn the indicator light off.
Monitor, heater, air conditioner, audio, phone and voice recognition systems4-55