2017 NISSAN ARMADA brake
[x] Cancel search: brakePage 217 of 614
4-20Monitor, heater, air conditioner, audio, phone and voice recognition systems
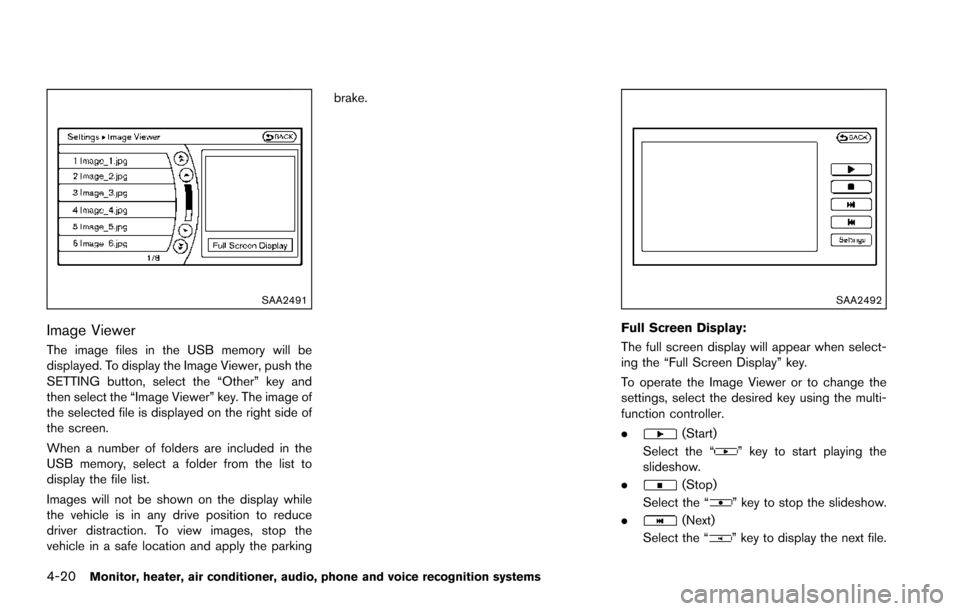
SAA2491
Image Viewer
The image files in the USB memory will be
displayed. To display the Image Viewer, push the
SETTING button, select the “Other” key and
then select the “Image Viewer” key. The image of
the selected file is displayed on the right side of
the screen.
When a number of folders are included in the
USB memory, select a folder from the list to
display the file list.
Images will not be shown on the display while
the vehicle is in any drive position to reduce
driver distraction. To view images, stop the
vehicle in a safe location and apply the parkingbrake.
SAA2492
Full Screen Display:
The full screen display will appear when select-
ing the “Full Screen Display” key.
To operate the Image Viewer or to change the
settings, select the desired key using the multi-
function controller.
.
(Start)
Select the “
” key to start playing the
slideshow.
.
(Stop)
Select the “
” key to stop the slideshow.
.
(Next)
Select the “
” key to display the next file.
Page 221 of 614
4-24Monitor, heater, air conditioner, audio, phone and voice recognition systems
5. When the vehicle is parked in the spacecompletely, move the shift lever to the P
(Park) position and apply the parking brake.
Difference between predictive and actual
distances
The displayed guidelines and their locations on
the ground are for approximate reference only.
Objects on uphill or downhill surfaces or
projecting objects will be actually located at
distances different from those displayed in the
monitor relative to the guidelines (refer to
illustrations) . When in doubt, turn around and
view the objects as you are backing up, or park
and exit the vehicle to view the positioning of
objects behind the vehicle.
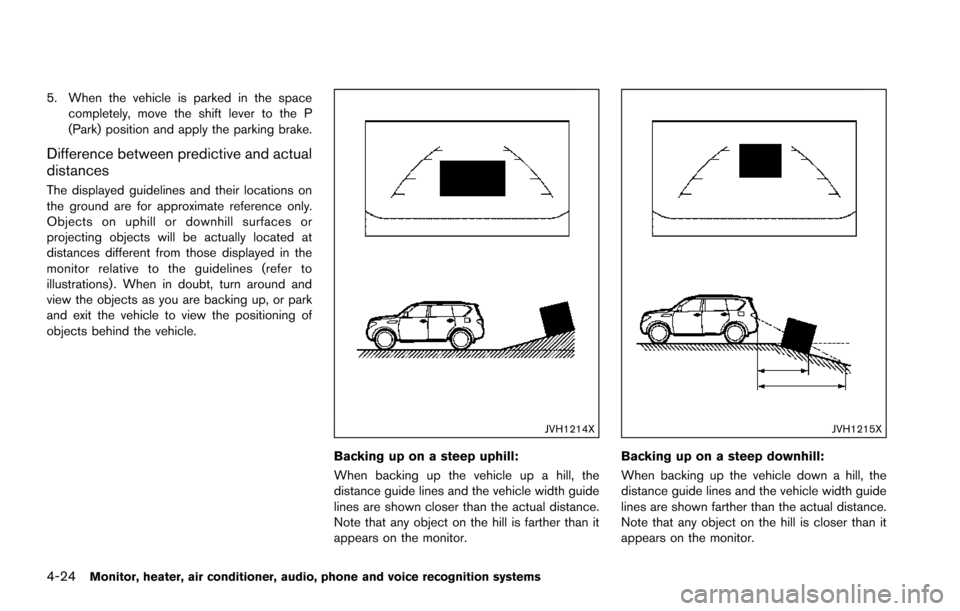
JVH1214X
Backing up on a steep uphill:
When backing up the vehicle up a hill, the
distance guide lines and the vehicle width guide
lines are shown closer than the actual distance.
Note that any object on the hill is farther than it
appears on the monitor.
JVH1215X
Backing up on a steep downhill:
When backing up the vehicle down a hill, the
distance guide lines and the vehicle width guide
lines are shown farther than the actual distance.
Note that any object on the hill is closer than it
appears on the monitor.
Page 222 of 614
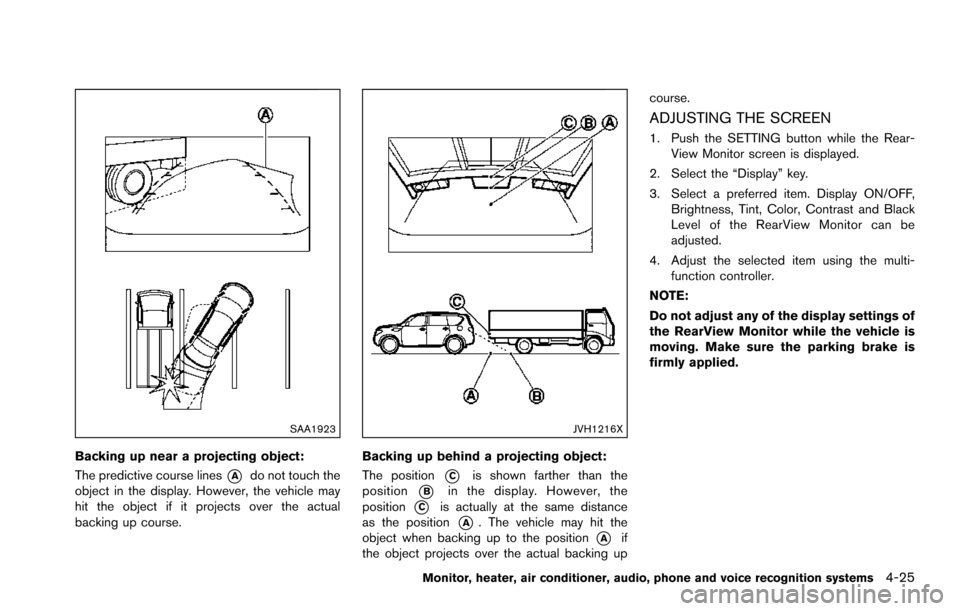
SAA1923
Backing up near a projecting object:
The predictive course lines
*Ado not touch the
object in the display. However, the vehicle may
hit the object if it projects over the actual
backing up course.
JVH1216X
Backing up behind a projecting object:
The position
*Cis shown farther than the
position
*Bin the display. However, the
position
*Cis actually at the same distance
as the position
*A. The vehicle may hit the
object when backing up to the position
*Aif
the object projects over the actual backing up course.
ADJUSTING THE SCREEN
1. Push the SETTING button while the Rear-
View Monitor screen is displayed.
2. Select the “Display” key.
3. Select a preferred item. Display ON/OFF, Brightness, Tint, Color, Contrast and Black
Level of the RearView Monitor can be
adjusted.
4. Adjust the selected item using the multi- function controller.
NOTE:
Do not adjust any of the display settings of
the RearView Monitor while the vehicle is
moving. Make sure the parking brake is
firmly applied.
Monitor, heater, air conditioner, audio, phone and voice recognition systems4-25
Page 234 of 614
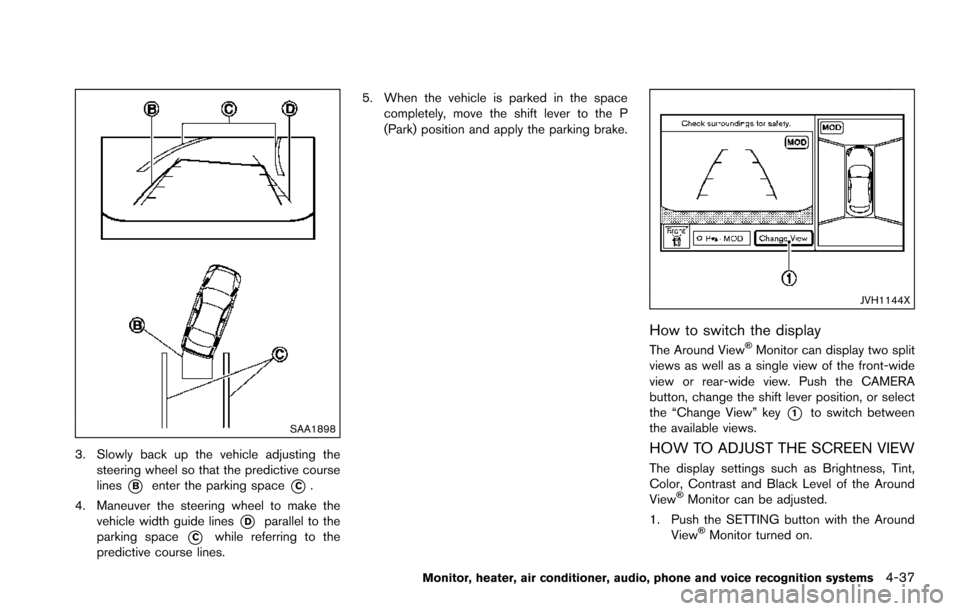
SAA1898
3. Slowly back up the vehicle adjusting thesteering wheel so that the predictive course
lines
*Benter the parking space*C.
4. Maneuver the steering wheel to make the vehicle width guide lines
*Dparallel to the
parking space
*Cwhile referring to the
predictive course lines. 5. When the vehicle is parked in the space
completely, move the shift lever to the P
(Park) position and apply the parking brake.
JVH1144X
How to switch the display
The Around View�ŠMonitor can display two split
views as well as a single view of the front-wide
view or rear-wide view. Push the CAMERA
button, change the shift lever position, or select
the “Change View” key
*1to switch between
the available views.
HOW TO ADJUST THE SCREEN VIEW
The display settings such as Brightness, Tint,
Color, Contrast and Black Level of the Around
View
�ŠMonitor can be adjusted.
1. Push the SETTING button with the Around View
�ŠMonitor turned on.
Monitor, heater, air conditioner, audio, phone and voice recognition systems4-37
Page 235 of 614
4-38Monitor, heater, air conditioner, audio, phone and voice recognition systems
2. Select the “Display” key.
3. Select an item you wish to adjust.
4. Adjust the level of the setting item using themulti-function controller.
NOTE:
Do not adjust any of the display settings of
the Around View
�ŠMonitor while the vehi-
cle is moving. Make sure the parking brake
is firmly applied.
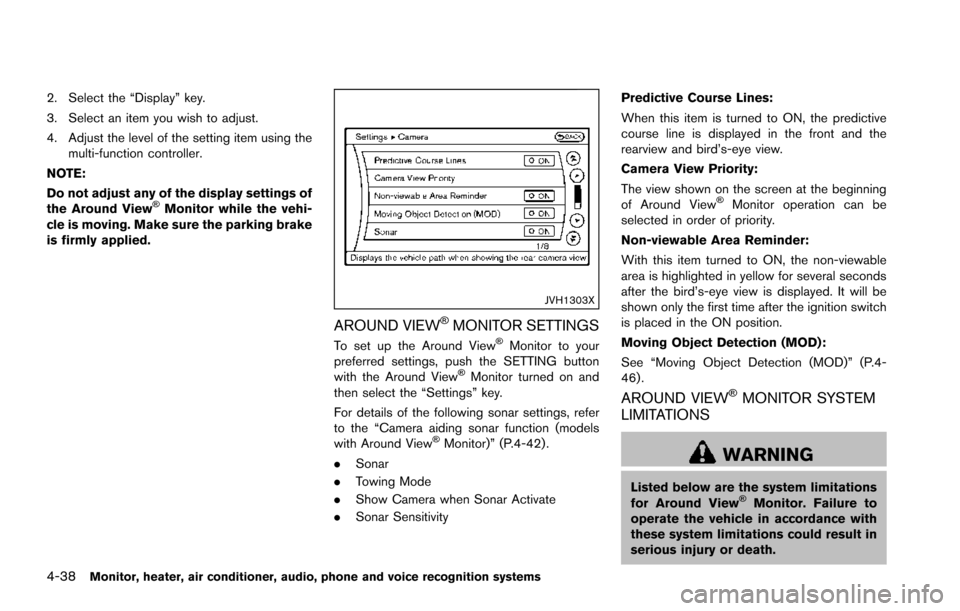
JVH1303X
AROUND VIEW�ŠMONITOR SETTINGS
To set up the Around View�ŠMonitor to your
preferred settings, push the SETTING button
with the Around View
�ŠMonitor turned on and
then select the “Settings” key.
For details of the following sonar settings, refer
to the “Camera aiding sonar function (models
with Around View
�ŠMonitor)” (P.4-42) .
. Sonar
. Towing Mode
. Show Camera when Sonar Activate
. Sonar Sensitivity Predictive Course Lines:
When this item is turned to ON, the predictive
course line is displayed in the front and the
rearview and bird’s-eye view.
Camera View Priority:
The view shown on the screen at the beginning
of Around View
�ŠMonitor operation can be
selected in order of priority.
Non-viewable Area Reminder:
With this item turned to ON, the non-viewable
area is highlighted in yellow for several seconds
after the bird’s-eye view is displayed. It will be
shown only the first time after the ignition switch
is placed in the ON position.
Moving Object Detection (MOD):
See “Moving Object Detection (MOD)” (P.4-
46) .
AROUND VIEW�ŠMONITOR SYSTEM
LIMITATIONS
WARNING
Listed below are the system limitations
for Around View�ŠMonitor. Failure to
operate the vehicle in accordance with
these system limitations could result in
serious injury or death.
Page 242 of 614
the ignition switch is placed in the ON position,
“Sonar is OFF” is displayed briefly.
Towing Mode:
When this item is turned ON, only the rear sonar
is OFF. The amber markers are displayed at the
rear corners of the vehicle icon.
Show Camera when Sonar Activate:
When this item is turned ON, the camera view is
automatically shown on the display in the case
that the distance to the objects measured by the
sonar is becoming short.
Sonar Sensitivity:
Adjust the sensitivity level of the sensor higher
(right) or lower (left) .
SONAR SYSTEM LIMITATIONS
WARNING
Listed below are the system limitations
for the sonar function. Failure to oper-
ate the vehicle in accordance with these
system limitations could result in ser-
ious injury or death.
.Inclement weather or ultrasonic
sources such as an automatic car
wash, a truck’ s compressed-air
brakes or a pneumatic drill may affect the function of the system,
including reduced performance or a
false activation.
. This function is designed as an aid
to the driver in detecting large
stationary objects to help avoid
damaging the vehicle.
. The system is not designed to pre-
vent contact with small or moving
objects.
. The system will not detect small
objects below the bumper, and may
not detect objects close to the
bumper or on the ground.
. The system may not detect the
following objects:
— Fluffy objects such as snow,
cloth, cotton, grass or wool.
— Thin objects such as rope, wire or chain.
— Wedge-shaped objects.
. If your vehicle sustains damage to
the bumper fascia, leaving it mis-
aligned or bent, the sensing zone
may be altered causing inaccurate
measurement of objects or false
alarms.
CAUTION
Excessive noise (such as audio system
volume or an open vehicle window) will
interfere with the tone and it may not be
heard.
SYSTEM TEMPORARILY UNAVAIL-
ABLE
When the amber markers are displayed at the
corners of the vehicle icon and the function
cannot be activated from the Camera setting
menu (the setting items are grayed out) , the
sonar system may be malfunctioning.
SYSTEM MAINTENANCE
CAUTION
Keep the surface of the sonar sensors
(located on the front and rear bumper
fascia) free from accumulations of
snow, ice and dirt. Do not scratch the
surface of the sonar sensors when
cleaning. If the sensors are covered,
the accuracy of the sonar function will
be diminished.
Monitor, heater, air conditioner, audio, phone and voice recognition systems4-45
Page 271 of 614
4-74Monitor, heater, air conditioner, audio, phone and voice recognition systems
DVD (Digital Versatile Disc) PLAYER
OPERATION
Precautions
Start the engine when using the DVD entertain-
ment system.
Movies will not be shown on the front display
while the vehicle is in any drive position to
reduce driver distraction. Audio is available
when a movie is played. To view movies in the
front display, stop the vehicle in a safe location,
move the shift lever to the P (Park) position and
apply the parking brake.
WARNING
.The driver must not attempt to
operate the DVD system or wear
the headphones while the vehicle is
in motion so that full attention may
be given to vehicle operation.
. Do not attempt to modify the system
to display a movie on the front
screen while the vehicle is being
driven. Doing so may distract the
driver and may cause a collision and
serious personal injury or death.
CAUTION
.Only operate the DVD while the
vehicle engine is running. Operating
the DVD for extended periods of
time with the engine OFF can dis-
charge the vehicle battery.
. Do not allow the system to get wet.
Excessive moisture such as spilled
liquids may cause the system to
malfunction.
. While playing VIDEO-CD media, this
DVD player does not guarantee
complete functionality of all VI-
DEO-CD formats.
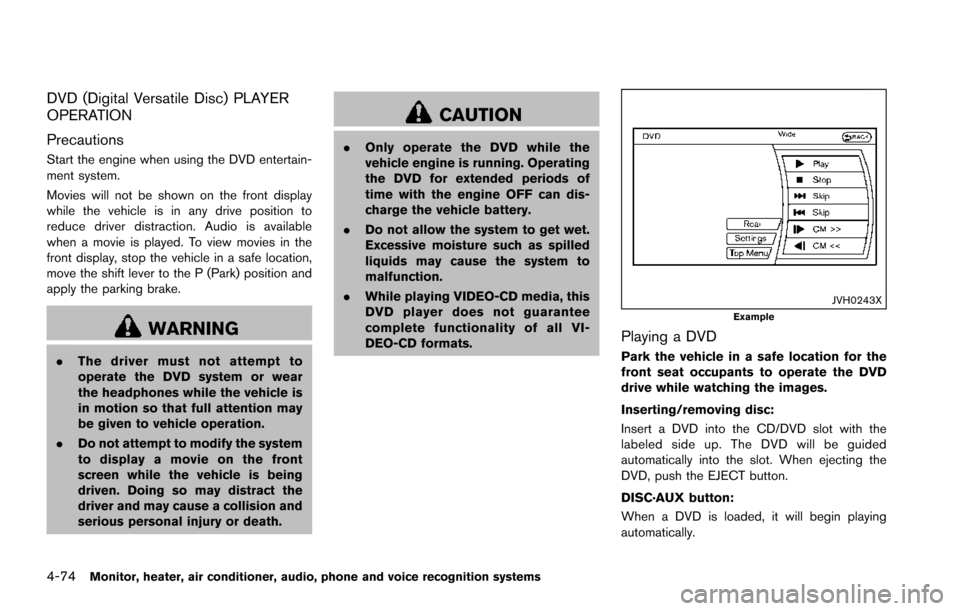
JVH0243XExample
Playing a DVD
Park the vehicle in a safe location for the
front seat occupants to operate the DVD
drive while watching the images.
Inserting/removing disc:
Insert a DVD into the CD/DVD slot with the
labeled side up. The DVD will be guided
automatically into the slot. When ejecting the
DVD, push the EJECT button.
DISC·AUX button:
When a DVD is loaded, it will begin playing
automatically.
Page 285 of 614
4-88Monitor, heater, air conditioner, audio, phone and voice recognition systems
SAA3162
FRONT AUXILIARY INPUT JACKS (if so
equipped)
The front auxiliary input jacks are located in the
console box. NTSC compatible devices such as
video games, camcorders and portable video
players can be connected to the auxiliary jacks.
Compatible audio devices, such as some MP3
players, can also be connected to the system
through the auxiliary jacks. The images from the
connected device can be viewed on the front
and rear displays.
The auxiliary jacks are color coded for identifica-
tion purposes..
Yellow - video input
. White - left channel audio input
. Red - right channel audio input
Before connecting a device to a jack, turn off the
power of the portable device.
With a compatible device connected to the
jacks, push the DISC·AUX button repeatedly
until the display switches to the AUX mode. The
output from the device will be played through
the monitor and audio system.
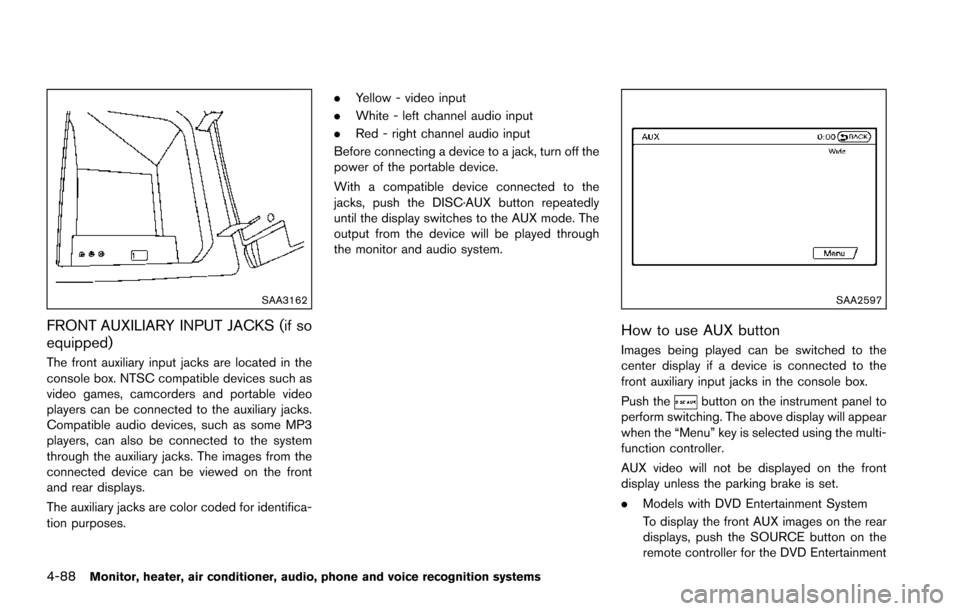
SAA2597
How to use AUX button
Images being played can be switched to the
center display if a device is connected to the
front auxiliary input jacks in the console box.
Push the
button on the instrument panel to
perform switching. The above display will appear
when the “Menu” key is selected using the multi-
function controller.
AUX video will not be displayed on the front
display unless the parking brake is set.
. Models with DVD Entertainment System
To display the front AUX images on the rear
displays, push the SOURCE button on the
remote controller for the DVD Entertainment