2017 NISSAN ALTIMA Setting
[x] Cancel search: SettingPage 218 of 497
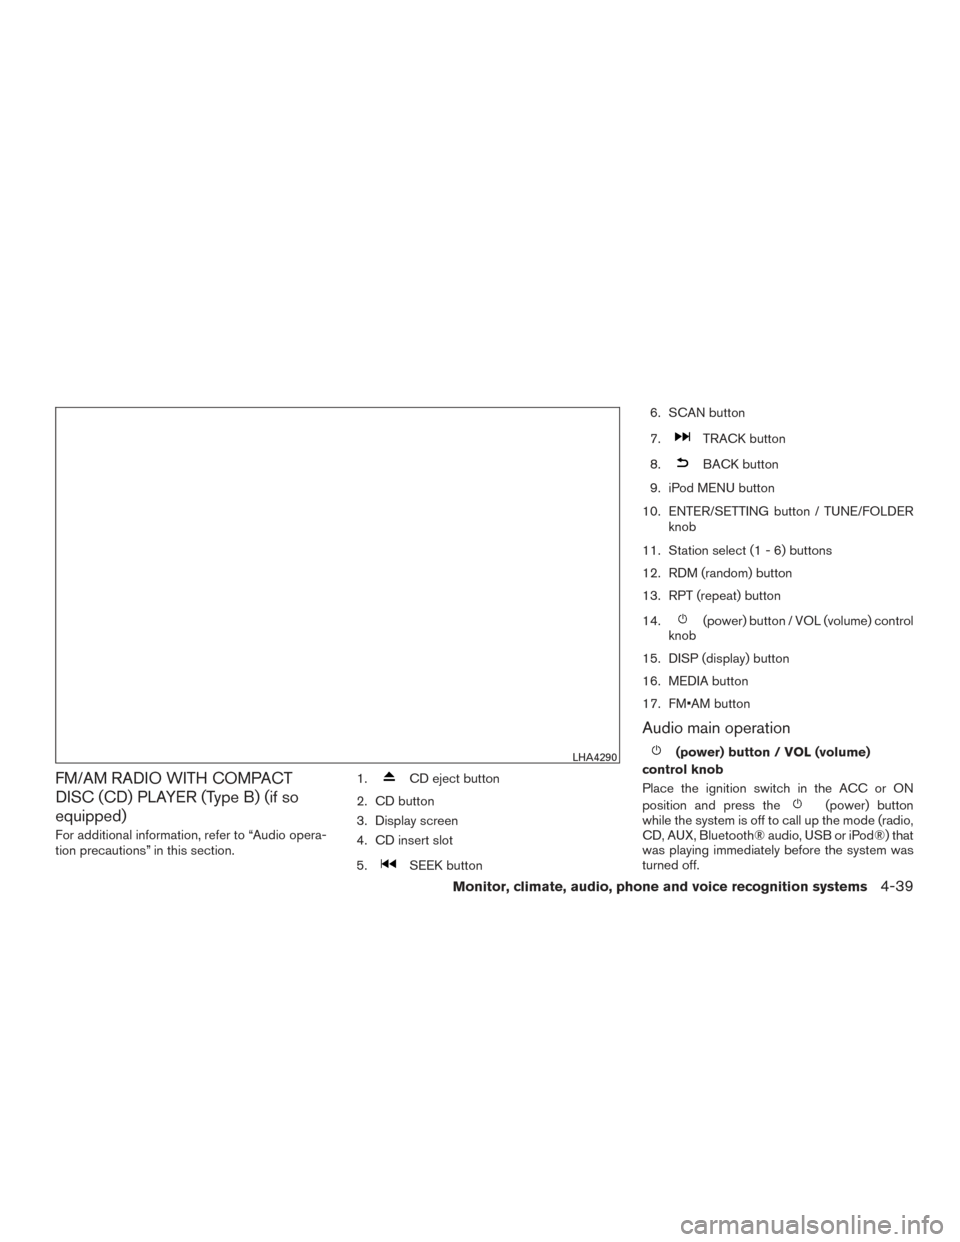
FM/AM RADIO WITH COMPACT
DISC (CD) PLAYER (Type B) (if so
equipped)
For additional information, refer to “Audio opera-
tion precautions” in this section.1.
CD eject button
2. CD button
3. Display screen
4. CD insert slot
5.
SEEK button 6. SCAN button
7.
TRACK button
8.
BACK button
9. iPod MENU button
10. ENTER/SETTING button / TUNE/FOLDER knob
11. Station select (1 - 6) buttons
12. RDM (random) button
13. RPT (repeat) button
14.
(power) button / VOL (volume) control
knob
15. DISP (display) button
16. MEDIA button
17. FM•AM button
Audio main operation
(power) button / VOL (volume)
control knob
Place the ignition switch in the ACC or ON
position and press the
(power) button
while the system is off to call up the mode (radio,
CD, AUX, Bluetooth® audio, USB or iPod®) that
was playing immediately before the system was
turned off.
LHA4290
Monitor, climate, audio, phone and voice recognition systems4-39
Page 219 of 497
To turn the system off, press the(power)
button.
Turn the VOL (volume) control knob to adjust the
volume.
This vehicle is equipped with Speed Sensitive
Volume. When this feature is active, the audio
volume changes as the driving speed changes. ENTER/SETTING button
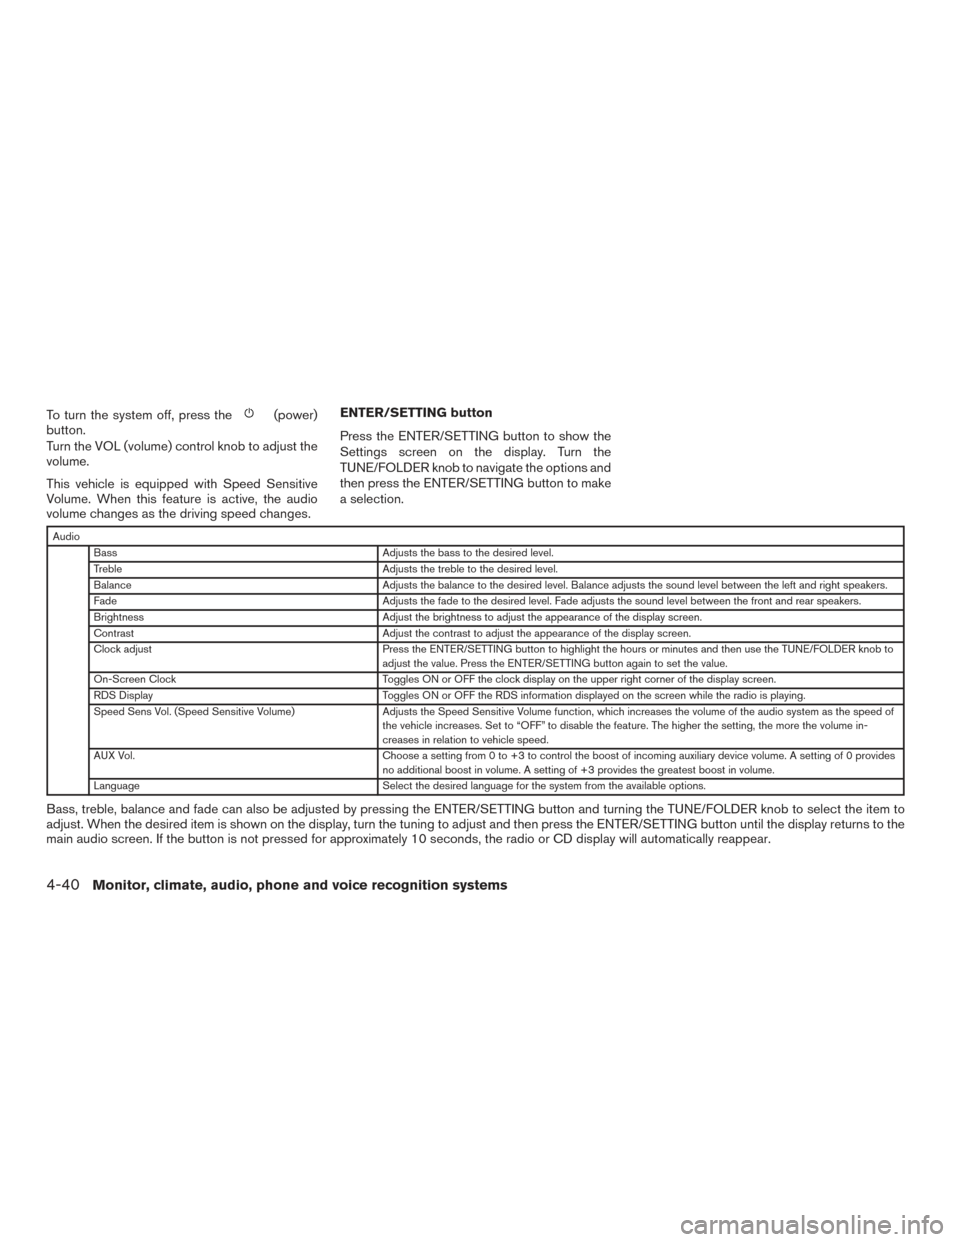
Press the ENTER/SETTING button to show the
Settings screen on the display. Turn the
TUNE/FOLDER knob to navigate the options and
then press the ENTER/SETTING button to make
a selection.
Audio
Bass Adjusts the bass to the desired level.
Treble Adjusts the treble to the desired level.
Balance Adjusts the balance to the desired level. Balance adjusts the sound level between the left and right speakers.
Fade Adjusts the fade to the desired level. Fade adjusts the sound level between the front and rear speakers.
Brightness Adjust the brightness to adjust the appearance of the display screen.
Contrast Adjust the contrast to adjust the appearance of the display screen.
Clock adjust Press the ENTER/SETTING button to highlight the hours or minutes and then use the TUNE/FOLDER knob to
adjust the value. Press the ENTER/SETTING button again to set the value.
On-Screen Clock Toggles ON or OFF the clock display on the upper right corner of the display screen.
RDS Display Toggles ON or OFF the RDS information displayed on the screen while the radio is playing.
Speed Sens Vol. (Speed Sensitive Volume) Adjusts the Speed Sensitive Volume function, which increases the volume of the audio system as the speed of
the vehicle increases. Set to “OFF” to disable the feature. The higher the setting, the more the volume in-
creases in relation to vehicle speed.
AUX Vol. Choose a setting from 0 to +3 to control the boost of incoming auxiliary device volume. A setting of 0 provides
no additional boost in volume. A setting of +3 provides the greatest boost in volume.
Language Select the desired language for the system from the available options.
Bass, treble, balance and fade can also be adjusted by pressing the ENTER/SETTING button and turning the TUNE/FOLDER knob to select the item to
adjust. When the desired item is shown on the display, turn the tuning to adjust and then press the ENTER/SETTING button until the display returns to the
main audio screen. If the button is not pressed for approximately 10 seconds, the radio or CD display will automatically reappear.
4-40Monitor, climate, audio, phone and voice recognition systems
Page 223 of 497
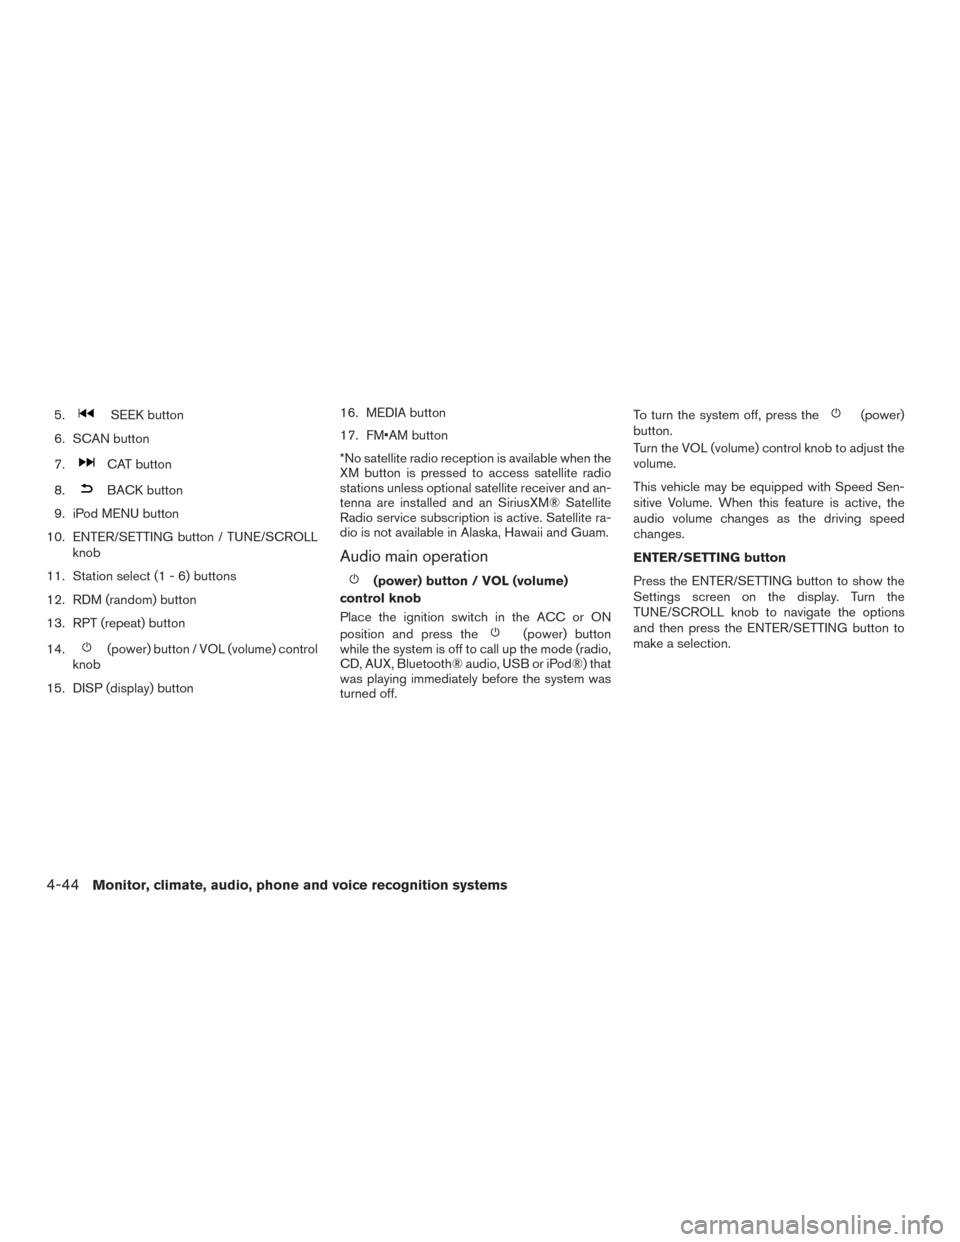
5.SEEK button
6. SCAN button
7.
CAT button
8.
BACK button
9. iPod MENU button
10. ENTER/SETTING button / TUNE/SCROLL knob
11. Station select (1 - 6) buttons
12. RDM (random) button
13. RPT (repeat) button
14.
(power) button / VOL (volume) control
knob
15. DISP (display) button 16. MEDIA button
17. FM•AM button
*No satellite radio reception is available when the
XM button is pressed to access satellite radio
stations unless optional satellite receiver and an-
tenna are installed and an SiriusXM® Satellite
Radio service subscription is active. Satellite ra-
dio is not available in Alaska, Hawaii and Guam.
Audio main operation
(power) button / VOL (volume)
control knob
Place the ignition switch in the ACC or ON
position and press the
(power) button
while the system is off to call up the mode (radio,
CD, AUX, Bluetooth® audio, USB or iPod®) that
was playing immediately before the system was
turned off. To turn the system off, press the
(power)
button.
Turn the VOL (volume) control knob to adjust the
volume.
This vehicle may be equipped with Speed Sen-
sitive Volume. When this feature is active, the
audio volume changes as the driving speed
changes.
ENTER/SETTING button
Press the ENTER/SETTING button to show the
Settings screen on the display. Turn the
TUNE/SCROLL knob to navigate the options
and then press the ENTER/SETTING button to
make a selection.
4-44Monitor, climate, audio, phone and voice recognition systems
Page 224 of 497
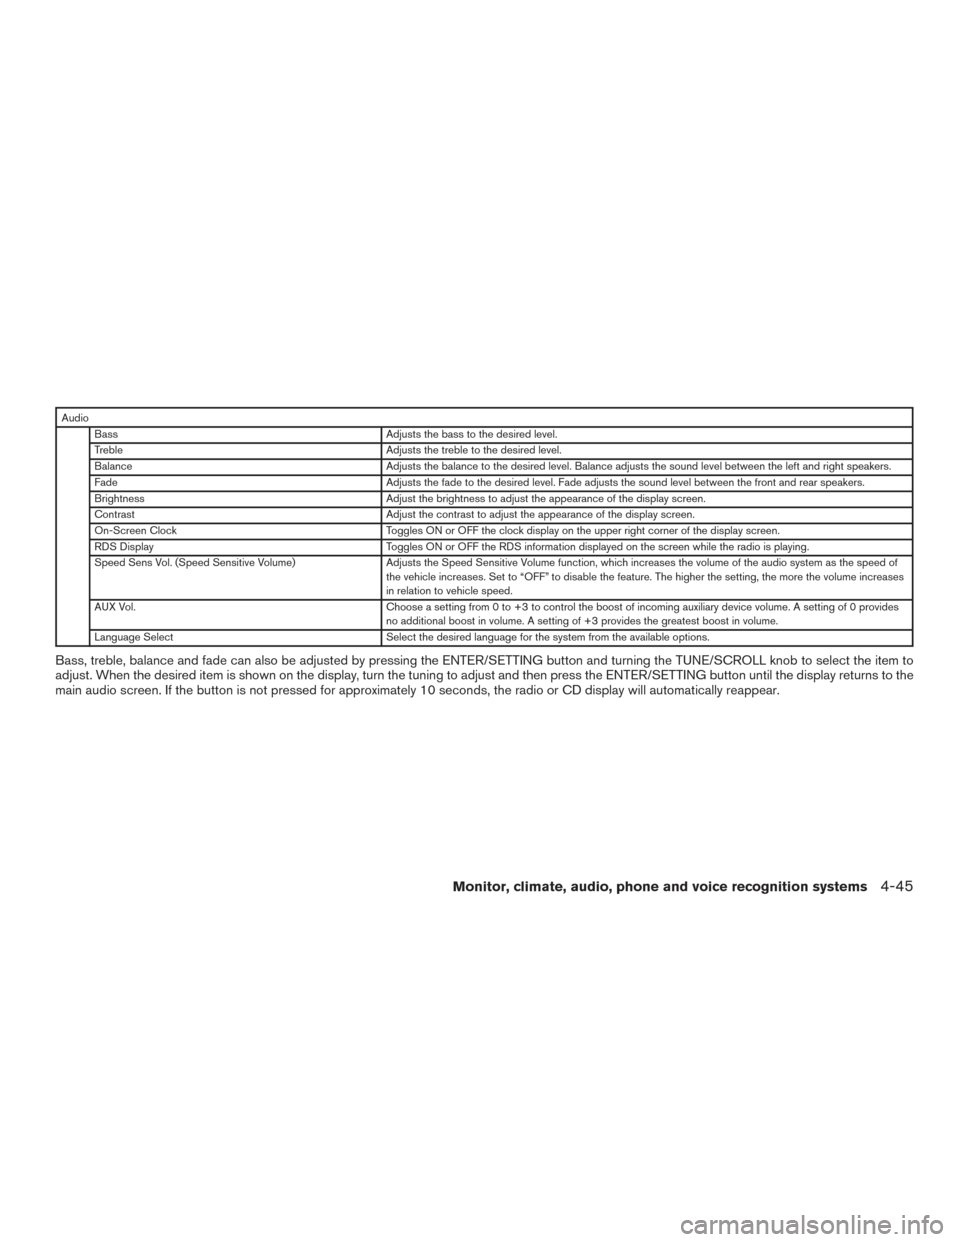
AudioBass Adjusts the bass to the desired level.
Treble Adjusts the treble to the desired level.
Balance Adjusts the balance to the desired level. Balance adjusts the sound level between the left and right speakers.
Fade Adjusts the fade to the desired level. Fade adjusts the sound level between the front and rear speakers.
Brightness Adjust the brightness to adjust the appearance of the display screen.
Contrast Adjust the contrast to adjust the appearance of the display screen.
On-Screen Clock Toggles ON or OFF the clock display on the upper right corner of the display screen.
RDS Display Toggles ON or OFF the RDS information displayed on the screen while the radio is playing.
Speed Sens Vol. (Speed Sensitive Volume) Adjusts the Speed Sensitive Volume function, which increases the volume of the audio system as the speed of
the vehicle increases. Set to “OFF” to disable the feature. The higher the setting, the more the volume increases
in relation to vehicle speed.
AUX Vol. Choose a setting from 0 to +3 to control the boost of incoming auxiliary device volume. A setting of 0 provides
no additional boost in volume. A setting of +3 provides the greatest boost in volume.
Language Select Select the desired language for the system from the available options.
Bass, treble, balance and fade can also be adjusted by pressing the ENTER/SETTING button and turning the TUNE/SCROLL knob to select the item to
adjust. When the desired item is shown on the display, turn the tuning to adjust and then press the ENTER/SETTING button until the display returns to the
main audio screen. If the button is not pressed for approximately 10 seconds, the radio or CD display will automatically reappear.
Monitor, climate, audio, phone and voice recognition systems4-45
Page 229 of 497
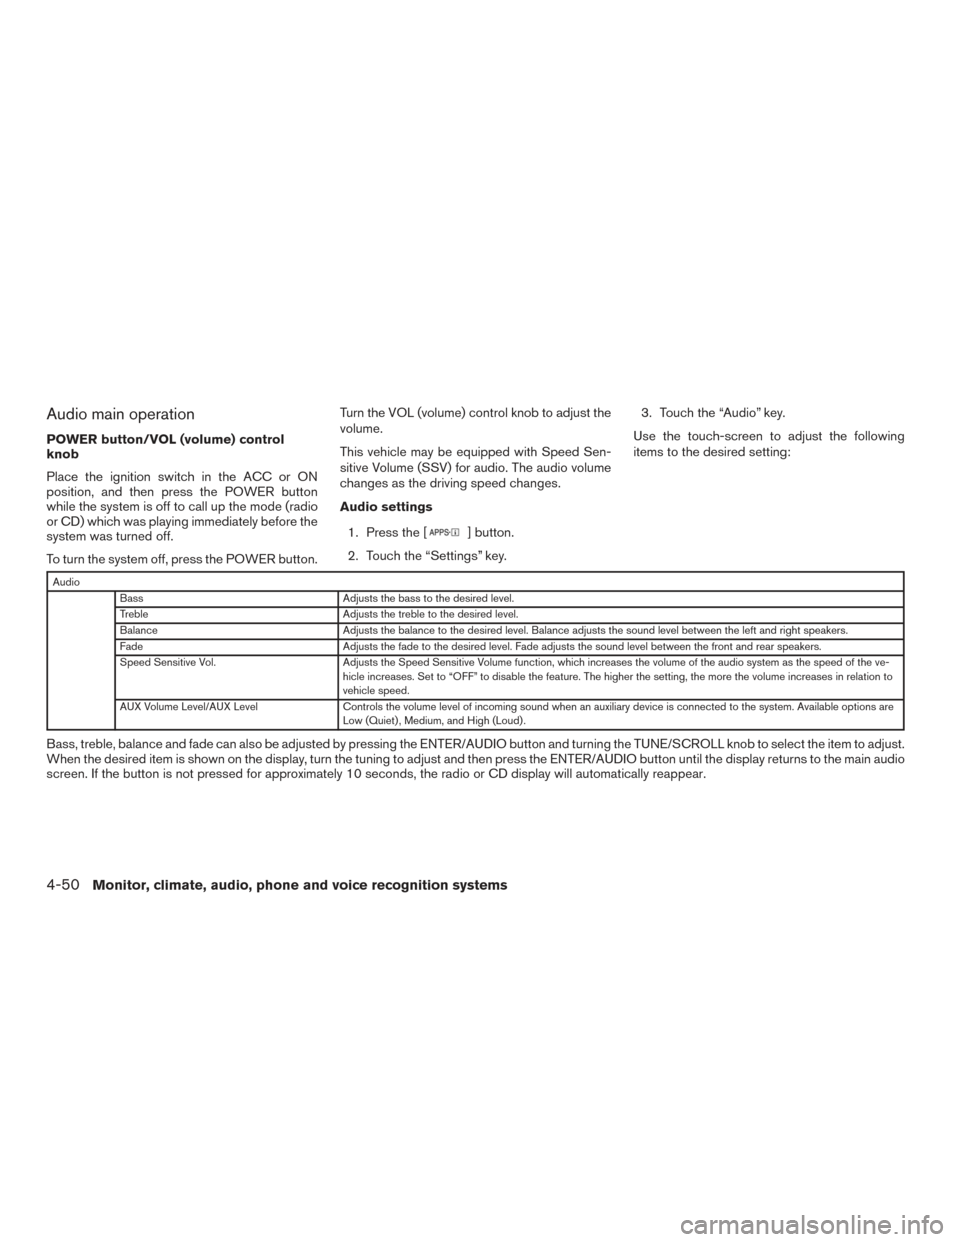
Audio main operation
POWER button/VOL (volume) control
knob
Place the ignition switch in the ACC or ON
position, and then press the POWER button
while the system is off to call up the mode (radio
or CD) which was playing immediately before the
system was turned off.
To turn the system off, press the POWER button.Turn the VOL (volume) control knob to adjust the
volume.
This vehicle may be equipped with Speed Sen-
sitive Volume (SSV) for audio. The audio volume
changes as the driving speed changes.
Audio settings
1. Press the [
] button.
2. Touch the “Settings” key. 3. Touch the “Audio” key.
Use the touch-screen to adjust the following
items to the desired setting:
Audio Bass Adjusts the bass to the desired level.
Treble Adjusts the treble to the desired level.
Balance Adjusts the balance to the desired level. Balance adjusts the sound level between the left and right speakers.
Fade Adjusts the fade to the desired level. Fade adjusts the sound level between the front and rear speakers.
Speed Sensitive Vol. Adjusts the Speed Sensitive Volume function, which increases the volume of the audio system as the speed of the ve-
hicle increases. Set to “OFF” to disable the feature. The higher the setting, the more the volume increases in relation to
vehicle speed.
AUX Volume Level/AUX Level Controls the volume level of incoming sound when an auxiliary device is connected to the system. Available options are
Low (Quiet) , Medium, and High (Loud) .
Bass, treble, balance and fade can also be adjusted by pressing the ENTER/AUDIO button and turning the TUNE/SCROLL knob to select the item to adjust.
When the desired item is shown on the display, turn the tuning to adjust and then press the ENTER/AUDIO button until the display returns to the main audio
screen. If the button is not pressed for approximately 10 seconds, the radio or CD display will automatically reappear.
4-50Monitor, climate, audio, phone and voice recognition systems
Page 230 of 497
![NISSAN ALTIMA 2017 L33 / 5.G Owners Manual SXM settings
To view the SXM settings:1. Press the [
] button.
2. Touch the “Settings” key.
3. Touch the “SXM” key.
The signal strength, activation status and other
information are displayed o NISSAN ALTIMA 2017 L33 / 5.G Owners Manual SXM settings
To view the SXM settings:1. Press the [
] button.
2. Touch the “Settings” key.
3. Touch the “SXM” key.
The signal strength, activation status and other
information are displayed o](/manual-img/5/510/w960_510-229.png)
SXM settings
To view the SXM settings:1. Press the [
] button.
2. Touch the “Settings” key.
3. Touch the “SXM” key.
The signal strength, activation status and other
information are displayed on the screen.
FM/AM/SAT radio operation
FM·AM button
Press the FM·AM button to change the band as
follows:
AM →FM1 →FM2 →AM
If another audio source is playing when the
FM·AM button is pressed, the audio source play-
ing will automatically be turned off and the last
radio station played will begin playing.
SXM band select
Pressing the SXM button will change the band as
follows:
SXM1* →SXM2*→ SXM3*→SXM1* (satellite,
if so equipped)
When the SXM button is pressed while the igni-
tion switch is in the ACC or ON position, the
radio will come on at the last station played. The last station played will also come on when
the VOL (volume) control knob is pressed to turn
the radio on.
*When the SXM button is pressed, the satellite
radio mode will be skipped unless an optional
satellite receiver and antenna are installed and a
SiriusXM® Satellite Radio service subscription is
active. Satellite radio is not available in Alaska,
Hawaii and Guam.
If a compact disc is playing when the SXM button
is pressed, the compact disc will automatically be
turned off and the last radio station played will
come on.
While the radio is in SXM mode, the operation
can be controlled through the touch-screen.
Touch the “Channels” key to display a list of
channels. Touch a channel displayed on the list to
change to that channel. Touch the “Categories”
key to display a list of categories. Touch a cat-
egory displayed on the list to display options
within that category.
Tuning with the touch-screen
When in AM or FM mode, the radio can be tuned
using the touch-screen. To bring up the visual
tuner, touch the “Tune” key on the lower right
corner of the screen. A screen appears with a bar
running from low frequencies on the left to high
frequencies on the right. Touch the screen at thelocation of the frequency you wish to tune and the
station will change to that frequency. To return to
the regular radio display screen, touch the “OK”
key.
Tuning with the TUNE knob
The radio can also be manually tuned using the
TUNE knob. When in FM or AM mode, turn the
TUNE knob to the left for lower frequencies or to
the right for higher frequencies. When in SXM
mode, turn the TUNE knob to change the chan-
nel.SEEK/TRACK tuning
When in FM or AM mode, press the
SEEK
button or
TRACK button to tune from low
to high or high to low frequencies and to stop at
the next broadcasting station.
When in SXM mode, press the
SEEK but-
ton or
TRACK button to change the cat-
egory.
Monitor, climate, audio, phone and voice recognition systems4-51
Page 240 of 497
●iPod® nano - 4th generation (firmware ver-
sion 1.0.4 or later)
● iPod® nano - 5th generation (firmware ver-
sion 1.0.2 or later)
● iPod® nano - 6th generation (firmware ver-
sion 1.1 or later)
● iPod® Touch - 2nd generation (firmware
version 4.2.1 or later)
● iPod® Touch - 3rd generation (firmware ver-
sion 5.1 or later) (minimum iOS 5.0 required
for smartphone integration)
● iPod® Touch - 4th generation (firmware ver-
sion 5.1 or later) (minimum iOS 5.0 required
for smartphone integration)
● iPhone® 3G (firmware version 4.2.1 or later)
● iPhone® 3GS (firmware version 5.1 or later)
(minimum iOS 5.0 required for smartphone
integration)
● iPhone® 4 (firmware version 5.1 or later)
(minimum iOS 5.0 required for smartphone
integration)
● iPhone® 4S (firmware version 5.1 or later)
(minimum iOS 5.0 required for smartphone
integration) ●
iPhone®5 (firmware version 5.1 or later)
(minimum iOS 5.0 required for smartphone
integration)
Make sure that your iPod® firmware is updated to
the version indicated above.
Audio main operation
Place the ignition switch in the ACC or ON
position. Press the MEDIA button repeatedly to
switch to the iPod® mode.
If the system has been turned off while the iPod®
was playing, pressing the ENTER/SETTING or
MENU button will start the iPod®.
iPod MENU button
Press the iPod MENU button while the iPod® is
connected to show the iPod® operation menu on
the audio display. Scroll through the menu list
using the TUNE/FOLDER or TUNE/SCROLL
control dial. Press ENTER/SETTING button to
select a menu item. Items in the iPod® menu
appear on the display in the following order: ● Now playing
● Playlists
● Artists
● Albums
● Songs ●
Podcasts
● Genres
● Composers
● Audiobooks
● Shuffle songs
For additional information about each item, refer
to the iPod® Owner’s Manual.
SEEK/CAT and TRACK buttons
When the
SEEK orCAT/TRACK
button is pressed for less than 1.5 seconds while
the iPod® is playing, the next track or the begin-
ning of the current track on the iPod® will be
played.
When the
SEEK orCAT/TRACK
button is pressed for more than 1.5 seconds
while the iPod® is playing, the iPod® will play
while fast forwarding or rewinding. When the
button is released, the iPod® will return to the
normal play speed.
Monitor, climate, audio, phone and voice recognition systems4-61
Page 245 of 497
NOTE:
Some phones may not require a PIN num-
ber in order to connect.
Audio main operation
To switch to the Bluetooth® audio mode, press
the USB/AUX button on the audio unit repeatedly
until the BT AUDIO is displayed on the screen.
NOTE:
When a Bluetooth® audio device is con-
nected to the system, audio function can
only be controlled through the device.
BLUETOOTH® STREAMING AUDIO
WITHOUT NAVIGATION SYSTEM
(Type B) (if so equipped)
If you have a compatible Bluetooth® audio de-
vice that is capable of playing audio files, the
device can be connected to the vehicle’s audio
system so that the audio files on the device play
through the vehicle’s speakers. For additional
information, refer to “FM/AM radio with compact
disc (CD) player (Type B)” or “FM/AM/SAT radio
with compact disc (CD) player (Type A)” in this
section.
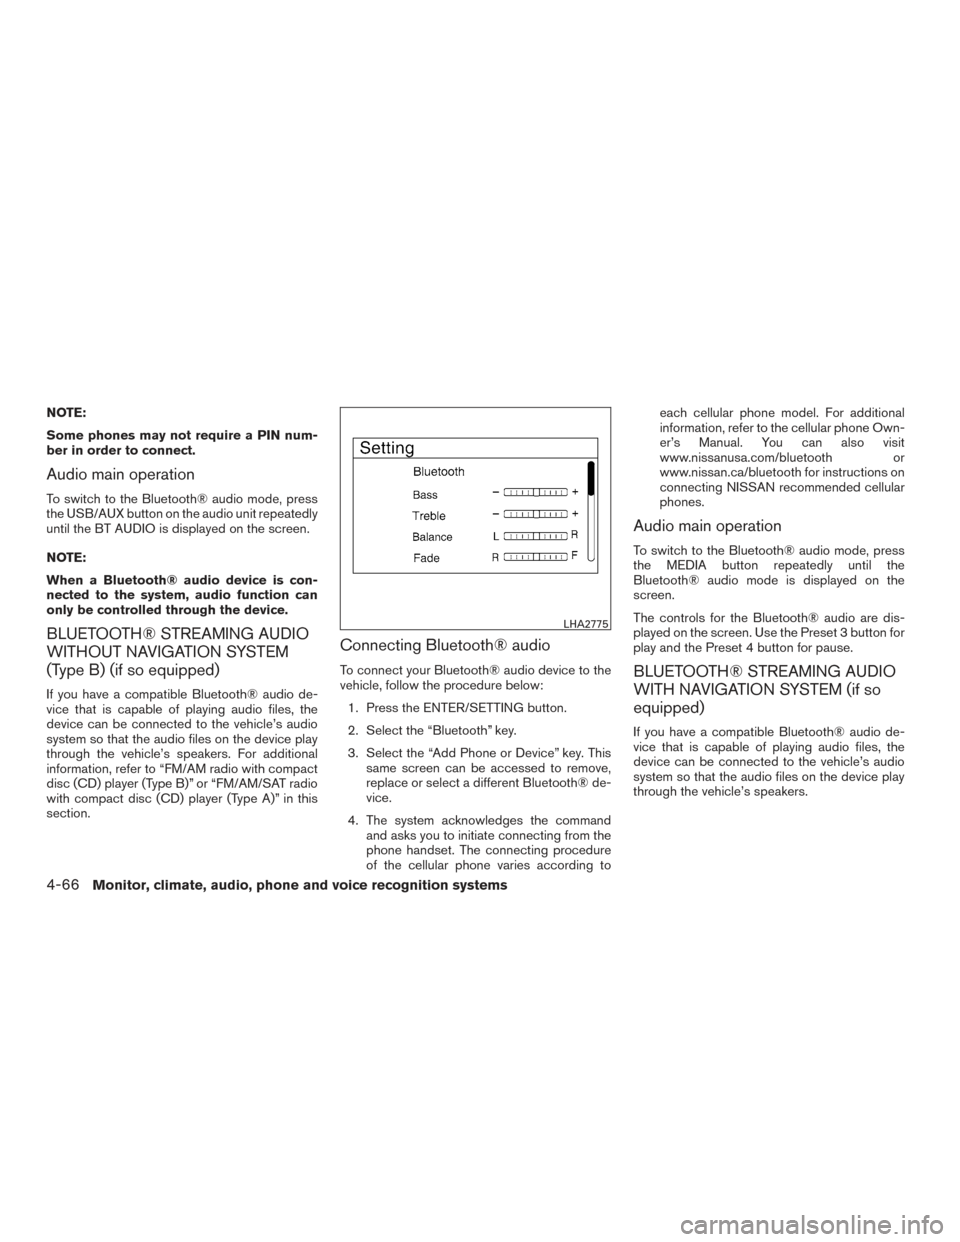
Connecting Bluetooth® audio
To connect your Bluetooth® audio device to the
vehicle, follow the procedure below:1. Press the ENTER/SETTING button.
2. Select the “Bluetooth” key.
3. Select the “Add Phone or Device” key. This same screen can be accessed to remove,
replace or select a different Bluetooth® de-
vice.
4. The system acknowledges the command and asks you to initiate connecting from the
phone handset. The connecting procedure
of the cellular phone varies according to each cellular phone model. For additional
information, refer to the cellular phone Own-
er’s Manual. You can also visit
www.nissanusa.com/bluetooth or
www.nissan.ca/bluetooth for instructions on
connecting NISSAN recommended cellular
phones.
Audio main operation
To switch to the Bluetooth® audio mode, press
the MEDIA button repeatedly until the
Bluetooth® audio mode is displayed on the
screen.
The controls for the Bluetooth® audio are dis-
played on the screen. Use the Preset 3 button for
play and the Preset 4 button for pause.
BLUETOOTH® STREAMING AUDIO
WITH NAVIGATION SYSTEM (if so
equipped)
If you have a compatible Bluetooth® audio de-
vice that is capable of playing audio files, the
device can be connected to the vehicle’s audio
system so that the audio files on the device play
through the vehicle’s speakers.
LHA2775
4-66Monitor, climate, audio, phone and voice recognition systems