2017 MITSUBISHI OUTLANDER SPORT change time
[x] Cancel search: change timePage 167 of 399
Multi-information display 5-104 Features and controls
5
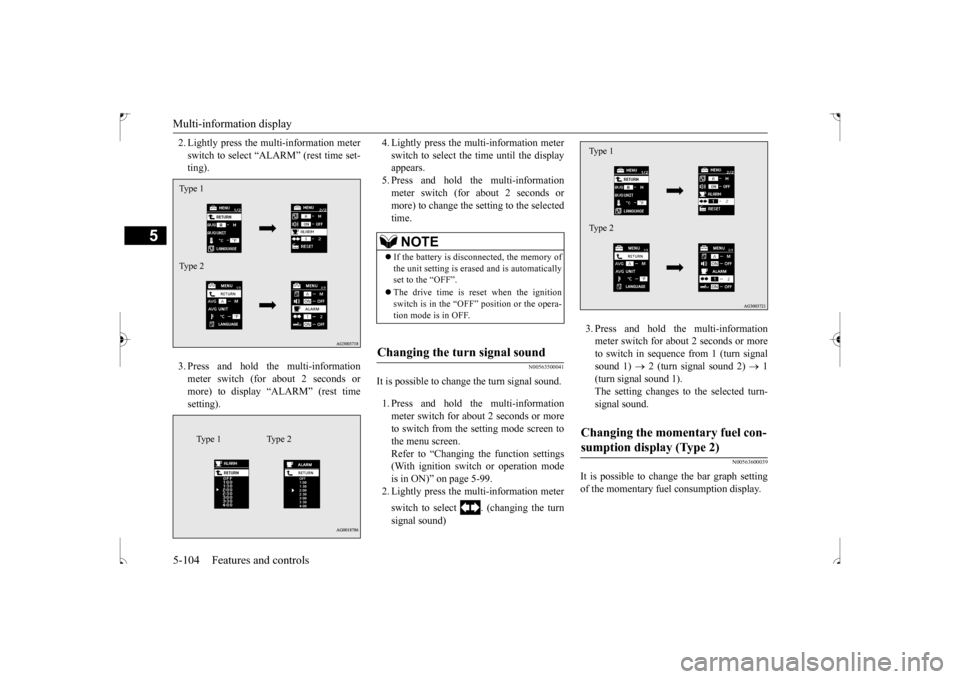
2. Lightly press the multi-information meter switch to select “ALARM” (rest time set- ting). 3. Press and hold the multi-information meter switch (for about 2 seconds or more) to display “ALARM” (rest timesetting).
4. Lightly press the multi-information meter switch to select the time until the display appears. 5. Press and hold the multi-informationmeter switch (for about 2 seconds or more) to change the setting to the selected time.
N00563500041
It is possible to change the turn signal sound. 1. Press and hold the multi-information meter switch for about 2 seconds or more to switch from the setting mode screen to the menu screen.Refer to “Changing the function settings (With ignition switch or operation mode is in ON)” on page 5-99.2. Lightly press the multi-information meter switch to select . (changing the turn signal sound)
3. Press and hold the multi-information meter switch for about 2 seconds or more to switch in sequence from 1 (turn signalsound 1)
2 (turn signal sound 2)
1
(turn signal sound 1). The setting changes to the selected turn-signal sound.
N00563600039
It is possible to change the bar graph settingof the momentary fuel consumption display.
Type 1 Type 2
Type 1 Type 2
NOTE
If the battery is disconnected, the memory of the unit setting is erased and is automatically set to the “OFF”. The drive time is reset when the ignition switch is in the “OFF” position or the opera- tion mode is in OFF.
Changing the turn signal sound
Changing the momentary fuel con- sumption display (Type 2) Type 1 Type 2
BK0239500US.book
104 ページ 2016年5月13日 金曜日 午前8時53分
Page 187 of 399
![MITSUBISHI OUTLANDER SPORT 2017 3.G Owners Manual Combination headlights and dimmer switch 5-124 Features and controls
5
[When the engine is started after the parking brake is released]
[When the engine is not running, or when the engine is started](/manual-img/19/7550/w960_7550-186.png "MITSUBISHI OUTLANDER SPORT 2017 3.G Owners Manual Combination headlights and dimmer switch 5-124 Features and controls
5
[When the engine is started after the parking brake is released]
[When the engine is not running, or when the engine is started")
Combination headlights and dimmer switch 5-124 Features and controls
5
[When the engine is started after the parking brake is released]
[When the engine is not running, or when the engine is started before the parking brake isreleased]
Rotate the switch to operate the lights. The combinations of switch operations and illuminated lights differ in accordance with the following conditions.
Except for vehicles equipped with day- time running lights OFF All lights off
Parking, tail, front and rear side- marker lights, license plate and instrument panel lights on Headlights and other lights on
Vehicles equipped with daytime running lights OFF
The daytime running lights illumi- nated The daytime running lights illumi- natedParking, tail, front and rear side- marker lights, license plate and instrument panel lights on Headlights and other lights on
NOTE
Once the daytime running light come on, they do not go out until the ignition switch is turned to the “OFF” or “ACC” position or the operation mode is changed to OFF or ACC.
OFF All lights off
Parking, tail, front and rear side- marker lights, license plate and instrument panel lights on Headlights and other lights onNOTE
Even if the daytime running lights are not on, they will come on once the vehicle starts moving. Once the daytime running light come on, they do not go out until the ignition switch isturned to the “OFF” or “ACC” position or the operation mode is changed to OFF or ACC.
Ty p e 2 Except for vehicles equipped with day- time running lights OFF All lights off AUTO
Headlights and other lights turn on and off automatically in accordance with outside light level. Parking, tail, front and rear side- marker lights, license plate and instrument panel lights on Headlights and other lights on
BK0239500US.book
124 ページ 2016年5月13日 金曜日 午前8時53分
Page 188 of 399
![MITSUBISHI OUTLANDER SPORT 2017 3.G Owners Manual Combination headlights and dimmer switch
Features and controls 5-125
5
[When the engine is started after the parking brake is released]
[When the engine is not running, or when the engine is started](/manual-img/19/7550/w960_7550-187.png "MITSUBISHI OUTLANDER SPORT 2017 3.G Owners Manual Combination headlights and dimmer switch
Features and controls 5-125
5
[When the engine is started after the parking brake is released]
[When the engine is not running, or when the engine is started")
Combination headlights and dimmer switch
Features and controls 5-125
5
[When the engine is started after the parking brake is released]
[When the engine is not running, or when the engine is started before the parking brake is released]
N00532601593
If the following operation is performed with the combination headlights and dim- mer switch in the “ ” or “ ” position, the lights automatically turn off. [Except for vehicles equipped with the F. A . S . T. - k e y ]The ignition switch is
turned to the “OFF”
or “ACC” position or the key is removed from the ignition swit
ch and the driver’s
door is opened.
Vehicles equipped with daytime running lights OFF
The daytime running lights illumi- nated
AUTO
The daytime running lights illumi- nated (when it is light outside the vehicle)Headlights and other lights turn on and off automatically in accordance with outside light level. The daytime running lights illumi- nated Parking, tail, front and rear side- marker lights, license plate and instrument panel lights on Headlights and other lights on
NOTE
Once the daytime running light come on, they do not go out until the ignition switch is turned to the “OFF” or “ACC” position orthe operation mode is changed to OFF or ACC.
OFF All lights off AUTO
Headlights and other lights turn on and off automatically in accordance with outside light level. Parking, tail, front and rear side- marker lights, license plate and instrument panel lights on Headlights and other lights on
NOTE
Even if the daytime running lights are not on, they will come on once the vehicle starts moving. Once the daytime running light come on, they do not go out until the ignition switch isturned to the “OFF” or “ACC” position or the operation mode is changed to OFF or ACC. The sensitivity of the automatic on/off con- trol can be adjusted.For further information, please contact your authorized Mitsubishi Motors dealer or a repair facility of your choice.
Do not cover the sensor (A) for the automatic on/off control by affixing a sticker or label to the windshield. If the lights do not turn on or off with the switch in the “AUTO” position, manuallyoperate the switch. Have the system checked by an authorized Mitsubishi Motors dealer or a repair facility of your choice.
Light auto-cutout function (headlights and other lights)
NOTE
BK0239500US.book
125 ページ 2016年5月13日 金曜日 午前8時53分
Page 191 of 399
Combination headlights and dimmer switch 5-128 Features and controls
5
N00547301123
This function turns on the headlights in the low beam setting for about 30 seconds after the ignition switch is turned to the “OFF”position or the operation mode is put in OFF.
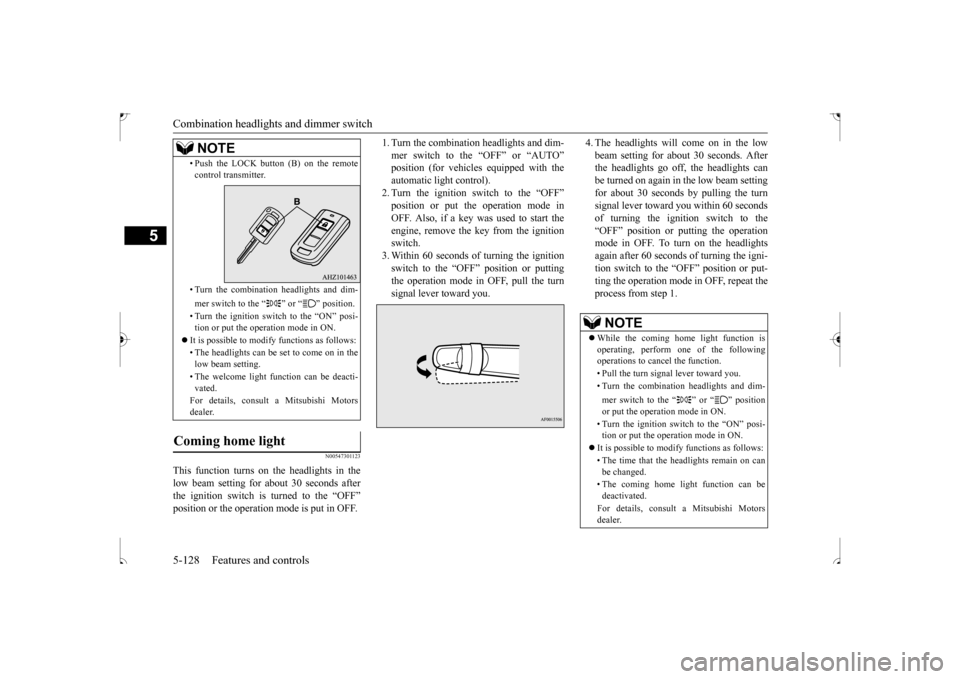
1. Turn the combination headlights and dim- mer switch to the “OFF” or “AUTO” position (for vehicles equipped with the automatic light control).2. Turn the ignition switch to the “OFF” position or put the operation mode in OFF. Also, if a key was used to start theengine, remove the key from the ignition switch. 3. Within 60 seconds of turning the ignitionswitch to the “OFF” position or puttingthe operation mode in OFF, pull the turn signal lever toward you.
4. The headlights will come on in the low beam setting for about 30 seconds. After the headlights go off, the headlights can be turned on again in the low beam settingfor about 30 seconds by pulling the turn signal lever toward you within 60 seconds of turning the ignition switch to the“OFF” position or putting the operation mode in OFF. To turn on the headlights again after 60 seconds of turning the igni-tion switch to the “OFF” position or put-ting the operation mode in OFF, repeat the process from step 1.
• Push the LOCK button (B) on the remote control transmitter. • Turn the combination headlights and dim- mer switch to the “ ” or “ ” position. • Turn the ignition switch to the “ON” posi- tion or put the operation mode in ON.
It is possible to modify functions as follows: • The headlights can be set to come on in the low beam setting. • The welcome light function can be deacti- vated. For details, consult a Mitsubishi Motors dealer.
Coming home light
NOTE
NOTE
While the coming home light function is operating, perform one of the followingoperations to cancel the function. • Pull the turn signal lever toward you.• Turn the combination headlights and dim- mer switch to the “ ” or “ ” position or put the operation mode in ON. • Turn the ignition switch to the “ON” posi- tion or put the operation mode in ON.
It is possible to modify functions as follows: • The time that the headlights remain on can be changed. • The coming home light function can be deactivated. For details, consult a Mitsubishi Motors dealer.
BK0239500US.book
128 ページ 2016年5月13日 金曜日 午前8時53分
Page 192 of 399
Headlight leveling switch (if so equipped)
Features and controls 5-129
5
N00537100105
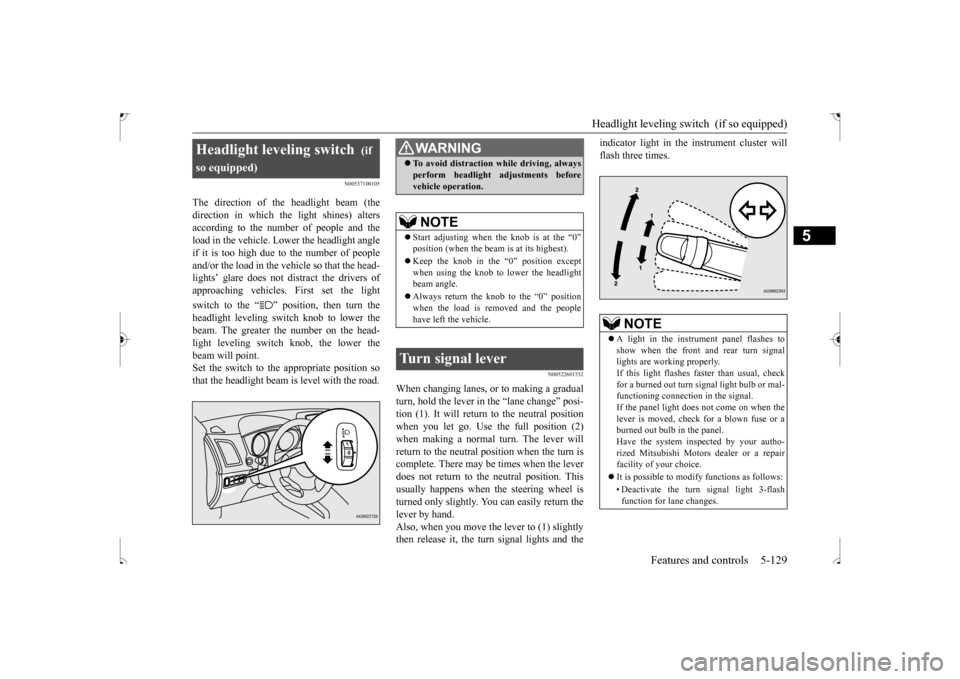
The direction of the headlight beam (the direction in which the light shines) alters according to the number of people and the load in the vehicle. Lower the headlight angleif it is too high due to the number of people and/or the load in the vehicle so that the head- lights’ glare does not distract the drivers ofapproaching vehicles. First set the light switch to the “ ” position, then turn the headlight leveling switch knob to lower the beam. The greater the number on the head- light leveling switch knob, the lower thebeam will point. Set the switch to the appropriate position so that the headlight beam is level with the road.
N00522601532
When changing lanes, or to making a gradual turn, hold the lever in
the “lane change” posi-
tion (1). It will return to the neutral positionwhen you let go. Use the full position (2) when making a normal turn. The lever will return to the neutral position when the turn iscomplete. There may be times when the lever does not return to the neutral position. This usually happens when the steering wheel isturned only slightly. You can easily return the lever by hand. Also, when you move the lever to (1) slightlythen release it, the turn signal lights and the
indicator light in the instrument cluster will flash three times.
Headlight leveling switch
(if
so equipped)
WA R N I N G To avoid distraction while driving, always perform headlight adjustments before vehicle operation.NOTE
Start adjusting when
the knob is at the “0”
position (when the beam is at its highest). Keep the knob in the “0” position except when using the knob to lower the headlightbeam angle. Always return the knob to the “0” position when the load is removed and the people have left the vehicle.
Turn signal lever
NOTE
A light in the instrument panel flashes to show when the front and rear turn signal lights are working properly. If this light flashes faster than usual, checkfor a burned out turn signal light bulb or mal- functioning connection in the signal. If the panel light does not come on when thelever is moved, check for a blown fuse or a burned out bulb in the panel. Have the system inspected by your autho-rized Mitsubishi Motors dealer or a repair facility of your choice. It is possible to modify functions as follows: • Deactivate the turn signal light 3-flash function for lane changes.
BK0239500US.book
129 ページ 2016年5月13日 金曜日 午前8時53分
Page 201 of 399
Bluetooth® 2.0 interface (if so equipped) 5-138 Features and controls
5
Steering control switch and microphone
P.5-138 Voice recognition function
P.5-140
Useful voice commands
P.5-140
Speaker enrollment function
P.5-142
Connecting the Bluetooth
® 2.0 interface and
the Bluetooth
® device
P.5-144
Operating a music player connected via Blue- tooth
® P.5-150
How to make or receive hands-free calls
P.5-150 Phonebook function
P.5-153
N00564001167
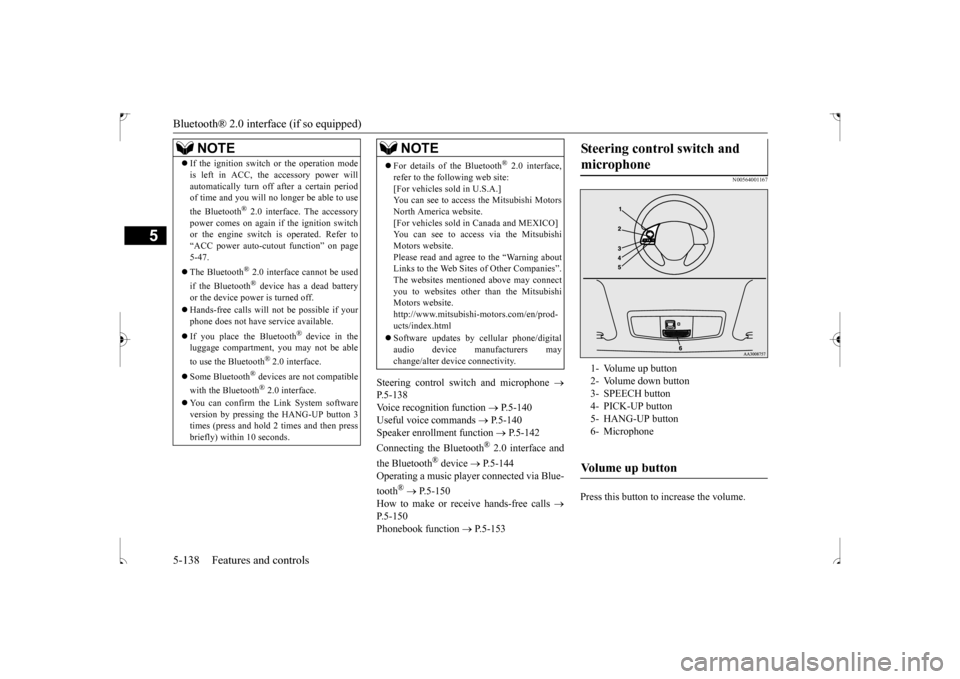
Press this button to increase the volume.
NOTE
If the ignition switch or the operation mode is left in ACC, the accessory power will automatically turn off after a certain period of time and you will no longer be able to use the Bluetooth
® 2.0 interface. The accessory
power comes on again if the ignition switch or the engine switch is operated. Refer to “ACC power auto-cutout function” on page5-47. The Bluetooth
® 2.0 interface cannot be used
if the Bluetooth
® device has a dead battery
or the device power is turned off. Hands-free calls will not be possible if your phone does not have service available. If you place the Bluetooth
® device in the
luggage compartment, you may not be able to use the Bluetooth
® 2.0 interface.
Some Bluetooth
® devices are not compatible
with the Bluetooth
® 2.0 interface.
You can confirm the Link System software version by pressing the HANG-UP button 3times (press and hold 2 times and then press briefly) within 10 seconds.
For details of the Bluetooth
® 2.0 interface,
refer to the following web site:[For vehicles sold in U.S.A.] You can see to access the Mitsubishi Motors North America website.[For vehicles sold in Canada and MEXICO] You can see to access via the Mitsubishi Motors website.Please read and agree to the “Warning about Links to the Web Sites of Other Companies”. The websites mentioned above may connectyou to websites other
than the Mitsubishi
Motors website. http://www.mitsubishi-motors.com/en/prod-ucts/index.html Software updates by cellular phone/digital audio device manufacturers may change/alter device connectivity.NOTE
Steering control switch and microphone
1- Volume up button 2- Volume down button3- SPEECH button 4- PICK-UP button 5- HANG-UP button6- MicrophoneVolume up button
BK0239500US.book
138 ページ 2016年5月13日 金曜日 午前8時53分
Page 203 of 399

Bluetooth® 2.0 interface (if so equipped) 5-140 Features and controls
5
N00564101155
The Bluetooth
® 2.0 interface is equipped
with a voice recognition function. Simply say voice commands and you can per-form various operations and make or receive hands-free calls. With the Bluetooth
® 2.0 interface, voice rec-
ognition is possible for US English, NorthAmerican Spanish, Canadian French and Jap- anese. The factory setting is “English.”
1. Press the SPEECH button (except for vehicles with Mitsubishi Multi-Commu- nication System) or PICK-UP button (forvehicles with Mitsubishi Multi-Commu- nication System). 2. Say “Setup.”3. Say “Language.” 4. The voice guide will say “Select a lan- guage: English, Spanish, French or Japa-nese.” Say the desired language. (Example: “English”) 5. The voice guide will say “English (Span-ish, French or Japanese) selected. Is this correct?” Say “Yes.” If you say “No,” the system will return toStep 4.
6. When the voice guide says “English (Spanish, French or Japanese) selected,”the language change process will be com- pleted and the system will return to the main menu.
N00564200016 N00564301030
The Bluetooth
® 2.0 interface is equipped
with a help function. If you say “Help” when the system is waitingfor a voice command input, the system will tell you a list of the commands that can be used under the existing circumstances.
NOTE
If a cellular phone is within close proximity of the microphone, it may distort the sound quality. In this case, place the cellular phone as far as possible from the microphone.
Voice recognition function
NOTE
If the voice command that you say differs from the predefined command or cannot berecognized due to ambient noise or some other reason, the Bluetooth
® 2.0 interface
will ask you for the voice command again up to 3 times.
For best performance and further reduction of ambient noise, the vehicle windows should be closed before pressing the SPEECH button (except for vehicles with Mitsubishi Multi-Communication System)or PICK-UP button (for vehicles with Mit- subishi Multi-Communication System) while engaging the voice recognition function. Some voice commands have alternative commands. Depending on the selected language, some functions may not be available.
Selecting the language
NOTE
NOTE
The voice guide will repeat the same mes- sage twice. The first message is in the cur- rent language, and the second message is in the selected language. If many entries are registered in the vehicle phonebook, changing the language will take a longer time. Changing the language deletes the mobile phonebook imported to the Bluetooth
® 2.0
interface. If you wish to use it, you will have to import it again.
Useful voice commands
Help function
BK0239500US.book
140 ページ 2016年5月13日 金曜日 午前8時53分
Page 207 of 399

Bluetooth® 2.0 interface (if so equipped) 5-144 Features and controls
5
3. If you have completed a speaker enroll- ment process once already, the voice guide will say either “Enrollment is enabled. Would you like to disable orretrain?” or “Enrollment is disabled. Would you like to enable or retrain?” 4. When enrollment is “enabled,” the voicemodel is on; when enrollment is “dis- abled,” the voice model is off. Say the command that fits your needs. Say “Retrain” to start the speaker enroll-ment process and recreate a new voice model. (Refer to “Speaker enrollment” on page 5-142.)
N00565001311
Before you can make or receive hands-free calls or play music using the Bluetooth
® 2.0
interface function, you must pair the Blue- tooth
® device and Bluetooth
® 2.0 interface.
Up to 7 Bluetooth
® devices can be paired
with the Bluetooth
® 2.0 interface.
If multiple paired Bluetooth
® devices are
available in the vehicle, the cellular phone or music player most recently connected is auto- matically connected to the Bluetooth
® 2.0
interface. You can also change a Bluetooth
® device to
be connected. To pair a Bluetooth
® device with the Blue-
tooth
® 2.0 interface, use either one of the fol-
lowing 2 methods (Type 1 or Type 2).
1. Stop your vehicle in a safe area, put the gearshift lever in the “N” (Neutral) posi- tion (manual transaxle), or the selectorlever in the “P” (PARK) position (contin- uously variable transmission (CVT)), and pull the parking brake lever. 2. Press the SPEECH button (except for vehicles with Mitsubishi Multi-Commu- nication System) or PICK-UP button (forvehicles with Mitsubishi Multi-Commu- nication System). 3. Say “Setup.”4. Say “Pairing Options.”5. The voice guide will say “Select one of the following: pair, edit, delete, or list.” Say “Pair.”
Connecting the Bluetooth
® 2.0
interface and Bluetooth
® device
NOTE
Pairing is required only when the device is used for the first time. Once the device has been paired with the Bluetooth
® 2.0 inter-
face, all you need is
to bring the device into
the vehicle next time and the device will connect to the Bluetooth
® 2.0 interface auto-
matically (if supported by the device). The device must have Bluetooth
® turned ON to
connect.
To p a i r
Pairing procedure- Type 1
(if so
equipped)NOTE
You cannot pair any Bluetooth
® device with
the Bluetooth
® 2.0 interface unless the vehi-
cle is parked. Before pairing a Bluetooth
®
device with the Bluetooth
® 2.0 interface,
confirm that the vehicle is parked in a safe location.
BK0239500US.book
144 ページ 2016年5月13日 金曜日 午前8時53分