2017 MITSUBISHI OUTLANDER III display
[x] Cancel search: displayPage 353 of 521

HomeLink® Wireless Control System (if so equipped) 5-272 Features and controls
5
The HomeLink
® has the capability of listen-
ing to these messages at a range up to 820.2feet (250 m) (open line of sight), but range may be reduced by obst
acles such as houses
or trees. You may have to slow your vehiclespeed to receive the CLOSED or OPENED message feedback from the garage door opener. If the unit is out of range beforereceiving either the UP or DOWN message from the door opener, both the UP and DOWN indicators will
flash red followed by
a continuous lit orange indicator in the direc- tion the door was last moving.Recall of the door state after initial feedback is possible by simultaneously pressing either HomeLink
® buttons 1 and 2 or buttons 2 and
3 for 2 seconds. The la
st recorded message
will be displayed for 3 seconds, again follow- ing the garage door stat
us indication of the
figure above.
N00585300023
To erase programming from the 3 buttons (individual buttons cannot
be erased but can
be “reprogrammed” as
outlined below), fol-
low the steps noted:
1. Press and hold the 2 outer HomeLink
®
buttons for at least
10 seconds. The indi-
cator will change from continuous yellow to rapidly flashing green. 2. Release both buttons. 3. HomeLink
® is now in the train (or learn-
ing) mode and can be programmed at anytime beginning with
“Programming a new
HomeLink
®” step 1.
N00585400024
To reprogram a HomeLink
® button, complete
the following. 1. Press and hold the desired HomeLink
®
button. Do not release the button. 2. The indicator light
will begin to slowly
flash orange after 20 seconds. The Home- Link
® button can be released at this point.
Proceed with “Programming a new HomeLink
®” step 2.
N00585600026
Your HomeLink
® system operates on a radio
frequency subject to
Federal Communica-
tions Commission (FCC)
Rules (For vehicles
sold in U.S.A.) and Industry Canada Rules (For vehicles sold in
Canada). This device
complies with Part 15 of the FCC Rules and RSS- 210 of the Industry Canada Rules. Operation is subject to
the following two con-
ditions. This device may not
cause harmful inter-
ference. This device must ac
cept any interference
that may be received, including interfer- ence that may caus
e undesired operation.
Clearing the programmed information
NOTE
Do not hold for longer than 20 seconds.
Reprogramming a single HomeLink
® button
NOTE
If you do not complete the programming of a new device to the button,
it will revert to the
previously stored programming.For questions or comments, visit www.homelink.com, www.youtube.com/HomeL
inkGentex, or by
calling the HomeLink
® Hotline.
General information
BK0239700US.book 272 ページ 2016年6月16日 木曜日 午前10時58分
Page 369 of 521

Vehicle preparation before driving 6-4 Driving safety
6
N00629001709
For a safer and more enjoyable trip, always check for the following: Before starting the vehicle, make certain that you and all passengers are seated andwearing their seat
belts properly (with
children in the rear seat, in appropriate restraints), and that all the doors and theliftgate are locked.
Move the driver’s seat as far backward as possible, while keeping good visibility,and good control of the steering wheel, brakes, accelerator, and controls. Check the instrument panel indicators and multi-information display
for any possible prob-
lem. Similarly, the front
passenger seat should
also be moved as fa
r back as possible.
Make sure that infants and small children are properly restrained in accordance with all laws and
regulations.
Check these by selecting the defroster mode, and set the blower swit
ch on high. You should
be able to feel the air blowing against thewindshield. Refer to “Defrosti
ng or defogging (wind-
shield, door windows)” on page 7-12 Check all the tires for heavy tread wear or uneven wear patterns. Look for stones, nails,glass, or other objects
stuck in the tread. Look
for any tread cuts or
sidewall cracks. Check
the wheel nuts for tightness, and the tires(including spare tire) for proper pressure.
Replace your tires before they are heavily worn out.As your vehicle is equi
pped with a tire pres-
sure monitoring system, there is a risk of damage to the tire inflation pressure sensorswhen the tire is replaced on the rim. Tire replacement should, onl
y, be performed by an
authorized Mitsubishi Motors dealer. Have someone watch wh
ile you turn all the
exterior lights on and off. Also check the turn signal indicators and hi
gh-beam indicators on
the instrument panel. Check the ground under the vehicle after parking overnight, for
fuel, water, oil, or
other leaks. Make sure
all the fluid levels are
correct. Also, if you
can smell fuel, you need
to find out why imme
diately and have it
fixed.
N00629201134
Even this vehicle’s sa
fety equipment, and
your safest driving, ca
nnot guarantee that you
can avoid an accident or injury. However, if
Vehicle preparation before driving Seat belts and seats
Defrosters Tires
Lights Fluid leaks Safe driving techniques
BK0239700US.book 4 ページ 2016年6月16日 木曜日 午前10時58分
Page 380 of 521
Trailer towing
Driving safety 6-15
6
You’ll need more passing distance up ahead when you’re towing a trailer. And, because you’re a good deal longer, you’ll need to gomuch farther beyond the passed vehicle before you can return to your lane. Hold the bottom of the steering wheel with one hand. Then, to move the trailer to the left,just move that hand to the left. To move the trailer to the right, move your hand to the right. Always back up sl
owly and, if possible,
have someone guide you. When you’re turning with a trailer, make wider than normal turns to help prevent the trailer from striking shoulders, curbs, roadsigns, trees or other objects.
Avoid jerky or sudden maneuvers. Signal well in advance. Towing a trailer puts additional burden on the engine and transaxle,
which may cause over-
heating. Following ar
e some suggestions to
reduce overheating: When towing at high al
titudes, engine coolant
and automatic transaxle oil will overheat at a lower temperature than at normal altitudes. If you turn your engine off immediately aftertowing at high altitude
on steep uphill grades,
your vehicle may show
signs similar to over-
heating. To avoid this
, let the engine run
while parked (preferably on level ground) with the automatic transaxle in the “P”turning the engine off.
If the engine coolant temperature indica- tor flashes on the information screen in the multi-information display or the engine power drops suddenly, refer to “Engine overheati
ng” on page 8-4.
If the warning display or warning display illuminates, re
fer to “Warning dis-
play” on page 5-70, 5-78.
Reduce speed and downshift before you start down a long or steep downgrade. If you don’t downshift, over using the brakes can cause reduced brake efficiency. You can tow in “D” (DRIVE) position. You may want to shift the selector lever to the 3rd or a lower position, under heavy loads or hilly conditions. Always place chocks or blocks under both the vehicle and trailer wheels when parking. Besure that the parking brake is firmly set and that the selector lever is in the “P” (PARK) position. Avoid parki
ng on a hill with a
trailer, but if it cannot be avoided, do so only after performing the following:
Passing Backing up Making turns
CAUTION Making sharp turns while towing a trailer could cause the
trailer to come in contact
with the vehicle. Your
vehicle could be dam-
aged. Avoid making sharp turns while tow- ing a trailer.
Overheating Cause of overheating
Solution
Air conditioning on Turn off Highway speeds Reduce speed Going up hills Select lower gear posi-
tion
Stop-and-go city traf- fic
With the vehicle stopped, shift to the “N” (NEUTRAL) position and idle the engine at high idle.
Driving on hills Parking
BK0239700US.book 15 ページ 2016年6月16日 木曜日 午前10時58分
Page 384 of 521
7
Comfort controlsVents ................................................................................................7-2 Dual-zone automatic climate control air conditioner ......................7-5 Important air conditioning operating tips ..
...........
...........
.........
.....7-13
Air purifier .....................................................................................7-14 AM/FM radio/CD player (if so equipped) .....................................7-14 Handling of Discs ..........................................................................7-18Audio Files (MP3/WMA/AAC) ....................................................7-19 Important Points on Safety for the Customer ................................7-23 Operation Keys ..............................................................................7-24Listen to Radio ...............................................................................7-26 Listen to Satellite Radio (if so equipped) .......................................7-28 Listen to CDs .................................................................................7-30Listen to MP3s ...............................................................................7-31 Listen to an iPod ............................................................................7-32 Listen to Audio Files on a USB Device .........................................7-34To play iPod/USB memory device tr
acks via voice ope
ration ......7-37
Listen to Bluetooth Audio .............................................................7-40 Display Indicator ...........................................................................7-42Audio Quality and Volume Balance Adjustment ...........................7-44 System Settings ..............................................................................7-44 Troubleshooting ..........
...........
...........
...........
...........
.........
.........
.....7-47
Clock (if so equipped) ....................................................................7-49 General information about your radio .....
...........
...........
...........
.....7-50
BK0239700US.book 1 ページ 2016年6月16日 木曜日 午前10時58分
Page 389 of 521

Dual-zone automatic climate
control air conditioner
7-6 Comfort controls
7
N00736901206
Press of the blower speed selection switch to increase the blower speed. Press of the blower speed selection switch to decrease the blower speed. The selected blower sp
eed will be shown in
the display (A).
9- Electric rear window
defogger switch
P.5-237
10- OFF switch11- Driver’s side temperature display
P.7-7
12- DUAL indicator13- Mode selection display 14- Passenger’s side temperature display
P.7-7
15- Air conditioning indicator 16- Blower speed display
NOTE
There is an interior air temperature sensor (A) in the illustrated position. Never place anything ove
r the sensor, since
doing so will prevent it from functioning properly.
NOTE
Since the air conditi
oning operation is con-
trolled while the ECO mode is operating,you may feel that effectiveness of the airconditioner is insufficient. ECO mode switch P.5-231
Even during ECO mode operation, you can select normal operati
on of the air condi-
tioner.On vehicles equipped
with Mitsubishi Multi-
Communication System,
screen operations
can be used to change
the setting. Refer to
the separate owner’ In extreme cold, the air conditioning control panel screen may ope
rate sluggishly. This
does not indicate a problem. It will disappear when the vehicle interiortemperature rises to a normal temperature.
Blower speed selection switch 1- Increase 2- Decrease
BK0239700US.book 6 ページ 2016年6月16日 木曜日 午前10時58分
Page 390 of 521
Dual-zone automatic climat
e control air conditioner Comfort controls 7-7
7
N00737001448
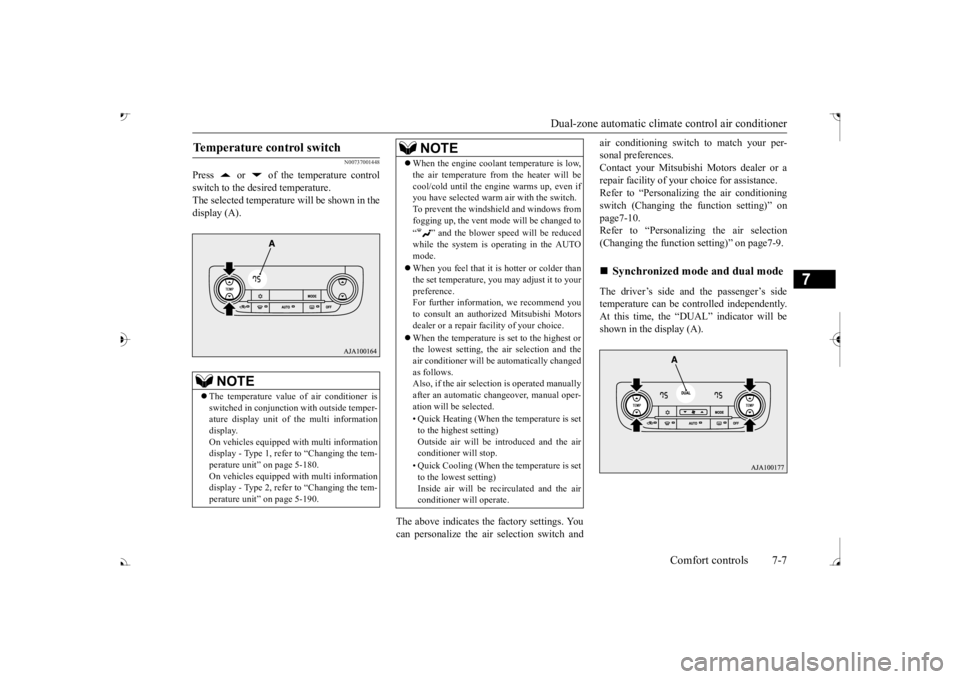
Press or of the temperature control switch to the desired temperature. The selected temperature will be shown in the display (A).
The above indicates the
factory settings. You
can personalize the air
selection switch and
air conditioning switch to match your per- sonal preferences.Contact your Mitsubishi
Motors dealer or a
repair facility of your
choice for assistance.
Refer to “Personalizi
ng the air conditioning
switch (Changing the function setting)” on page7-10. Refer to “Personalizing the air selection(Changing the function setting)” on page7-9. The driver’s side and the passenger’s side temperature can be controlled independently.At this time, the “
DUAL” indicato
r will be
shown in the display (A).
Temperature control switch
NOTE
The temperature value
of air conditioner is
switched in conjunction
with outside temper-
ature display unit of the multi informationdisplay. On vehicles equipped with multi information display - Type 1, refer to “Changing the tem-perature unit” on page 5-180. On vehicles equipped with multi information display - Type 2, refer to “Changing the tem-perature unit” on page 5-190.
When the engine coolan
t temperature is low,
the air temperature from the heater will becool/cold until the engi
ne warms up, even if
you have selected warm
air with the switch.
To prevent the windshield and windows from fogging up, the vent mode will be changed to “ ” and the blower speed will be reduced while the system is operating in the AUTO mode. When you feel that it is hotter or colder than the set temperature, you may adjust it to yourpreference. For further information, we recommend you to consult an authorized Mitsubishi Motorsdealer or a repair fa
cility of your choice.
When the temperature is set to the highest or the lowest setting, the air selection and the air conditioner will be automatically changed as follows.Also, if the air select
ion is operated manually
after an automatic ch
angeover, manual oper-
ation will be selected. • Quick Heating (When th
e temperature is set
to the highest setting)Outside air will be introduced and the air conditioner will stop. • Quick Cooling (When the temperature is set to the lowest setting) Inside air will be reci
rculated and the air
conditioner wi
ll operate.
NOTE
Synchronized mode and dual mode
BK0239700US.book 7 ページ 2016年6月16日 木曜日 午前10時58分
Page 391 of 521
Dual-zone automatic climate
control air conditioner
7-8 Comfort controls
7
Synchronized mode If the driver’s side temperature controlswitch is pressed, the passenger’s side temperature will also be controlled to the same setting temperature as the driver’sside. Dual mode If the passenger’s side temperature con-trol switch is pressed under synchronized mode, the system will switch to dual mode. In dual mode, the driver’s side and the passenger’s side
temperature can be
set separately by usi
ng each temperature
control switch. Press the AUTO switch to return to syn- chronized mode.
N00737101234
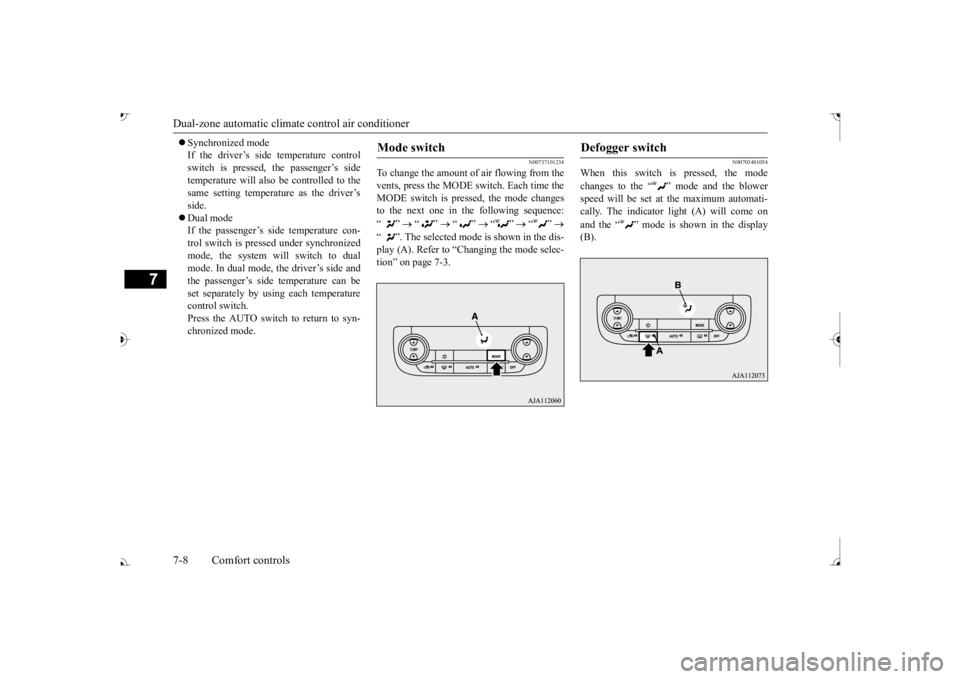
To change the amount of air flowing from the vents, press the MODE switch. Each time the MODE switch is pressed, the mode changesto the next one in the following sequence: “”
“”
“”
“”
“”
“ ”. The selected mode is shown in the dis- play (A). Refer to “C tion” on page 7-3.
N00703401054
When this switch is pressed, the mode changes to the “ ”
mode and the blower
speed will be set at the maximum automati- cally. The indicator light (A) will come on and the “ ” mode is shown in the display (B).
Mode switch
Defogger switch
BK0239700US.book 8 ページ 2016年6月16日 木曜日 午前10時58分
Page 393 of 521
Dual-zone automatic climate
control air conditioner
7-10 Comfort controls
7
• When the setting has changed from enabled to disabled,
the system will beep
three times and the indicator light will flash three times. • When the setting has changed from dis-abled to enabled, the system will beep two times and the i
ndicator light will
flash three times.On vehicles equippe
d with Mitsubishi
Multi-Communication System, screen operations can also be used to change the setting. Refer to th
e separate owner’s
manual for details.
N00737301467
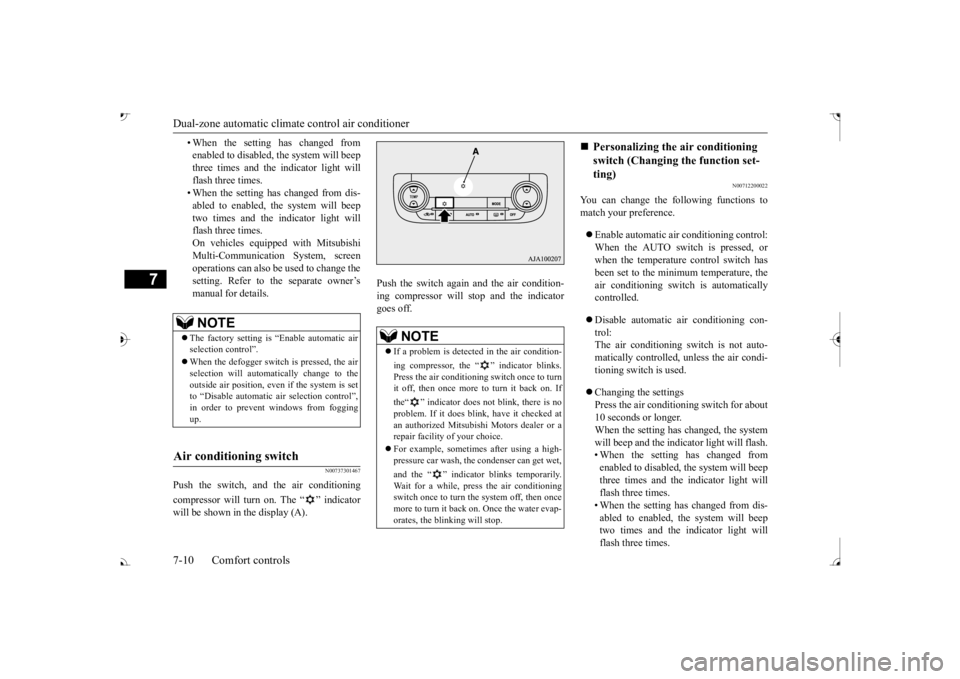
Push the switch, and the air conditioning compressor will turn on. The “ ” indicator will be shown in the display (A).
Push the switch again and the air condition- ing compressor will st
op and the indicator
goes off.
N00712200022
You can change the following functions tomatch your preference. Enable automatic air conditioning control: When the AUTO switch is pressed, or when the temperature control switch hasbeen set to the minimum temperature, the air conditioning switch is automatically controlled. Disable automatic air conditioning con- trol: The air conditioning switch is not auto-matically controlled,
unless the air condi-
tioning switch is used. Changing the settings Press the air conditioning switch for about10 seconds or longer. When the setting has changed, the system will beep and the indi
cator light will flash.
• When the setting has changed from enabled to disabled, the system will beep three times and the indicator light willflash three times. • When the setting has changed from dis- abled to enabled, the system will beeptwo times and the i
ndicator light will
flash three times.
NOTE
The factory setting is “Enable automatic air selection control”. When the defogger switch is pressed, the air selection will automatically change to the outside air position, even if the system is setto “Disable automatic air selection control”, in order to prevent windows from fogging up.
Air conditioning switch
NOTE
If a problem is detect
ed in the air condition-
ing compressor, the “ ” indicator blinks. Press the air conditioni
ng switch once to turn
it off, then once more to turn it back on. If the“ ” indicator does not blink, there is no problem. If it does blink,
have it checked at
an authorized Mitsubish
i Motors dealer or a
repair facility of your choice. For example, sometimes after using a high- pressure car wash, the
condenser can get wet,
and the “ ” indicator blinks temporarily. Wait for a while, pres
s the air conditioning
switch once to turn the system off, then once more to turn it back on. Once the water evap-orates, the blinking will stop.
Personalizing the air conditioning switch (Changing the function set-ting)
BK0239700US.book 10 ページ 2016年6月16日 木曜日 午前10時58分