2017 MERCEDES-BENZ S-Class MAYBACH battery
[x] Cancel search: batteryPage 81 of 382

KEYLESS-GOstart function
Gene ral notes
Bear in min dthat th eengin ecan be started by
any of th evehicl eoccupant sif there is aSmart -
Key in th evehicl e (
Ypage 147).
Changing the settings ofthe locking
system
You can chang eth esetting sof th elocking sys-
tem. This mean sthat only th edriver's door and
th efuel filler flap are unlocke dwhen th evehicl e
is unlocked. This is useful if you frequentl ytravel
on your own .
XTo change th esetting: press and hold down
th e% and& buttons simultaneousl y
for approximately six seconds until th ebat -
tery chec klamp (
Ypage 80 )flashes twice .
If th esetting of th elocking system is changed
within th esignal range of th evehicle, pressing
th e& or% button:
Rlocks or
Runlocks th evehicl e
The SmartKey no wfunction sas follows :
XTo unlock: press the% buttononce .
XTo unlock centrally: press the% button
twice .
XTo lock: press the& button.
The KEYLESS-GO function scan be changed as
follows :
XTo unlock th edriver's door :touch th einner
surfac eof th edoor handle on th edriver's
door .
XTo unlock centrally: touch theinner surfac e
of th edoor handle on th efront-passenger
door or th erear door .
XTo lock centrally: touch theouter sensor
surfac eon on eof th edoor handles .
XTo restoreth efactory settings: press and
hold th e% and& buttons simultane -
ousl yfor approximately six seconds until th e
battery chec klamp (
Ypage 80) flashes
twice .
Mechanical key
Gene ral notes
If th evehicl ecan no longer be locke dor
unlocke dwit hth eSmartKey or KEYLESS-GO ,
use th emechanical key.
If you use th emechanical ke yto unloc kand
open th edriver's door ,th eanti-thef talarm sys-
te m will be triggered .Switc hoff th ealarm
(
Ypage 76) .
If you unloc kth evehicl eusin gth emechanical
key, th efuel filler flap will no tbe unlocke dauto -
matically.
XTo unlock th efuel filler flap: insert the
SmartKey int oth eignition lock.
Removing the mechanical key
XPush release catch :in th edirection of th e
arrow and at th esam etime remove mechan -
ical ke y; from th eSmartKey.
Fo rfurther information about :
RLocking/unlocking thedriver's door
(Ypage 84 )
RUnlocking th etrunk (Ypage 90 )
Inserting the mechanical key
XPush mechanical ke y; completely int oth e
SmartKey until it engage sand release
catch :is bac kin it sbasic position .
SmartKey79
Opening and closing
Z
Page 82 of 382
SmartKey battery
Important safety notes
GWARNING
Batteries contain toxic and corrosive substan- ces. If batteries are swallowed, it can result in
severe health problems. There is a risk of fatalinjury.
Keep batteries out of the reach of children. If
a battery is swallowed, seek medical attention immediately.
HEnvironmental note
Batteries contain dangerous
substances. It is against the
law to dispose of them with
the household rubbish. They
must be collected separatelyand recycled to protect the
environment.
Dispose of batteries in an
environmentally friendly
manner. Take discharged
batteries to a qualified spe-
cialist workshop or a special
collection point for used bat-
teries.
The SmartKey batteries contain perchlorate
material, which may require special handling
and regard for the environment. National guide-
lines must be observed during disposal. In Cal-
ifornia, see www.dtsc.ca.gov/
HazardousWaste/Perchlorate/index.cfm.
Mercedes-Benz recommends that you have the
batteries replaced at a qualified specialist work-
shop.
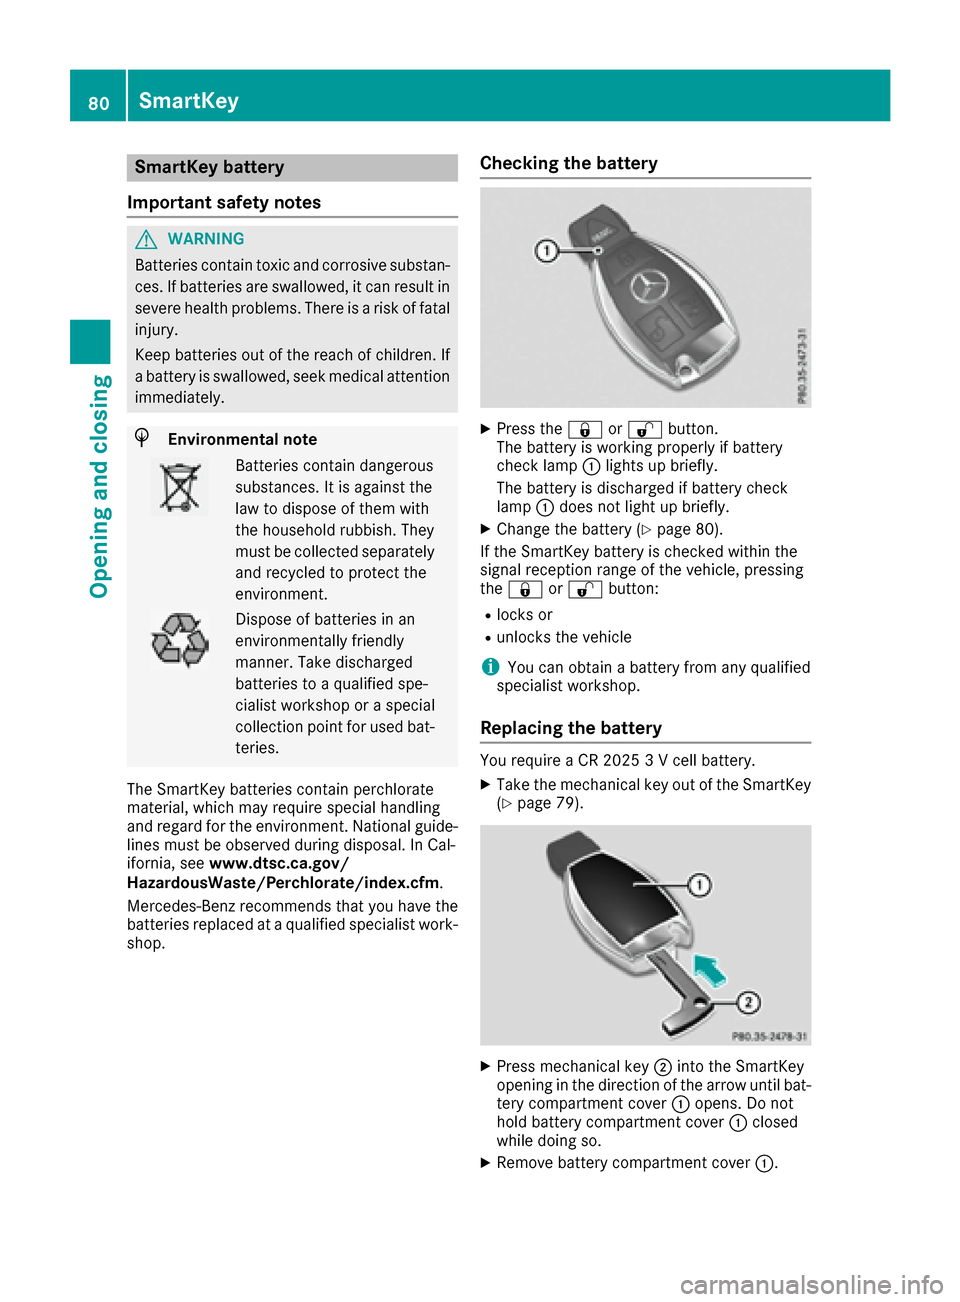
Checking the battery
XPress the &or% button.
The battery is working properly if battery
check lamp :lights up briefly.
The battery is discharged if battery check
lamp :does not light up briefly.
XChange the battery (Ypage 80).
If the SmartKey battery is checked within the
signal reception range of the vehicle, pressing
the & or% button:
Rlocks or
Runlocks the vehicle
iYou can obtain a battery from any qualified
specialist workshop.
Replacing the battery
You require a CR 2025 3 V cell battery.
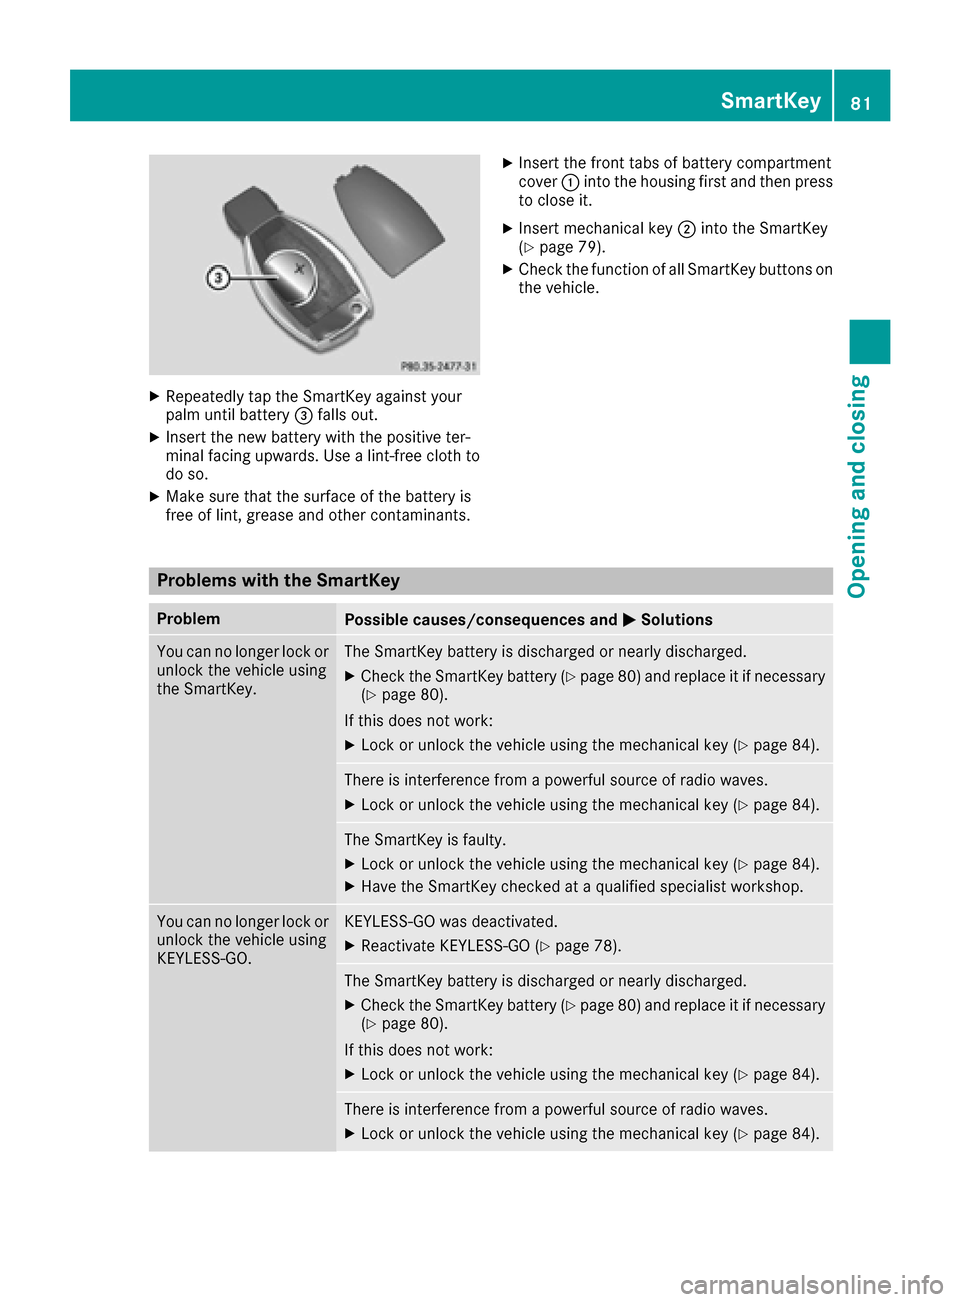
XTake the mechanical key out of the SmartKey
(Ypage 79).
XPress mechanical key ;into the SmartKey
opening in the direction of the arrow until bat-
tery compartment cover :opens. Do not
hold battery compartment cover :closed
while doing so.
XRemove battery compartment cover :.
80SmartKey
Opening and closing
Page 83 of 382
XRepeatedly tap theSmartKey against your
palm until battery =falls out .
XInsertth ene wbattery wit hth epositive ter-
minal facing upwards. Use alint-free cloth to
do so.
XMak esur ethat th esurfac eof th ebattery is
free of lint, grease and other contaminants.
XInser tth efron ttab sof battery compartmen t
cover :intoth ehousing first and then press
to close it .
XInsertmechanical ke y; intoth eSmartKey
(Ypage 79).
XChec kth efunction of all SmartKey buttons on
th evehicle.
Problems with the SmartKey
ProblemPossible causes/consequences and MSolutions
You can no longer lockor
unlock th evehicl eusin g
th eSmartKey.The SmartKey battery is discharged or nearly discharged.
XChec kth eSmartKey battery (Ypage 80) and replace it if necessar y
(Ypage 80).
If this does no twork:
XLoc kor unlock th evehicl eusin gth emechanical ke y (Ypage 84).
There is interferenc efrom apowerful source of radi owaves.
XLoc kor unlock th evehicl eusin gth emechanical ke y (Ypage 84).
The SmartKey is faulty.
XLockor unlock th evehicl eusin gth emechanical ke y (Ypage 84).
XHaveth eSmartKey checke dat aqualified specialist workshop.
You can no longer loc kor
unlock th evehicl eusin g
KEYLESS-GO .KEYLESS-GO was deactivated.
XReactivateKEYLESS-GO (Ypage 78).
The SmartKey battery is discharged or nearly discharged.
XCheckth eSmartKey battery (Ypage 80) and replace it if necessar y
(Ypage 80).
If this does no twork:
XLoc kor unlock th evehicl eusin gth emechanical ke y (Ypage 84).
There is interferenc efrom apowerful source of radi owaves.
XLoc kor unlock th evehicl eusin gth emechanical ke y (Ypage 84).
SmartKey81
Opening and closing
Z
Page 84 of 382

ProblemPossible causes/consequences andMSolutions
KEYLESS-GO is malfunctioning.
XLock/unlock the vehicle using the remote control function of the
SmartKey.
XHave the vehicle and SmartKey checked at a qualified specialist
workshop.
If the vehicle can also not be locked/unlocked using the remote con-
trol function:
XLock or unlock the vehicle using the mechanical key (Ypage 84).
XHave the vehicle and SmartKey checked at a qualified specialist
workshop.
The engine cannot be
started using the Smart-
Key.The on-board voltage is too low.
XSwitch off non-essential consumers, e.g. seat heating or interior
lighting, and try to start the engine again.
If this does not work:
XCheck the starter battery and charge it if necessary (Ypage 334).
or
XJump-start the vehicle (Ypage 335).
or
XConsult a qualified specialist workshop.
The engine cannot be
started using the Start/
Stop button. The Smart-
Key is in the vehicle.The vehicle is locked.
XUnlock the vehicle and try to start the vehicle again.
The SmartKey battery is discharged or nearly discharged.
XCheck the SmartKey battery (Ypage 80) and replace it if necessary
(Ypage 80).
If this does not work:
XStart your vehicle with the SmartKey in the ignition lock.
There is interference from a powerful source of radio waves.
XStart your vehicle with the SmartKey in the ignition lock.
You have lost a Smart-
Key.XHave the SmartKey deactivated at a qualified specialist workshop.
XReport the loss immediately to the vehicle insurers.
XIf necessary, have the locks changed as well.
You have lost the
mechanical key.XReport the loss immediately to the vehicle insurers.
XIf necessary, have the locks changed as well.
82SmartKey
Opening and closing
Page 92 of 382
XTo deactivate:open the glove box.
XPush the switch to position :.
If the vehicle is unlocked centrally, the trunk
will also be unlocked.
Unlocking the trunk using the
mechanical key
General notes
Use the mechanical key if the trunk lid can no
longer be unlocked:
Rusing the SmartKey
Rusing HANDS-FREE ACCESS
Rusing the remote operating switch in the door
control panel
!The trunk lid swings upwards when opened.
Therefore, make sure that there is sufficient
clearance above the trunk lid.
The opening dimensions of the trunk lid can be
found in the "Vehicle data" section
(
Ypage 376).
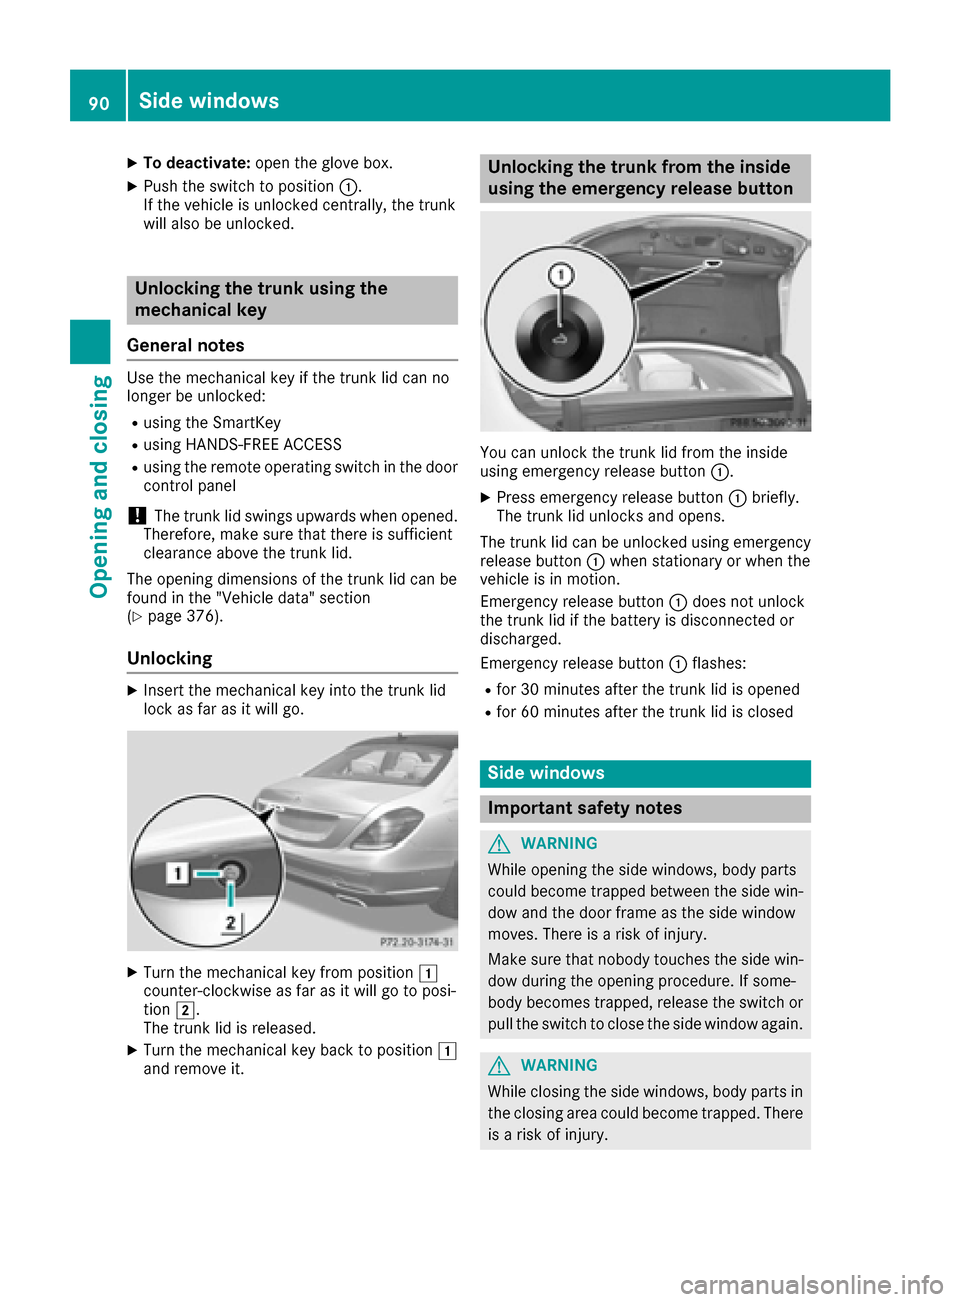
Unlocking
XInsert the mechanical key into the trunk lid
lock as far as it will go.
XTurn the mechanical key from position 1
counter-clockwise as far as it will go to posi-
tion 2.
The trunk lid is released.
XTurn the mechanical key back to position 1
and remove it.
Unlocking the trunk from the inside
using the emergency release button
You can unlock the trunk lid from the inside
using emergency release button :.
XPress emergency release button :briefly.
The trunk lid unlocks and opens.
The trunk lid can be unlocked using emergency
release button :when stationary or when the
vehicle is in motion.
Emergency release button :does not unlock
the trunk lid if the battery is disconnected or
discharged.
Emergency release button :flashes:
Rfor 30 minutes after the trunk lid is opened
Rfor 60 minutes after the trunk lid is closed
Side windows
Important safety notes
GWARNING
While opening the side windows, body parts
could become trapped between the side win-
dow and the door frame as the side window
moves. There is a risk of injury.
Make sure that nobody touches the side win-
dow during the opening procedure. If some-
body becomes trapped, release the switch or
pull the switch to close the side window again.
GWARNING
While closing the side windows, body parts in
the closing area could become trapped. There is a risk of injury.
90Side windows
Opening and closing
Page 115 of 382
limited temperature sensitivity or a limited
ability to react to excessively high tempera-
tures may be affected or they may even suffer
burn-like injuries. There is a risk of injury.
Therefore, do not switch the seat heating on
repeatedly.
For vehicles equipped with the Warmth Comfort
package: the armrest in the door and the center
console can also be heated when you switch on
the seat heating of one of the front seats. You
can set this via the multimedia system; see the
Digital Operator's Manual.
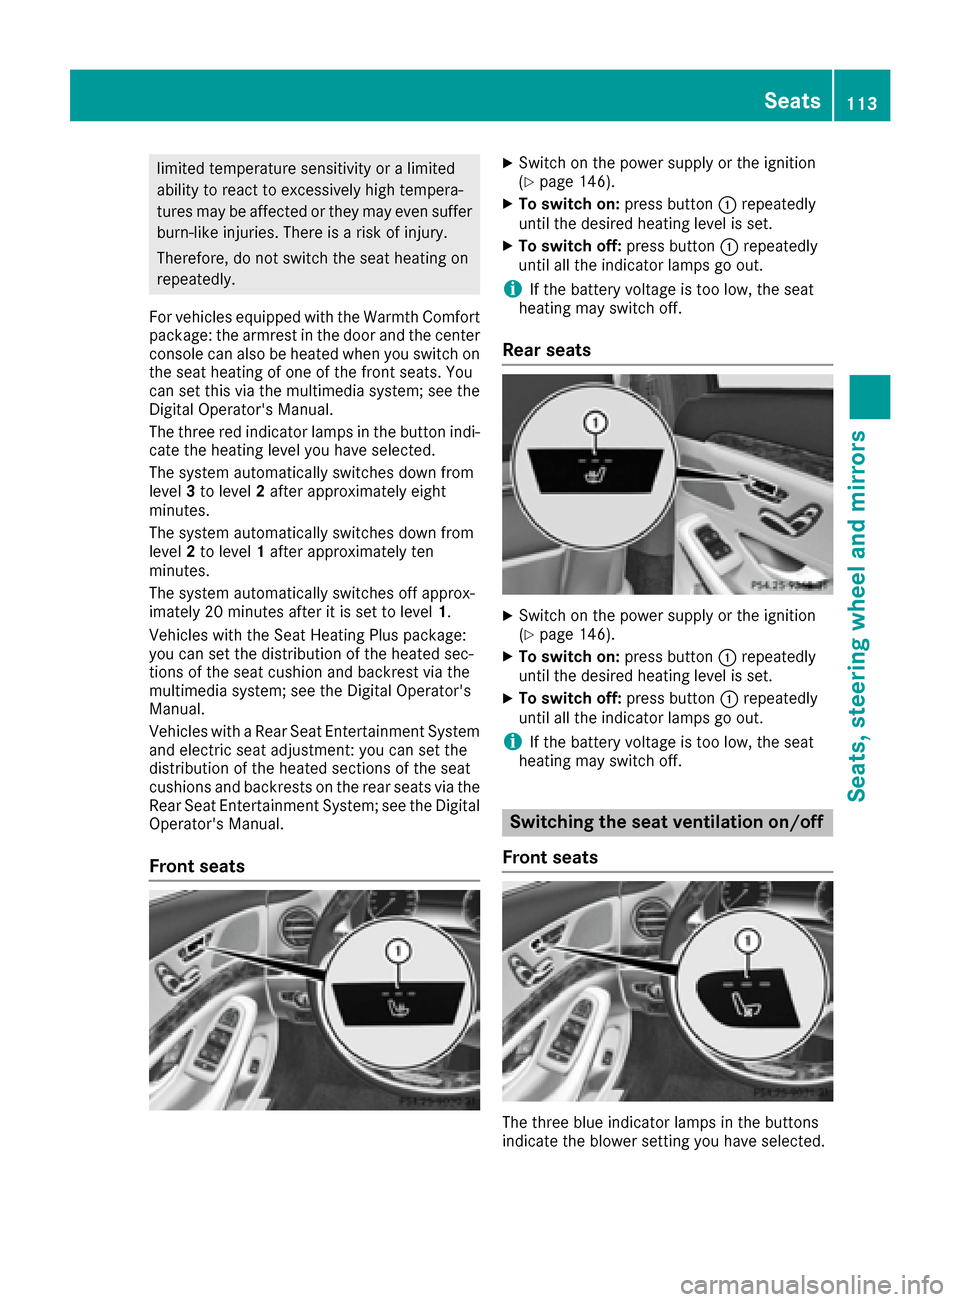
The three red indicator lamps in the button indi-
cate the heating level you have selected.
The system automatically switches down from
level 3to level 2after approximately eight
minutes.
The system automatically switches down from
level 2to level 1after approximately ten
minutes.
The system automatically switches off approx-
imately 20 minutes after it is set to level 1.
Vehicles with the Seat Heating Plus package:
you can set the distribution of the heated sec-
tions of the seat cushion and backrest via the
multimedia system; see the Digital Operator's
Manual.
Vehicles with a Rear Seat Entertainment System
and electric seat adjustment: you can set the
distribution of the heated sections of the seat
cushions and backrests on the rear seats via the
Rear Seat Entertainment System; see the Digital
Operator's Manual.
Front seats
XSwitch on the power supply or the ignition
(Ypage 146).
XTo switch on: press button:repeatedly
until the desired heating level is set.
XTo switch off: press button:repeatedly
until all the indicator lamps go out.
iIf the battery voltage is too low, the seat
heating may switch off.
Rear seats
XSwitch on the power supply or the ignition
(Ypage 146).
XTo switch on: press button:repeatedly
until the desired heating level is set.
XTo switch off: press button:repeatedly
until all the indicator lamps go out.
iIf the battery voltage is too low, the seat
heating may switch off.
Switching the seat ventilation on/off
Front seats
The three blue indicator lamps in the buttons
indicate the blower setting you have selected.
Seats113
Seats, steering wheel and mirrors
Z
Page 116 of 382
XSwitch on the power supply or the ignition
(Ypage 146).
XTo switch on:press button:repeatedly
until the desired blower setting is set.
XTo switch off: press button:repeatedly
until all the indicator lamps go out.
iIf the battery voltage is too low, the seat
ventilation may switch off.
iYou can open the side windows and the slid-
ing sunroof using the "Convenience opening"
feature (
Ypage 92). The seat ventilation of
the driver's seat automatically switches to the
highest level.
iWhen the vehicle is stationary, the fan
speed can be reduced automatically. This
reduces the noises of the seat ventilation.
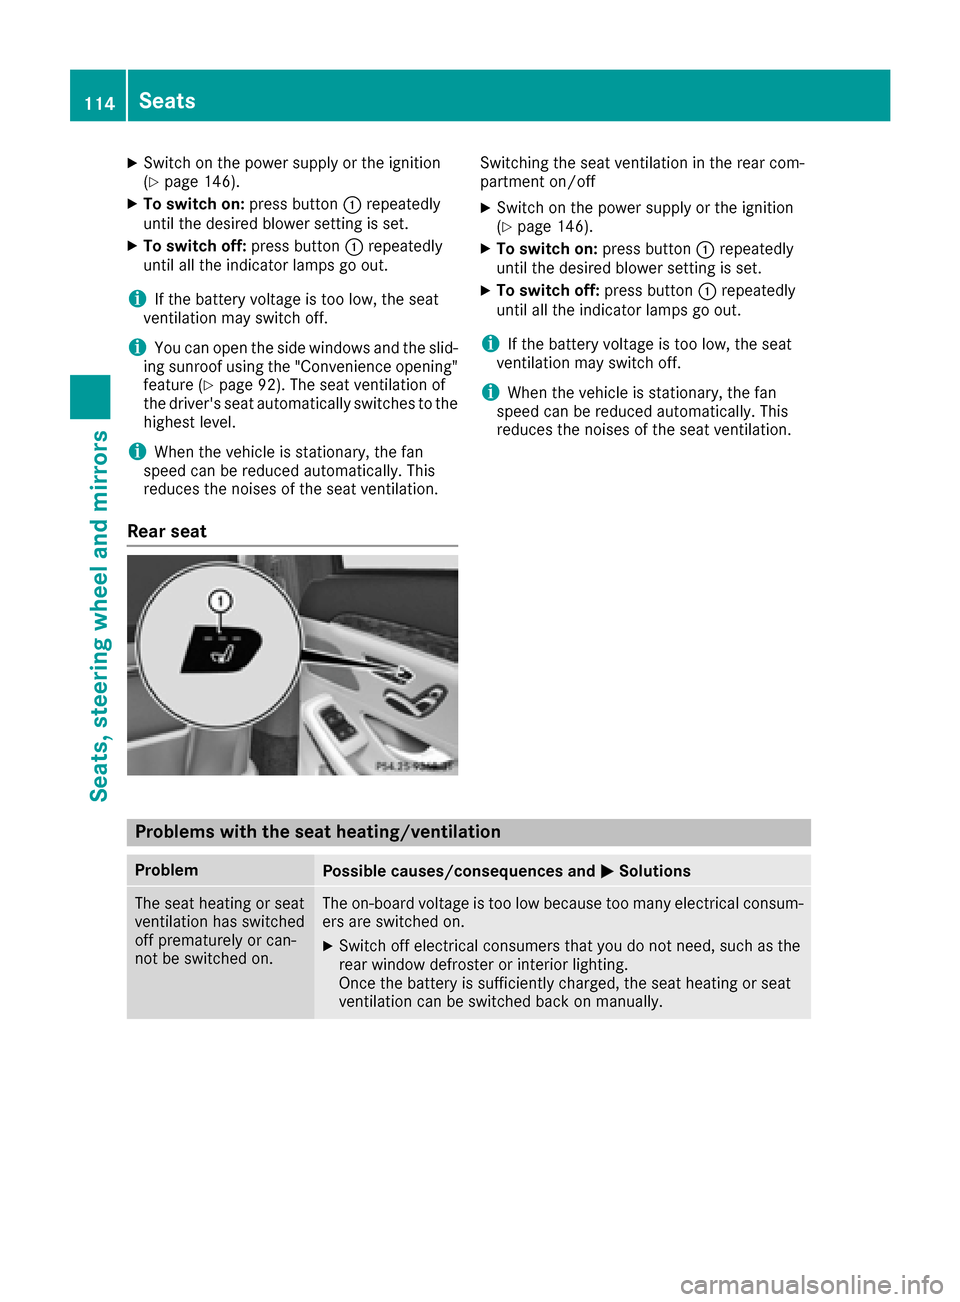
Rear seat
Switching the seat ventilation in the rear com-
partment on/off
XSwitch on the power supply or the ignition
(Ypage 146).
XTo switch on: press button:repeatedly
until the desired blower setting is set.
XTo switch off: press button:repeatedly
until all the indicator lamps go out.
iIf the battery voltage is too low, the seat
ventilation may switch off.
iWhen the vehicle is stationary, the fan
speed can be reduced automatically. This
reduces the noises of the seat ventilation.
Problems with the seat heating/ventilation
ProblemPossible causes/consequences and MSolutions
The seat heating or seat
ventilation has switched
off prematurely or can-
not be switched on.The on-board voltage is too low because too many electrical consum-
ers are switched on.
XSwitch off electrical consumers that you do not need, such as the
rear window defroster or interior lighting.
Once the battery is sufficiently charged, the seat heating or seat
ventilation can be switched back on manually.
114Seats
Seats, steering wheel and mirrors
Page 120 of 382
The indicator lamp goes out again after some
time. You can adjust the selected exterior
mirror using button:as long as the indicator
lamp is lit.
XPress button :up, down, or to the left or
right until you have adjusted the exterior mir- ror to the correct position. You should have a
good overview of traffic conditions.
The convex exterior mirrors provide a larger field of vision.
After the engine has been started, the exterior
mirrors are automatically heated if the rear win-
dow defroster is switched on and the outside
temperature is low.
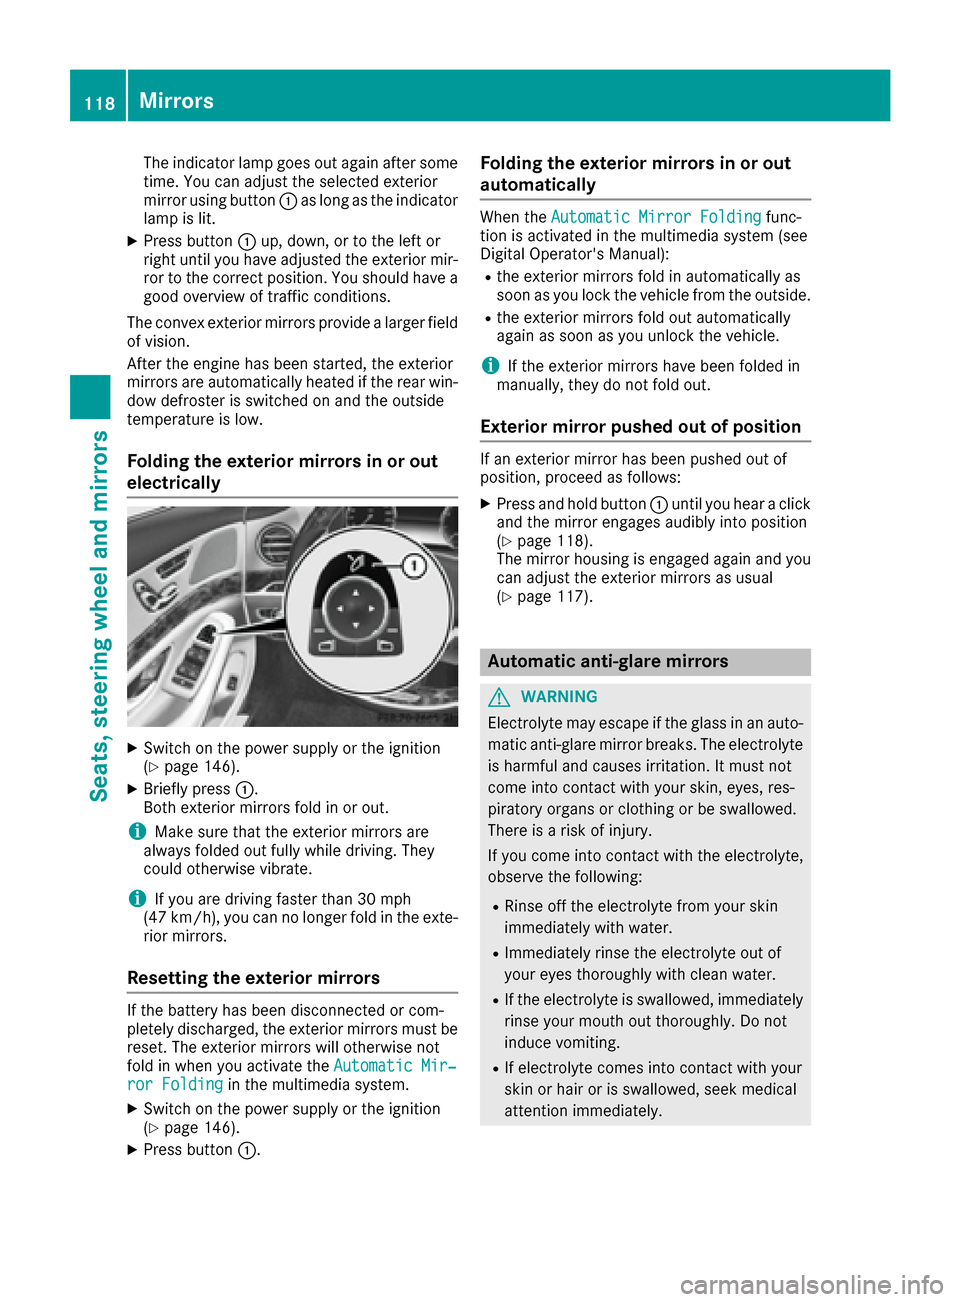
Folding the exterior mirrors in or out
electrically
XSwitch on the power supply or the ignition
(Ypage 146).
XBriefly press :.
Both exterior mirrors fold in or out.
iMake sure that the exterior mirrors are
always folded out fully while driving. They
could otherwise vibrate.
iIf you are driving faster than 30 mph
(47 km/h), you can no longer fold in the exte-
rior mirrors.
Resetting the exterior mirrors
If the battery has been disconnected or com-
pletely discharged, the exterior mirrors must be
reset. The exterior mirrors will otherwise not
fold in when you activate the Automatic Mir‐
ror Foldingin the multimedia system.
XSwitch on the power supply or the ignition
(Ypage 146).
XPress button:.
Folding the exterior mirrors in or out
automatically
When theAutomatic Mirror Foldingfunc-
tion is activated in the multimedia system (see
Digital Operator's Manual):
Rthe exterior mirrors fold in automatically as
soon as you lock the vehicle from the outside.
Rthe exterior mirrors fold out automatically
again as soon as you unlock the vehicle.
iIf the exterior mirrors have been folded in
manually, they do not fold out.
Exterior mirror pushed out of position
If an exterior mirror has been pushed out of
position, proceed as follows:
XPress and hold button :until you hear a click
and the mirror engages audibly into position
(
Ypage 118).
The mirror housing is engaged again and you
can adjust the exterior mirrors as usual
(
Ypage 117).
Automatic anti-glare mirrors
GWARNING
Electrolyte may escape if the glass in an auto-
matic anti-glare mirror breaks. The electrolyte
is harmful and causes irritation. It must not
come into contact with your skin, eyes, res-
piratory organs or clothing or be swallowed.
There is a risk of injury.
If you come into contact with the electrolyte,
observe the following:
RRinse off the electrolyte from your skin
immediately with water.
RImmediately rinse the electrolyte out of
your eyes thoroughly with clean water.
RIf the electrolyte is swallowed, immediately
rinse your mouth out thoroughly. Do not
induce vomiting.
RIf electrolyte comes into contact with your
skin or hair or is swallowed, seek medical
attention immediately.
118Mirrors
Seats, steering wheel and mirrors