2017 MERCEDES-BENZ S-Class COUPE reset
[x] Cancel search: resetPage 7 of 338

Switching off (ATA) .......................... 71
Switching the function on/off
(ATA) ................................................ 71
Alarm system
see ATA (Anti-Theft Alarm system)
Anti-lock braking system
see ABS (Anti-lock Braking System)
Anti-Theft Alarm system
see ATA (Anti-Theft Alarm system)
Armrest
Stowage compartment .................. 255
Ashtray ............................................... 259
Assistance display (on-board com-
puter) .................................................. 197
Assistance menu (on-board com-
puter) .................................................. 197
ASSYST PLUS
Displaying a service message ........ 279
Hiding a service message .............. 279
Resetting the service interval dis-
play ................................................ 279
Service message ............................ 278
Special service requirements ......... 279
ATA (Anti-Theft Alarm system)
Activating/deactivating ................... 71
Function ........................................... 71
Switching off the alarm .................... 71
ATTENTION ASSIST
Activating/deactivating ................. 199
Display message ............................ 219
Function/notes ............................. 175
Authorized Mercedes-Benz Center
see Qualified specialist workshop
Authorized workshop
see Qualified specialist workshop
AUTO lights
Display message ............................ 215
see Lights
Automatic car wash (care) ............... 280
Automatic engine start (ECO start/
stop function) .................................... 125
Automatic engine switch-off (ECO
start/stop function) .......................... 125
Automatic headlamp mode .............. 104
Automatic transmission
Accelerator pedal position ............. 131
Automatic drive program ............... 132 Changing gear ............................... 131
DIRECT SELECT lever ..................... 128
Display message ............................ 227
Drive program display .................... 129
Driving tips .................................... 131
Emergency running mode .............. 135
Engaging drive positi
on .................. 129
Eng
aging neutral ............................ 129
Engaging park position automati-
cally ............................................... 128
Engaging reverse gear ................... 128
Engaging the park position ............ 128
Kickdown ....................................... 131
Manual drive program .................... 132
Manual drive program (Mercedes-
AMG vehicles) ................................ 133
Oil temperature (on-board com-
puter, Mercedes-AMG vehicles) ..... 202
Overview ........................................ 128
Problem (malfunction) ................... 135
Program selector button ................ 131
Pulling away ................................... 124
Starting the engine ........................ 123
Steering wheel paddle shifters ...... 132
Transmission position display ........ 129
Transmission positions .................. 130
Automatic transmission emer-
gency mode ....................................... 135
AUX (audio)
Notes/socket ................................ 252
B
Back button ....................................... 243
Backup lamp
Display message ............................ 215
BAS (Brake Assist System) ................. 62
BAS PLUS (Brake Assist System
PLUS) with Cross-Traffic Assist
Function/notes ................................ 62
BAS PLUS with Cross-Traffic Assist
(Brake Assist PLUS with Cross-
Traffic Assist)
Important safety notes .................... 63
Battery (SmartKey)
Checking .......................................... 75
Important safety notes .................... 75
Replacing ......................................... 75
Index5
Page 19 of 338

Refrigerant (air-conditioning sys-
tem)Important safety notes .................. 334
Refueling
Fuel gauge ....................................... 34
Important safety notes .................. 135
see Fuel
Remote control
Garage door opener ....................... 268
Programming (garage door
opener) .......................................... 269
Replacing bulbs
General notes ................................ 108
Reporting safety defects .................... 29
Rescue card ......................................... 30
Reserve (fuel tank)
see Fuel
Reserve fuel
Display message ............................ 218
Warning lamp ................................. 237
Residual heat (climate control) ........ 116
Restraint system
Display message ............................ 211
Introduction ..................................... 41
Warning lamp ................................. 236
Warning lamp (function) ................... 42
Reversing feature
Roller sunblind ................................. 88
Side windows ................................... 85
Trunk lid ........................................... 80
ROAD SURFACE SCAN ....................... 158
Roadside Assistance (breakdown) .... 27
Roller sunblind
Panorama roof ................................. 88
Rear window .................................. 258
Roller sunblind for the panorama
roof
Opening and closing ........................ 89
Operating ......................................... 88
Resetting ......................................... 89
Roof lining and carpets (cleaning
guidelines) ......................................... 287
Roof load (maximum) ........................ 335
Route guidance
see also Digital Operator's Man-
ual .................................................. 242S
SafetyChildren in the vehicle ..................... 57
see Occupant safety
see Operating safety
Safety system
see Driving safety systems
SD card
Inserting/removing ........................ 251
SD memory card
see also Digital Operator's Man-
ual .................................................. 242
Selecting ........................................ 194
Search & Send
see also Digital Operator's Man-
ual .................................................. 242
Seat
Adjusting the front-passenger
seat from the driver's seat ............... 93
Seat belts
Adjusting the driver's and front-
passenger seat belt ......................... 46
Cleaning ......................................... 286
Correct usage .................................. 44
Fastening ......................................... 44
Important safety guidelines ............. 43
Introduction ..................................... 42
Releasing ......................................... 45
Warning lamp ................................. 232
Warning lamp (function) ................... 46
Seating
Seating comfort package ................. 95
Seating comfort package ................... 95
Seats
Active multicontour seat .................. 95
Adjusting (electrically) ..................... 92
Adjusting the 4-way lumbar sup-
port .................................................. 95
Adjusting the head restraint ............ 93
Calling up a stored setting (mem-
ory function) .................................. 103
Cleaning the cover ......................... 286
Correct driver's seat position ........... 91
EASY-ENTRY/EXIT system ............... 99
Folding the backrests forward/
back ................................................. 95
Important safety notes .................... 91
Index17
Page 20 of 338

Seat backrest display message ..... 229
Seat heating .................................... 96
Seat heating problem ...................... 97
Seat ventilation ................................ 96
Storing settings (memory func-
tion) ............................................... 103
Switching AIRSCARF on/off ............ 97
Switching seat heating on/off ......... 96
Switching seat ventilation on/off .... 96
Section
Wheels and tires ............................ 303
Securing a load
see Securing cargo
Securing cargo .................................. 256
Selector lever
Cleaning ......................................... 286
see Automatic transmission
Sensors (cleaning instructions) ....... 284
Service menu (on-board com-
puter) .................................................. 197
Service message
see ASSYST PLUS
Service products
Brake fluid ..................................... 333
Coolant (engine) ............................ 333
Engine oil ....................................... 332
Fuel ................................................ 331
Important safety notes .................. 330
Refrigerant (air-conditioning sys-
tem) ............................................... 334
Washer fluid ................................... 334
Setting the date/time format
see also Digital Operator's Man-
ual .................................................. 242
Setting the language
see also Digital Operator's Man-
ual .................................................. 242
Setting the time
see also Digital Operator's Man-
ual .................................................. 242
Settings
Factory (on-board computer) ......... 202
On-board computer ....................... 197
SETUP (on-board computer) ............. 202
Side impact air bag ............................. 48
Side marker lamp (display mes-
sage) ................................................... 215 Side windows
Cleaning ......................................... 283
Convenience closing feature ............ 87
Convenience opening feature .......... 86
Important safety information ........... 85
Opening/closing .............................. 86
Problem (malfunction) ..................... 88
Resetting ......................................... 87
Reversing feature ............................. 85
SIRIUS services
see also Digital Opera
tor's Man-
ual .................................................. 242
SmartKey
Changing the battery ....................... 75
Changing the programming ............. 74
Checking the battery ....................... 75
Convenience closing feature ............ 87
Convenience opening feature .......... 86
Display message ............................ 230
Door central locking/unlocking ....... 72
Important safety notes .................... 72
KEYLESS-GO start function .............. 74
Loss ................................................. 76
Mechanical key ................................ 74
Overview .......................................... 72
Positions (ignition lock) ................. 121
Problem (malfunction) ..................... 76
Starting the engine ........................ 123
Smartphone
Starting the engine ........................ 123
SMS
see also Digital Operator's Man-
ual .................................................. 242
Snow chains ...................................... 305
Sockets
Center console .............................. 260
General notes ................................ 260
Rear compartment ......................... 260
Trunk ............................................. 260
Sound
Switching on/off ........................... 243
Special seat belt retractor .................. 57
Specialist workshop ............................ 29
Speed, controlling
see Cruise control
Speedometer
Activating/deactivating the addi-
tional speedometer ........................ 201
18Index
Page 23 of 338

Sidewall (definition) ....................... 321
Snow chains .................................. 305
Speed rating (definition) ................ 320
Storing ........................................... 322
Structure and characteristics
(definition) ..................................... 319
Summer tires in winter .................. 305
Temperature .................................. 316
TIN (Tire Identification Number)
(definition) ..................................... 321
Tire bead (definition) ...................... 321
Tire pressure (definition) ................ 321
Tire pressures (recommended) ...... 320
Tire size (data) ............................... 326
Tire size designation, load-bearing
capacity, speed rating .................... 316
Tire tread ....................................... 304
Tire tread (definition) ..................... 321
Total load limit (definition) ............. 321
Traction ......................................... 315
Traction (definition) ....................... 321
Tread wear ..................................... 315
Uniform Tire Quality Grading
Standards ...................................... 315
Uniform Tire Quality Grading
Standards (definition) .................... 319
Wear indicator (definition) ............. 321
Wheel and tire combination ........... 326
Wheel rim (definition) .................... 320
see Flat tire
Top Tether ............................................ 60
Touchpad
Changing the station/music
track .............................................. 245
Character suggestions ................... 244
Deleting characters ....................... 245
Entering a space ............................ 245
Entering characters ....................... 244
Gesture control .............................. 244
Handwriting recognition ................ 245
Operating the touchpad ................. 244
Overview ........................................ 244
Quick access for Audio .................. 245
Quick access for telephone ........... 245
Switching ....................................... 244
Switching input line ....................... 245
Tow-starting
Emergency engine starting ............ 300 Important safety notes .................. 298
Towing away
Important safety guidelines ........... 298
Installing the towing eye ................ 299
No
tes for 4MATIC vehicles ............ 300
Removing the towing eye ............... 299
Transporting the vehicle ................ 300
With both axles on the ground ....... 299
Towing eye ......................................... 288
Traffic reports
see also Digital Operator's Man-
ual .................................................. 242
Traffic Sign Assist
Activating ....................................... 176
Display message ............................ 223
Function/notes ............................. 176
Important safety notes .................. 176
Instrument cluster display ............. 177
Switching on/off ........................... 198
Transfer case ..................................... 135
Transmission
see Automatic transmission
Transporting the vehicle .................. 300
Trim pieces (cleaning instruc-
tions) .................................................. 286
Trip computer (on-board com-
puter) .................................................. 191
Trip odometer
Calling up ....................................... 190
Resetting (on-board computer) ...... 191
Trunk
Emergency release .......................... 84
Emergency release button ............... 85
Important safety notes .................... 80
Locking separately ........................... 84
Opening ........................................... 81
Opening/closing (automatically
from inside) ...................................... 83
Opening/closing (automatically
from outside) ................................... 81
Opening/closing (from outside,
HANDS-FREE ACCESS) .................... 82
Power closing .................................. 79
Trunk lid
Display message ............................ 229
Obstacle recognition ........................ 80
Opening dimensions ...................... 335
Index21
Page 31 of 338

Diagnostics connection
The diagnosticsconnection is only intended fo r
th econnection of diagnostic equipmen tat a
qualified specialis tworkshop .
GWARNING
If you connec tequipmen tto adiagnostic s
connection in th evehicle, it may affec tth e
operation of vehicle systems .As aresult ,th e
operatin gsafet yof th evehicle could be affec -
ted. There is aris kof an accident.
Only connec tequipmen tto adiagnostic scon-
nection in th evehicle, whic his approved fo r
your vehicle by Mercedes-Benz.
GWARNING
Objects in th edriver's footwell can restric tth e
peda ltrave lor obstruct adepressed pedal.
The operatin gand road safet yof th evehicle is
jeopardized. There is aris kof an accident.
Mak esur ethat all objects in th evehicle are
stowed correctly, and that they canno tente r
th edriver's footwell. Install th efloormat s
securely and as specifie din order to ensur e
sufficien tclearanc efo rth epedals. Do no tuse
loose floormat sand do no tplac efloormat son
to pof on eanother.
!If th eengin eis switched of fand equipmen t
on th ediagnostic sconnection is used ,th e
starter battery may discharge.
Connectin gequipmen tto th ediagnostic scon-
nection can lead to emission smonitorin ginfor-
mation bein greset ,fo rexample. Thi smay lead
to th evehicle failin gto mee tth erequirements of
th enext emission stest durin gth emain inspec-
tion .
Qualified specialist workshop
An authorized Mercedes-Ben zCente ris aquali-
fie dspecialis tworkshop .It has th enecessary
specialis tknowledge ,tools and qualification sto
correctl ycarry out th ewor krequire don your
vehicle. Thi sis especially th ecas efo rwor krel -
evant to safety.
Observ eth enote sin th eMaintenance Booklet .Always hav
eth efollowin gwor kcarrie dout at an
authorized Mercedes-Ben zCenter:
Rwor krelevant to safet y
Rserviceand maintenance wor k
Rrepair work
Ralterations, installation wor kand modifica-
tion s
Rworkon electronic component s
Correct use
If you remov eany warnin gstickers ,you or oth-
ers could fail to recogniz ecertain dangers.
Leave warnin gstickers in position .
Observ eth efollowin ginformation when drivin g
your vehicle:
Rth esafet ynote sin this manual
Rtechnical dat afo rth evehicle
Rtraffic rule sand regulation s
Rlaws and safetystandard spertainin gto moto r
vehicles
Problem swit hyou rvehicle
If you should experience aproblem wit hyour
vehicle, particularly on ethat you believe may
affec tit s saf eoperation ,we urg eyou to contact
an authorized Mercedes-Ben zCente rimmedi-
ately to hav eth eproblem diagnosed and recti -
fied. If th eproblem is no tresolved to your sat -
isfaction ,please discus sth eproblem again wit h
an authorized Mercedes-Ben zCente ror ,if nec-
essary, contact us at on eof th efollowin g
addresses.
In th eUSA
Customer Assistanc eCente r
Mercedes-Ben zUSA, LL C
3 Mercedes Drive
Montvale, NJ 07645-0350
In Canad a
Customer Relation sDepartmen t
Mercedes-Ben zCanada, Inc.
98 Vanderhoo fAvenue
Toronto ,Ontario M4 G4C9
Reporting safet ydefect s
USAonly:
Operating safety29
Introduction
Z
Page 88 of 338

GWARNING
The reversing feature does not react:
Rto soft, light and thin objects, e.g. small fin-
gers
Rwhile resetting
This means that the reversing feature cannot
prevent someone being trapped in these sit-
uations. There is a risk of injury.
Make sure that no body parts are in close
proximity during the closing procedure. If
someone becomes trapped, press the switch
to open the side window again.
Opening and closing the side win-
dows
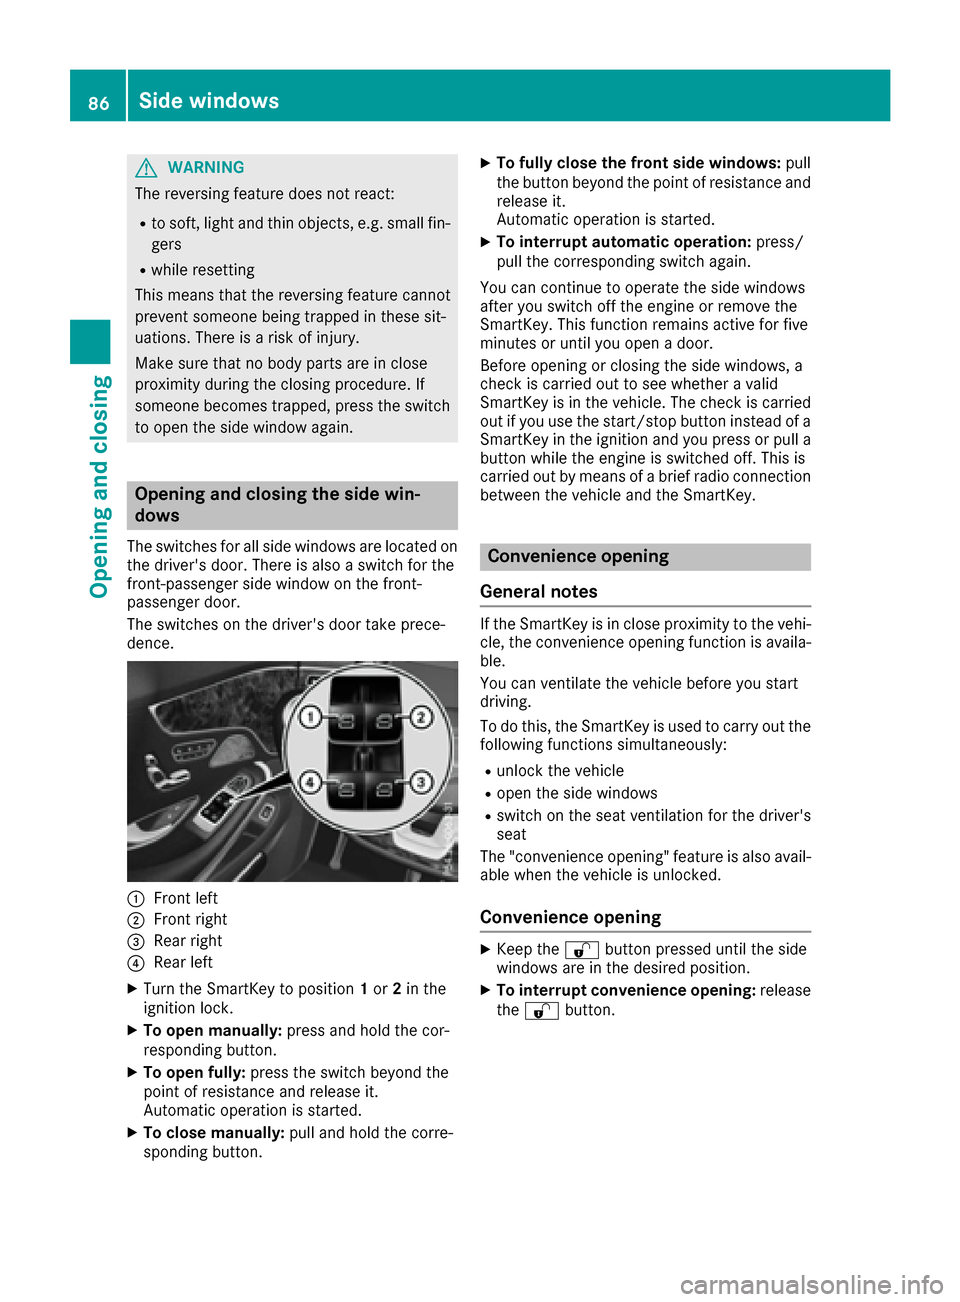
The switches for all side windows are located on the driver's door. There is also a switch for the
front-passenger side window on the front-
passenger door.
The switches on the driver's door take prece-
dence.
0043Front left
0044Front right
0087Rear right
0085Rear left
XTurn the SmartKey to position 1or 2in the
ignition lock.
XTo open manually: press and hold the cor-
responding button.
XTo open fully: press the switch beyond the
point of resistance and release it.
Automatic operation is started.
XTo close manually: pull and hold the corre-
sponding button.
XTo fully close the front side windows: pull
the button beyond the point of resistance and
release it.
Automatic operation is started.
XTo interrupt automatic operation: press/
pull the corresponding switch again.
You can continue to operate the side windows
after you switch off the engine or remove the
SmartKey. This function remains active for five
minutes or until you open a door.
Before opening or closing the side windows, a
check is carried out to see whether a valid
SmartKey is in the vehicle. The check is carried out if you use the start/stop button instead of a
SmartKey in the ignition and you press or pull a
button while the engine is switched off. This is
carried out by means of a brief radio connection
between the vehicle and the SmartKey.
Convenience opening
General notes
If the SmartKey is in close proximity to the vehi-
cle, the convenience opening function is availa-
ble.
You can ventilate the vehicle before you start
driving.
To do this, the SmartKey is used to carry out the
following functions simultaneously:
Runlock the vehicle
Ropen the side windows
Rswitch on the seat ventilation for the driver's
seat
The "convenience opening" feature is also avail-
able when the vehicle is unlocked.
Convenience opening
XKeep the 0036button pressed until the side
windows are in the desired position.
XTo interrupt convenience opening: release
the 0036 button.
86Side windows
Opening and closing
Page 89 of 338

Convenience closing feature
Important safety notes
GWARNING
When using the convenience closing feature,
parts of the body could be trapped in the clos-
ing area when a side window is being closed.
There is a risk of injury.
Observe the complete closing procedure
when the convenience closing feature is oper-
ating. Make sure that no body parts are in
close proximity during the closing procedure.
When you lock the vehicle, you can close the
windows at the same time.
You can then close the roller sunblinds.
iNotes on the automatic reversing feature
for:
Rthe side window (Ypage 85)
Rthe roller sunblind (Ypage 88)
Using the SmartKey
XPress and hold the 0037button until the side
windows are fully closed.
XMake sure that all the side windows are
closed.
XPress and hold the 0037button again until the
roller sunblinds of the panorama roof close.
XTo interrupt convenience closing: release
the 0037 button.
Using KEYLESS-GO
The SmartKey must be outside the vehicle. All
the doors must be closed.
XTouch recessed sensor surface 0043on the
door handle until the side windows are fully
closed.
iMake sure you only touch recessed sensor
surface 0043.
XMake sure that all the side windows are
closed.
XTouch recessed sensor surface 0043on the
door handle again until the roller sunblind of
the panorama roof closes.
XTo interrupt convenience closing: release
recessed sensor surface 0043on the door han-
dle.
Resetting the side windows
If a side window can no longer be closed fully,
you must reset it.
XClose all the doors.
XTurn the SmartKey to position 1or 2in the
ignition lock.
XPull the corresponding switch on the door
control panel until the side window is com-
pletely closed (
Ypage 86).
XHold the switch for an additional second.
If the side window opens again slightly:
XImmediately pull the corresponding switch on
the door control panel until the side window is
completely closed (
Ypage 86).
XHold the switch for an additional second.
XIf the respective side window remains closed
after the button is released, then it has been
set correctly. If this is not the case, repeat the
steps above.
Side windows87
Opening and closing
Z
Page 90 of 338

Problems with the side windows
GWARNING
If you close a side window again immediately after it has been blocked or reset, the side window
closes with increased or maximum force. The reversing feature is then not active. Parts of the
body could be trapped in the closing area in the process. This poses an increased risk of injury or
even fatal injury.
Make sure that no parts of the body are in the closing area. To stop the closing process, release
the switch or push the switch again to reopen the side window.
ProblemPossible causes/consequences and 0050Solutions
A side window cannot be
closed because it is
blocked by objects, e.g.
leaves in the window
guide.XRemove the objects.
XClose the side window.
A side window cannot be
closed and you cannot
see the cause.If a side window is obstructed during closing and reopens again
slightly:
XImmediately after the window blocks, pull the corresponding switch
again until the side window has closed.
The side window is closed with increased force.
If a side window is obstructed again during closing and reopens again slightly:
XImmediately after the window blocks, pull the corresponding switchagain until the side window has closed.
The sliding sunroof is closed without the automatic reversing fea-
ture.
Panorama roof
Operating the roller sunblind for the
panorama roof
Important safety notes
GWARNING
Parts of the body could become trapped
between the roller sunblind and frame or dur-
ing opening or closing. There is a risk of injury. When opening or closing, make sure that no
body parts are in the sweep of the roller sun-
blind.
If somebody becomes trapped:
Rrelease the switch immediately, or
Rduring automatic operation, push the
switch briefly in any direction
The opening or closing procedure will be stop- ped.
The roller sunblind shields the vehicle interior
from sunlight.
Roller sunblind reversing feature
The roller sunblind is equipped with an auto-
matic reversing feature. If an object blocks or
restricts the roller sunblind during the closing
process, the roller sunblind automatically opens
again a little. The automatic reversing feature is only an aid and is not a substitute for your atten-
tion when closing the roller sunblind.
GWARNING
The reversing feature does not react in par-
ticular to soft, light and thin objects, e.g. small
fingers. This means that the reversing feature
88Panorama roof
Opening and closing