2017 MERCEDES-BENZ S-Class COUPE remove seats
[x] Cancel search: remove seatsPage 27 of 338

Protecting the environment
General notes
HEnvironmental note
Daimler's declared policy is one of compre-
hensive environmental protection.
The objectives are for the natural resources
that form the basis of our existence on this
planet to be used sparingly and in a manner
that takes the requirements of both nature
and humanity into account.
You too can help to protect the environment
by operating your vehicle in an environmen-
tally responsible manner.
Fuel consumption and the rate of engine,
transmission, brake and tire wear are affected by these factors:
Roperating conditions of your vehicle
Ryour personal driving style
You can influence both factors. You should
bear the following in mind:
Operating conditions:
Ravoid short trips as these increase fuel con-
sumption.
Ralways make sure that the tire pressures
are correct.
Rdo not carry any unnecessary weight.
Rremove roof racks once you no longer need
them.
Ra regularly serviced vehicle will contribute
to environmental protection. You should
therefore adhere to the service intervals.
Ralways have service work carried out at a
qualified specialist workshop.
Personal driving style:
Rdo not depress the accelerator pedal when
starting the engine.
Rdo not warm up the engine when the vehicle
is stationary.
Rdrive carefully and maintain a safe distance
from the vehicle in front.
Ravoid frequent, sudden acceleration and
braking.
Rchange gear in good time and use each gear
only up to 00C3of its maximum engine speed.
Rswitch off the engine in stationary traffic.
Rkeep an eye on the vehicle's fuel consump-
tion.
Environmental concerns and recom-
mendations
Wherever the operating instructions require you
to dispose of materials, first try to regenerate or
re-use them. Observe the relevant environmen-
tal rules and regulations when disposing of
materials. In this way you will help to protect the
environment.
Genuine Mercedes-Benz parts
HEnvironmental note
Daimler AG also supplies reconditioned major
assemblies and parts which are of the same
quality as new parts. They are covered by the
same Limited Warranty entitlements as new
parts.
!Air bags and Emergency Tensioning Devi-
ces, as well as control units and sensors for
these restraint systems, may be installed in
the following areas of your vehicle:
Rdoors
Rdoor pillars
Rdoor sills
Rseats
Rcockpit
Rinstrument cluster
Rcenter console
Do not install accessories such as audio sys-
tems in these areas. Do not carry out repairs or welding. You could impair the operating
efficiency of the restraint systems.
Have aftermarket accessories installed at a
qualified specialist workshop.
You could jeopardize the operating safety of
your vehicle if you use parts, tires and wheels as
well as accessories relevant to safety which
have not been approved by Mercedes-Benz. This
could lead to malfunctions in safety-relevant
Genuine Mercedes-Benz parts25
Introduction
Z
Page 61 of 338

Replacechild restrain tsystems whic hhav e
been damaged or subjecte dto aload in an
acciden tas soo nas possible. Hav eth esecur-
ing systems on th echild restrain tsystem
checke dat aqualified specialist workshop,
before you instal l achild restrain tsystem
again .
The securin gsystems of child restrain tsystems
are:
Rth eseat belt system
Rth eLATCH-type (ISOFIX) securin grings
Rth eTop Tether anchorages
If it is absolutely necessar yto carry achild on
th efront-passenger seat ,be sur eto observ eth e
information on th e"Occupant Classification
Syste m(OCS)" (
Ypage 49). There you will also
fin dinformation on deactivating th efront-
passenger fron tair bag.
All child restrain tsystems mus tmee tth efol -
lowin gstandards :
RU.S. Federal Motor Vehicl eSafet yStandards
21 3and 22 5
RCanadian Motor Vehicl eSafet yStandards
21 3and 210. 2
Confirmation that th echild restrain tsystem cor-
responds to th estandards can be foun don an
instruction label on th echild restrain tsystem.
This confirmation can also be foun din th einstal -
lation instruction sthat are included wit hth e
child restrain tsystem.
Observ eth ewarning labels in th evehicl einte-
rio rand on th ech ild re
strain
tsystem.
LATCH-type (ISOFIX) child seat secur-
ing system
GWARNIN G
LATCH-type (ISOFIX) child restrain tsystems
do no toffer sufficien tprotective effec tfor
children whos eweigh tis greate rthan 48 lbs
(22 kg )who are secured usin gth esafet ybelt
integrate din th echild restrain tsystem. In th e
event of an accident, achild might no tbe
restrained correctly. This poses an increased
ris kof injury or eve nfatal injury.
If th echild weigh smor ethan 48 lbs (22 kg),
only use LATCH-type (ISOFIX) child restrain t
systems withwhic hth echild is also secured
wit hth evehicl eseat belt .Als osecure th e
child restrain tsystem wit hth eTop Tether
belt ,if available.
Always comply wit hth emanufacturer' sinstal -
lation and operating instruction sfor th echild
restrain tsystem used .
Befor eevery trip, mak esur ethat th eLATCH -
typ e(ISOFIX) child restrain tsystem is engage d
correctl yin bot hLATCH-type (ISOFIX) securin g
rings
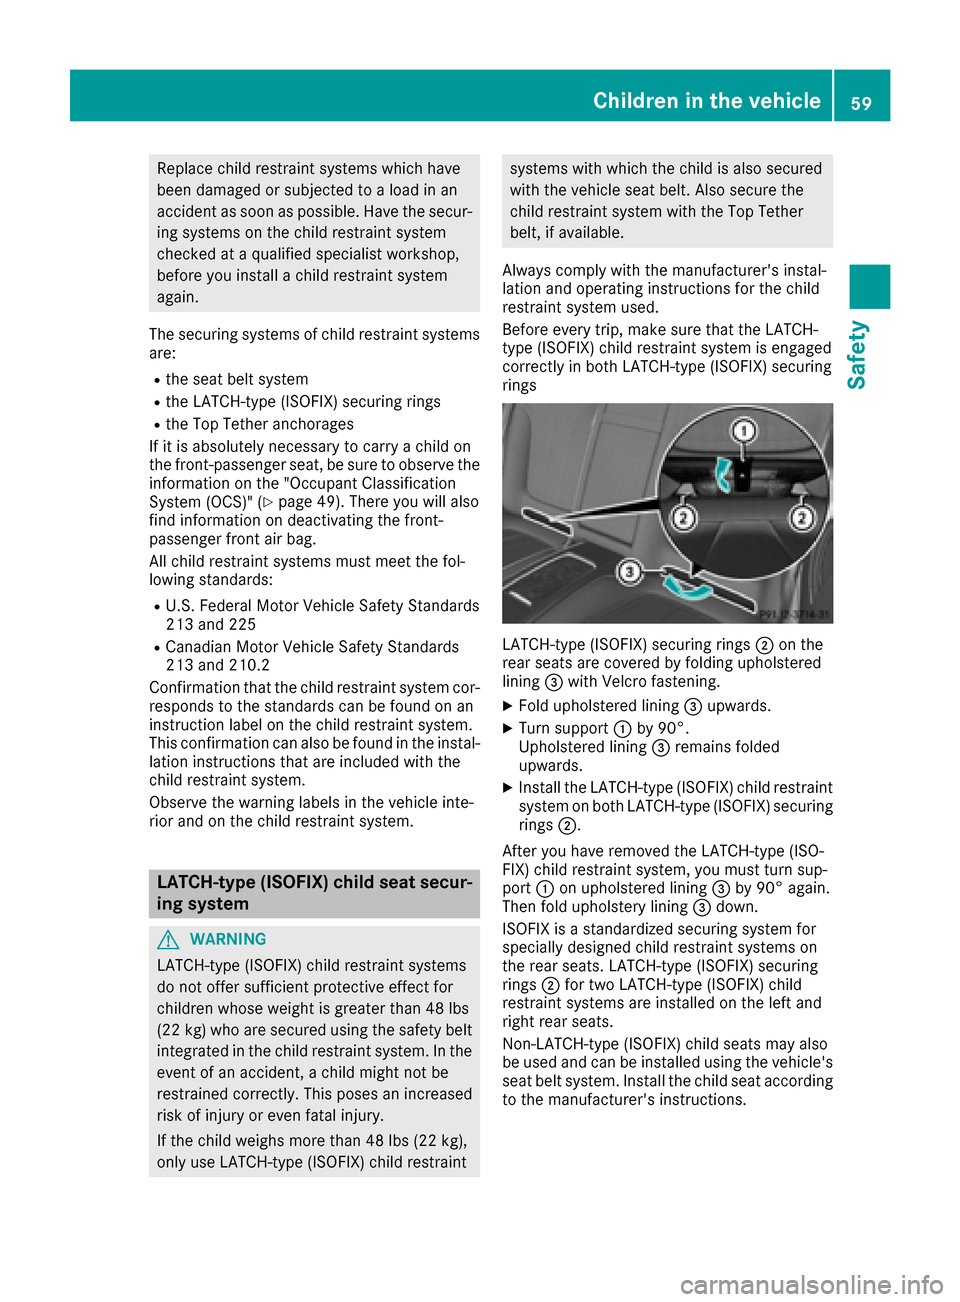
LATCH-type (ISOFIX) securin grings 0044on th e
rear seat sare covered by foldin gupholstere d
lining 0087withVelcro fastening.
XFold upholstere dlining 0087upwards.
XTurn support 0043by 90°.
Upholstere dlining 0087remain sfolded
upwards.
XInstall th eLATCH-type (ISOFIX) child restrain t
system on bot hLATCH-type (ISOFIX) securin g
rings 0044.
Afte ryou hav eremove dth eLATCH-type (ISO-
FIX) child restrain tsystem, you mus ttur nsup-
por t0043 on upholstere dlining 0087by 90 °again .
The nfol dupholstery lining 0087down .
ISOFIX is astandardize dsecurin gsystem for
specially designed child restrain tsystems on
th erear seats. LATCH-type (ISOFIX) securin g
rings 0044for two LATCH-type (ISOFIX) child
restrain tsystems are installed on th elef tand
right rear seats.
Non-LATCH-typ e(ISOFIX) child seat smay also
be used and can be installed usin gth evehicle's
seat belt system. Install th echild seat according
to th emanufacturer' sinstructions.
Children in the vehicle59
Safety
Z
Page 101 of 338

Problems with the steering wheel heating
ProblemPossible causes/consequences and0050Solutions
The steering wheel heat-
ing has switched off pre-
maturely or cannot be
switched on.The on-board voltage is too low because too many electrical consum-
ers are switched on.
XSwitch off electrical consumers that you do not need, such as the
rear window defroster or interior lighting.
EASY-ENTRY/EXIT feature
Important safety notes
GWARNING
When the EASY-ENTRY/EXIT feature adjusts
the steering wheel and the driver's seat, you
and other vehicle occupants – particularly
children – could become trapped. There is a
risk of injury.
While the EASY-ENTRY/EXIT feature is mak-
ing adjustments, make sure that no one has
any body parts in the sweep of the seat and
the steering wheel.
If there is a risk of becoming trapped by
Rthe steering wheel: move the steering
wheel adjustment lever.
Rthe seat: press the switch for seat adjust-
ment.
The adjustment process is stopped.
You can stop the adjustment process by press-
ing one of the memory function's position but-
tons. This function is only available on vehicles
with memory function.
GWARNING
If children activate the EASY-ENTRY/EXIT fea-
ture, they can become trapped, particularly
when unattended. There is a risk of injury.
When leaving the vehicle, always take the
SmartKey with you and lock the vehicle. Never
leave children unsupervised in the vehicle.
GWARNING
If you drive off while the EASY-ENTRY/EXIT
feature is making adjustments, you could lose
control of the vehicle. There is a risk of an
accident.
Always wait until the adjustment process is
complete before driving off.
The EASY-ENTRY/EXIT feature makes getting in
and out of your vehicle easier.
You can activate and deactivate the EASY-
ENTRY/EXIT feature using the multimedia sys-
tem (see the Digital Operator's Manual).
Position of the steering wheel and the
driver's seat when the EASY-ENTRY/
EXIT feature is active
The steering wheel tilts upwards and the driver's seat moves backwards if you:
Rremove the SmartKey from the ignition lock
Rwith the start/stop button: open the driv-
er's door; the ignition must be switched off
Rwith the SmartKey: open the driver's door;
the SmartKey must be in position 0or 1in the
ignition lock (
Ypage 121)
iThe steering wheel only tilts upwards and
the driver's seat only moves backwards if the
driving position is stored after the seat or
steering column has been adjusted.
The last position of the steering wheel or seat is
stored if:
Rthe ignition is switched off
Rthe setting is stored with the memory function
(Ypage 103).
iThe steering wheel only moves upwards if it
has not already reached the upper stop. The
driver's seat only moves backwards if it is not
already in the rearmost position.
Steering wheel99
Seats, steering wheel and mirrors
Z
Page 102 of 338

Position of the steering wheel and the
driver's seat for driving
The steering wheel and the driver's seat are
moved to the previously set position if:
Rthe driver's door is closed and you insert the
SmartKey into the ignition lock
Ryou close the driver's door when the ignition
is switched on
Ryou press the Start/Stop button once
iThe steering wheel and the driver's seat only
return to the last set position if the driving
position is stored after the seat or steering
column has been adjusted.
The last position of the steering wheel or seat is
stored if:
Rthe ignition is switched off
Rthe setting is stored with the memory function
(Ypage 103).
Crash-responsive EASY-EXIT feature
If the crash-responsive EASY-EXIT feature is trig-
gered in an accident, the steering column will
move upwards when the driver's door is opened
or the SmartKey is removed from the ignition
lock. This makes it easier to exit the vehicle and rescue the occupants.
The crash-responsive EASY-EXIT feature is only
operational if the EASY-EXIT/ENTRY feature is
activated in the multimedia system (see the sep-
arate Operator's Manual).
Mirrors
Exterior mirrors
Important safety notes
GWARNING
You could lose control of your vehicle if you do the following while driving:
Radjust the driver's seat, head restraint,
steering wheel or mirrors
Rfasten the seat belt
There is a risk of an accident.
Adjust the driver's seat, head restraint, steer- ing wheel and mirror and fasten your seat belt
before starting the engine.
GWARNING
The exterior mirror on the front-passenger
side reduces the size of the image. Visible
objects are actually closer than they appear.
This means that you could misjudge the dis-
tance from road users traveling behind, e.g.
when changing lane. There is a risk of an acci-
dent.
For this reason, always make sure of the
actual distance from the road users traveling
behind by glancing over your shoulder.
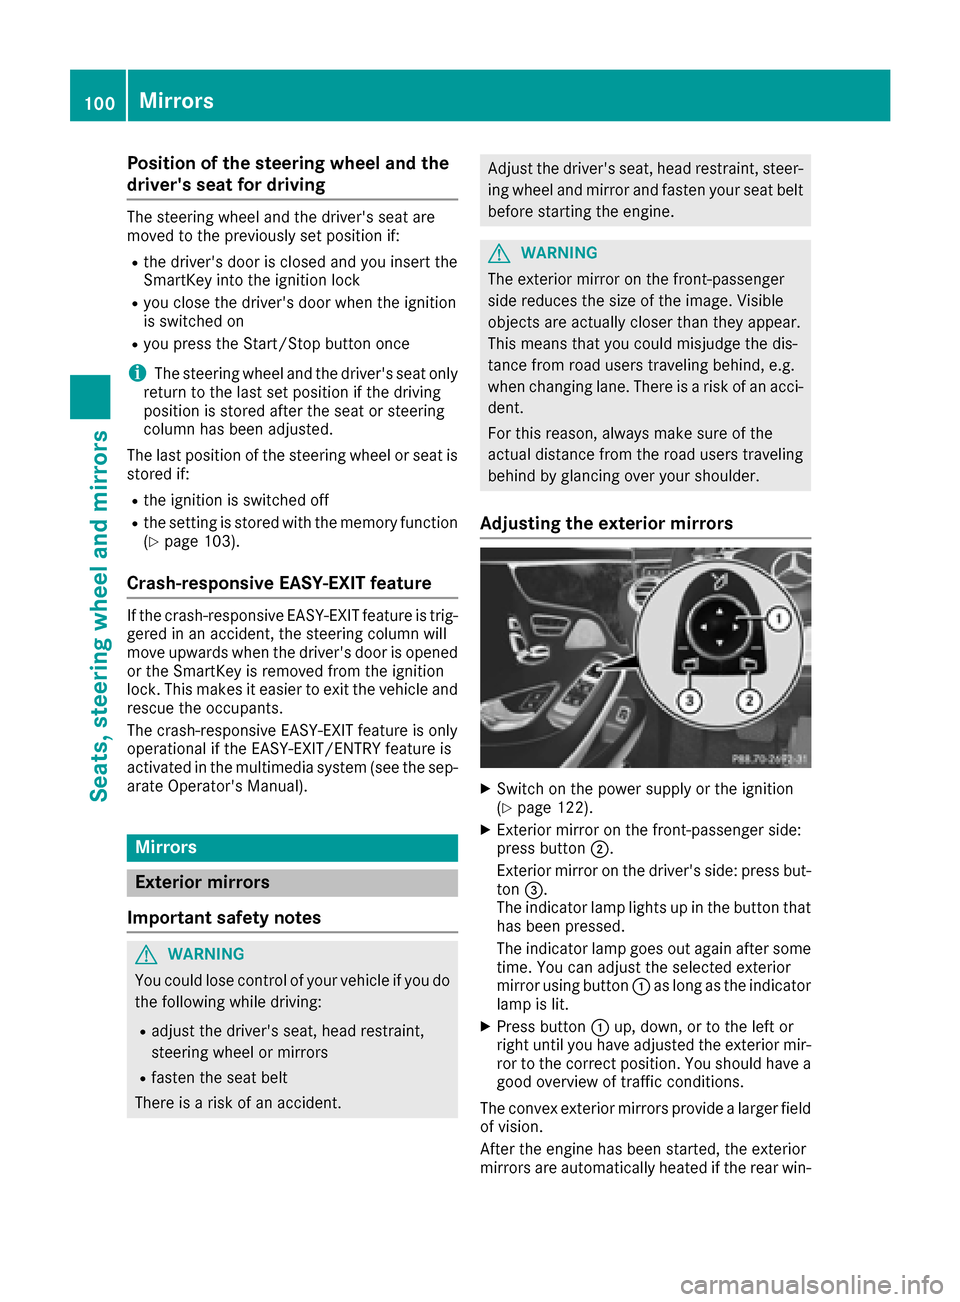
Adjusting the exterior mirrors
XSwitch on the power supply or the ignition
(Ypage 122).
XExterior mirror on the front-passenger side:
press button 0044.
Exterior mirror on the driver's side: press but-
ton 0087.
The indicator lamp lights up in the button that
has been pressed.
The indicator lamp goes out again after some
time. You can adjust the selected exterior
mirror using button 0043as long as the indicator
lamp is lit.
XPress button 0043up, down, or to the left or
right until you have adjusted the exterior mir- ror to the correct position. You should have a
good overview of traffic conditions.
The convex exterior mirrors provide a larger field of vision.
After the engine has been started, the exterior
mirrors are automatically heated if the rear win-
100Mirrors
Seats, steering wheel and mirrors
Page 295 of 338

immediately. Do not drive any further. You
should have all work involving the battery car-ried out at a qualified specialist workshop.
For further information about ABS (
Ypage 62)
and ESP®(Ypage 66).
Mercedes-AMG vehicles:
GWARNING
Electrostatic build-up can lead to the creation of sparks, which could ignite the highly explo-
sive gases of a battery. There is a risk of an
explosion.
Before handling the battery, touch the vehicle
body to remove any existing electrostatic
build-up.
The highly flammable gas mixture forms when
charging the battery as well as when jump-start-
ing.
Always make sure that neither you nor the bat-
tery is electrostatically charged. A build-up of
electrostatic charge can be caused, for exam-
ple:
Rby wearing clothing made from synthetic
fibers
Rdue to friction between clothing and seats
Rif you push or pull the battery across the car-
pet or other synthetic materials
Rif you wipe the battery with a cloth
GWARNING
During the charging process, a battery produ-
ces hydrogen gas. If a short circuit occurs or
sparks are created, the hydrogen gas can
ignite. There is a risk of an explosion.
RMake sure that the positive terminal of a
connected battery does not come into con- tact with vehicle parts.
RNever place metal objects or tools on a bat-
tery.
RIt is important that you observe the descri-
bed order of the battery terminals when
connecting and disconnecting a battery.
RWhen jump-starting, make sure that the
battery poles with identical polarity are
connected.
RIt is particularly important to observe the
described order when connecting and dis-
connecting the jumper cables.
RNever connect or disconnect the battery
terminals while the engine is running.
GWARNING
Battery acid is caustic. There is a risk of injury.
Avoid contact with skin, eyes or clothing. Do
not inhale any battery gases. Do not lean over
the battery. Keep children away from batter-
ies. Wash away battery acid immediately with
plenty of clean water and seek medical atten-
tion.
All vehicles:
HEnvironmental note
Batteries contain dangerous
substances. It is against the
law to dispose of them with
the household rubbish. They
must be collected separately and recycled to protect the
environment.
Dispose of batteries in an
environmentally friendly
manner. Take discharged
batteries to a qualified spe-
cialist workshop or a special
collection point for used bat-
teries.
!Have the battery checked regularly at a
qualified specialist workshop.
Observe the service intervals in the Mainte-
nance Booklet or contact a qualified specialist
workshop for more information.
Battery (vehicle)293
Breakdown assistance
Z