2017 MERCEDES-BENZ S-Class COUPE reset
[x] Cancel search: resetPage 91 of 338
cannot prevent someone being trapped in
these situations. There is a risk of injury.
When closing the roller sunblind, make sure
that no body parts are in the sweep area.
If somebody becomes trapped:
Rrelease the switch immediately, or
Rpress the switch in any direction during the
automatic closing process
The closing process is stopped.
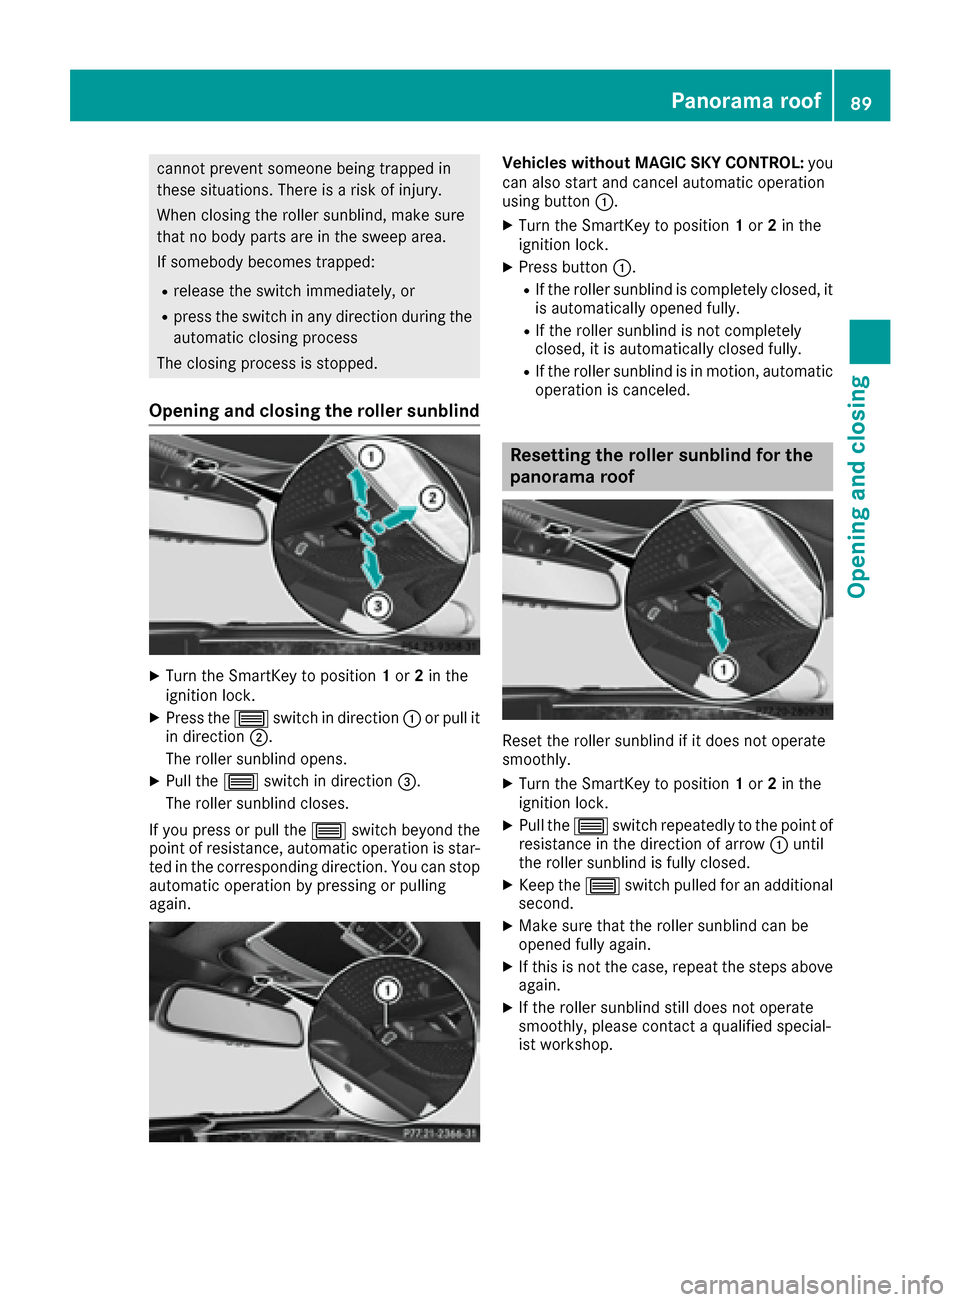
Opening and closing the roller sunblind
XTurn the SmartKey to position 1or 2in the
ignition lock.
XPress the 0057switch in direction 0043or pull it
in direction 0044.
The roller sunblind opens.
XPull the 0057switch in direction 0087.
The roller sunblind closes.
If you press or pull the 0057switch beyond the
point of resistance, automatic operation is star-
ted in the corresponding direction. You can stop
automatic operation by pressing or pulling
again.
Vehicles without MAGIC SKY CONTROL: you
can also start and cancel automatic operation
using button 0043.
XTurn the SmartKey to position 1or 2in the
ignition lock.
XPress button 0043.
RIf the roller sunblind is completely closed, it
is automatically opened fully.
RIf the roller sunblind is not completely
closed, it is automatically closed fully.
RIf the roller sunblind is in motion, automatic
operation is canceled.
Resetting the roller sunblind for the
panorama roof
Reset the roller sunblind if it does not operate
smoothly.
XTurn the SmartKey to position 1or 2in the
ignition lock.
XPull the 0057switch repeatedly to the point of
resistance in the direction of arrow 0043until
the roller sunblind is fully closed.
XKeep the 0057switch pulled for an additional
second.
XMake sure that the roller sunblind can be
opened fully again.
XIf this is not the case, repeat the steps above
again.
XIf the roller sunblind still does not operate
smoothly, please contact a qualified special-
ist workshop.
Panorama roof89
Opening and closing
Z
Page 103 of 338

dow defroster is switched on and the outside
temperature is low.
Folding the exterior mirrors in or outelectrically
XSwitch on the power supply or the ignition
(Ypage 122).
XBriefly press 0043.
Both exterior mirrors fold in or out.
iMake sure that the exterior mirrors are
always folded out fully while driving. They
could otherwise vibrate.
iIf you are driving faster than 30 mph
(47 km/h), you can no longer fold in the exte-
rior mirrors.
Resetting the exterior mirrors
If the battery has been disconnected or com-
pletely discharged, the exterior mirrors must be
reset. The exterior mirrors will otherwise not
fold in when you activate the Automatic Mir‐
ror Foldingin the multimedia system.
XSwitch on the power supply or the ignition
(Ypage 122).
XPress button0043.
Folding the exterior mirrors in or out
automatically
When theAutomatic Mirror Foldingfunc-
tion is activated in the multimedia system (see
Digital Operator's Manual):
Rthe exterior mirrors fold in automatically as
soon as you lock the vehicle from the outside.
Rthe exterior mirrors fold out automatically
again as soon as you unlock the vehicle.
iIf the exterior mirrors have been folded in
manually, they do not fold out.
Exterior mirror pushed out of position
If an exterior mirror has been pushed out of
position, proceed as follows:
XPress and hold button 0043until you hear a click
and the mirror engages audibly into position
(
Ypage 101).
The mirror housing is engaged again and you
can adjust the exterior mirrors as usual
(
Ypage 100).
Automatic anti-glare mirrors
GWARNING
Electrolyte may escape if the glass in an auto-
matic anti-glare mirror breaks. The electrolyte
is harmful and causes irritation. It must not
come into contact with your skin, eyes, res-
piratory organs or clothing or be swallowed.
There is a risk of injury.
If you come into contact with the electrolyte,
observe the following:
RRinse off the electrolyte from your skin
immediately with water.
RImmediately rinse the electrolyte out of
your eyes thoroughly with clean water.
RIf the electrolyte is swallowed, immediately
rinse your mouth out thoroughly. Do not
induce vomiting.
RIf electrolyte comes into contact with your
skin or hair or is swallowed, seek medical
attention immediately.
RImmediately change out of clothing which
has come into contact with electrolyte.
RIf an allergic reaction occurs, seek medical
attention immediately.
The exterior mirror on the driver's side and the
rear-view mirror automatically go into anti-glare
mode if:
Rthe ignition is switched on
Rincident light from headlamps strikes the sen-
sor in the rear-view mirror
Mirrors101
Seats, steering wheel and mirrors
Z
Page 105 of 338
pants – particularly children – could become
trapped. There is a risk of injury.
While the memory function is making adjust-
ments, make sure that no one has any body
parts in the sweep of the seat or steering
wheel. If somebody becomes trapped, imme-diately release the memory function position
button. The adjustment process is stopped.
GWARNING
Children could become trapped if they acti-
vate the memory function, particularly when
unattended. There is a risk of injury.
When leaving the vehicle, always take the
SmartKey with you and lock the vehicle. Never
leave children unsupervised in the vehicle.
The memory function can be used at any time,
even if the power supply is switched off.
Storing settings
With the memory function, you can store up to
three different settings, e.g. for three different
people.
The following settings are stored as a single
memory preset:
Rseat, backrest, head restraint position and
contour of the backrest in the lumbar region
Ractive multicontour seat: side bolsters of the
backrest, shoulder of the backrest, contour of the backrest, dynamic function level
Rseat heating: distribution of the heated sec-
tions of the seat cushion and backrest
Rdriver's side: position of the exterior mirrors
on the driver's and front-passenger sides
Rposition of the head-up display
XAdjust the seat accordingly (Ypage 92).
XOn the driver's side, adjust the steering wheel(Ypage 98) and the exterior mirrors
(Ypage 100).
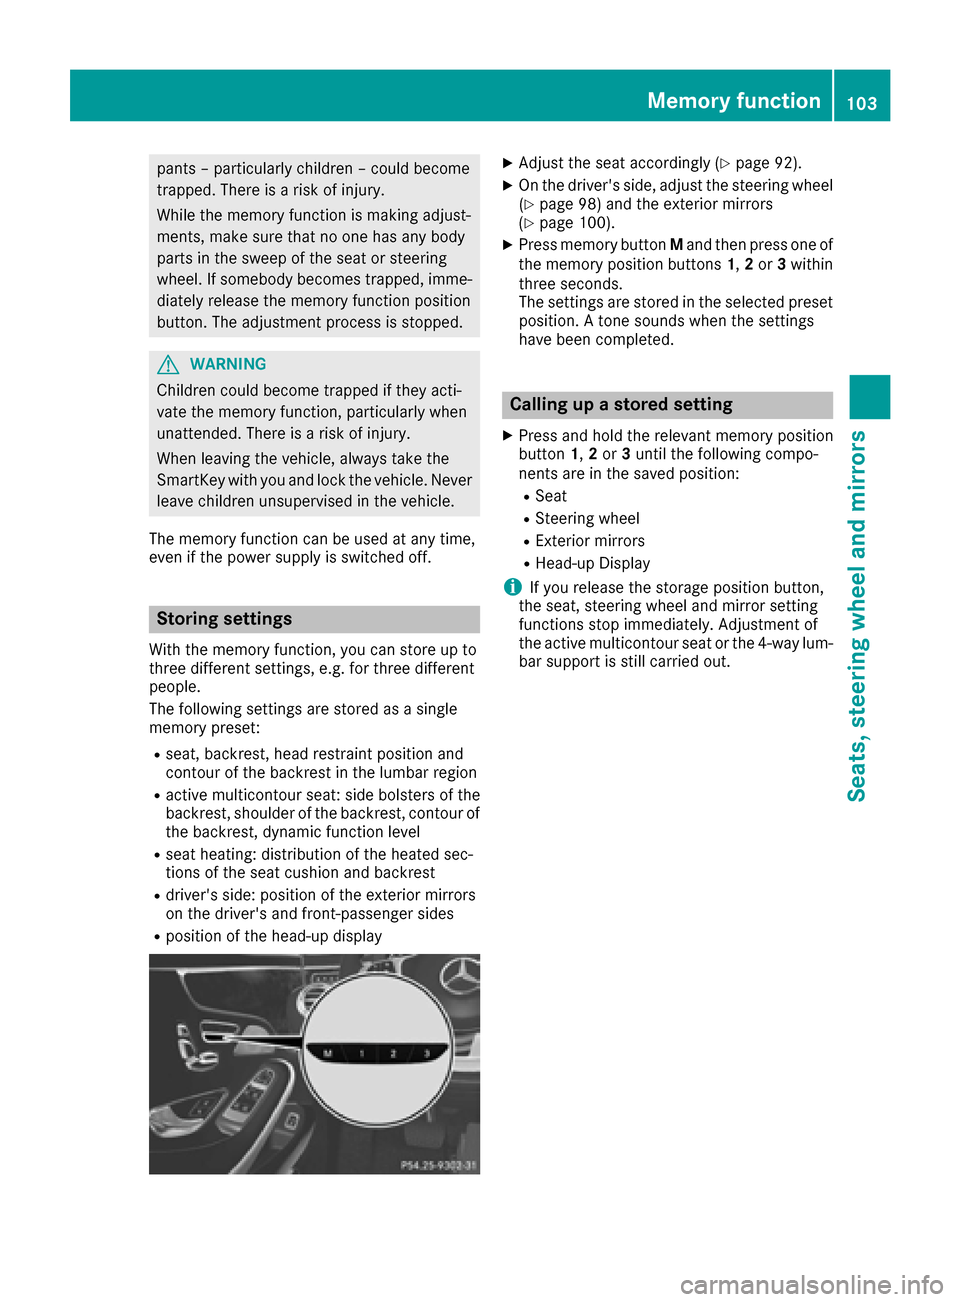
XPress memory button Mand then press one of
the memory position buttons 1,2or 3within
three seconds.
The settings are stored in the selected preset
position. A tone sounds when the settings
have been completed.
Calling up a stored setting
XPress and hold the relevant memory position
button 1,2or 3until the following compo-
nents are in the saved position:
RSeat
RSteering wheel
RExterior mirrors
RHead-up Display
iIf you release the storage position button,
the seat, steering wheel and mirror setting
functions stop immediately. Adjustment of
the active multicontour seat or the 4-way lum-
bar support is still carried out.
Memory function103
Seats, steering wheel and mirrors
Z
Page 144 of 338
The percent value is the average value of the
three bars. The three bars and the mean value
begin at the value of 50%. A higher percentage
indicates a more economical driving style.
The ECO display does not indicate the actual fuel
consumption. A fixed percentage count in the
ECO display does not indicate a fixed consump-
tion.
Apart from driving style, consumption is
dependent on many factors such as, e.g.:
RLoad
RTire pressure
RCold start
RChoice of route
RActive electrical consumers
These factors are not included in the ECO dis-
play.
The evaluation of your driving style is carried out
using the following three categories:
RAccel.(evaluation of all acceleration pro-
cesses)
-The bar fills up: moderate acceleration,
especially at higher speeds
-The bar empties: sporty acceleration
RConstant(assessment of driving behavior at
all times)
-The bar fills up: constant speed and avoid-
ance of unnecessary acceleration and
deceleration
-The bar empties: fluctuations in speed
RCoasting(assessment of all deceleration
processes)
-The bar fills up: anticipatory driving, keep-
ing your distance and early release of the
accelerator. The vehicle can coast without
use of the brakes.
-The bar empties: frequent braking
An economical driving style specially requires
driving at moderate engine speeds.
To achieve a higher value in the categories
Accel.
and Constant:
Robserve the gearshift recommendations.
Rdrive in drive program E.
On long journeys at a constant speed, e.g. on the
highway, only the bar for Constant
will change.
The ECO display summarizes the driving char-
acteristics from the start of the journey to its
completion. For this reason, the bars change
dynamically at the beginning of the journey. On
longer journeys, there are fewer changes. For more dynamic changes, carry out a manual
reset.
Show the ECO display (
Ypage 190).
Braking
Important safety notes
GWARNING
If you shift down on a slippery road surface in an attempt to increase the engine's braking
effect, the drive wheels could lose their grip.
There is an increased danger of skidding and
accidents.
Do not shift down for additional engine brak-
ing on a slippery road surface.
Downhill gradients
!On long and steep gradients, you must
reduce the load on the brakes by shifting to a
lower gear in good time. This allows you to
take advantage of the engine's braking effect.
This helps you to avoid overheating the
brakes and wearing them out excessively.
When you take advantage of engine braking, a
drive wheel may not turn for some time, e.g.
on a slippery road surface. This could cause
damage to the drive train. This type of damage
is not covered by the Mercedes-Benz war-
ranty.
Heavy and light loads
GWARNING
If you rest your foot on the brake pedal while
driving, the braking system can overheat. This increases the stopping distance and can even
cause the braking system to fail. There is a
risk of an accident.
Never use the brake pedal as a footrest. Never
depress the brake pedal and the accelerator
pedal at the same time.
!Depressing the brake pedal constantly
results in excessive and premature wear to
the brake pads.
If the brakes have been subjected to a heavy
load, do not stop the vehicle immediately. Drive
142Driving tips
Driving and parking
Page 193 of 338
If the ignition remains switched off for longer
than four hours, the ECO display will be auto-
matically reset.
For more information on the ECO display, see
(
Ypage 141).
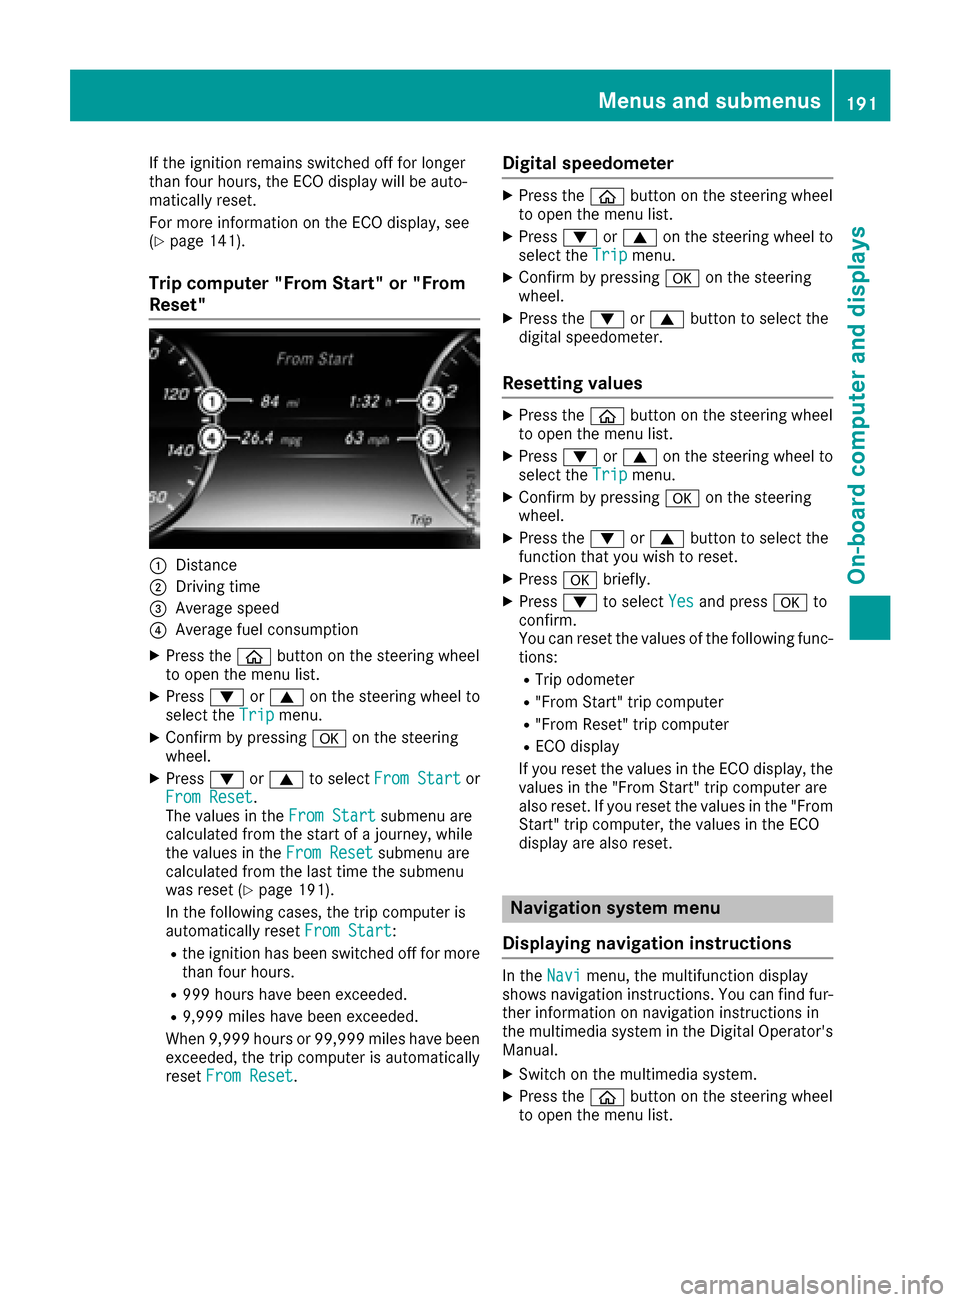
Trip computer "From Start" or "From
Reset"
0043Distance
0044Driving time
0087Average speed
0085Average fuel consumption
XPress the00E2button on the steering wheel
to open the menu list.
XPress 0064or0063 on the steering wheel to
select the Tripmenu.
XConfirm by pressing 0076on the steering
wheel.
XPress 0064or0063 to select From Startor
From Reset.
The values in the From Startsubmenu are
calculated from the start of a journey, while
the values in the From Reset
submenu are
calculated from the last time the submenu
was reset (
Ypage 191).
In the following cases, the trip computer is
automatically reset From Start
:
Rthe ignition has been switched off for more
than four hours.
R999 hours have been exceeded.
R9,999 miles have been exceeded.
When 9,999 hours or 99,999 miles have been
exceeded, the trip computer is automatically
reset From Reset
.
Digital speedometer
XPress the 00E2button on the steering wheel
to open the menu list.
XPress 0064or0063 on the steering wheel to
select the Tripmenu.
XConfirm by pressing 0076on the steering
wheel.
XPress the 0064or0063 button to select the
digital speedometer.
Resetting values
XPress the 00E2button on the steering wheel
to open the menu list.
XPress 0064or0063 on the steering wheel to
select the Tripmenu.
XConfirm by pressing 0076on the steering
wheel.
XPress the 0064or0063 button to select the
function that you wish to reset.
XPress 0076briefly.
XPress 0064to select Yesand press 0076to
confirm.
You can reset the values of the following func-
tions:
RTrip odometer
R"From Start" trip computer
R"From Reset" trip computer
RECO display
If you reset the values in the ECO display, the values in the "From Start" trip computer are
also reset. If you reset the values in the "From
Start" trip computer, the values in the ECO
display are also reset.
Navigation system menu
Displaying navigation instructions
In the Navimenu, the multifunction display
shows navigation instructions. You can find fur-
ther information on navigation instructions in
the multimedia system in the Digital Operator's Manual.
XSwitch on the multimedia system.
XPress the 00E2button on the steering wheel
to open the menu list.
Menus and submenus191
On-board computer and displays
Z
Page 196 of 338
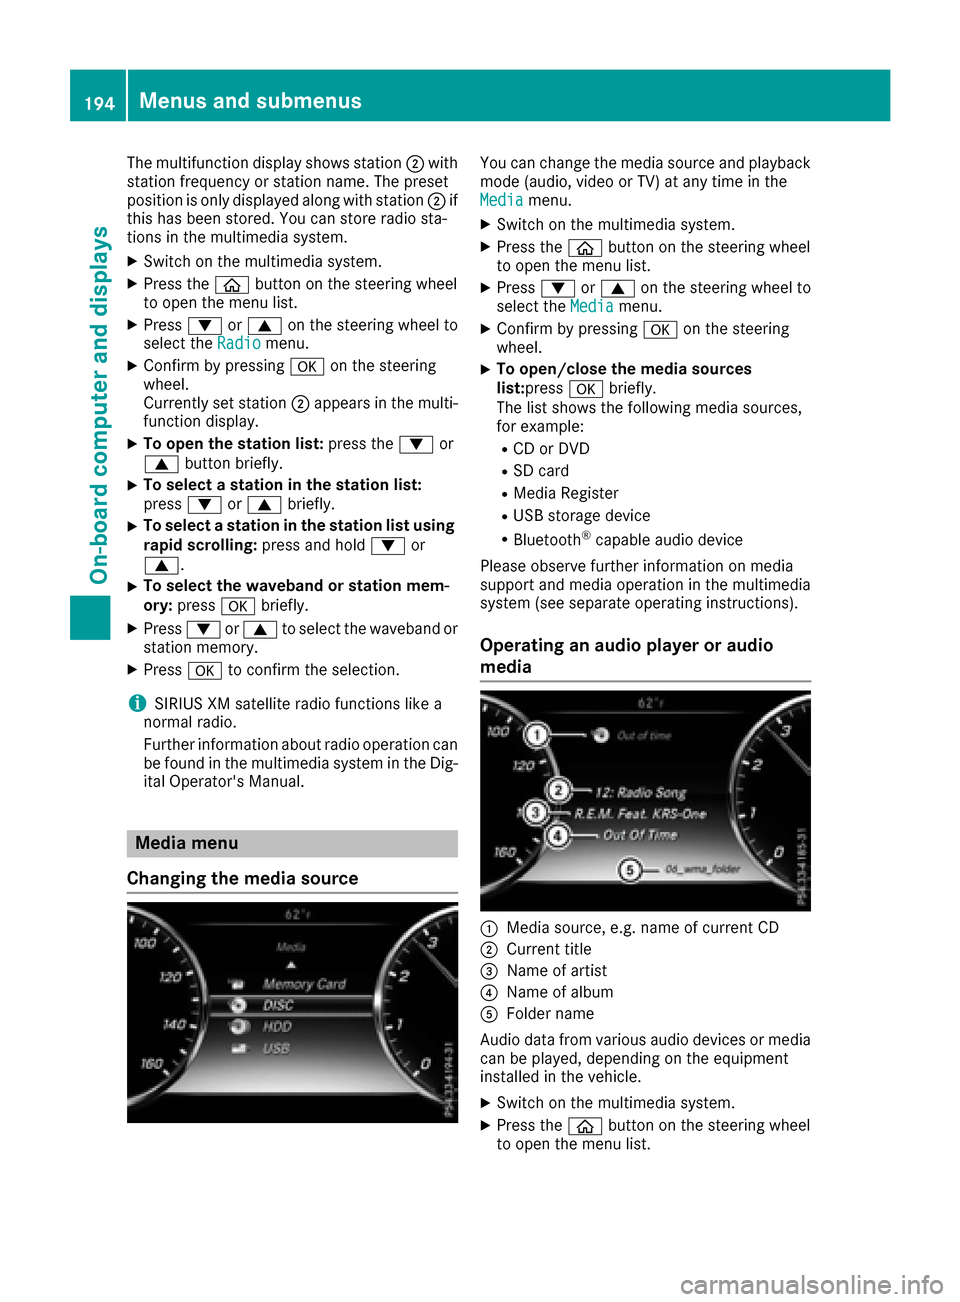
The multifunction display shows station0044with
station frequency or station name. The preset
position is only displayed along with station 0044if
this has been stored. You can store radio sta-
tions in the multimedia system.
XSwitch on the multimedia system.
XPress the 00E2button on the steering wheel
to open the menu list.
XPress 0064or0063 on the steering wheel to
select the Radiomenu.
XConfirm by pressing 0076on the steering
wheel.
Currently set station 0044appears in the multi-
function display.
XTo open the station list: press the0064or
0063 button briefly.
XTo select a station in the station list:
press 0064or0063 briefly.
XTo select a station in the station list using
rapid scrolling: press and hold0064or
0063.
XTo select the waveband or station mem-
ory: press 0076briefly.
XPress 0064or0063 to select the waveband or
station memory.
XPress 0076to confirm the selection.
iSIRIUS XM satellite radio functions like a
normal radio.
Further information about radio operation can
be found in the multimedia system in the Dig-
ital Operator's Manual.
Media menu
Changing the media source
You can change the media source and playback
mode (audio, video or TV) at any time in the
Media
menu.
XSwitch on the multimedia system.
XPress the 00E2button on the steering wheel
to open the menu list.
XPress 0064or0063 on the steering wheel to
select the Mediamenu.
XConfirm by pressing 0076on the steering
wheel.
XTo open/close the media sources
list: press 0076briefly.
The list shows the following media sources,
for example:
RCD or DVD
RSD card
RMedia Register
RUSB storage device
RBluetooth®capable audio device
Please observe further information on media
support and media operation in the multimedia
system (see separate operating instructions).
Operating an audio player or audio
media
0043Media source, e.g. name of current CD
0044Current title
0087Name of artist
0085Name of album
0083Folder name
Audio data from various audio devices or media
can be played, depending on the equipment
installed in the vehicle.
XSwitch on the multimedia system.
XPress the 00E2button on the steering wheel
to open the menu list.
194Menus and submenus
On-board computer and displays
Page 202 of 338
Head-up display submenu
Selecting other displays
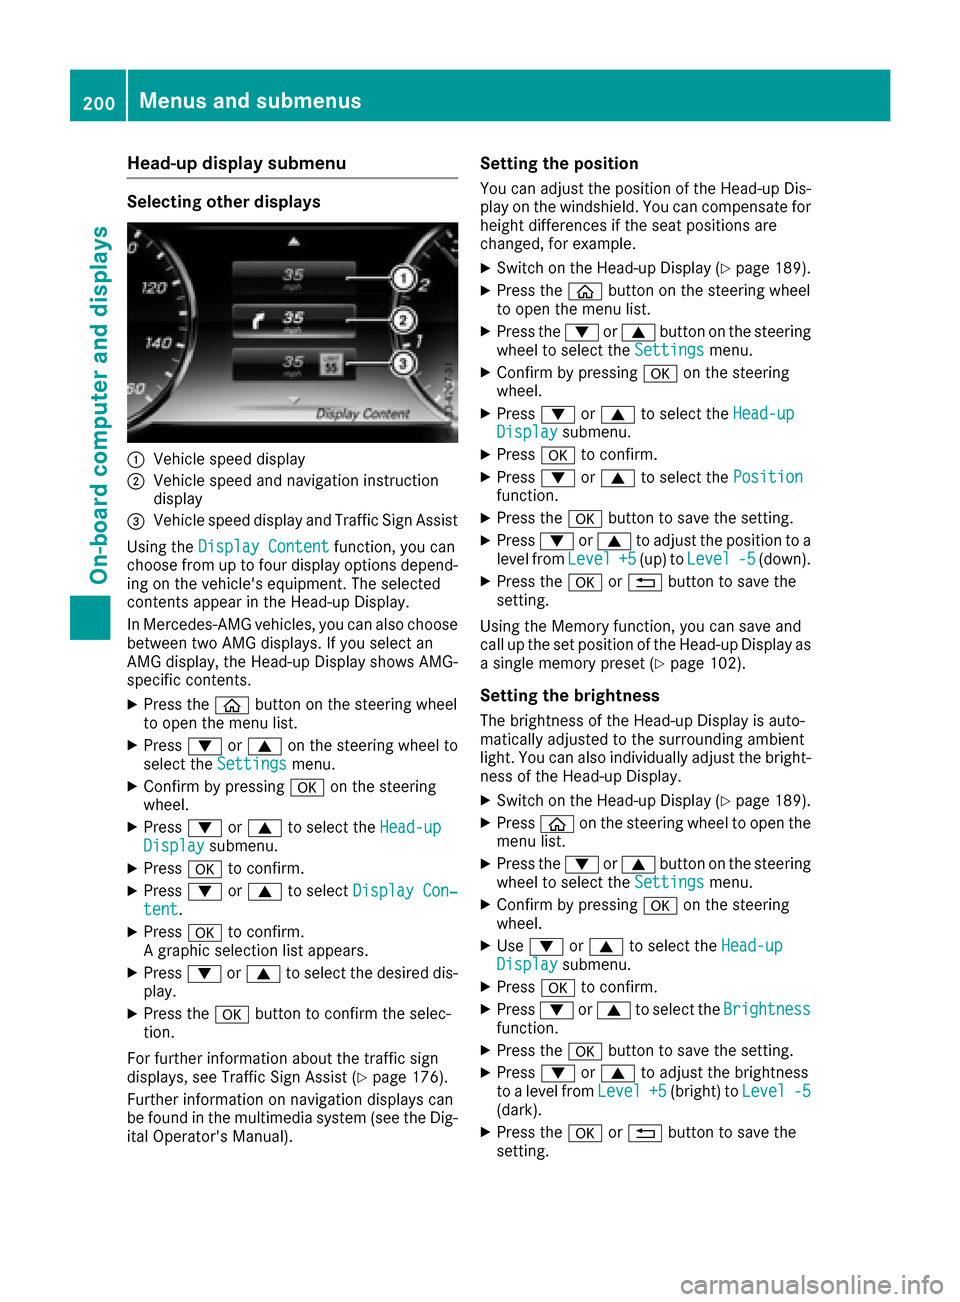
0043Vehicle speed display
0044Vehicle speed and navigation instruction
display
0087Vehicle speed display and Traffic Sign Assist
Using the Display Content
function, you can
choose from up to four display options depend-
ing on the vehicle's equipment. The selected
contents appear in the Head-up Display.
In Mercedes-AMG vehicles, you can also choose
between two AMG displays. If you select an
AMG display, the Head-up Display shows AMG-
specific contents.
XPress the 00E2button on the steering wheel
to open the menu list.
XPress 0064or0063 on the steering wheel to
select the Settingsmenu.
XConfirm by pressing 0076on the steering
wheel.
XPress 0064or0063 to select the Head-upDisplaysubmenu.
XPress0076to confirm.
XPress 0064or0063 to select Display Con‐tent.
XPress0076to confirm.
A graphic selection list appears.
XPress 0064or0063 to select the desired dis-
play.
XPress the 0076button to confirm the selec-
tion.
For further information about the traffic sign
displays, see Traffic Sign Assist (
Ypage 176).
Further information on navigation displays can
be found in the multimedia system (see the Dig-
ital Operator's Manual).
Setting the position
You can adjust the position of the Head-up Dis-
play on the windshield. You can compensate for
height differences if the seat positions are
changed, for example.
XSwitch on the Head-up Display (Ypage 189).
XPress the 00E2button on the steering wheel
to open the menu list.
XPress the 0064or0063 button on the steering
wheel to select the Settingsmenu.
XConfirm by pressing 0076on the steering
wheel.
XPress 0064or0063 to select the Head-upDisplaysubmenu.
XPress0076to confirm.
XPress 0064or0063 to select the Positionfunction.
XPress the0076button to save the setting.
XPress 0064or0063 to adjust the position to a
level from Level+5(up) toLevel-5(down).
XPress the 0076or0038 button to save the
setting.
Using the Memory function, you can save and
call up the set position of the Head-up Display as
a single memory preset (
Ypage 102).
Setting the brightness
The brightness of the Head-up Display is auto-
matically adjusted to the surrounding ambient
light. You can also individually adjust the bright-
ness of the Head-up Display.
XSwitch on the Head-up Display (Ypage 189).
XPress 00E2on the steering wheel to open the
menu list.
XPress the 0064or0063 button on the steering
wheel to select the Settingsmenu.
XConfirm by pressing 0076on the steering
wheel.
XUse 0064 or0063 to select the Head-upDisplaysubmenu.
XPress0076to confirm.
XPress 0064or0063 to select the Brightnessfunction.
XPress the0076button to save the setting.
XPress 0064or0063 to adjust the brightness
to a level from Level+5(bright) toLevel-5(dark).
XPress the0076or0038 button to save the
setting.
200Menus and submenus
On-board computer and displays
Page 204 of 338
![MERCEDES-BENZ S-Class COUPE 2017 C217 Owners Manual XUsing0064or0063, select the AdditionalSpeedometer [km/h]function.
The current selection appears.
XTo activate/deactivate: press0076again.
Restoring the factory settings
XPress 00E2on the steering whe MERCEDES-BENZ S-Class COUPE 2017 C217 Owners Manual XUsing0064or0063, select the AdditionalSpeedometer [km/h]function.
The current selection appears.
XTo activate/deactivate: press0076again.
Restoring the factory settings
XPress 00E2on the steering whe](/manual-img/4/3653/w960_3653-203.png)
XUsing0064or0063, select the AdditionalSpeedometer [km/h]function.
The current selection appears.
XTo activate/deactivate: press0076again.
Restoring the factory settings
XPress 00E2on the steering wheel to open the
menu list.
XPress 0064or0063 on the steering wheel to
select the Settingsmenu.
XConfirm by pressing 0076on the steering
wheel.
XPress 0064or0063 to select the FactorySettingssubmenu.
XPress0076to confirm.
The Reset All Settings?function
appears.
XPress the 0064or0063 button to select Noor
Yes.
XPress the 0076button to confirm the selec-
tion.
If you have selected and confirmed Yes
, the
multifunction display shows a confirmation
message.
For safety reasons, the Daytime Running
Lightsfunction in theLightssubmenu is only
reset when the vehicle is stationary.
AMG menu (Mercedes-AMG vehicles)
Warm-up
0043Digital speedometer
0044Gear indicator
0087Upshift indicator
0085Transmission fluid temperature
0083Engine oil temperature
XPress the 00E2button on the steering wheel
to open the menu list.
XPress 0064or0063 on the steering wheel to
select the AMGmenu.
XConfirm by pressing 0076on the steering
wheel.
Upshift indicator: upshift indicatorUP
0087
indicates that the engine has reached the
overrevving range when in the manual drive
program.
Engine/transmission oil temperature:
when the engine and transmission are at nor-
mal operating temperature, oil tempera-
ture 0085and 0083are displayed in white in the
multifunction display.
If the multifunction display shows oil temper-
ature 0085or0083 in blue, the engine or the
transmission are not yet at normal operating
temperature. Avoid driving at full engine out-
put during this time.
SETUP
0043Drive program C,Sor M
0044ESP®mode (ON/OFF)
0087Suspension setting SPORTorCOMFORT
XPress the 00E2button on the steering wheel
to open the menu list.
XPress the 0064or0063 button on the steering
wheel to select the AMGmenu.
XConfirm by pressing 0076on the steering
wheel.
XPress the 0064or0063 button until the
SETUP display appears.
202Menus and submenus
On-board computer and displays