2017 MERCEDES-BENZ S-Class COUPE Light
[x] Cancel search: LightPage 116 of 338
Setting climate control to automatic
General notes
In automatic mode, the set temperature is main-
tained automatically at a constant level. The
system automatically regulates the temperature
of the dispensed air, the airflow and the air dis-
tribution.
During automatic controlling, the "Cooling with
air dehumidification" function is activated.
Setting climate control to automatic
XTurn the SmartKey to position 2in the ignition
lock (Ypage 121).
XSet the desired temperature using the 0082
rocker switch.
XTo activate: press the0058rocker switch up
or down.
The indicator lamp in the 0058rocker switch
lights up.
XTo switch to manual operation: press the
0097 rocker switch up or down.
The indicator lamp in the 0058rocker switch
goes out.
In automatic mode, if you adjust the airflow or
air distribution manually, the indicator lamp on
the 0058 rocker switch goes out. The function
which has not been changed manually, however,
continues to be controlled automatically. When
the manually set function switches back to auto-
matic mode, the indicator lamp on the 0058
rocker switch lights up again.
Adjusting the climate mode settings
In automatic mode you can select the following
airflow settings for the driver's and front-
passenger areas:
FOCUS high airflow, slightly cooler setting
MEDIUM medium airflow, standard setting
DIFFUSE low airflow, slightly warmer and draft- free setting
XTo set:set the climate mode using the mul-
timedia system (Ypage 247).
Setting the temperature
General notes
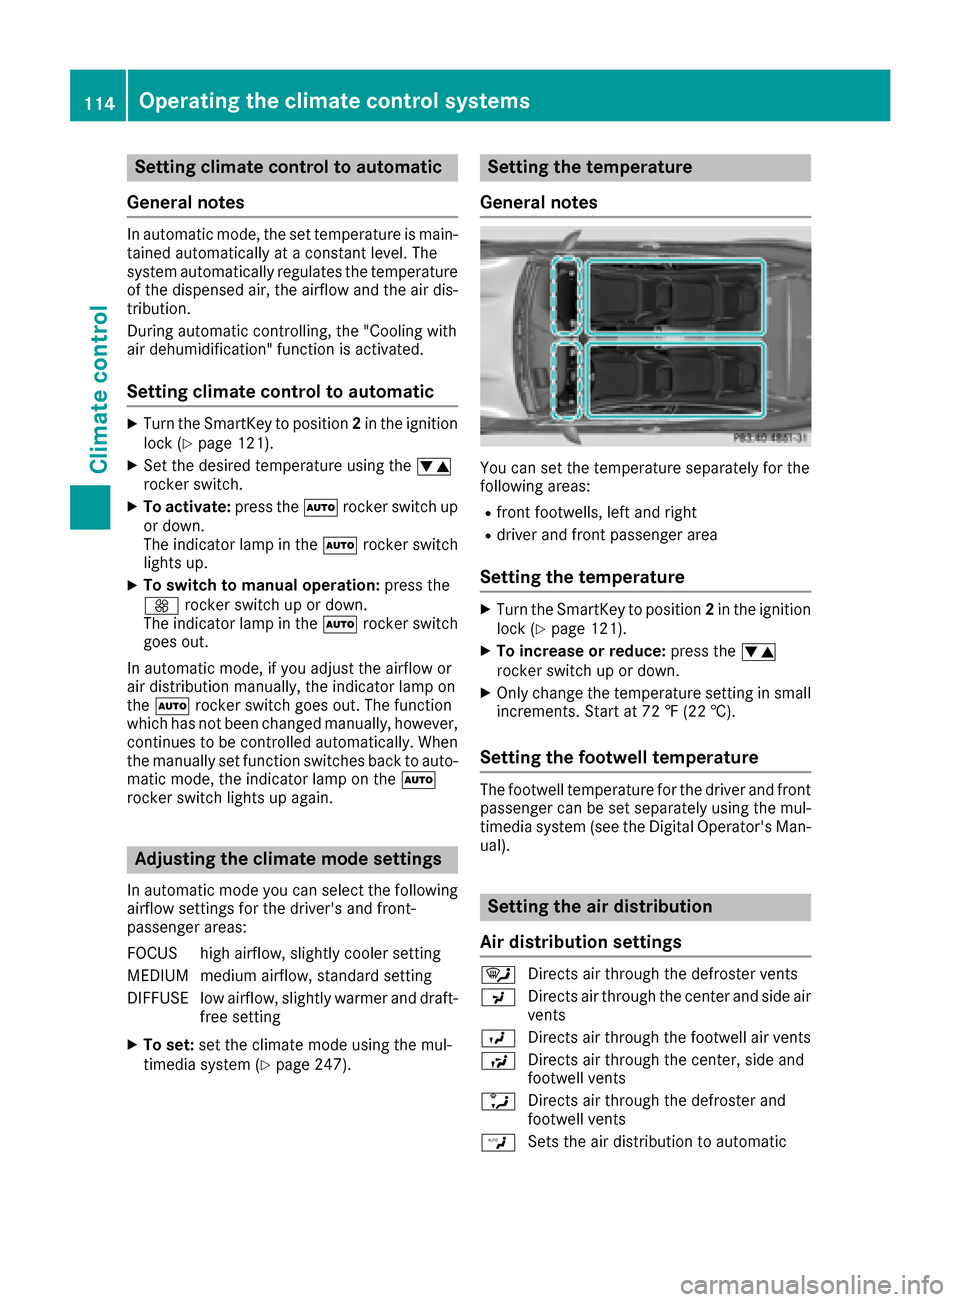
You can set the temperature separately for the
following areas:
Rfront footwells, left and right
Rdriver and front passenger area
Setting the temperature
XTurn the SmartKey to position 2in the ignition
lock (Ypage 121).
XTo increase or reduce: press the0082
rocker switch up or down.
XOnly change the temperature setting in small
increments. Start at 72 ‡ (22 †).
Setting the footwell temperature
The footwell temperature for the driver and front
passenger can be set separately using the mul-
timedia system (see the Digital Operator's Man-
ual).
Setting the air distribution
Air distribution settings
0061 Directs air through the defroster vents
009C Directs air through the center and side air
vents
009B Directs air through the footwell air vents
009F Directs air through the center, side and
footwell vents
0086 Directs air through the defroster and
footwell vents
00A2 Sets the air distribution to automatic
114Operating the climate control systems
Climate control
Page 117 of 338
Setting the air distribution via the mul-
timedia system
The air distribution for the left and right sides of
the driver's and front-passenger areas can be
adjusted using the multimedia system (see the
Digital Operator's Manual).
Setting the airflow
General notes
You can select different airflow settings for the
driver's and front-passenger sides.
Setting the airflow
XTurn the SmartKey to position 2in the ignition
lock (Ypage 121).
XTo increase or reduce: press the0097
rocker switch up or down.
iYou can also set the airflow using the mul-
timedia system (see the Digital Operator's
Manual).
Activating or deactivating the syn-
chronization function
Climate control can be set centrally using the
synchronization function. The settings for tem-
perature, air distribution and airflow on the driv-
er's side are adopted for the front-passenger
side.
XTo activate or deactivate: activate or deac-
tivate the "Synchronization" function via the
multimedia system (see the Digital Operator's
Manual).
The synchronization function deactivates if the
settings for the front-passenger side are
changed.
Defrosting the windshield
General notes
You can use this function to defrost the wind-
shield or to clear a fogged up windshield or front
side windows on the inside.
Switch off the "Windshield defrosting" function
as soon as the windshield is clear again.
Switching the "Windshield defrosting"
function on or off
XTurn the SmartKey to position 2in the ignition
lock (Ypage 121).
XTo activate: press the0064rocker switch on
the front control panel up or down.
The indicator lamp in the 0064rocker switch
lights up.
The climate control system switches to the
following functions:
Rhigh airflow
Rhigh temperature
Rair distribution to the windshield and front
side windows
Rair-recirculation mode off
Rwindshield heating on
Rcooling with air dehumidification on
XTo deactivate: press the0064rocker switch
up or down.
The indicator lamp in the 0064rocker switch
goes out. The previously selected settings are restored. Air-recirculation mode remains
deactivated.
Defrosting the windows
Windows fogged up on the inside
XSwitch on automatic mode using the 0058
rocker switch.
XIf the windows continue to fog up: activate the
"Windshield defrosting" function using the
0064 rocker switch. The windshield heating is
switched on.
iYou should only select this setting until the
windshield is clear again.
Windows fogged up on the outside
XActivate the windshield wipers.
XSwitch on automatic mode using the 0058
rocker switch.
iIf you clean the windows regularly, they do
not fog up so quickly.
Operating the climate control systems115
Climate control
Page 118 of 338
Rear window defroster
General notes
The rear window defroster has a high current
draw. You should therefore switch it off as soon
as the rear window is clear. Otherwise, the rear window defroster switches off automatically
after several minutes.
If the battery voltage is too low, the rear window
defroster may switch off.
Activating or deactivating
XTurn the SmartKey to position 2in the ignition
lock (Ypage 121).
XPress the 006Crocker switch up or down.
The indicator lamp in the 006Crocker switch
lights up or goes out.
Problems with the rear window defroster
ProblemPossible causes/consequences and 0050Solutions
The rear window
defroster has deactiva-
ted prematurely or can-
not be activated.The battery has not been sufficiently charged.
XSwitch off any consumers that are not required, e.g. reading lamps,
interior lighting or the seat heating.
When the battery is sufficiently charged, the rear window defroster
can be activated again.
Switching air-recirculation mode
on/off
General notes
You can also temporarily deactivate the flow of
fresh air manually if unpleasant odors are enter-
ing the vehicle from outside. The air already
inside the vehicle will then be recirculated.
If you switch on air-recirculation mode, the win-
dows can fog up more quickly, in particular at
low temperatures. Only use air-recirculation
mode briefly to prevent the windows from fog-
ging up.
Activating/deactivating
XTurn the SmartKey to position 2in the ignition
lock (Ypage 121).
XTo activate: press the0072rocker switch up
or down.
The indicator lamp in the 0072rocker switch
lights up.
Air-recirculation mode switches on automati-
cally:
Rat high outside temperatures
Rat high levels of pollution
Rin a tunnel The indicator lamp in the
0072rocker switch is
not lit when automatic air-recirculation mode is
activated. Outside air is added after about
30 minutes.
XTo deactivate: press the0072rocker switch
up or down.
The indicator lamp in the 0072rocker switch
goes out.
Air-recirculation mode deactivates automati-
cally:
Rafter approximately five minutes at outside
temperatures below approximately 41 ‡
(5 †)
Rafter approximately five minutes if cooling
with air dehumidification is deactivated
Rafter approximately 30 minutes at outside
temperatures above approximately 41 ‡
(5 †) if the "Cooling with air dehumidifica-
tion" function is activated
Switching the residual heat on or off
General notes
Once the engine is switched off, it is possible to
make use of the residual heat of the engine to
continue heating or ventilating the front com-
partment of the vehicle for approximately
30 minutes.
116Operating the climate control systems
Climate control
Page 119 of 338
The heating or ventilation time depends on the
temperature that has been set.
Activating/deactivating
XTurn the SmartKey to position0in the ignition
lock or remove it (Ypage 121).
XTo activate: press the0056rocker switch up
or down.
The indicator lamp in the 0056rocker switch
lights up.
The blower will run at a low speed regardless of
the airflow setting.
If you activate the residual heat function at high
temperatures, only the ventilation will be acti-
vated. The blower runs at medium speed.
XTo deactivate: press the0056rocker switch
up or down.
The indicator lamp in the 0056rocker switch
goes out.
Residual heat is deactivated automatically:
Rafter approximately 30 minutes
Rwhen the ignition is switched on
Perfume atomizer
Operating the perfume atomizer
GWARNING
If children open the vial, they could drink the
perfume or it could come into contact with
their eyes. There is a risk of injury. Do not
leave children unsupervised in the vehicle.
If the perfume liquid has been drunk, consult
a doctor. If perfume comes into contact with
your eyes or skin, rinse the eyes with clean
water. If you continue to experience difficul-
ties, consult a doctor.
HEnvironmental note
Full vials must not be dis-
posed of with household
waste. They must be collec-
ted separately and recycled
to protect the environment.
Dispose of full vials in an
environmentally responsible
manner and take them to a
harmful substance collec-
tion point.
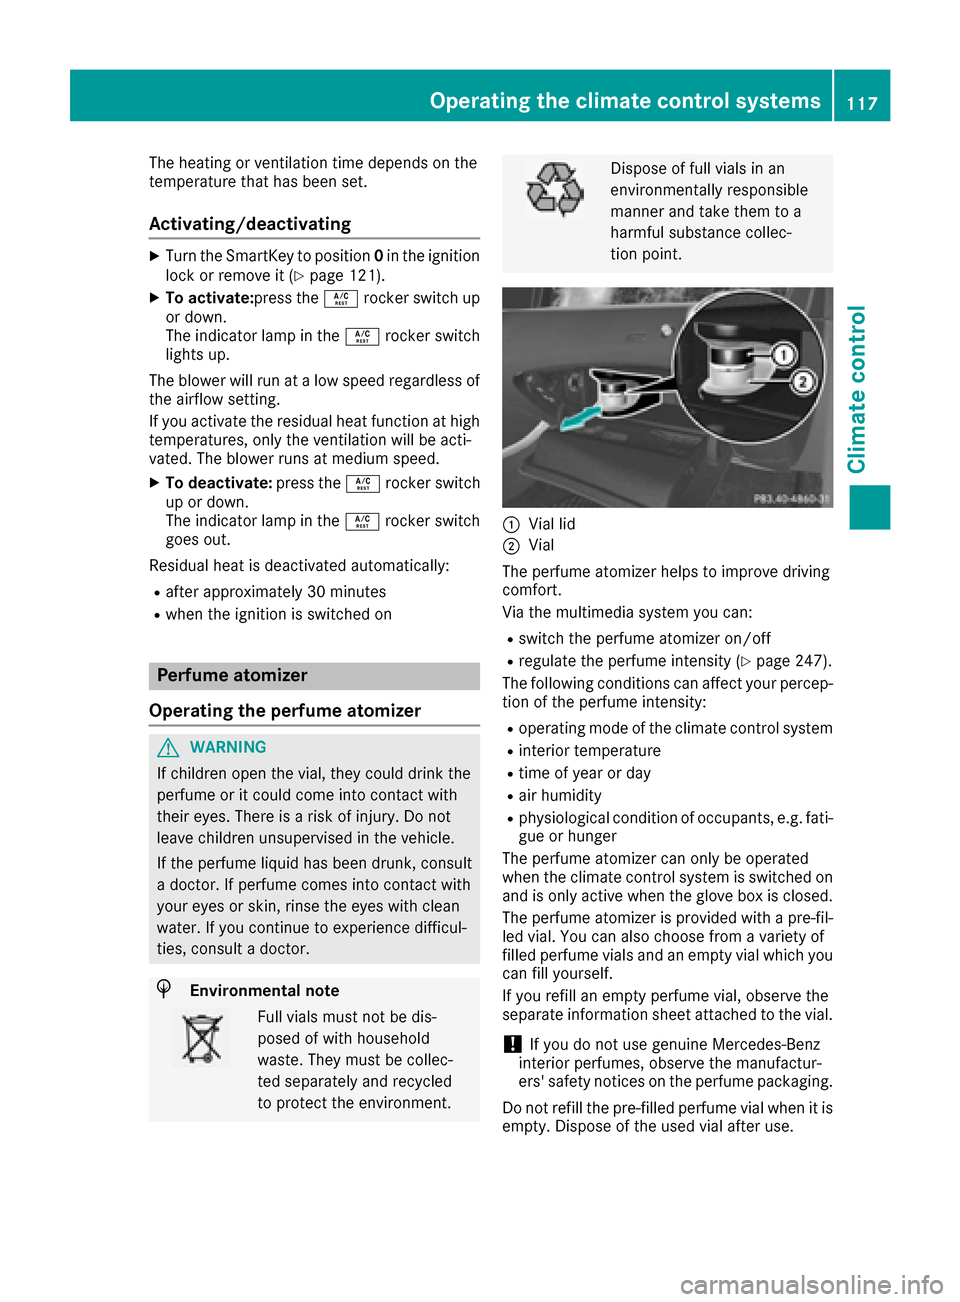
0043Vial lid
0044Vial
The perfume atomizer helps to improve driving
comfort.
Via the multimedia system you can:
Rswitch the perfume atomizer on/off
Rregulate the perfume intensity (Ypage 247).
The following conditions can affect your percep-
tion of the perfume intensity:
Roperating mode of the climate control system
Rinterior temperature
Rtime of year or day
Rair humidity
Rphysiological condition of occupants, e.g. fati-
gue or hunger
The perfume atomizer can only be operated
when the climate control system is switched on
and is only active when the glove box is closed.
The perfume atomizer is provided with a pre-fil- led vial. You can also choose from a variety of
filled perfume vials and an empty vial which you
can fill yourself.
If you refill an empty perfume vial, observe the
separate information sheet attached to the vial.
!If you do not use genuine Mercedes-Benz
interior perfumes, observe the manufactur-
ers' safety notices on the perfume packaging.
Do not refill the pre-filled perfume vial when it is
empty. Dispose of the used vial after use.
Operating the climate control systems117
Climate control
Z
Page 124 of 338
The engine can be switched off while the vehicle
is in motion by pressing and holding the Start/
Stop button for three seconds. This function
operates independently of the ECO start/stop
automatic engine switch-off function.
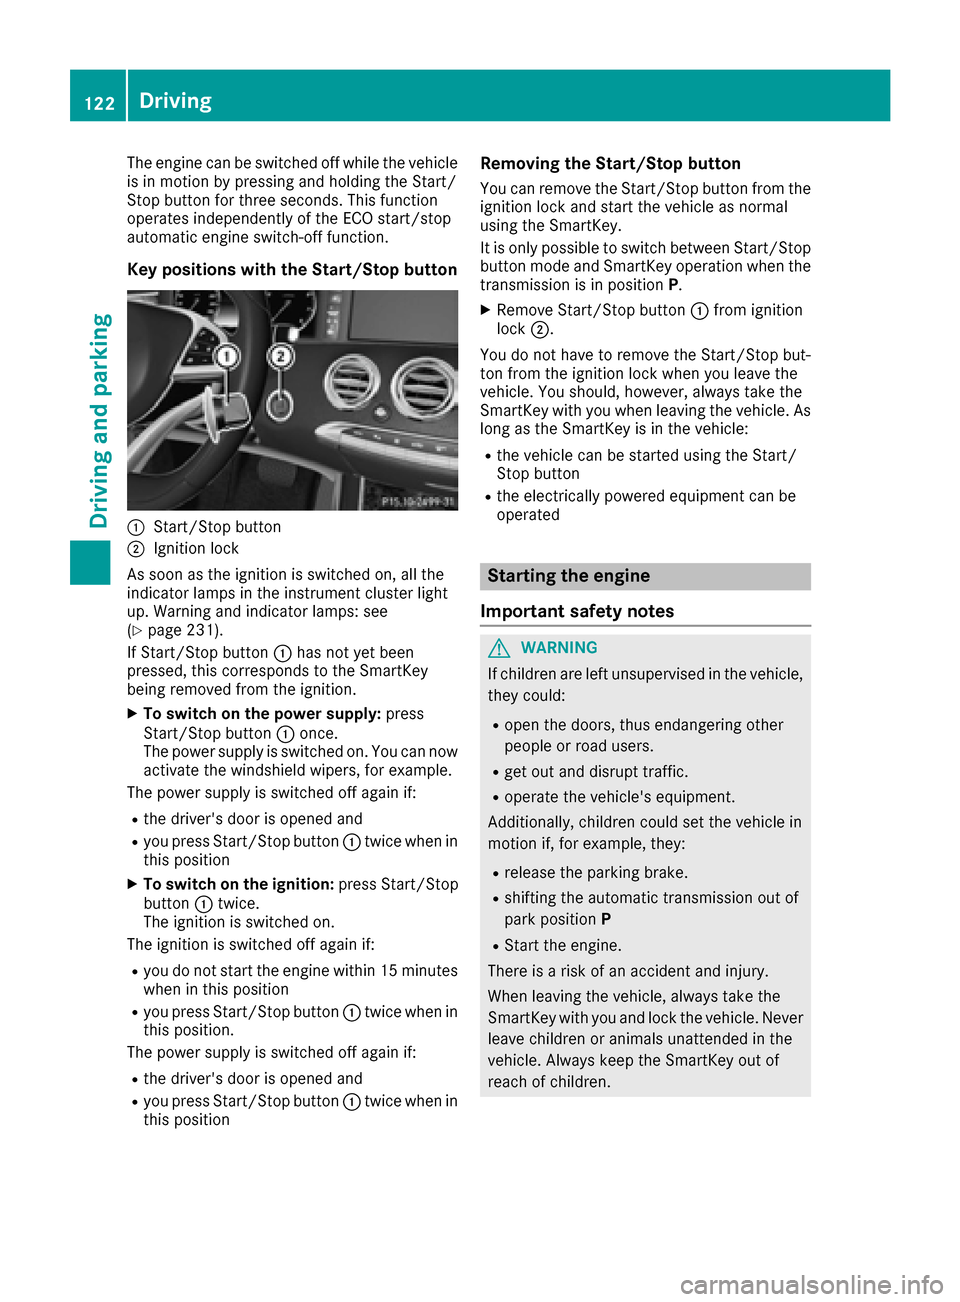
Key positions with the Start/Stop button
0043Start/Stop button
0044Ignition lock
As soon as the ignition is switched on, all the
indicator lamps in the instrument cluster light
up. Warning and indicator lamps: see
(
Ypage 231).
If Start/Stop button 0043has not yet been
pressed, this corresponds to the SmartKey
being removed from the ignition.
XTo switch on the power supply: press
Start/Stop button 0043once.
The power supply is switched on. You can now activate the windshield wipers, for example.
The power supply is switched off again if:
Rthe driver's door is opened and
Ryou press Start/Stop button 0043twice when in
this position
XTo switch on the ignition: press Start/Stop
button 0043twice.
The ignition is switched on.
The ignition is switched off again if:
Ryou do not start the engine within 15 minutes when in this position
Ryou press Start/Stop button 0043twice when in
this position.
The power supply is switched off again if:
Rthe driver's door is opened and
Ryou press Start/Stop button 0043twice when in
this position
Removing the Start/Stop button
You can remove the Start/Stop button from the
ignition lock and start the vehicle as normal
using the SmartKey.
It is only possible to switch between Start/Stop button mode and SmartKey operation when the
transmission is in position P.
XRemove Start/Stop button 0043from ignition
lock 0044.
You do not have to remove the Start/Stop but-
ton from the ignition lock when you leave the
vehicle. You should, however, always take the
SmartKey with you when leaving the vehicle. As
long as the SmartKey is in the vehicle:
Rthe vehicle can be started using the Start/
Stop button
Rthe electrically powered equipment can be
operated
Starting the engine
Important safety notes
GWARNING
If children are left unsupervised in the vehicle,
they could:
Ropen the doors, thus endangering other
people or road users.
Rget out and disrupt traffic.
Roperate the vehicle's equipment.
Additionally, children could set the vehicle in
motion if, for example, they:
Rrelease the parking brake.
Rshifting the automatic transmission out of
park position P
RStart the engine.
There is a risk of an accident and injury.
When leaving the vehicle, always take the
SmartKey with you and lock the vehicle. Never
leave children or animals unattended in the
vehicle. Always keep the SmartKey out of
reach of children.
122Driving
Driving and parking
Page 128 of 338
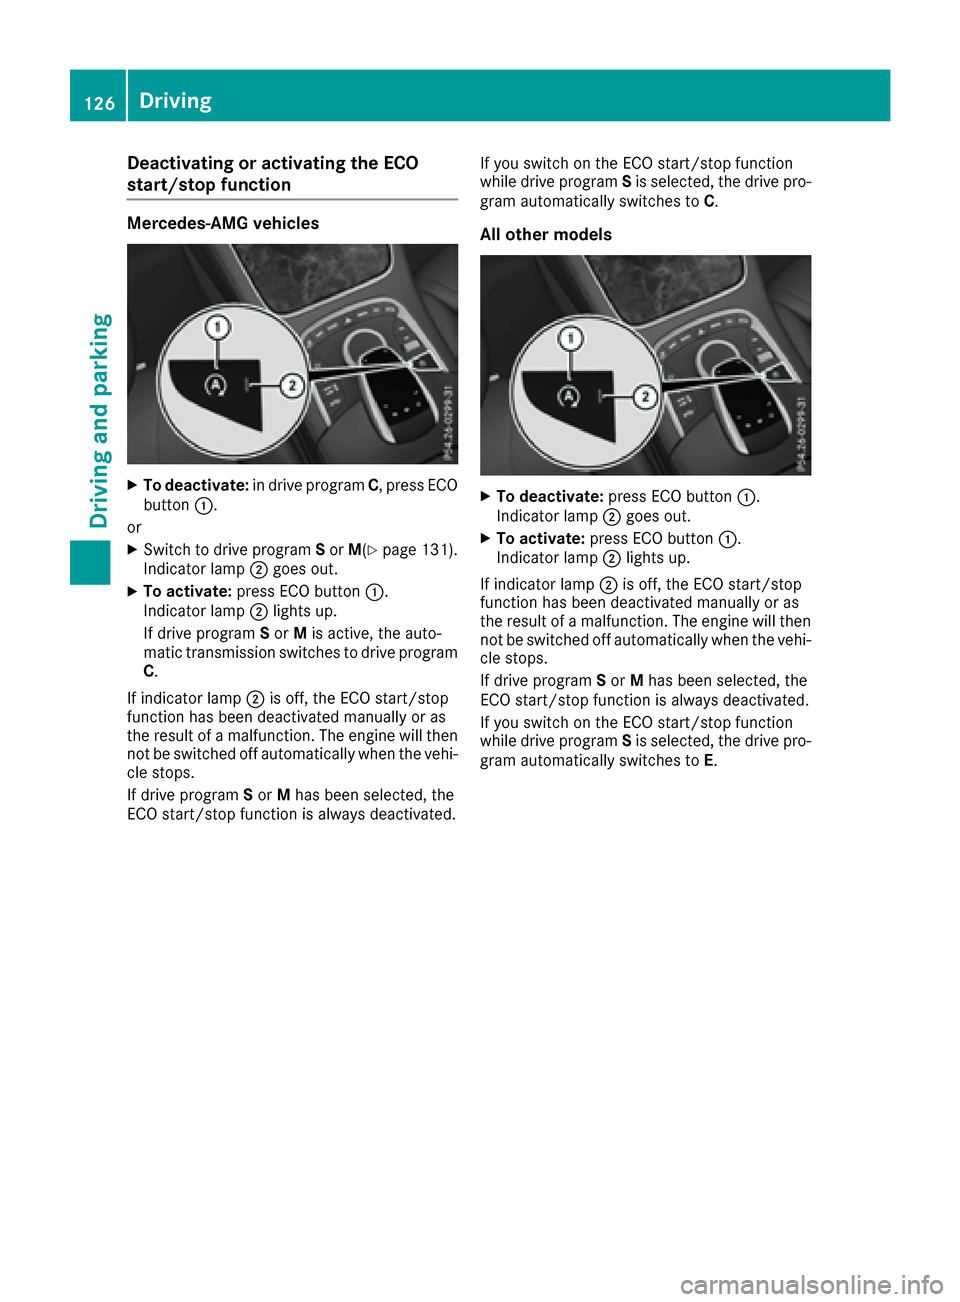
Deactivating or activating theECO
start/stop function
Mercedes-AMG vehicles
XTo deactivate :in drive program C,press EC O
butto n0043.
or
XSwitc hto drive program Sor M(Ypage 131).
Indicator lamp 0044goe sout .
XTo activate :press EC Obutto n0043.
Indicator lamp 0044lights up.
If drive program Sor Mis active ,th eauto-
matic transmissio nswitches to drive program
C.
If indicator lamp 0044is off, th eEC Ostart/sto p
function has bee ndeactivated manually or as
th eresult of amalfunction .The engin ewill then
no tbe switched of fautomatically when th evehi-
cl e stops .
If drive program Sor Mhas bee nselected, th e
EC Ostart/sto pfunction is always deactivated. If you switch on th
eEC Ostart/sto pfunction
whil edrive program Sis selected, th edrive pro -
gram automatically switches to C.
All other model s
XTo deactivate:press EC Obutto n0043.
Indicator lamp 0044goe sout .
XTo activate :press EC Obutto n0043.
Indicator lamp 0044lights up.
If indicator lamp 0044is off, th eEC Ostart/sto p
function has bee ndeactivated manually or as
th eresult of amalfunction .The engin ewill then
no tbe switched of fautomatically when th evehi-
cl e stops .
If drive program Sor Mhas bee nselected, th e
EC Ostart/sto pfunction is always deactivated.
If you switch on th eEC Ostart/sto pfunction
whil edrive program Sis selected, th edrive pro -
gram automatically switches to E.
126Driving
Driving and parking
Page 129 of 338
Problems with the engine
ProblemPossible causes/consequences and0050Solutions
The engine does not
start. The starter motor
can be heard.RThere is a malfunction in the engine electronics.
RThere is a malfunction in the fuel supply.
Before attempting to start the engine again:
XTurn the SmartKey back to position 005Ain the ignition lock.
or
XPress the Start/Stop button repeatedly until all indicator lamps in
the instrument cluster go out.
XTry to start the engine again (Ypage 122). Avoid excessively long
and frequent attempts to start the engine as these will drain the
battery.
If the engine does not start after several attempts:
XConsult a qualified specialist workshop.
The engine does not
start. You cannot hear
the starter motor.The on-board voltage is too low because the battery is too weak or
discharged.
XJump-start the vehicle (Ypage 295).
If the engine does not start despite attempts to jump-start it:
XConsult a qualified specialist workshop.
The starter motor was exposed to a thermal load that was too high.
XTry to start the engine again.
If the engine still does not start:
XConsult a qualified specialist workshop.
The engine is not running
smoothly and is misfir-
ing.There is a malfunction in the engine electronics or in a mechanical
component of the engine management system.
XOnly depress the accelerator pedal slightly.
Otherwise, non-combusted fuel may get into the catalytic converter
and damage it.
XHave the cause rectified immediately at a qualified specialist work-
shop.
The coolant temperature
gauge shows a value
above 248 ‡ (120 †).The coolant level is too low. The coolant is too hot and the engine is no
longer being cooled sufficiently.
XStop as soon as possible and allow the engine and the coolant to
cool down.
XCheck the coolant level (Ypage 277). Observe the warning notes
as you do so and add coolant if necessary.
Driving127
Driving and parking
Z
Page 139 of 338
XCompletely insert thefiller neck of the fuel
pump nozz leinto the tank, hook in place and
refuel.
XOnly fill the tank unt ilthe pump nozz le
swit ches off.
Do not add any more fuel after the pump stops filli ng for the first time. Otherwise, fuel may
leak out.
Closing the fuel filler flap
XReplac e the cap on the filler neck and turn
clock wiseuntil it engages audibly.
XClose the fuel filler flap. If
you drive at speeds above 2 km/hwith the fuel
filler flap open, the Fuel Filler Flap Open
messageisshown on the multifunction display.
Close the fuel filler flap before locking the vehi-
cle.
If you are driving with the fuel filler cap open, the 00B6 reserve fuel warning lamp flashes. A mes-
sage appears in the multifunction display
(
Ypage 218).
In addition, the 00B9Check Engine warning
lamp may light up (
Ypage 237).
For further information on warning and indicator
lamps inthe instrument cluster, see
(
Ypage 237).
Problems with fuel and the fuel tank
ProblemPossible causes/consequences and 0050Solutions
Fuelisleaking from the
veh icle.GWAR NING
The fuel line or the fuel tank is faulty.
Risk of explos ion or fire.
XApply the electr icparking brake.
XSwit ch off the engine.
XMake sure that the ignition is switched off (Ypage 121).
or
XWhen using the SmartKey, turn the SmartKey to position 0in the
ignition lock and remove it(Ypage 121).
XDo not restart the engine under any circumstances.
XConsult a qualified specialist workshop.
The fuel filler flap cannot
be opened.The fuel filler flap isnot unlocked.
XUnlock the veh icle(Ypage 72).
The SmartKey battery is discharged or nearly discharged.
XUnlock the veh icleusing the mechanical key (Ypage 74).
The fuel filler flap isunlocked, but the opening mechanism is jammed.
XConsult a qualified specialist workshop.
Parking
Important safety notes
GWARNING
Flammable material such as leaves, grass or
twigs may ignite ifthey come into contact with
hot parts of the exhaust system or exhaust
gas flow. There is a risk of fire.
Park the vehicle so that no flammable mate-
rials come into contact with parts of the vehi-
cle which are hot. Take particular care not to
park on dry grassland or harvested grain
fields.
Parking137
Driving and parking
Z