2017 MERCEDES-BENZ S-Class COUPE wheel
[x] Cancel search: wheelPage 102 of 338
Position of the steering wheel and the
driver's seat for driving
The steering wheel and the driver's seat are
moved to the previously set position if:
Rthe driver's door is closed and you insert the
SmartKey into the ignition lock
Ryou close the driver's door when the ignition
is switched on
Ryou press the Start/Stop button once
iThe steering wheel and the driver's seat only
return to the last set position if the driving
position is stored after the seat or steering
column has been adjusted.
The last position of the steering wheel or seat is
stored if:
Rthe ignition is switched off
Rthe setting is stored with the memory function
(Ypage 103).
Crash-responsive EASY-EXIT feature
If the crash-responsive EASY-EXIT feature is trig-
gered in an accident, the steering column will
move upwards when the driver's door is opened
or the SmartKey is removed from the ignition
lock. This makes it easier to exit the vehicle and rescue the occupants.
The crash-responsive EASY-EXIT feature is only
operational if the EASY-EXIT/ENTRY feature is
activated in the multimedia system (see the sep-
arate Operator's Manual).
Mirrors
Exterior mirrors
Important safety notes
GWARNING
You could lose control of your vehicle if you do the following while driving:
Radjust the driver's seat, head restraint,
steering wheel or mirrors
Rfasten the seat belt
There is a risk of an accident.
Adjust the driver's seat, head restraint, steer- ing wheel and mirror and fasten your seat belt
before starting the engine.
GWARNING
The exterior mirror on the front-passenger
side reduces the size of the image. Visible
objects are actually closer than they appear.
This means that you could misjudge the dis-
tance from road users traveling behind, e.g.
when changing lane. There is a risk of an acci-
dent.
For this reason, always make sure of the
actual distance from the road users traveling
behind by glancing over your shoulder.
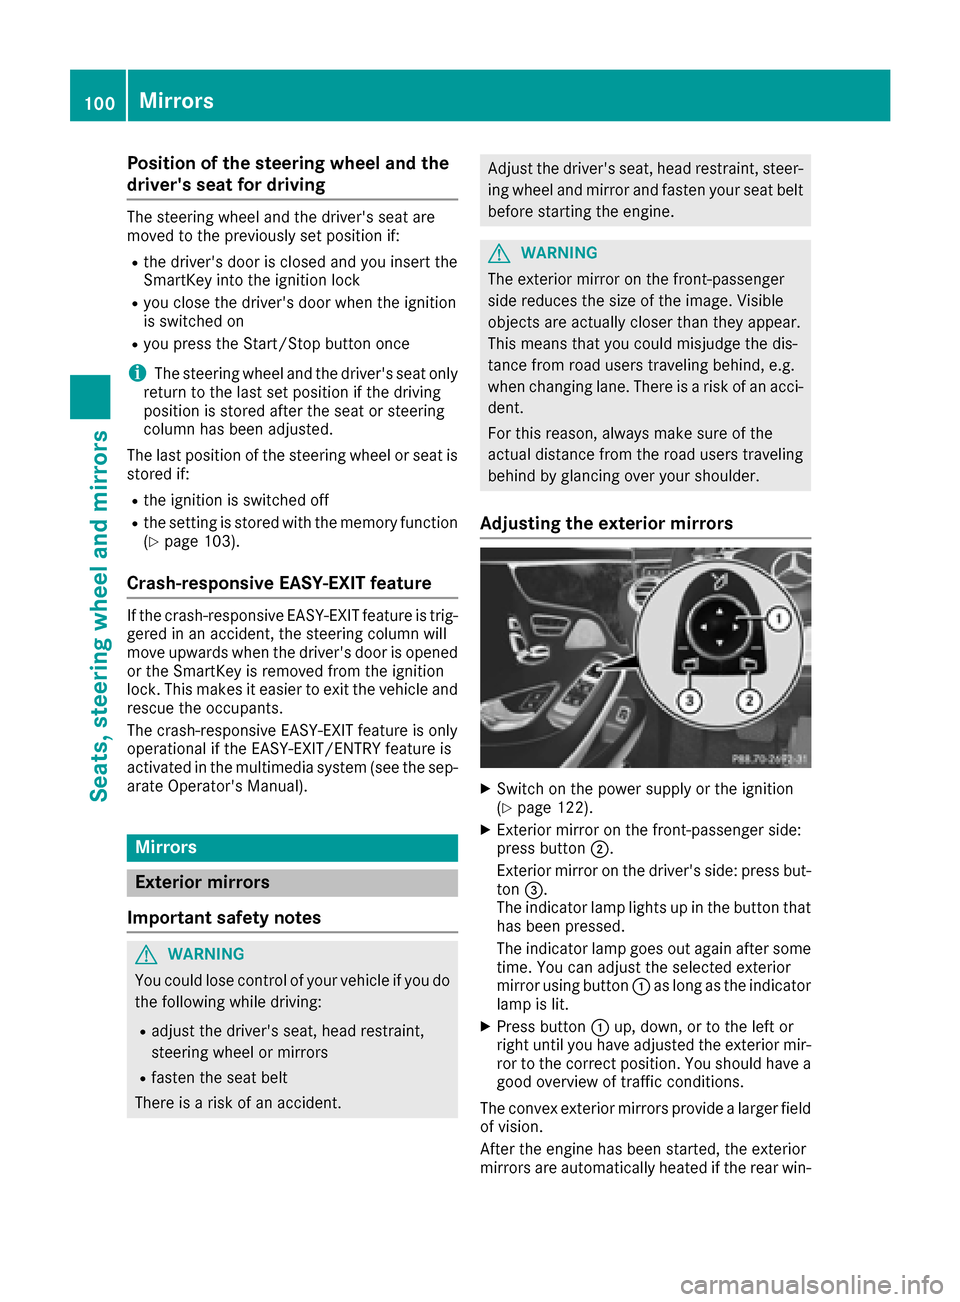
Adjusting the exterior mirrors
XSwitch on the power supply or the ignition
(Ypage 122).
XExterior mirror on the front-passenger side:
press button 0044.
Exterior mirror on the driver's side: press but-
ton 0087.
The indicator lamp lights up in the button that
has been pressed.
The indicator lamp goes out again after some
time. You can adjust the selected exterior
mirror using button 0043as long as the indicator
lamp is lit.
XPress button 0043up, down, or to the left or
right until you have adjusted the exterior mir- ror to the correct position. You should have a
good overview of traffic conditions.
The convex exterior mirrors provide a larger field of vision.
After the engine has been started, the exterior
mirrors are automatically heated if the rear win-
100Mirrors
Seats, steering wheel and mirrors
Page 103 of 338

dow defroster is switched on and the outside
temperature is low.
Folding the exterior mirrors in or outelectrically
XSwitch on the power supply or the ignition
(Ypage 122).
XBriefly press 0043.
Both exterior mirrors fold in or out.
iMake sure that the exterior mirrors are
always folded out fully while driving. They
could otherwise vibrate.
iIf you are driving faster than 30 mph
(47 km/h), you can no longer fold in the exte-
rior mirrors.
Resetting the exterior mirrors
If the battery has been disconnected or com-
pletely discharged, the exterior mirrors must be
reset. The exterior mirrors will otherwise not
fold in when you activate the Automatic Mir‐
ror Foldingin the multimedia system.
XSwitch on the power supply or the ignition
(Ypage 122).
XPress button0043.
Folding the exterior mirrors in or out
automatically
When theAutomatic Mirror Foldingfunc-
tion is activated in the multimedia system (see
Digital Operator's Manual):
Rthe exterior mirrors fold in automatically as
soon as you lock the vehicle from the outside.
Rthe exterior mirrors fold out automatically
again as soon as you unlock the vehicle.
iIf the exterior mirrors have been folded in
manually, they do not fold out.
Exterior mirror pushed out of position
If an exterior mirror has been pushed out of
position, proceed as follows:
XPress and hold button 0043until you hear a click
and the mirror engages audibly into position
(
Ypage 101).
The mirror housing is engaged again and you
can adjust the exterior mirrors as usual
(
Ypage 100).
Automatic anti-glare mirrors
GWARNING
Electrolyte may escape if the glass in an auto-
matic anti-glare mirror breaks. The electrolyte
is harmful and causes irritation. It must not
come into contact with your skin, eyes, res-
piratory organs or clothing or be swallowed.
There is a risk of injury.
If you come into contact with the electrolyte,
observe the following:
RRinse off the electrolyte from your skin
immediately with water.
RImmediately rinse the electrolyte out of
your eyes thoroughly with clean water.
RIf the electrolyte is swallowed, immediately
rinse your mouth out thoroughly. Do not
induce vomiting.
RIf electrolyte comes into contact with your
skin or hair or is swallowed, seek medical
attention immediately.
RImmediately change out of clothing which
has come into contact with electrolyte.
RIf an allergic reaction occurs, seek medical
attention immediately.
The exterior mirror on the driver's side and the
rear-view mirror automatically go into anti-glare
mode if:
Rthe ignition is switched on
Rincident light from headlamps strikes the sen-
sor in the rear-view mirror
Mirrors101
Seats, steering wheel and mirrors
Z
Page 104 of 338
The mirrors do not go into anti-glare mode if
reverse gear is engaged or if the interior lighting
is switched on.
Parking position for the exterior mir-
ror on the front-passenger side
Setting and storing the parking position
You can set the front-passenger side exterior
mirror such that you can see the rear wheel on
that side as soon as you engage reverse gear.
You can store this position.
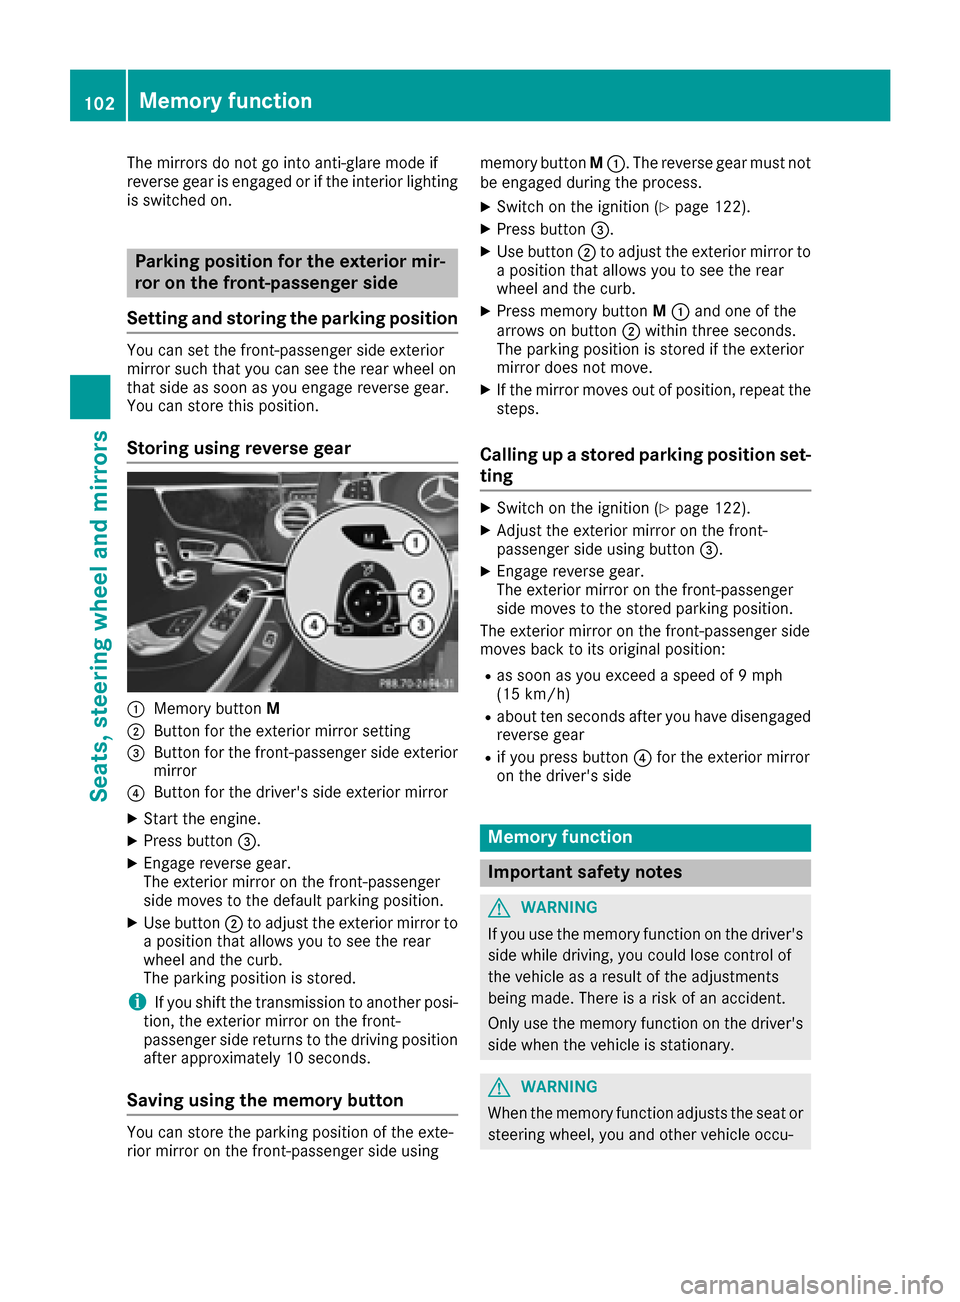
Storing using reverse gear
0043Memory button M
0044Button for the exterior mirror setting
0087Button for the front-passenger side exterior
mirror
0085Button for the driver's side exterior mirror
XStart the engine.
XPress button0087.
XEngage reverse gear.
The exterior mirror on the front-passenger
side moves to the default parking position.
XUse button0044to adjust the exterior mirror to
a position that allows you to see the rear
wheel and the curb.
The parking position is stored.
iIf you shift the transmission to another posi-
tion, the exterior mirror on the front-
passenger side returns to the driving position
after approximately 10 seconds.
Saving using the memory button
You can store the parking position of the exte-
rior mirror on the front-passenger side using memory button
M0043. The reverse gear must not
be engaged during the process.
XSwitch on the ignition (Ypage 122).
XPress button 0087.
XUse button0044to adjust the exterior mirror to
a position that allows you to see the rear
wheel and the curb.
XPress memory button M0043 and one of the
arrows on button 0044within three seconds.
The parking position is stored if the exterior
mirror does not move.
XIf the mirror moves out of position, repeat the
steps.
Calling up a stored parking position set-
ting
XSwitch on the ignition (Ypage 122).
XAdjust the exterior mirror on the front-
passenger side using button 0087.
XEngage reverse gear.
The exterior mirror on the front-passenger
side moves to the stored parking position.
The exterior mirror on the front-passenger side
moves back to its original position:
Ras soon as you exceed a speed of 9 mph
(15 km/h)
Rabout ten seconds after you have disengaged
reverse gear
Rif you press button 0085for the exterior mirror
on the driver's side
Memory function
Important safety notes
GWARNING
If you use the memory function on the driver's side while driving, you could lose control of
the vehicle as a result of the adjustments
being made. There is a risk of an accident.
Only use the memory function on the driver's
side when the vehicle is stationary.
GWARNING
When the memory function adjusts the seat or steering wheel, you and other vehicle occu-
102Memory function
Seats, steering wheel and mirrors
Page 105 of 338
pants – particularly children – could become
trapped. There is a risk of injury.
While the memory function is making adjust-
ments, make sure that no one has any body
parts in the sweep of the seat or steering
wheel. If somebody becomes trapped, imme-diately release the memory function position
button. The adjustment process is stopped.
GWARNING
Children could become trapped if they acti-
vate the memory function, particularly when
unattended. There is a risk of injury.
When leaving the vehicle, always take the
SmartKey with you and lock the vehicle. Never
leave children unsupervised in the vehicle.
The memory function can be used at any time,
even if the power supply is switched off.
Storing settings
With the memory function, you can store up to
three different settings, e.g. for three different
people.
The following settings are stored as a single
memory preset:
Rseat, backrest, head restraint position and
contour of the backrest in the lumbar region
Ractive multicontour seat: side bolsters of the
backrest, shoulder of the backrest, contour of the backrest, dynamic function level
Rseat heating: distribution of the heated sec-
tions of the seat cushion and backrest
Rdriver's side: position of the exterior mirrors
on the driver's and front-passenger sides
Rposition of the head-up display
XAdjust the seat accordingly (Ypage 92).
XOn the driver's side, adjust the steering wheel(Ypage 98) and the exterior mirrors
(Ypage 100).
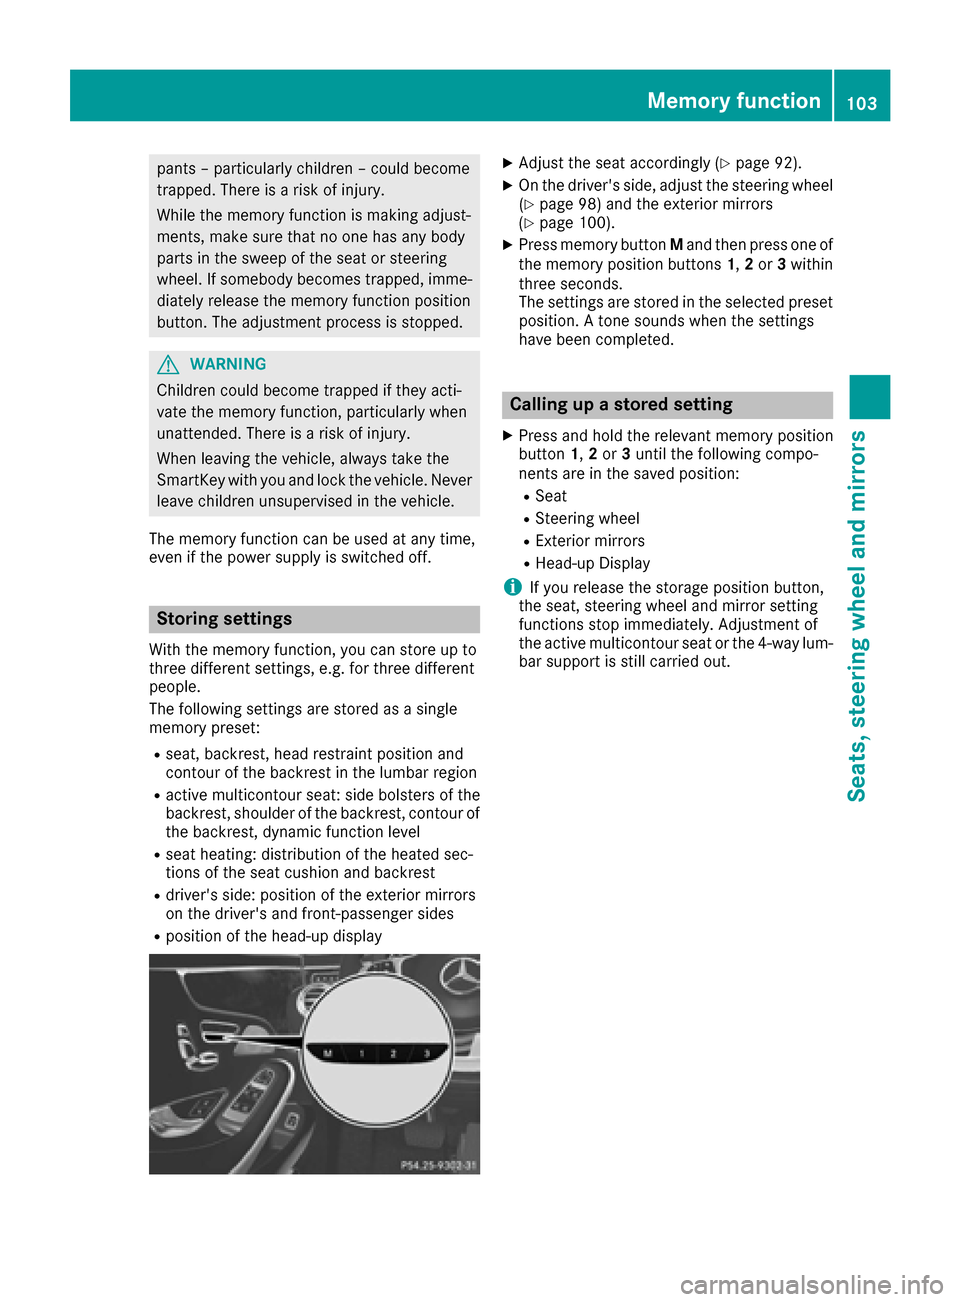
XPress memory button Mand then press one of
the memory position buttons 1,2or 3within
three seconds.
The settings are stored in the selected preset
position. A tone sounds when the settings
have been completed.
Calling up a stored setting
XPress and hold the relevant memory position
button 1,2or 3until the following compo-
nents are in the saved position:
RSeat
RSteering wheel
RExterior mirrors
RHead-up Display
iIf you release the storage position button,
the seat, steering wheel and mirror setting
functions stop immediately. Adjustment of
the active multicontour seat or the 4-way lum-
bar support is still carried out.
Memory function103
Seats, steering wheel and mirrors
Z
Page 108 of 338

0087High-beam flasher
0085Turn signal, left
XTo indicate briefly:press the combination
switch briefly to the pressure point in direc-
tion of arrow 0044or0085.
The corresponding turn signal flashes three
times.
XTo indicate: press the combination switch
beyond the pressure point in direction of
arrow 0044or0085.
XTo switch on the high-beam headlamps:
turn the light switch to the 0058or0058
position.
XPress the combination switch beyond the
pressure point in the direction of arrow 0043.
In the 0058position, the high-beam head-
lamps are switched on only when it is dark and
the engine is running.
The blue 0057indicator lamp on the instru-
ment cluster lights up when the high-beam
headlamps are switched on.
XTo switch off the high-beam headlamps:
move the combination switch back to its nor-
mal position.
The blue 0057indicator lamp on the instru-
ment cluster goes out.
Vehicles with Adaptive Highbeam Assist
Plus:
If Adaptive Highbeam Assist Plus is activated, it
automatically controls activation and deactiva-
tion of the high-beam headlamps (
Ypage 106).
XHigh-beam flasher: pull the combination
switch in the direction of arrow 0087.
Hazard warning lamps
XTo switch the hazard warning lamps on or
off: press button 0043.
The turn signal lamps flash when the hazard
warning lamps are switched on. If you now
switch on a turn signal lamp using the com-
bination switch, only the turn signal lamp on
the corresponding side of the vehicle will
flash.
The hazard warning lamps switch on automati-
cally if an air bag is deployed.
The hazard warning lamps still operate if the
ignition is switched off.
Cornering light function
The cornering light function improves the illu-
mination of the road over a wide angle in the
direction you are turning, enabling better visi-
bility in tight bends, for example. It can only be
activated when the low-beam headlamps are
switched on.
Active:
Rif you are driving at speeds below 25 mph
(40 km/h) and switch on the turn signal or
turn the steering wheel
Rif you are driving at speeds between 25 mph
(40 km/h) and 45 mph (70 km/h) and turn
the steering wheel
The cornering lamp may remain lit for a short
time, but is automatically switched off after no
more than three minutes.
Adaptive Highbeam Assist Plus
General notes
With Adaptive Highbeam Assist Plus, you can
automatically switch between low-beam, partial
high-beam and high-beam headlamps.
Partial high-beam is a form of illumination
whereby the high-beam is directed past other
road users. Other road users are kept out of the
high-beam. This prevents glare. When there is a
vehicle in front, for example, the high-beam
headlamps illuminate the areas to its right and
left. The vehicle in front is illuminated by the low-
beam headlamps.
The system automatically adapts the low-beam
headlamp range depending on the distance to
the other vehicle. Once the system no longer
106Exterior lighting
Lights and windshield wipers
Page 123 of 338
There is a risk of fire and an accident. Releasethe parking brake fully before driving off.
!Do not warm up the engine with the vehicle
stationary. Drive off immediately. Avoid high
engine speeds and driving at full throttle until
the engine has reached its operating temper-
ature.
Only shift the automatic transmission to the
desired drive position when the vehicle is sta-
tionary.
Where possible, avoid spinning the drive
wheels when pulling away on slippery roads.
You could otherwise damage the drive train.
!At low engine oil temperatures under 68 ‡
(+20 †), the maximum engine speed is limi-
ted in order to protect the engine. To protect
the engine and maintain smooth engine oper-
ation, avoid driving at full throttle when the
engine is cold.
Key positions
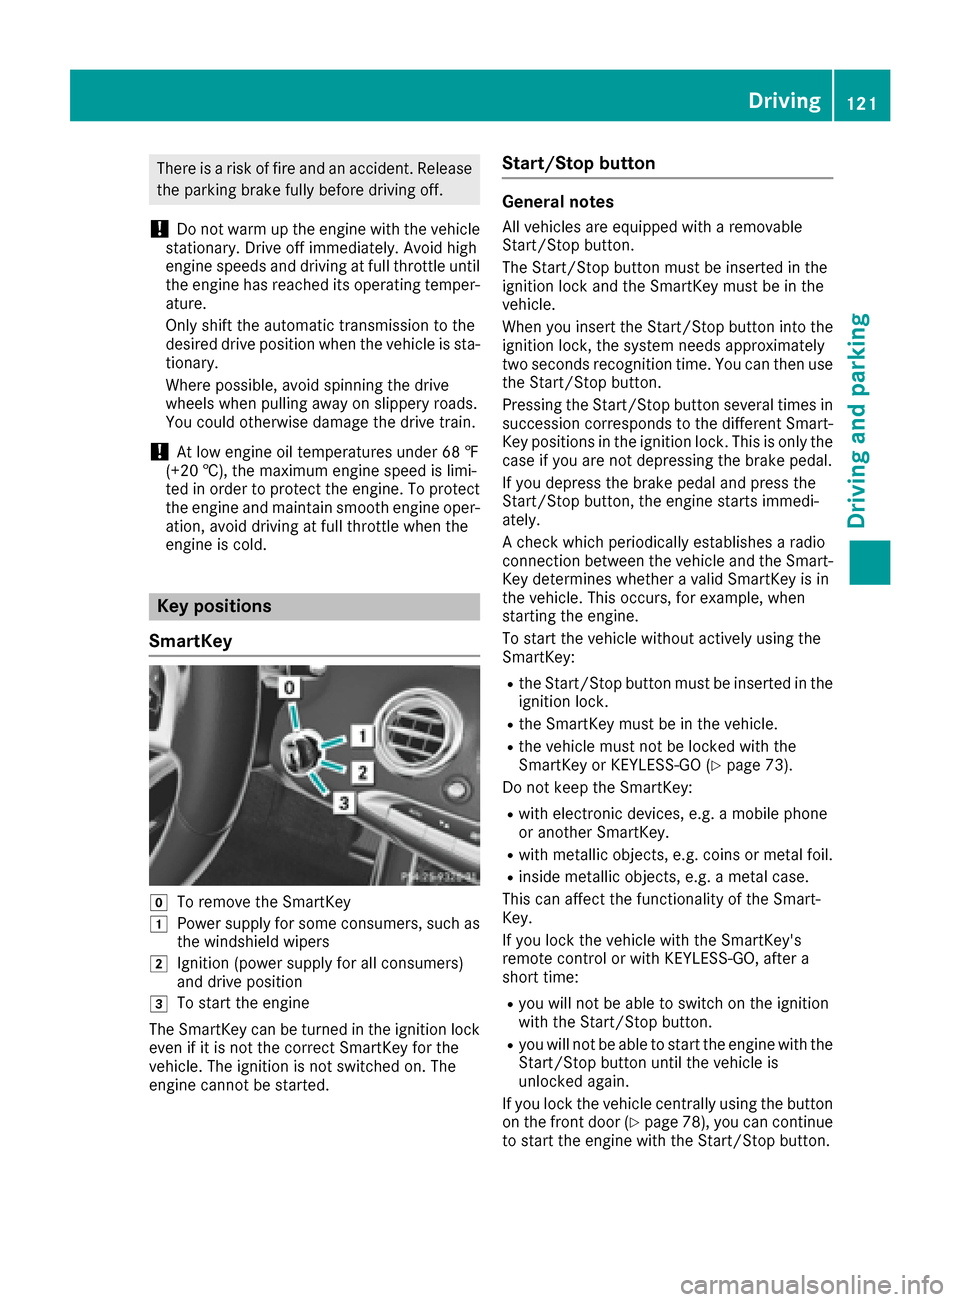
SmartKey
005ATo remove the SmartKey
0047Power supply for some consumers, such as
the windshield wipers
0048Ignition (power supply for all consumers)
and drive position
0049To start the engine
The SmartKey can be turned in the ignition lock
even if it is not the correct SmartKey for the
vehicle. The ignition is not switched on. The
engine cannot be started.
Start/Stop button
General notes
All vehicles are equipped with a removable
Start/Stop button.
The Start/Stop button must be inserted in the
ignition lock and the SmartKey must be in the
vehicle.
When you insert the Start/Stop button into the
ignition lock, the system needs approximately
two seconds recognition time. You can then use
the Start/Stop button.
Pressing the Start/Stop button several times in
succession corresponds to the different Smart-
Key positions in the ignition lock. This is only the
case if you are not depressing the brake pedal.
If you depress the brake pedal and press the
Start/Stop button, the engine starts immedi-
ately.
A check which periodically establishes a radio
connection between the vehicle and the Smart-
Key determines whether a valid SmartKey is in
the vehicle. This occurs, for example, when
starting the engine.
To start the vehicle without actively using the
SmartKey:
Rthe Start/Stop button must be inserted in the
ignition lock.
Rthe SmartKey must be in the vehicle.
Rthe vehicle must not be locked with the
SmartKey or KEYLESS-GO (Ypage 73).
Do not keep the SmartKey:
Rwith electronic devices, e.g. a mobile phone
or another SmartKey.
Rwith metallic objects, e.g. coins or metal foil.
Rinside metallic objects, e.g. a metal case.
This can affect the functionality of the Smart-
Key.
If you lock the vehicle with the SmartKey's
remote control or with KEYLESS-GO, after a
short time:
Ryou will not be able to switch on the ignition
with the Start/Stop button.
Ryou will not be able to start the engine with the
Start/Stop button until the vehicle is
unlocked again.
If you lock the vehicle centrally using the button
on the front door (
Ypage 78), you can continue
to start the engine with the Start/Stop button.
Driving121
Driving and parking
Z
Page 132 of 338
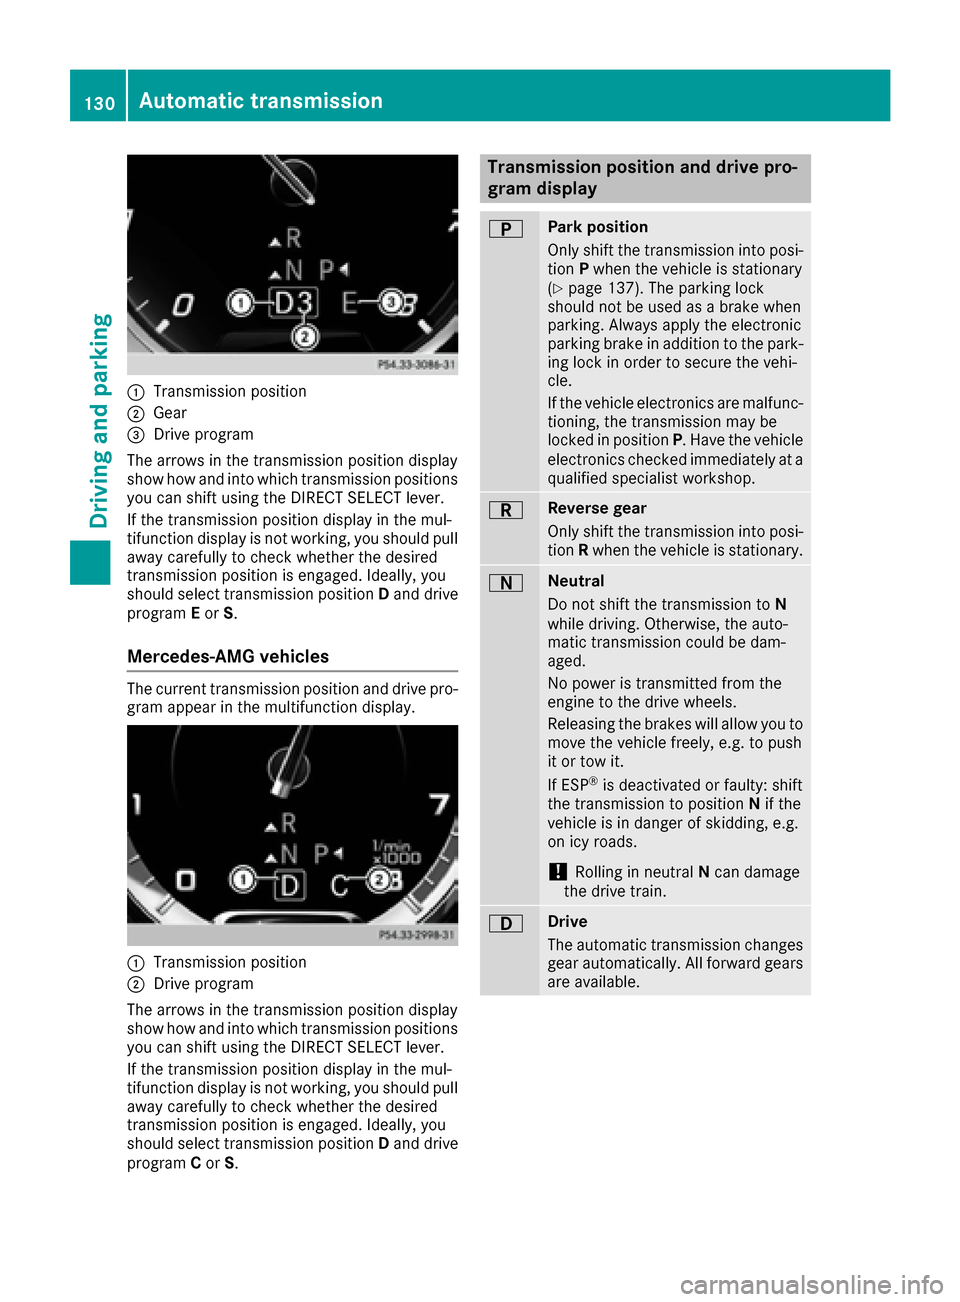
0043Transmission position
0044Gear
0087Drive program
The arrows in the transmission position display
show how and into which transmission positions
you can shift using the DIRECT SELECT lever.
If the transmission position display in the mul-
tifunction display is not working, you should pull
away carefully to check whether the desired
transmission position is engaged. Ideally, you
should select transmission position Dand drive
program Eor S.
Mercedes-AMG vehicles
The current transmission position and drive pro-
gram appear in the multifunction display.
0043Transmission position
0044Drive program
The arrows in the transmission position display
show how and into which transmission positions
you can shift using the DIRECT SELECT lever.
If the transmission position display in the mul-
tifunction display is not working, you should pull
away carefully to check whether the desired
transmission position is engaged. Ideally, you
should select transmission position Dand drive
program Cor S.
Transmission position and drive pro-
gram display
0045Park position
Only shift the transmission into posi-
tion Pwhen the vehicle is stationary
(
Ypage 137). The parking lock
should not be used as a brake when
parking. Always apply the electronic
parking brake in addition to the park-
ing lock in order to secure the vehi-
cle.
If the vehicle electronics are malfunc- tioning, the transmission may be
locked in position P. Have the vehicle
electronics checked immediately at a
qualified specialist workshop.
0046Reverse gear
Only shift the transmission into posi-
tion Rwhen the vehicle is stationary.
0044Neutral
Do not shift the transmission to N
while driving. Otherwise, the auto-
matic transmission could be dam-
aged.
No power is transmitted from the
engine to the drive wheels.
Releasing the brakes will allow you to
move the vehicle freely, e.g. to push
it or tow it.
If ESP
®is deactivated or faulty: shift
the transmission to position Nif the
vehicle is in danger of skidding, e.g.
on icy roads.
!Rolling in neutral Ncan damage
the drive train.
003ADrive
The automatic transmission changes
gear automatically. All forward gears
are available.
130Automatic transmission
Driving and parking
Page 134 of 338
You can also activate manual drive programM
using the steering wheel paddle shifters
(
Ypage 132). In manual drive program M, you
can briefly change gear yourself by using the
steering wheel paddle shifters.
Mercedes-AMG vehicles
C Controlled
EfficiencyComfortable, economical
driving
S SportSporty driving style
M ManualManual gear shifting
Permanent drive program Mis only available for
Mercedes-AMG vehicles.
Further information about permanent drive pro-
gram M(
Ypage 133).
You can also activate manual drive program M
using the steering wheel paddle shifters
(
Ypage 132). In manual drive program M, you
can briefly change gear yourself by using the
steering wheel paddle shifters.
For further information on the automatic drive
program, see (
Ypage 132).
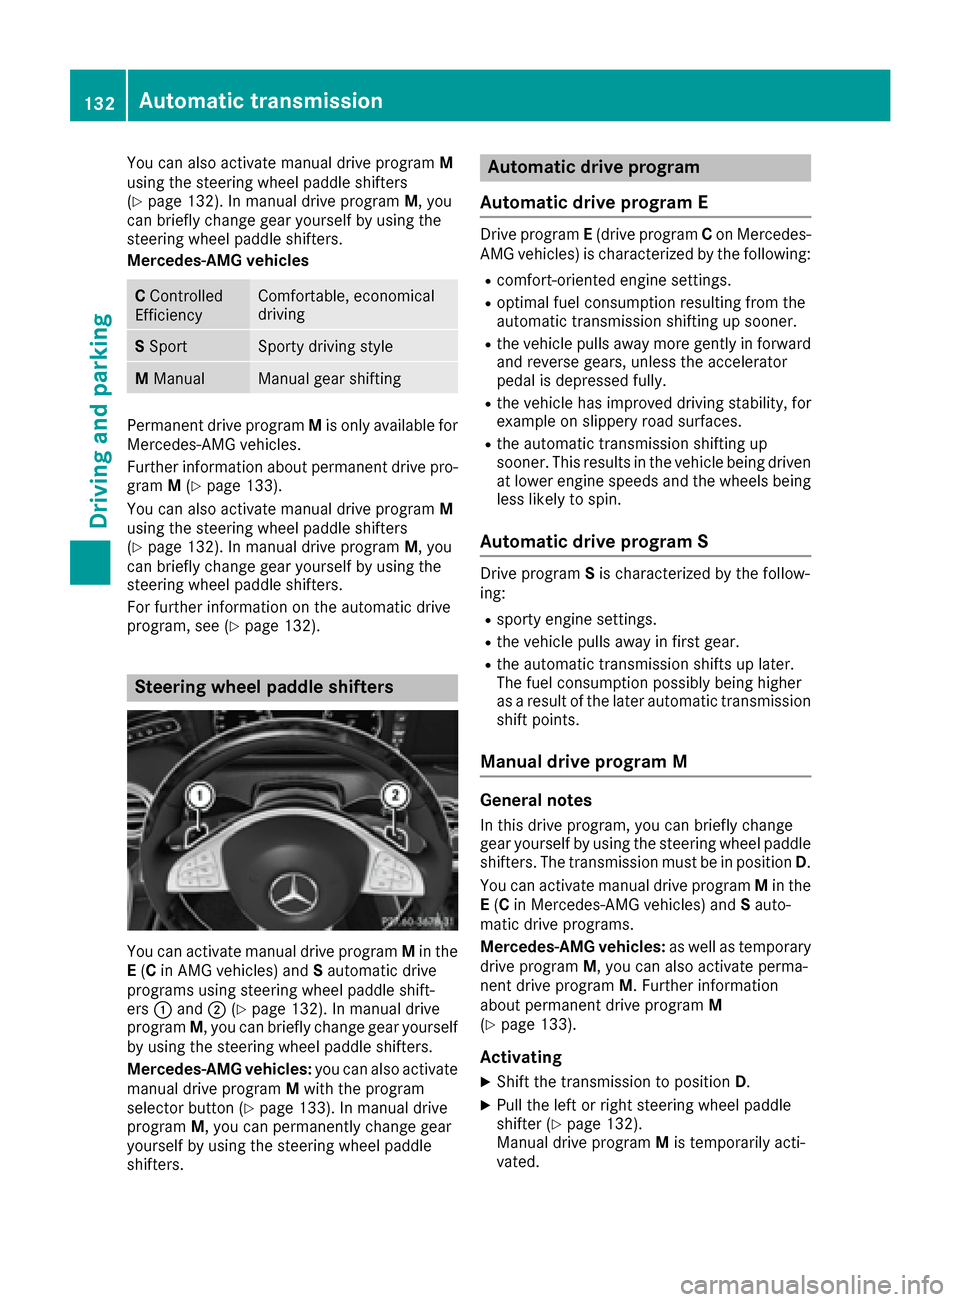
Steering wheel paddle shifters
You can activate manual drive program Min the
E (C in AMG vehicles) and Sautomatic drive
programs using steering wheel paddle shift-
ers 0043and 0044(
Ypage 132). In manual drive
program M, you can briefly change gear yourself
by using the steering wheel paddle shifters.
Mercedes-AMG vehicles: you can also activate
manual drive program Mwith the program
selector button (
Ypage 133). In manual drive
program M, you can permanently change gear
yourself by using the steering wheel paddle
shifters.
Automatic drive program
Automatic drive program E
Drive program E(drive program Con Mercedes-
AMG vehicles) is characterized by the following:
Rcomfort-oriented engine settings.
Roptimal fuel consumption resulting from the
automatic transmission shifting up sooner.
Rthe vehicle pulls away more gently in forward
and reverse gears, unless the accelerator
pedal is depressed fully.
Rthe vehicle has improved driving stability, for
example on slippery road surfaces.
Rthe automatic transmission shifting up
sooner. This results in the vehicle being driven
at lower engine speeds and the wheels being
less likely to spin.
Automatic drive program S
Drive program Sis characterized by the follow-
ing:
Rsporty engine settings.
Rthe vehicle pulls away in first gear.
Rthe automatic transmission shifts up later.
The fuel consumption possibly being higher
as a result of the later automatic transmission
shift points.
Manual drive program M
General notes
In this drive program, you can briefly change
gear yourself by using the steering wheel paddle
shifters. The transmission must be in position D.
You can activate manual drive program Min the
E (C in Mercedes-AMG vehicles) and Sauto-
matic drive programs.
Mercedes-AMG vehicles: as well as temporary
drive program M, you can also activate perma-
nent drive program M. Further information
about permanent drive program M
(
Ypage 133).
Activating
XShift the transmission to position D.
XPull the left or right steering wheel paddle
shifter (Ypage 132).
Manual drive program Mis temporarily acti-
vated.
132Automatic transmission
Driving and parking