2017 MERCEDES-BENZ S-Class COUPE clock
[x] Cancel search: clockPage 82 of 338
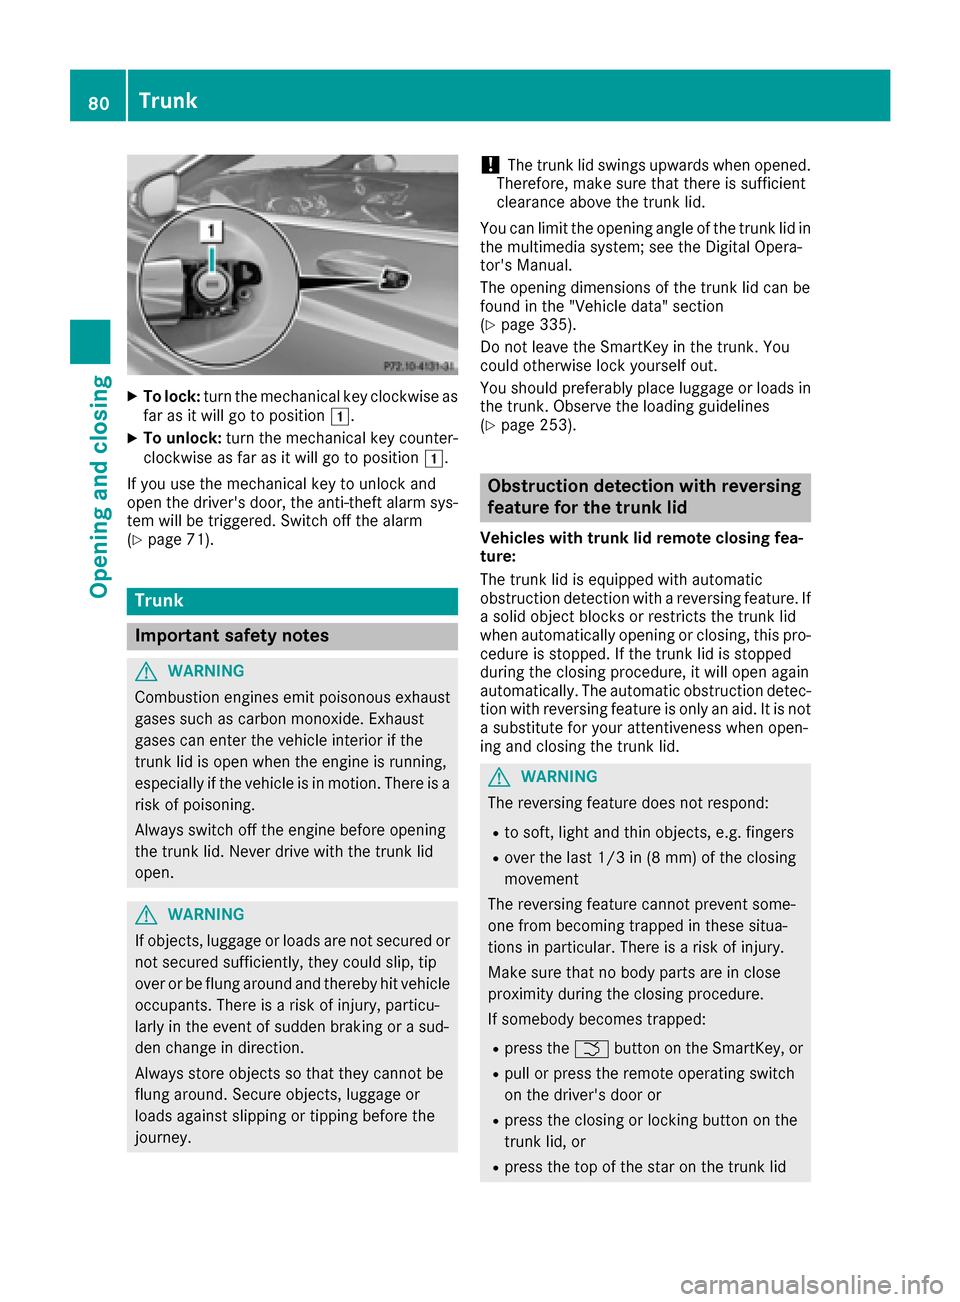
XTo lock:turn the mechanical key clockwise as
far as it will go to position 0047.
XTo unlock:turn the mechanical key counter-
clockwise as far as it will go to position 0047.
If you use the mechanical key to unlock and
open the driver's door, the anti-theft alarm sys-
tem will be triggered. Switch off the alarm
(
Ypage 71).
Trunk
Important safety notes
GWARNING
Combustion engines emit poisonous exhaust
gases such as carbon monoxide. Exhaust
gases can enter the vehicle interior if the
trunk lid is open when the engine is running,
especially if the vehicle is in motion. There is a
risk of poisoning.
Always switch off the engine before opening
the trunk lid. Never drive with the trunk lid
open.
GWARNING
If objects, luggage or loads are not secured or
not secured sufficiently, they could slip, tip
over or be flung around and thereby hit vehicle
occupants. There is a risk of injury, particu-
larly in the event of sudden braking or a sud-
den change in direction.
Always store objects so that they cannot be
flung around. Secure objects, luggage or
loads against slipping or tipping before the
journey.
!The trunk lid swings upwards when opened.
Therefore, make sure that there is sufficient
clearance above the trunk lid.
You can limit the opening angle of the trunk lid in
the multimedia system; see the Digital Opera-
tor's Manual.
The opening dimensions of the trunk lid can be
found in the "Vehicle data" section
(
Ypage 335).
Do not leave the SmartKey in the trunk. You
could otherwise lock yourself out.
You should preferably place luggage or loads in
the trunk. Observe the loading guidelines
(
Ypage 253).
Obstruction detection with reversing
feature for the trunk lid
Vehicles with trunk lid remote closing fea-
ture:
The trunk lid is equipped with automatic
obstruction detection with a reversing feature. If
a solid object blocks or restricts the trunk lid
when automatically opening or closing, this pro-
cedure is stopped. If the trunk lid is stopped
during the closing procedure, it will open again
automatically. The automatic obstruction detec-
tion with reversing feature is only an aid. It is not a substitute for your attentiveness when open-
ing and closing the trunk lid.
GWARNING
The reversing feature does not respond:
Rto soft, light and thin objects, e.g. fingers
Rover the last 1/3 in (8 mm) of the closing
movement
The reversing feature cannot prevent some-
one from becoming trapped in these situa-
tions in particular. There is a risk of injury.
Make sure that no body parts are in close
proximity during the closing procedure.
If somebody becomes trapped:
Rpress the 0054button on the SmartKey, or
Rpull or press the remote operating switch
on the driver's door or
Rpress the closing or locking button on the
trunk lid, or
Rpress the top of the star on the trunk lid
80Trunk
Opening and closing
Page 87 of 338
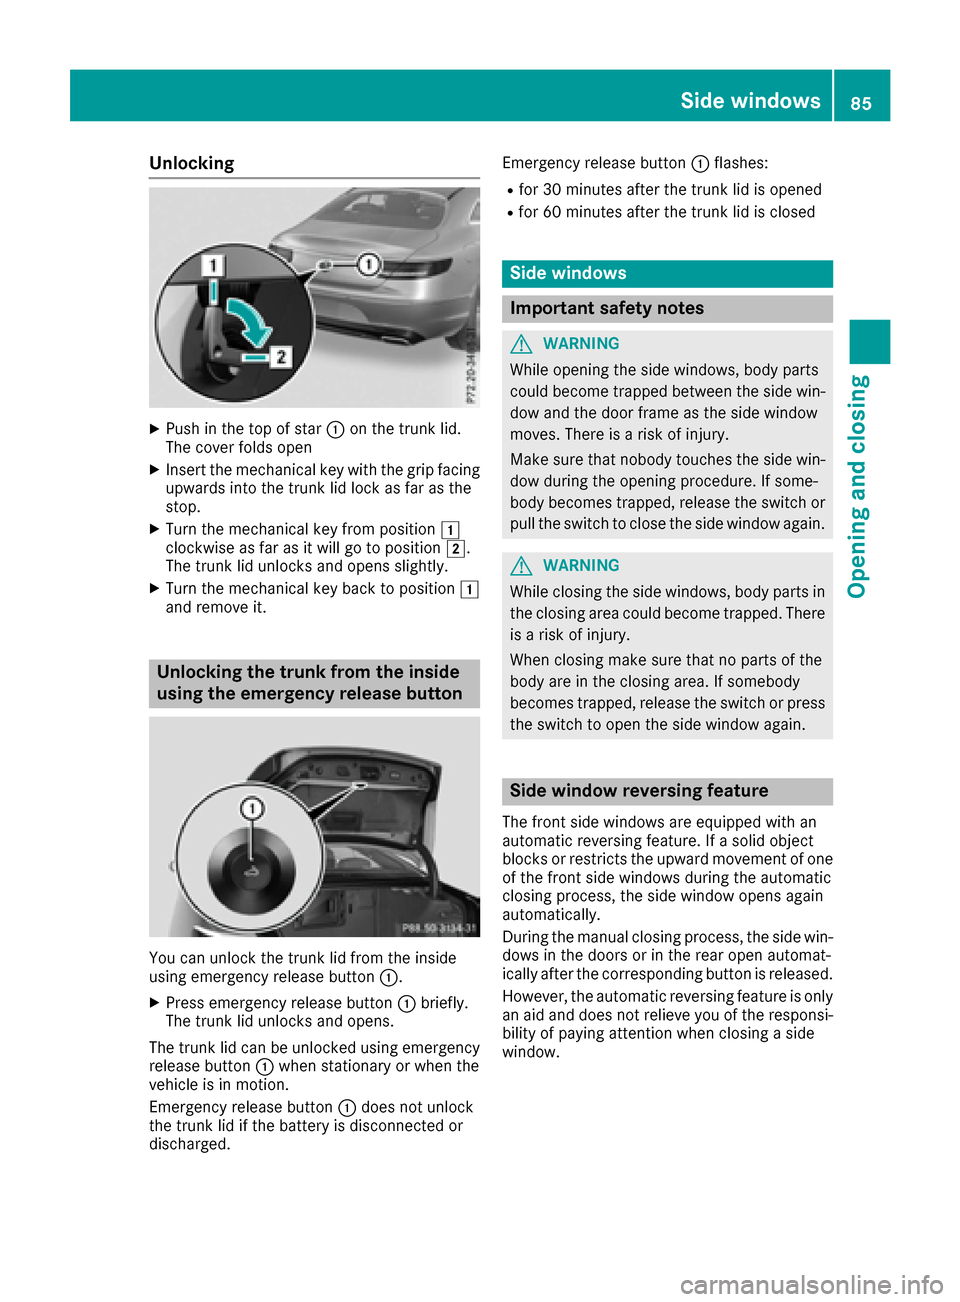
Unlocking
XPush in the top of star0043on the trunk lid.
The cover folds open
XInsert the mechanical key with the grip facing
upwards into the trunk lid lock as far as the
stop.
XTurn the mechanical key from position 0047
clockwise as far as it will go to position 0048.
The trunk lid unlocks and opens slightly.
XTurn the mechanical key back to position 0047
and remove it.
Unlocking the trunk from the inside
using the emergency release button
You can unlock the trunk lid from the inside
using emergency release button 0043.
XPress emergency release button 0043briefly.
The trunk lid unlocks and opens.
The trunk lid can be unlocked using emergency
release button 0043when stationary or when the
vehicle is in motion.
Emergency release button 0043does not unlock
the trunk lid if the battery is disconnected or
discharged. Emergency release button
0043flashes:
Rfor 30 minutes after the trunk lid is opened
Rfor 60 minutes after the trunk lid is closed
Side windows
Important safety notes
GWARNING
While opening the side windows, body parts
could become trapped between the side win-
dow and the door frame as the side window
moves. There is a risk of injury.
Make sure that nobody touches the side win-
dow during the opening procedure. If some-
body becomes trapped, release the switch or
pull the switch to close the side window again.
GWARNING
While closing the side windows, body parts in
the closing area could become trapped. There is a risk of injury.
When closing make sure that no parts of the
body are in the closing area. If somebody
becomes trapped, release the switch or press
the switch to open the side window again.
Side window reversing feature
The front side windows are equipped with an
automatic reversing feature. If a solid object
blocks or restricts the upward movement of one
of the front side windows during the automatic
closing process, the side window opens again
automatically.
During the manual closing process, the side win- dows in the doors or in the rear open automat-
ically after the corresponding button is released.
However, the automatic reversing feature is only
an aid and does not relieve you of the responsi-
bility of paying attention when closing a side
window.
Side windows85
Opening and closing
Z
Page 121 of 338
In order to ensure the direct flow of fresh air
through the air vents into the vehicle interior,
please observe the following notes:
Rkeep the air inlet between the windshield and
the hood free of blockages, such as ice, snow
or leaves.
Rnever cover the air vents or air intake grilles in
the vehicle interior.
Setting the air vents
Air vents are located:
Ron the left and right-hand side of the dash-
board
Rin the middle of the dashboard
Rin the front head restraints
Rin the glove box
Rin the rear-compartment center console
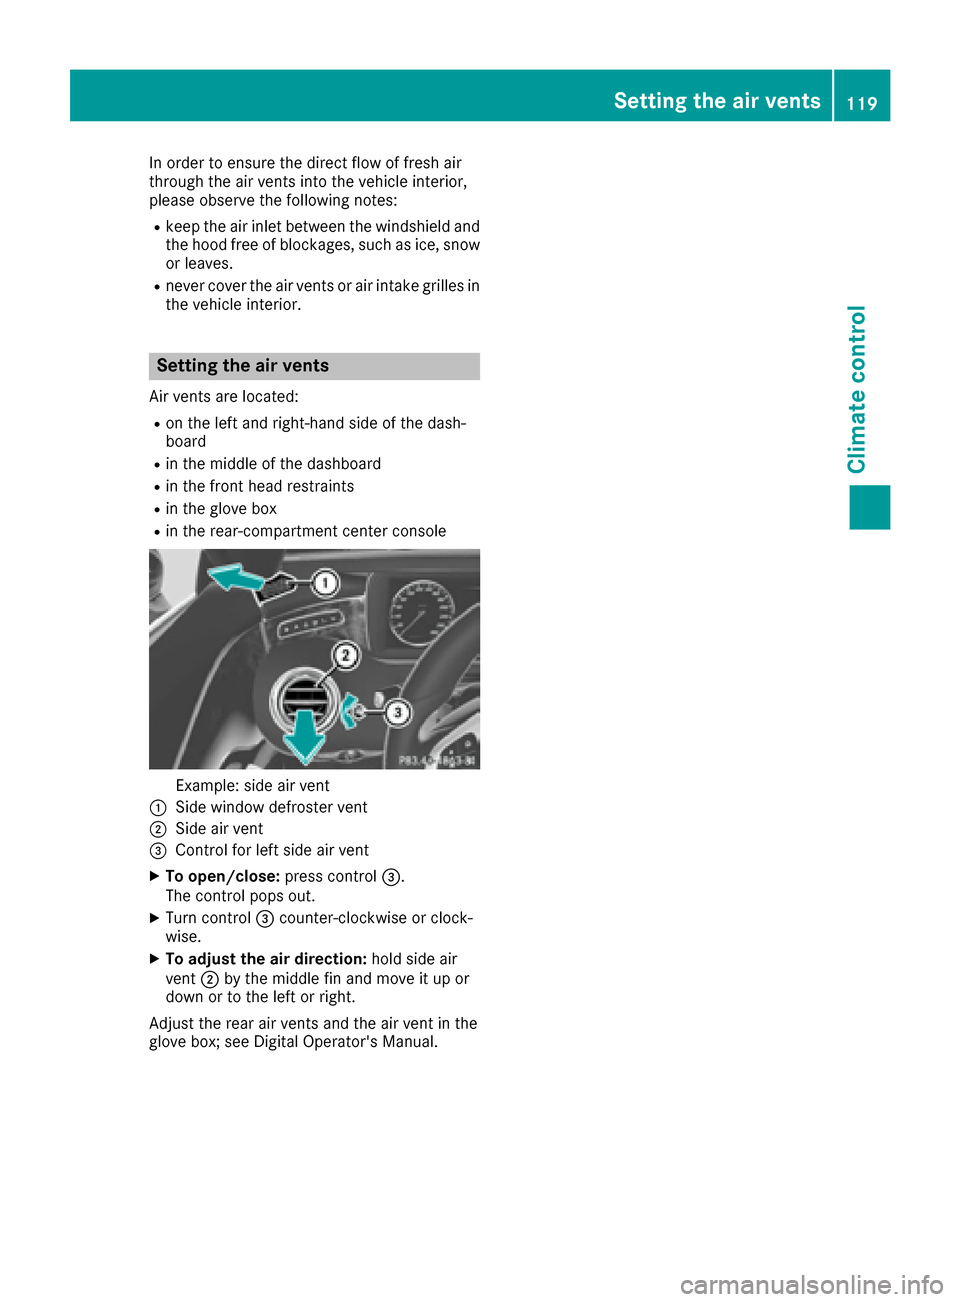
Example: side air vent
0043Side window defroster vent
0044Side air vent
0087Control for left side air vent
XTo open/close: press control0087.
The control pops out.
XTurn control 0087counter-clockwise or clock-
wise.
XTo adjust the air direction: hold side air
vent 0044by the middle fin and move it up or
down or to the left or right.
Adjust the rear air vents and the air vent in the
glove box; see Digital Operator's Manual.
Setting the air vents119
Climate control
Z
Page 138 of 338
If you or others come into contact with fuel,
observe the following:
RWash away fuel from skin immediately
using soap and water.
RIf fuel comes into contact with your eyes,
immediately rinse them thoroughly with
clean water. Seek medical assistance with-
out delay.
RIf fuel is swallowed, seek medical assis-
tance without delay. Do not induce vomit-
ing.
RImmediately change out of clothing which
has come into contact with fuel.
GWARNING
Electrostatic buildup can create sparks and
ignite fuel vapors. There is a risk of fire and
explosion.
Always touch the vehicle body before opening
the fuel filler flap or touching the fuel pump
nozzle. Any existing electrostatic buildup is
thereby discharged.
Do not get into the vehicle again during the refu-
eling process. Otherwise, electrostatic charge
could build up again.
!Do not use diesel to refuel vehicles with a
gasoline engine. Do not switch on the ignition
if you accidentally refuel with the wrong fuel.
Otherwise, the fuel will enter the fuel system. Even small amounts of the wrong fuel could
result in damage to the fuel system and the
engine. Notify a qualified specialist workshop
and have the fuel tank and fuel lines drained
completely.
!Overfilling the fuel tank could damage the
fuel system.
!Take care not to spill any fuel on painted
surfaces. You could otherwise damage the
paintwork.
!Use a filter when adding fuel from a fuel can.
The fuel lines and/or the fuel injection system
could otherwise be blocked by particles from
the fuel can.
If you overfill the fuel tank, fuel could spray out
when the fuel pump nozzle is removed. For further information on fuel and fuel quality
(
Ypage 331).
Refueling
General information
Pay attention to the important safety notes
(Ypage 135).
If you unlock/lock the vehicle from the outside,
the fuel filler flap also unlocks/locks.
The position of the fuel filler cap is displayed in
the instrument cluster 00B6. The arrow next to
the filling pump indicates the side of the vehicle.
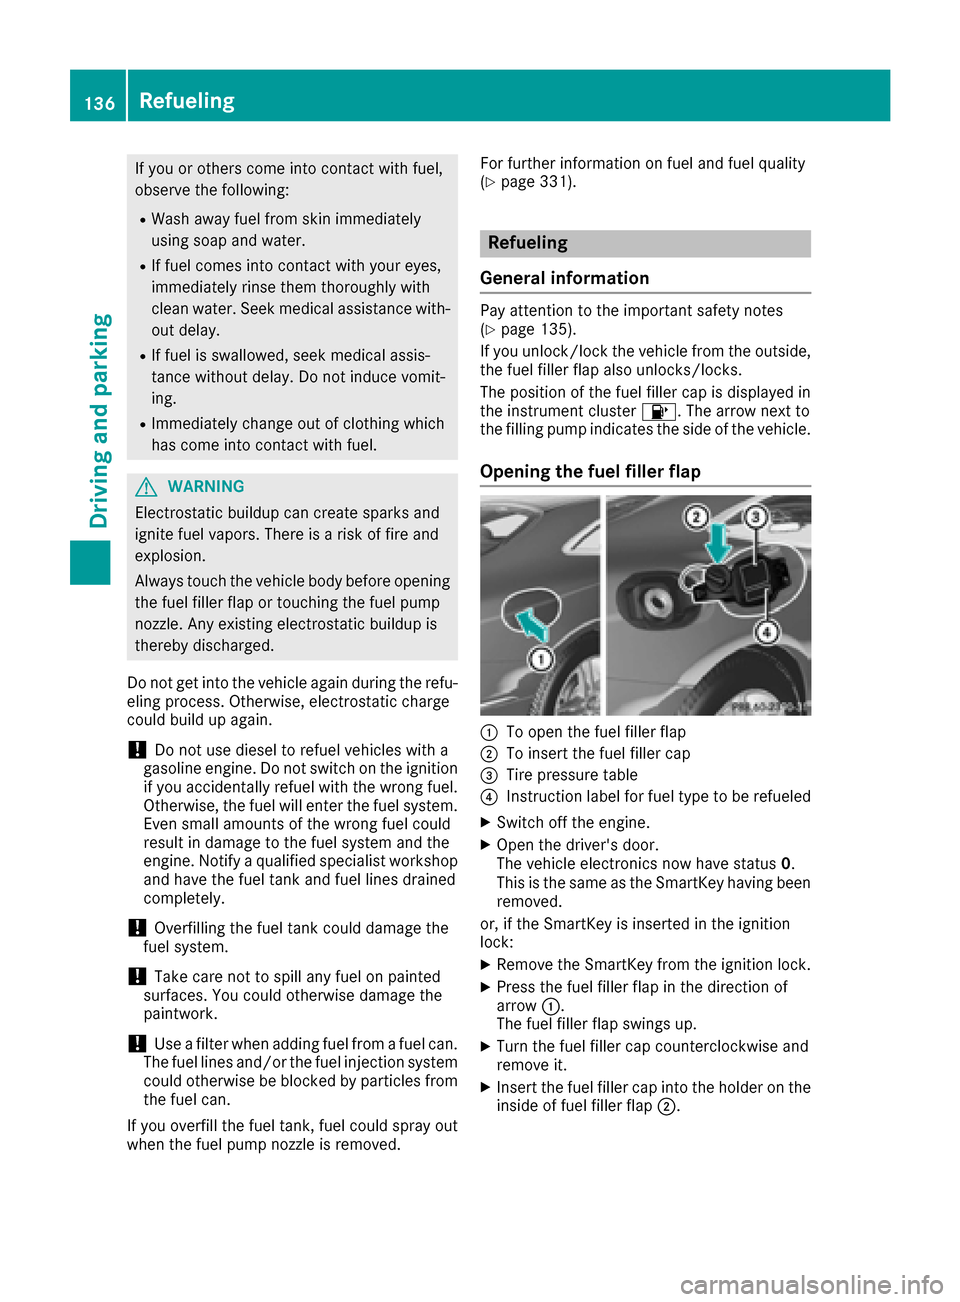
Opening the fuel filler flap
0043To open the fuel filler flap
0044To insert the fuel filler cap
0087Tire pressure table
0085Instruction label for fuel type to be refueled
XSwitch off the engine.
XOpen the driver's door.
The vehicle electronics now have status 0.
This is the same as the SmartKey having been
removed.
or, if the SmartKey is inserted in the ignition
lock:
XRemove the SmartKey from the ignition lock.
XPress the fuel filler flap in the direction of
arrow 0043.
The fuel filler flap swings up.
XTurn the fuel filler cap counterclockwise and
remove it.
XInsert the fuel filler cap into the holder on the inside of fuel filler flap 0044.
136Refueling
Driving and parking
Page 139 of 338
XCompletely insert thefiller neck of the fuel
pump nozz leinto the tank, hook in place and
refuel.
XOnly fill the tank unt ilthe pump nozz le
swit ches off.
Do not add any more fuel after the pump stops filli ng for the first time. Otherwise, fuel may
leak out.
Closing the fuel filler flap
XReplac e the cap on the filler neck and turn
clock wiseuntil it engages audibly.
XClose the fuel filler flap. If
you drive at speeds above 2 km/hwith the fuel
filler flap open, the Fuel Filler Flap Open
messageisshown on the multifunction display.
Close the fuel filler flap before locking the vehi-
cle.
If you are driving with the fuel filler cap open, the 00B6 reserve fuel warning lamp flashes. A mes-
sage appears in the multifunction display
(
Ypage 218).
In addition, the 00B9Check Engine warning
lamp may light up (
Ypage 237).
For further information on warning and indicator
lamps inthe instrument cluster, see
(
Ypage 237).
Problems with fuel and the fuel tank
ProblemPossible causes/consequences and 0050Solutions
Fuelisleaking from the
veh icle.GWAR NING
The fuel line or the fuel tank is faulty.
Risk of explos ion or fire.
XApply the electr icparking brake.
XSwit ch off the engine.
XMake sure that the ignition is switched off (Ypage 121).
or
XWhen using the SmartKey, turn the SmartKey to position 0in the
ignition lock and remove it(Ypage 121).
XDo not restart the engine under any circumstances.
XConsult a qualified specialist workshop.
The fuel filler flap cannot
be opened.The fuel filler flap isnot unlocked.
XUnlock the veh icle(Ypage 72).
The SmartKey battery is discharged or nearly discharged.
XUnlock the veh icleusing the mechanical key (Ypage 74).
The fuel filler flap isunlocked, but the opening mechanism is jammed.
XConsult a qualified specialist workshop.
Parking
Important safety notes
GWARNING
Flammable material such as leaves, grass or
twigs may ignite ifthey come into contact with
hot parts of the exhaust system or exhaust
gas flow. There is a risk of fire.
Park the vehicle so that no flammable mate-
rials come into contact with parts of the vehi-
cle which are hot. Take particular care not to
park on dry grassland or harvested grain
fields.
Parking137
Driving and parking
Z
Page 188 of 338

Important safety notes
GWARNING
If you operate information systems and com-
munication equipmen tintegrate din th evehi-
cle while driving ,you will be distracte dfrom
traffic conditions. You could also lose control
of th evehicle. Ther eis aris kof an accident.
Only operate th eequipmen twhen th etraffic
situation permits. If you are no tsur ethat this
is possible ,park th evehicl epayin gattention
to traffic condition sand operate th eequip-
men twhen th evehicl eis stationary.
You must observ eth elegal requirements for th e
country in whic hyou are currentl ydriving when
operating th eon-board computer.
GWARNIN G
If th einstrumen tcluste rhas faile dor mal-
functioned, you may no trecognize function
restriction sin systems relevan tto safety. The
operating safet yof your vehicl emay be
impaired .Ther eis aris kof an accident.
Drive on carefully. Hav eth evehicl echecke d
at aqualified specialist workshop immedi-
ately.
If th eoperating safet yof your vehicl eis
impaired ,pull ove ras soo nas it is saf eto do so.
Contac t aqualified specialist workshop.
The on-board computer only shows message sor
warning sfrom certain systems in th emultifunc-
tion display. You should therefor emak esur e
your vehicl eis operating safely at all times .
Fo ran overview, see th einstrumen tpanel illus-
tration (
Ypage 34).
Displays and operation
Instrument cluster lighting
The ligh tsensor in th einstrumen tcluste rauto -
matically control sth ebrightness of th emulti-
function display. In daylight, th edisplays in th e
instrumen tcluste rare illuminated. Adimming
function is no tpossible in daylight.
The lighting in th einstrumen tcluster, in th edis-
plays and th econtrol sin th evehicl einterior can
be adjusted usin gth ebrightness control knob. The brightness control is locate
dbetween th e
instrumen tcluste rand th emultimedia system
display (
Ypage 35).
XTurn thebrightness control knob clockwise or
counter-clockwise.
If you tur nth eligh tswitch (
Ypage 104) to th e
0060, 0058or0058 position ,th ebrightness
will depend upon th ebrightness of th eambi -
en tlight.
Speedometer segments
The segments in th espeedometer indicat e
whic hspee drange is available.
RCruis econtrol activated (Ypage 145):
The segments ligh tup from th estore dspee d
to th een dof th escale.
RDISTRONI CPLU Sactivated (Ypage 147):
On eor two segments in th eset spee drange
ligh tup.
RDISTRONI CPLU Sdetects avehicl ein fron t
moving mor eslowly than th estore dspeed:
The segments between th espee dof th evehi-
cle in fron tand th estore dspee dligh tup.
Tachometer
!
Do no tdriv ein th eoverrevving range, as this
could damag eth eengine.
The red ban din th etachometer indicates th e
engine's overrevving range.
The fuel suppl yis interrupted to protect th e
engin ewhen th ered ban dis reached.
Outside temperature display
You should pay special attention to road condi-
tion swhen temperatures are aroun dfreezing
point.
Bea rin min dthat th eoutside temperature dis-
play indicates th etemperature measured and
does no trecord th eroad temperature.
The outside temperature display is in th emulti-
function display (
Ypage 188).
Ther eis ashort delay before achang ein outside
temperature is shown in th emultifunction dis-
play.
186Displays and operation
On-board computer and displays
Page 256 of 338
Stowage compartments in the front
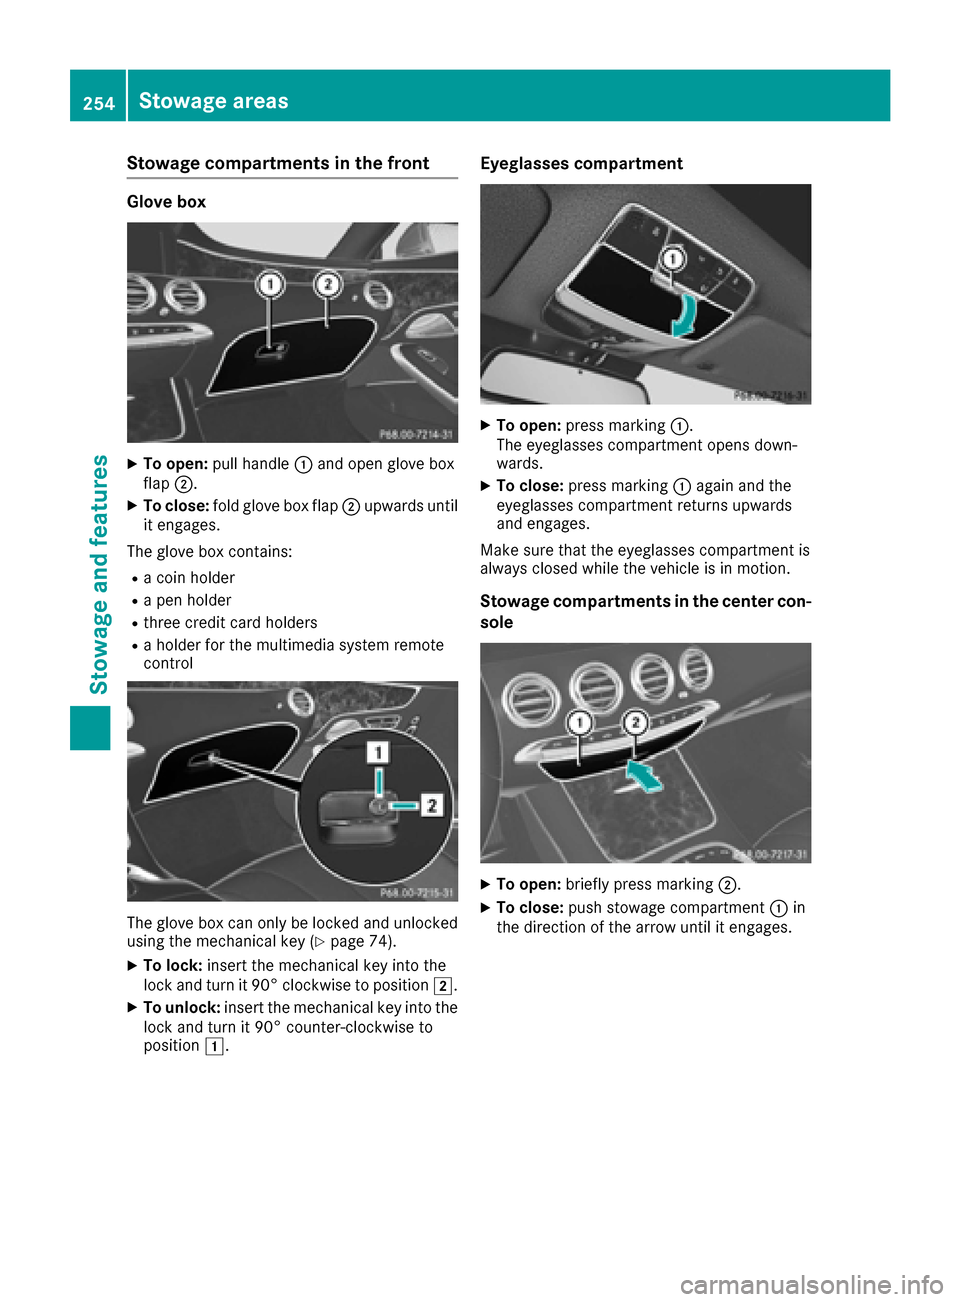
Glove box
XTo open:pull handle 0043and open glove box
flap 0044.
XTo close: fold glove box flap 0044upwards until
it engages.
The glove box contains:
Ra coin holder
Ra pen holder
Rthree credit card holders
Ra holder for the multimedia system remote
control
The glove box can only be locked and unlocked
using the mechanical key (Ypage 74).
XTo lock: insert the mechanical key into the
lock and turn it 90° clockwise to position 0048.
XTo unlock:insert the mechanical key into the
lock and turn it 90° counter-clockwise to
position 0047.
Eyeglasses compartment
XTo open: press marking 0043.
The eyeglasses compartment opens down-
wards.
XTo close: press marking 0043again and the
eyeglasses compartment returns upwards
and engages.
Make sure that the eyeglasses compartment is
always closed while the vehicle is in motion.
Stowage compartments in the center con-
sole
XTo open: briefly press marking 0044.
XTo close:push stowage compartment 0043in
the direction of the arrow until it engages.
254Stowage areas
Stowage and features
Page 278 of 338
Display messagesPossible causes/consequences and0050Solutions
Reduce Engine OilLevel
The engineoil level is to ohigh .
XHaveexcess engin eoil siphoned off .
For Engine OilLevelIgnitionMustBe On
The ignition is switched off .
XTurn theSmartKey to position 2in th eignition loc k (Ypage 121).
or
XOn vehicles wit hKEYLESS-GO ,press th eStart/Sto pbutto ntwice
(Ypage 121).
Nee dMor eTim etoCheck Engine OilLevel
The require dwaiting period was no tobserved.
XIf th eengin eis at normal operating temperature: repeat th emeas -
uremen tafter about fiv eminutes.
If th eengin eis no tat normal operating temperature, e.g. if th e
engin ewas only started briefly: repeat th emeasuremen tafter
approximately 30 minutes.
Engine Oil LevelNotMeasurabl ewithEngine Runnin g
The engineis running; oil level measuremen tis no tpossible.
XSwitc hoff th eengine.
XIf th eengin eis at normal operating temperature: wait about fiv e
minute sbefore carryin gout th emeasurement.
If th eengin eis no tat normal operating temperature, e.g. if th e
engin ewas only started briefly: wait approximately 30 minute s
before carryin gout th emeasurement.
Adding engine oil
HEnvironmenta lnot e
Whe naddin goil, tak ecar eno tto spil lany. If
oil enters th esoil or waterways, it is harmful to
th eenvironment.
!Use only engin eoils and oil filters that are
approve dfor vehicles wit h aservic esystem. A
list of th eengin eoils and oil filters that hav e
been tested and approve din accordanc ewit h
Mercedes-Ben zSpecification sfor Service
Products is available at any authorize d
Mercedes-Ben zCenter.
The followin gcaus eengin efailure or damag e
to th eexhaust system:
RUse of engin eoils and oil filters that hav e
no tbeen expressl yapprove dfor th eservic e
system
RReplacement of engin eoil and oil filter after
th ereplacemen tinterval specified by th e
servic esystem has expired
RUse of engin eoil additive s
!Do notadd to omuc hoil. addin gto omuc h
engin eoil can result in damag eto th eengin e
or to th ecatalytic converter. Hav eexcess
engin eoil siphoned off .
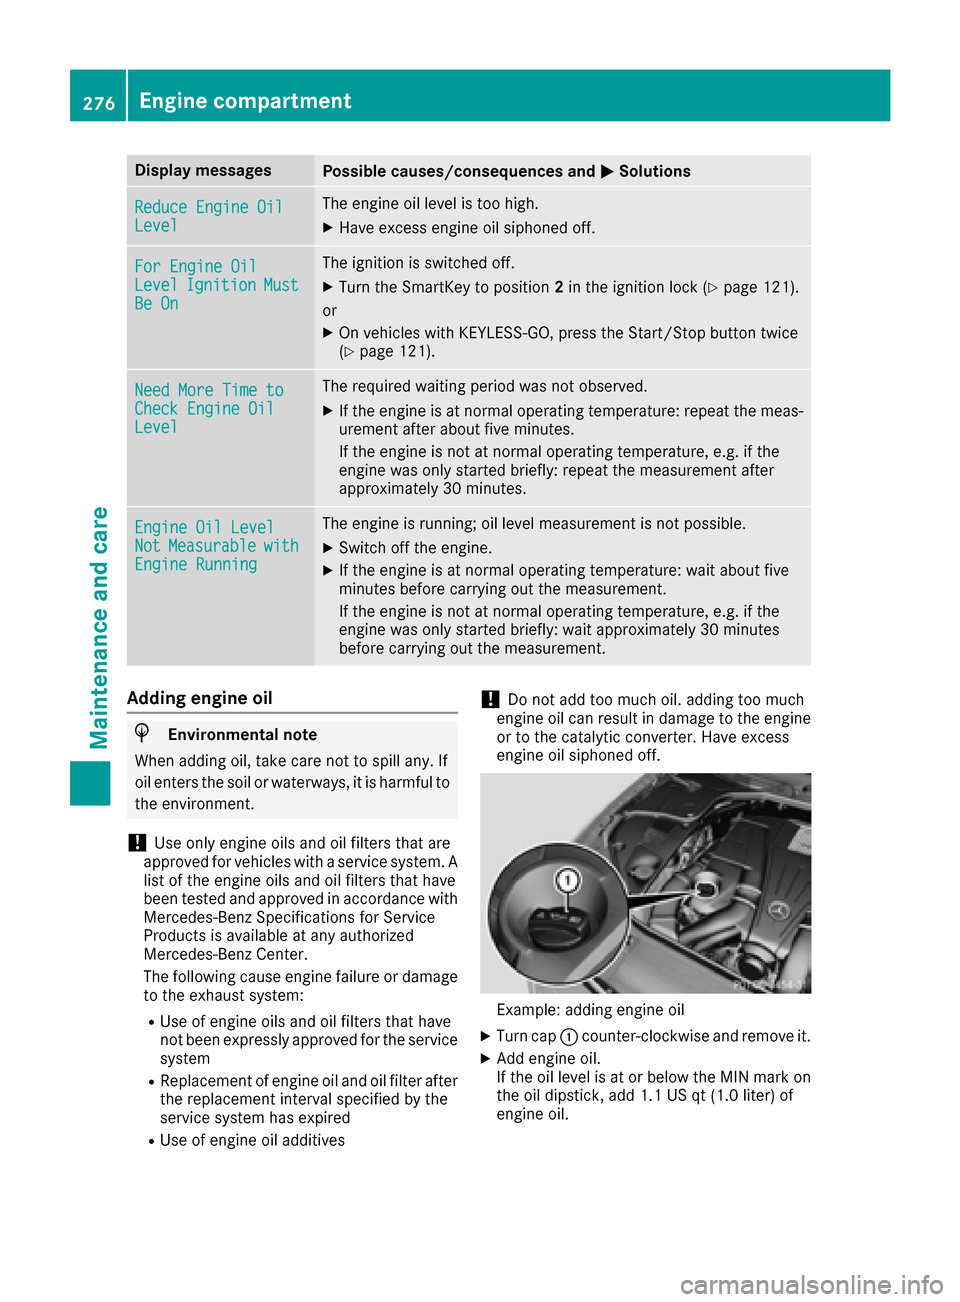
Example: addingengin eoil
XTurn cap 0043counter-clockwise and remove it .
XAddengin eoil.
If th eoil level is at or belo wtheMIN mar kon
th eoil dipstick ,add 1. 1US qt (1.0 lite r) of
engi ne oil.
276Engine compartment
Maintenance and care