2017 MERCEDES-BENZ S-Class CABRIOLET roof
[x] Cancel search: roofPage 8 of 338

Battery (SmartKey)Checking .......................................... 75
Important safety notes .................... 75
Replacing ......................................... 75
Battery (vehicle)
Charging ........................................ 294
Display message ............................ 218
Important safety notes .................. 292
Jump starting ................................. 294
Belt
see Seat belts
Blind Spot Assist
see Active Blind Spot Assist
Blootooth
®
Connecting a different mobile
phone ............................................ 252
Bluetooth
®
Searching for a mobile phone ........ 251
see also Digital Operator's Man-
ual .................................................. 243
Telephony ...................................... 251
Brake Assist
see BAS (Brake Assist System)
Brake fluid
Display message ............................ 210
Notes ............................................. 332
Brake force distribution
see EBD (electronic brake force
distribution)
Brakes
ABS .................................................. 61
Adaptive Brake Assist ...................... 65
BAS .................................................. 62
BAS PLUS with Cross-Traffic
Assist ............................................... 62
Brake fluid (notes) ......................... 332
Display message ............................ 205
EBD .................................................. 68
High-performance brake system .... 147
Hill start assist ............................... 127
HOLD function ............................... 158
Important safety notes .................. 146
Maintenance .................................. 146
Parking brake ................................ 142
Riding tips ...................................... 146
Warning lamp ................................. 234 Breakdown
Where will I find...? ........................ 288
see Flat tire
see Towing away
Brightness control (instrument
cluster lighting) ................................... 35
Buttons on the steering wheel ......... 188
C
California
Important notice for retail cus-
tomers and lessees .......................... 26
Calling up a malfunction
see Display messages
Calling up the climate control bar
Multimedia system ........................ 248
Calling up the climate control
menu
Multimedia system ........................ 248
Camera
see Rear view camera
Car
see Vehicle
Care
360° camera ................................. 284
AIRCAP .......................................... 282
Car wash ........................................ 279
Carpets .......................................... 287
Display ........................................... 285
Exhaust pipe .................................. 285
Exterior lights ................................ 284
General notes ................................ 279
Interior ........................................... 285
Matte finish ................................... 281
Night View Assist Plus ................... 285
Paint .............................................. 281
Plastic trim .................................... 286
Power washer ................................ 280
Rear view camera .......................... 284
Roof lining ...................................... 287
Seat belt ........................................ 287
Seat cover ..................................... 286
Selector lever ................................ 286
Sensors ......................................... 284
Soft top .......................................... 282
Steering wheel ............................... 286
Trim pieces .................................... 286
6Index
Page 19 of 338

Remote controlGarage door opener ....................... 267
Programming (garage door
opener) .......................................... 268
Replacing bulbs
General notes ................................ 111
Reporting safety defects .................... 29
Rescue card ......................................... 30
Reserve (fuel tank)
see Fuel
Reserve fuel
Display message ............................ 219
Warning lamp ................................. 238
Residual heat (climate control) ........ 120
Restraint system
Display message ............................ 212
Introduction ..................................... 41
Warning lamp ................................. 237
Warning lamp (function) ................... 42
Reversing feature
Side windows ................................... 85
Trunk lid ........................................... 80
Roadside Assistance (breakdown) .... 27
Roll bar
Display message ............................ 213
Operation ......................................... 53
Roof
Overview .......................................... 89
see Soft top
Roof lining and carpets (cleaning
guidelines) ......................................... 287
Roof load (maximum) ........................ 334
Route guidance
see also Digital Operator's Man-
ual .................................................. 243
S
SafetyChildren in the vehicle ..................... 57
see Occupant safety
see Operating safety
Safety system
see Driving safety systems
SD card
Inserting/removing ........................ 252 SD memory card
see also Digital Operator's Man-
ual .................................................. 243
Selecting ........................................ 195
Search & Send
see also Digital Operator's Man-
ual .................................................. 243
Seat
Adjusting the front-passenger
seat from the driver's seat ............... 96
Seat belts
Adjusting the driver's and front-
passenger seat belt ......................... 46
Cleaning ......................................... 287
Correct usage .................................. 44
Fastening ......................................... 44
Important safety guidelines ............. 43
Introduction ..................................... 42
Releasing ......................................... 45
Warning lamp ................................. 232
Warning lamp (function) ................... 46
Seating
Seating comfort package ................. 98
Seating comfort package ................... 98
Seats
Active multicontour seat .................. 98
Adjusting (electrically) ..................... 95
Adjusting the 4-way lumbar sup-
port .................................................. 98
Adjusting the head restraint ............ 96
Calling up a stored setting (mem-
ory function) .................................. 106
Cleaning the cover ......................... 286
Correct driver's seat position ........... 94
EASY-ENTRY/EXIT system ............. 102
Folding the backrests forward/
back ................................................. 97
Important safety notes .................... 94
Seat backrest display message ..... 229
Seat heating .................................... 99
Seat heating problem .................... 100
Seat ventilation ................................ 99
Storing settings (memory func-
tion) ............................................... 106
Switching AIRSCARF on/off .......... 100
Switching seat heating on/off ......... 99
Switching seat ventilation on/off .... 99
Index17
Page 27 of 338

Protecting the environment
General notes
HEnvironmental note
Daimler's declared policy is one of compre-
hensive environmental protection.
The objectives are for the natural resources
that form the basis of our existence on this
planet to be used sparingly and in a manner
that takes the requirements of both nature
and humanity into account.
You too can help to protect the environment
by operating your vehicle in an environmen-
tally responsible manner.
Fuel consumption and the rate of engine,
transmission, brake and tire wear are affected by these factors:
Roperating conditions of your vehicle
Ryour personal driving style
You can influence both factors. You should
bear the following in mind:
Operating conditions:
Ravoid short trips as these increase fuel con-
sumption.
Ralways make sure that the tire pressures
are correct.
Rdo not carry any unnecessary weight.
Rremove roof racks once you no longer need
them.
Ra regularly serviced vehicle will contribute
to environmental protection. You should
therefore adhere to the service intervals.
Ralways have service work carried out at a
qualified specialist workshop.
Personal driving style:
Rdo not depress the accelerator pedal when
starting the engine.
Rdo not warm up the engine when the vehicle
is stationary.
Rdrive carefully and maintain a safe distance
from the vehicle in front.
Ravoid frequent, sudden acceleration and
braking.
Rchange gear in good time and use each gear
only up to Ôof its maximum engine speed.
Rswitch off the engine in stationary traffic.
Rkeep an eye on the vehicle's fuel consump-
tion.
Environmental concerns and recom-
mendations
Wherever the operating instructions require you
to dispose of materials, first try to regenerate or
re-use them. Observe the relevant environmen-
tal rules and regulations when disposing of
materials. In this way you will help to protect the
environment.
Genuine Mercedes-Benz parts
HEnvironmental note
Daimler AG also supplies reconditioned major
assemblies and parts which are of the same
quality as new parts. They are covered by the
same Limited Warranty entitlements as new
parts.
!Air bags and Emergency Tensioning Devi-
ces, as well as control units and sensors for
these restraint systems, may be installed in
the following areas of your vehicle:
Rdoors
Rdoor pillars
Rdoor sills
Rseats
Rcockpit
Rinstrument cluster
Rcenter console
Do not install accessories such as audio sys-
tems in these areas. Do not carry out repairs or welding. You could impair the operating
efficiency of the restraint systems.
Have aftermarket accessories installed at a
qualified specialist workshop.
You could jeopardize the operating safety of
your vehicle if you use parts, tires and wheels as
well as accessories relevant to safety which
have not been approved by Mercedes-Benz. This
could lead to malfunctions in safety-relevant
Genuine Mercedes-Benz parts25
Introduction
Z
Page 51 of 338

of whether the front-passenger seat is occupied
or not.
Head bags
Head bags:deploy in the area of the side win-
dows at the front.
When deployed, the head bag enhances the
level of protection for the head. However, it does
not protect the:
Rchest
Rarms
In the event of a side impact, the head bag is
deployed on the side on which the impact
occurs.
If the system determines that they can offer
additional protection to that provided by the
seat belt, a head bag may be deployed in other
accident situations (
Ypage 54).
The head bag on the front-passenger side does
not deploy under the following conditions:
ROCS has detected that the front-passenger
seat is unoccupied.
Rthe front-passenger seat belt is not fastened.
If the belt tongue is engaged in the belt buckle,
the head bag on the front-passenger side
deploys if an appropriate accident situation
occurs. In this case, deployment is independent
of whether the front-passenger seat is occupied
or not.
Occupant Classification System
(OCS)
Introduction
The Occupant Classification System (OCS) cat-
egorizes the person in the front-passenger seat.
Depending on that result, the front-passenger front air bag and front-passenger knee bag are
either enabled or deactivated.
The system does not deactivate:
Rthe side impact air bag
Rthe headbag
Rthe Emergency Tensioning Devices
Prerequisite
To be classified correctly, the front passenger
must sit:
Rwith the seat belt fastened correctly
Rin an almost upright position with their back
against the seat backrest
Rwith their feet resting on the floor, if possible
If the front passenger does not observe these
conditions, OCS may produce a false classifica-
tion, e.g. because the front passenger:
Rtransfers their weight by supporting them-
selves on a vehicle armrest
Rsits in such a way that their weight is raised
from the seat cushion
If it is absolutely necessary to install a child
restraint system on the front-passenger seat, be
sure to observe the correct positioning of the
child restraint system. Never place objects
under or behind the child restraint system, e.g. a
cushion. Fully retract the seat cushion length.
The entire base of the child restraint system
must always rest on the seat cushion of the
front-passenger seat. The backrest of the
forward-facing child restraint system must lie as
flat as possible against the backrest of the front-
passenger seat.
The child restraint system must not touch the
roof or be subjected to a load by the head
restraint. Adjust the angle of the seat backrest
and the head restraint position accordingly.
Only then can OCS be guaranteed to function
correctly. Always observe the child restraint sys-
tem manufacturer's installation and operating
instructions.
Occupant Classification System opera-
tion (OCS)
Occupant safety49
Safety
Z
Page 62 of 338

with the vehicle seat belt. Also secure the
child restraint system with the Top Tether
belt, if available.
Always comply with the manufacturer's instal-
lation and operating instructions for the child
restraint system used.
Before every trip, make sure that the LATCH-
type (ISOFIX) child restraint system is engaged
correctly in both LATCH-type (ISOFIX) securing
rings
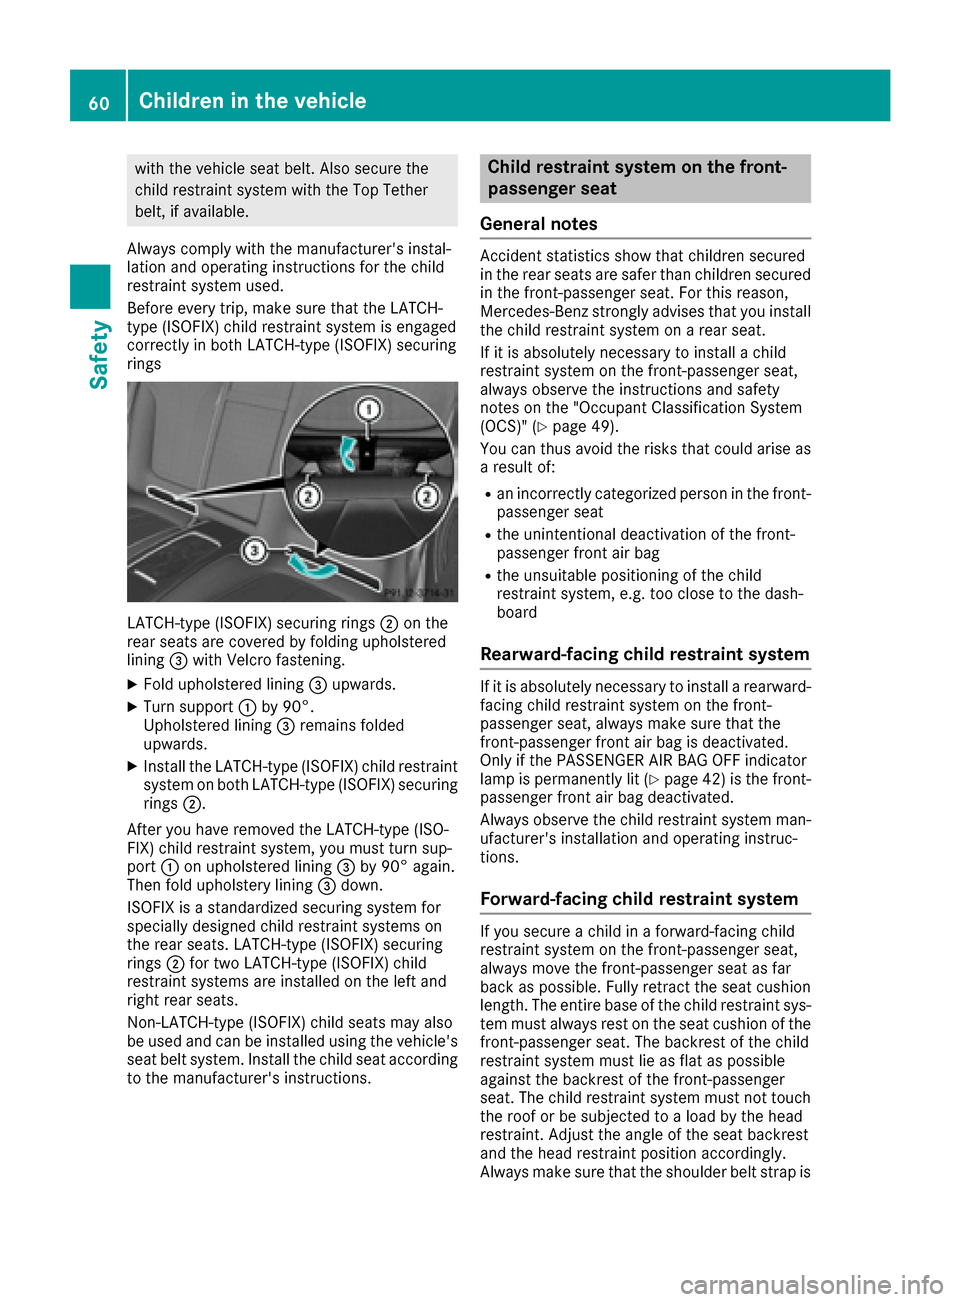
LATCH-type (ISOFIX) securing rings ;on the
rear seats are covered by folding upholstered
lining =with Velcro fastening.
XFold upholstered lining =upwards.
XTurn support :by 90°.
Upholstered lining =remains folded
upwards.
XInstall the LATCH-type (ISOFIX) child restraint system on both LATCH-type (ISOFIX) securing
rings ;.
After you have removed the LATCH-type (ISO-
FIX) child restraint system, you must turn sup-
port :on upholstered lining =by 90° again.
Then fold upholstery lining =down.
ISOFIX is a standardized securing system for
specially designed child restraint systems on
the rear seats. LATCH-type (ISOFIX) securing
rings ;for two LATCH-type (ISOFIX) child
restraint systems are installed on the left and
right rear seats.
Non-LATCH-type (ISOFIX) child seats may also
be used and can be installed using the vehicle's
seat belt system. Install the child seat according
to the manufacturer's instructions.
Child restraint system on the front-
passenger seat
General notes
Accident statistics show that children secured
in the rear seats are safer than children secured
in the front-passenger seat. For this reason,
Mercedes-Benz strongly advises that you install
the child restraint system on a rear seat.
If it is absolutely necessary to install a child
restraint system on the front-passenger seat,
always observe the instructions and safety
notes on the "Occupant Classification System
(OCS)" (
Ypage 49).
You can thus avoid the risks that could arise as a result of:
Ran incorrectly categorized person in the front-
passenger seat
Rthe unintentional deactivation of the front-
passenger front air bag
Rthe unsuitable positioning of the child
restraint system, e.g. too close to the dash-
board
Rearward-facing child restraint system
If it is absolutely necessary to install a rearward-
facing child restraint system on the front-
passenger seat, always make sure that the
front-passenger front air bag is deactivated.
Only if the PASSENGER AIR BAG OFF indicator
lamp is permanently lit (
Ypage 42) is the front-
passenger front air bag deactivated.
Always observe the child restraint system man-
ufacturer's installation and operating instruc-
tions.
Forward-facing child restraint system
If you secure a child in a forward-facing child
restraint system on the front-passenger seat,
always move the front-passenger seat as far
back as possible. Fully retract the seat cushion
length. The entire base of the child restraint sys-
tem must always rest on the seat cushion of the front-passenger seat. The backrest of the child
restraint system must lie as flat as possible
against the backrest of the front-passenger
seat. The child restraint system must not touch
the roof or be subjected to a load by the head
restraint. Adjust the angle of the seat backrest
and the head restraint position accordingly.
Always make sure that the shoulder belt strap is
60Children in the vehicle
Safety
Page 91 of 338

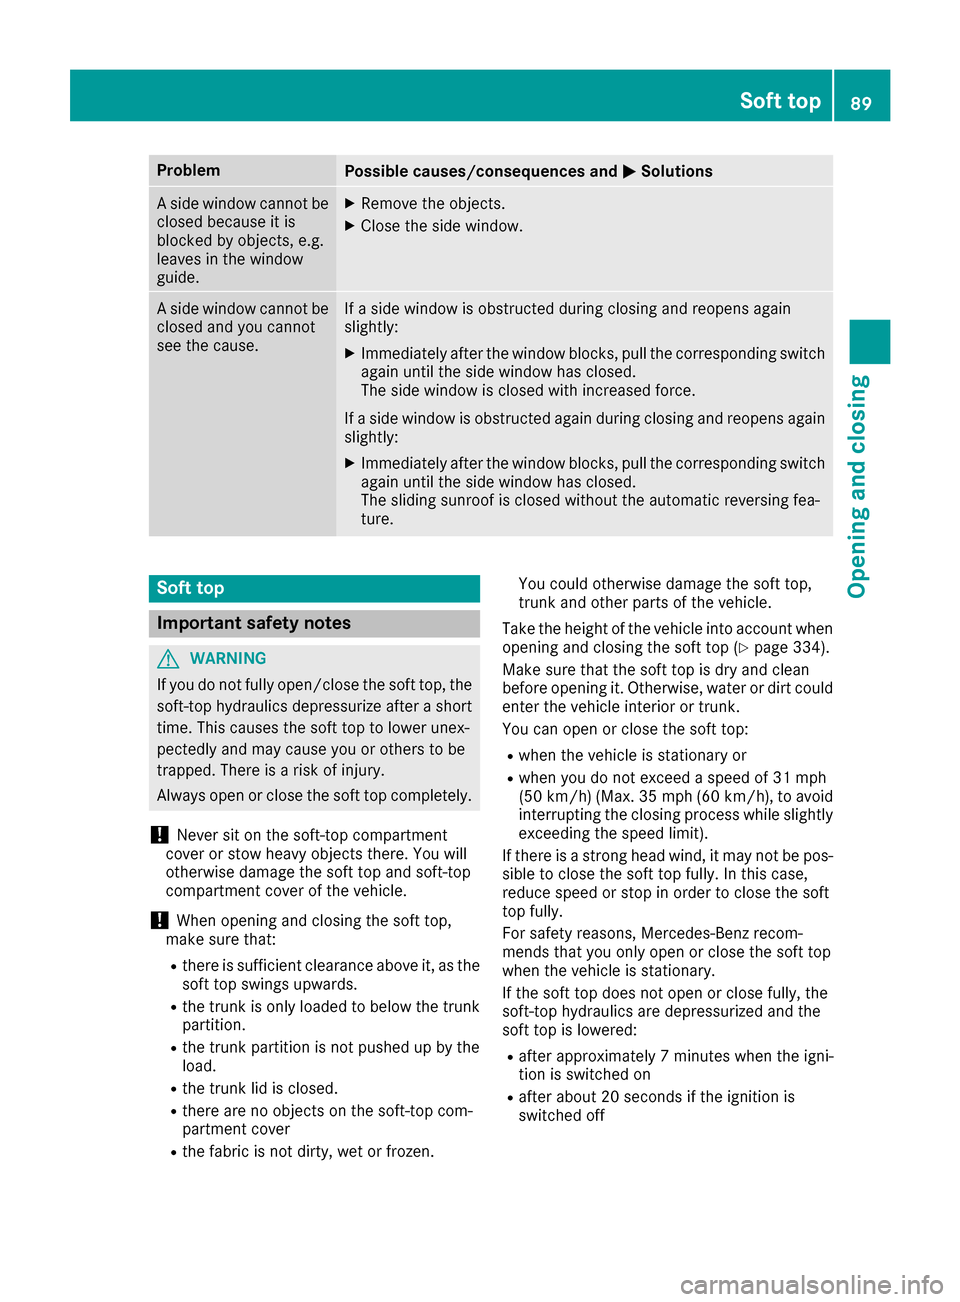
ProblemPossible causes/consequences andMSolutions
A side window cannot be
closed because it is
blocked by objects, e.g.
leaves in the window
guide.XRemove the objects.
XClose the side window.
A side window cannot be
closed and you cannot
see the cause.If a side window is obstructed during closing and reopens again
slightly:
XImmediately after the window blocks, pull the corresponding switch
again until the side window has closed.
The side window is closed with increased force.
If a side window is obstructed again during closing and reopens again slightly:
XImmediately after the window blocks, pull the corresponding switchagain until the side window has closed.
The sliding sunroof is closed without the automatic reversing fea-
ture.
Soft top
Important safety notes
GWARNING
If you do not fully open/close the soft top, the
soft-top hydraulics depressurize after a short
time. This causes the soft top to lower unex-
pectedly and may cause you or others to be
trapped. There is a risk of injury.
Always open or close the soft top completely.
!Never sit on the soft-top compartment
cover or stow heavy objects there. You will
otherwise damage the soft top and soft-top
compartment cover of the vehicle.
!When opening and closing the soft top,
make sure that:
Rthere is sufficient clearance above it, as the soft top swings upwards.
Rthe trunk is only loaded to below the trunk
partition.
Rthe trunk partition is not pushed up by the
load.
Rthe trunk lid is closed.
Rthere are no objects on the soft-top com-
partment cover
Rthe fabric is not dirty, wet or frozen. You could otherwise damage the soft top,
trunk and other parts of the vehicle.
Take the height of the vehicle into account when
opening and closing the soft top (
Ypage 334).
Make sure that the soft top is dry and clean
before opening it. Otherwise, water or dirt could
enter the vehicle interior or trunk.
You can open or close the soft top:
Rwhen the vehicle is stationary or
Rwhen you do not exceed a speed of 31 mph
(50 km/h) (Max. 35 mph (60 km/h), to avoid
interrupting the closing process while slightly
exceeding the speed limit).
If there is a strong head wind, it may not be pos-
sible to close the soft top fully. In this case,
reduce speed or stop in order to close the soft
top fully.
For safety reasons, Mercedes-Benz recom-
mends that you only open or close the soft top
when the vehicle is stationary.
If the soft top does not open or close fully, the
soft-top hydraulics are depressurized and the
soft top is lowered:
Rafter approximately 7 minutes when the igni-
tion is switched on
Rafter about 20 seconds if the ignition is
switched off
Soft top89
Opening and closing
Z
Page 92 of 338

Opening/closing with the soft top
switch
Important safety notes
GWARNING
When opening or closing the soft top, there is a risk that parts of the body could become
trapped by moving parts such as the roof
mechanism, the trunk lid, or the side win-
dows. There is a risk of injury.
When opening or closing the roof, make sure
that no parts of the body are in the vicinity of
moving parts. Release the switch if somebody
becomes trapped.
GWARNING
If the vehicle speed exceeds 35 mph
(60 km/h), the soft top stops during the open- ing or closing process. This impairs your view
to the rear. There is a risk of an accident.
Reduce your speed to below 35 mph
(60 km/h) or stop the vehicle in accordance
with the traffic conditions. Press or pull the
soft-top switch again in order to open or close
the soft top fully.
Opening and closing
XMake sure that the trunk partition is closed
(Ypage 91).
XClose the trunk lid.
XTurn the SmartKey to position 2in the ignition
lock.
XFold the armrest to the left or the right
(Ypage 256).
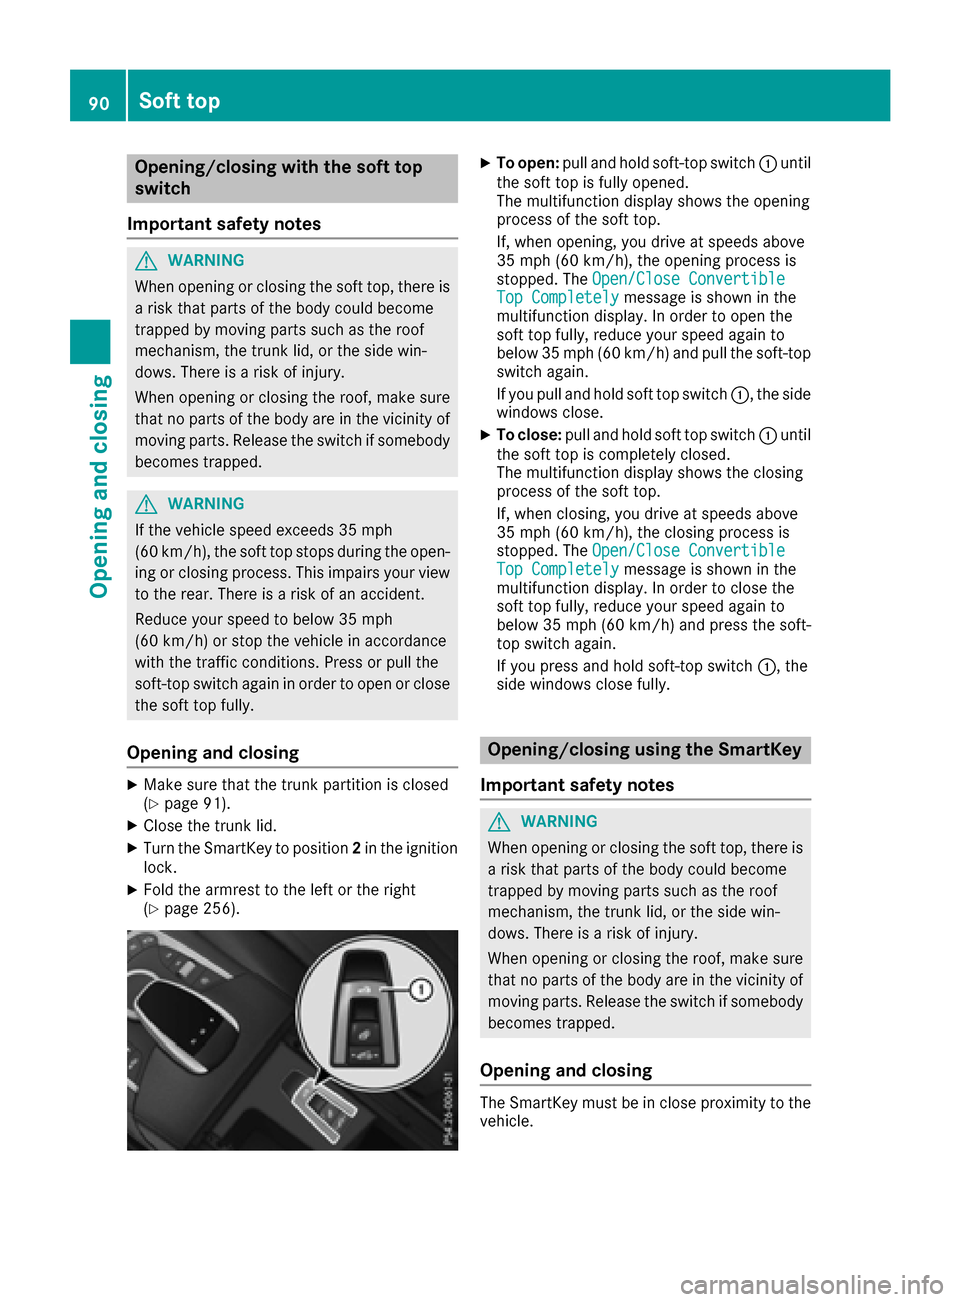
XTo open: pull and hold soft-top switch :until
the soft top is fully opened.
The multifunction display shows the opening
process of the soft top.
If, when opening, you drive at speeds above
35 mph (60 km/h), the opening process is
stopped. The Open/Close Convertible
Top Completelymessage is shown in the
multifunction display. In order to open the
soft top fully, reduce your speed again to
below 35 mph (60 km/h) and pull the soft-top
switch again.
If you pull and hold soft top switch :, the side
windows close.
XTo close: pull and hold soft top switch :until
the soft top is completely closed.
The multifunction display shows the closing
process of the soft top.
If, when closing, you drive at speeds above
35 mph (60 km/h), the closing process is
stopped. The Open/Close Convertible
Top Completelymessage is shown in the
multifunction display. In order to close the
soft top fully, reduce your speed again to
below 35 mph (60 km/ h)and press the soft-
top switch again.
If you press and hold soft-top switch :, the
side windows close fully.
Opening/closing using the SmartKey
Important safety notes
GWARNING
When opening or closing the soft top, there is a risk that parts of the body could become
trapped by moving parts such as the roof
mechanism, the trunk lid, or the side win-
dows. There is a risk of injury.
When opening or closing the roof, make sure
that no parts of the body are in the vicinity of
moving parts. Release the switch if somebody
becomes trapped.
Opening and closing
The SmartKey must be in close proximity to the vehicle.
90Soft top
Opening and closing
Page 94 of 338

Ensure that persons do not hold onto the
upper frame of the windshield and do not
touch the AIRCAP wind deflector.
General notes
With AIRCAP, four people can travel with the soft
top open. AIRCAP reduces the draft for the
driver and passengers in both the front and the
rear compartment in a vehicle with the soft top
down.
AIRCAP has the following components:
Ra wind screen behind the two rear-seat head
restraints
Ra wind deflector above the windshield
When AIRCAP has been activated, the wind
screen extends up between the two rear-seat
head restraints. At the same time, the wind
deflector extends out along the front wind-
shield.
Activating and deactivating AIRCAP
AIRCAP can be activated or deactivated up to
speeds of approximately 100 mph (160 km/h).
XTurn the SmartKey to position 2in the ignition
lock.
XFold the armrest to the left or the right
(Ypage 256).
XTo activate: press button :.
AIRCAP extends. Two indicator lamps on but-
ton :light up.
XTo deactivate: press button:again.
AIRCAP retracts. Both indicator lamps in but-
ton :go out.
If, after turning off the engine, you turn the
SmartKey in the ignition lock to position 2, AIR-
CAP is extended automatically.
If you park your vehicle with the roof open and
remove the SmartKey, AIRCAP retracts auto-
matically.
AIRCAP cannot be extended or retracted if the
vehicle speed exceeds approximately 100 mph
(160 km/h).
Problems with the soft top
ProblemPossible causes/consequences and MSolutions
The soft top will not open
or close.The ignition is not switched on.
XMake sure that the SmartKey is in position 2in the ignition lock.
The trunk lid is open.
XClose the trunk lid (Ypage 81).
The trunk partition is not closed.
XClose the trunk partition (Ypage 91).
92Soft top
Opening and closing