2017 MERCEDES-BENZ S-Class CABRIOLET light
[x] Cancel search: lightPage 242 of 338

Warning/
indicator
lampNSignal type
Possible causes/consequences and M
Solutions
XAt coolant temperatures below 257‡(125 †), you can continue driving to the
nearest qualified specialist workshop.
XAvoid heavy loads on the engine as you do so, e.g. driving in mountainous terrain
and stop-and-go traffic.
Driving systems
Warning/
indicator
lampNSignal type
Possible causes/consequences and M
Solutions
·NThe red distance warning lamp lights up while the vehicle is in motion. A warning
tone also sounds.
You are approaching a vehicle, a pedestrian or a stationary obstacle in your line of travel at too high a speed.
XBe prepared to brake immediately.
XPay careful attention to the traffic situation. You may have to brake or take
evasive action.
Further information on PRE ‑SAFE
®Brake (Ypage 68).
For further information about the distance warning function of COLLISION PRE-
VENTION ASSIST PLUS, see (
Ypage 64).
240Warning and indicator lamps in the instrument cluster
On-board computer and displays
Page 245 of 338

General notes
The multimedia system section in this Opera-
tor's Manual describes the basic principles for
operation. More information can be found in theDigital Operator's Manual.
Important safety notes
GWARNING
If you operate information systems and com-
munication equipment integrated in the vehi-
cle while driving, you will be distracted from
traffic conditions. You could also lose control
of the vehicle. There is a risk of an accident.
Only operate the equipment when the traffic
situation permits. If you are not sure that this
is possible, park the vehicle paying attention
to traffic conditions and operate the equip-
ment when the vehicle is stationary.
You must observe the legal requirements for the
country in which you are currently driving when
operating the multimedia system.
The multimedia system calculates the route to
the destination without taking the following into
account, for example:
Rtraffic lights
Rstop and yield signs
Rparking or stopping restrictions
Rroad narrowing
Rother road and traffic rules and regulations
The multimedia system may give incorrect nav-
igation recommendations if the actual street/
traffic situation does not correspond with the
digital map's data.
For example:
Ra diverted route
Rthe road layout or the direction of a one-way
street has been changed
For this reason, you must always observe road
and traffic rules and regulations during your
journey. Road and traffic rules and regulations
always have priority over multimedia system
driving recommendations.
Navigation announcements are intended to
direct you while driving without diverting your
attention from the road and driving. Please always use this feature instead of con-
sulting the map display for directions. Looking
at the icons or map display can distract you from
traffic conditions and driving, and increase the
risk of an accident.
This equipment complies with FCC radiation
exposure limits set forth for uncontrolled equip-
ment and meets the FCC radio frequency (RF)
Exposure Guidelines in Supplement C to OET65.
This equipment has very low levels of RF energy
that is deemed to comply without maximum
permissive exposure evaluation (MPE). How-
ever, it is recommended
to insta
ll it at a distance
of at least 8 inches (approx. 20 cm) between the
radiation source and a person's body (not
including limbs such as hands, wrists, feet and
legs).
GWARNING
Modifications to electronic components, their software as well as wiring can impair their
function and/or the function of other net-
worked components. In particular, systems
relevant to safety could also be affected. As a
result, these may no longer function as inten-
ded and/or jeopardize the operating safety of
the vehicle. There is an increased risk of an
accident and injury.
Never tamper with the wiring as well as elec-
tronic components or their software. You
should have all work to electrical and elec-
tronic equipment carried out at a qualified
specialist workshop.
If you make any changes to the vehicle elec-
tronics, the general operating permit is ren-
dered invalid.
Function restrictions
For safety reasons, some functions are restric-
ted or unavailable while the vehicle is in motion.
You will notice this, for example, because either
you will not be able to select certain menu items
or a message will appear to this effect.
Function restrictions243
Multimedia system
Z
Page 247 of 338

XTo exit the menu:briefly press the%
button.
The multimedia system changes to the next
higher menu level in the current operating
mode.
XTo call up the basic display: press the%
button for longer than two seconds.
The multimedia system changes to the basic
display of the current operating mode.
The telephone keypad or touchpad
The multimedia system is equipped with either a
telephone keypad or a touchpad.
The telephone keypad is touch-sensitive. As
soon as one or several of the keys are gently
touched, the telephone keypad is shown in the
multimedia system's display. The key being
touched is highlighted.
As an alternative to the controller, the touchpad
enables menu items to be selected and charac-
ter entry including handwriting recognition, for
example.
Touchpad
Switching the touchpad on/off
Multimedia system:
XSelect VehicleQSystem Set‐tingsQTouchpadQActivate Touch‐pad.
The touchpad is switched on Oor off ª.
Operating the touchpad
The touchpad is available in two versions.
Variant 1
:
Touch-sensitive surface
;Favorites button
=Quick access for audio
?Back button
Variant 2
:
Touch-sensitive surface
;Favorites button
=Calls up quick access for audio and tele-
phone
?Back button
Navigating in menus and lists can be done via
touch-sensitive surface :byswiping with
your finger.
XTo select the menu item: swipe up, down, to
the left or right.
XPress the touchpad.
XTo move the digital map: swipe in all direc-
tions.
Swiping with two fingers , e.g. using this func-
tion:
XTo show or hide the audio menu: swipe up
or down with two fingers.
XTo increase or reduce the vehicle and
sound settings: turn two fingers to the right
or left.
XTo zoom in and out of the map: move two
fingers together or apart.
Character entry with handwriting rec-
ognition
Entering characters
XUse one finger to write characters on the sur-
face.
The character is entered in the input line. If
the character that you have entered can be
Operating system245
Multimedia system
Z
Page 259 of 338

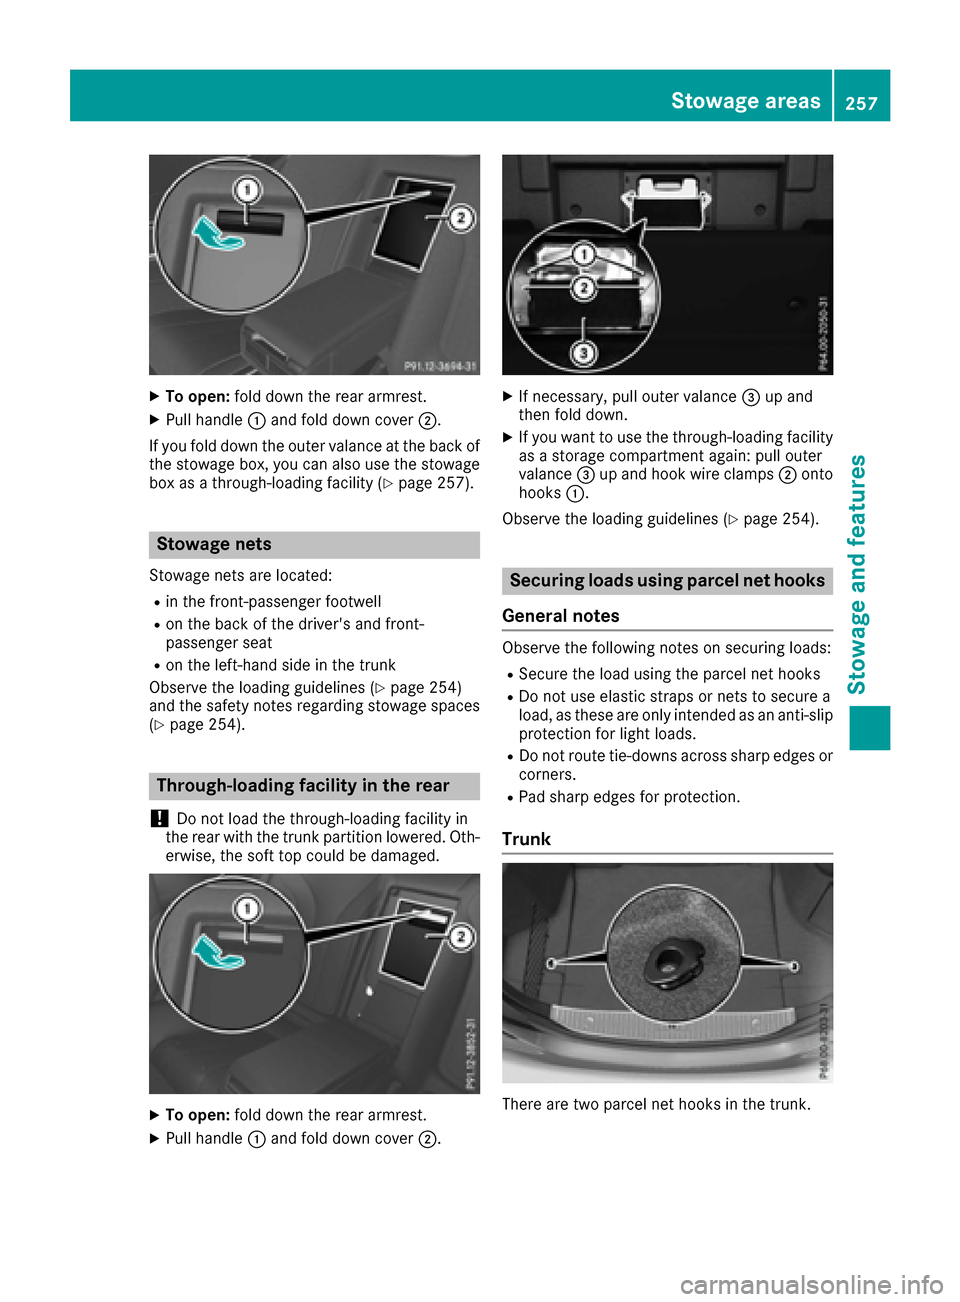
XTo open:fold down the rear armrest.
XPull handle :and fold down cover ;.
If you fold down the outer valance at the back of
the stowage box, you can also use the stowage box as a through-loading facility (
Ypage 257).
Stowage nets
Stowage nets are located:
Rin the front-passenger footwell
Ron the back of the driver's and front-
passenger seat
Ron the left-hand side in the trunk
Observe the loading guidelines (
Ypage 254)
and the safety notes regarding stowage spaces
(
Ypage 254).
Through-loading facility in the rear
!
Do not load the through-loading facility in
the rear with the trunk partition lowered. Oth-
erwise, the soft top could be damaged.
XTo open: fold down the rear armrest.
XPull handle :and fold down cover ;.
XIf necessary, pull outer valance =up and
then fold down.
XIf you want to use the through-loading facility as a storage compartment again: pull outer
valance =up and hook wire clamps ;onto
hooks :.
Observe the loading guidelines (
Ypage 254).
Securing loads using parcel net hooks
General notes
Observe the following notes on securing loads:
RSecure the load using the parcel net hooks
RDo not use elastic straps or nets to secure a
load, as these are only intended as an anti-slip protection for light loads.
RDo not route tie-downs across sharp edges or
corners.
RPad sharp edges for protection.
Trunk
There are two parcel net hooks in the trunk.
Stowage areas257
Stowag ean d features
Z
Page 260 of 338

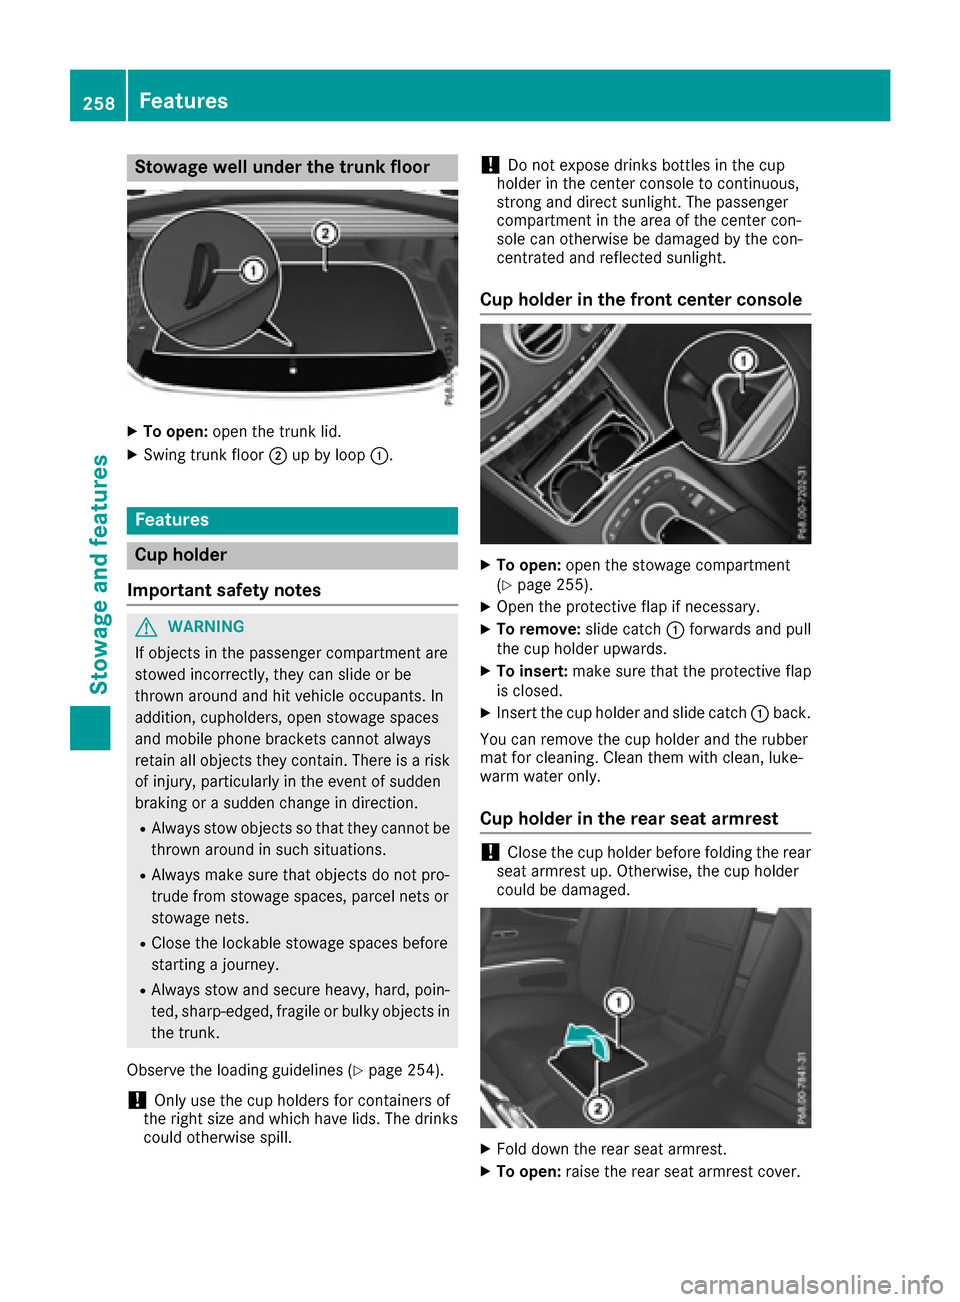
Stowage well under the trunk floor
XTo open:open the trunk lid.
XSwing trunk floor ;up by loop :.
Features
Cup holder
Important safety notes
GWARNING
If objects in the passenger compartment are
stowed incorrectly, they can slide or be
thrown around and hit vehicle occupants. In
addition, cupholders, open stowage spaces
and mobile phone brackets cannot always
retain all objects they contain. There is a risk of injury, particularly in the event of sudden
braking or a sudden change in direction.
RAlways stow objects so that they cannot be
thrown around in such situations.
RAlways make sure that objects do not pro-
trude from stowage spaces, parcel nets or
stowage nets.
RClose the lockable stowage spaces before
starting a journey.
RAlways stow and secure heavy, hard, poin-
ted, sharp-edged, fragile or bulky objects in
the trunk.
Observe the loading guidelines (
Ypage 254).
!Only use the cup holders for containers of
the right size and which have lids. The drinks
could otherwise spill.
!Do not expose drinks bottles in the cup
holder in the center console to continuous,
strong and direct sunlight. The passenger
compartment in the area of the center con-
sole can otherwise be damaged by the con-
centrated and reflected sunlight.
Cup holder in the front center console
XTo open: open the stowage compartment
(Ypage 255).
XOpen the protective flap if necessary.
XTo remove: slide catch:forwards and pull
the cup holder upwards.
XTo insert: make sure that the protective flap
is closed.
XInsert the cup holder and slide catch :back.
You can remove the cup holder and the rubber
mat for cleaning. Clean them with clean, luke-
warm water only.
Cup holder in the rear seat armrest
!Close the cup holder before folding the rear
seat armrest up. Otherwise, the cup holder
could be damaged.
XFold down the rear seat armrest.
XTo open: raise the rear seat armrest cover.
258Features
Stowage and features
Page 261 of 338

XPress release catch:.
Cup holder ;folds out forwards.
XSwing the rear seat armrest cover back down,
if necessary.
iBefore you fold the rear seat armrest back,
make sure that the cover of the rear seat arm-
rest is closed properly. Otherwise, there is a
risk of damage.
XTo close: raise the rear seat armrest cover.
Swing cup holder ;back until it engages.
Sun visors
Overview
GWARNING
If the mirror cover of the vanity mirror is folded
up when the vehicle is in motion, you could be
blinded by incident light. There is a risk of an
accident.
Always keep the mirror cover folded down
while driving.
:Mirror light
;Bracket
=Retaining clip, e.g. for a car park ticket
?Vanity mirror
AMirror cover
Vanity mirror in the sun visor
Mirror light :only functions if the sun visor is
clipped into retainer ;and mirror cover Ahas
been folded up.
Glare from the side
XFold down sun visor :.
XPull sun visor:out of retainer ;.
XSwing sun visor :to the side.
XSlide sun visor :horizontally as required.
Ashtray
Front ashtray
XTo open: briefly press marking ?.
Stowage compartment =opens.
XTo remove the insert: grip the sides of
insert :, push it forward and pull it
upwards ;.
XTo re-install the insert: press insert:into
the drawer until it engages.
XTo close: press stowage compartment =
closed until it locks.
Features259
Stowage and features
Z
Page 262 of 338

Cigarette lighter
Important safety notes
GWARNING
You can burn yourself if you touch the hot
heating element or the socket of the cigarette lighter.
In addition, flammable materials can ignite if:
Rthe hot cigarette lighter falls
Ra child holds the hot cigarette lighter to
objects, for example
There is a risk of fire and injury.
Always hold the cigarette lighter by the knob.
Always make sure that the cigarette lighter is
out of reach of children. Never leave children
unsupervised in the vehicle.
Your attention must always be focused on the
traffic conditions. Only use the cigarette lighter when road and traffic conditions permit.
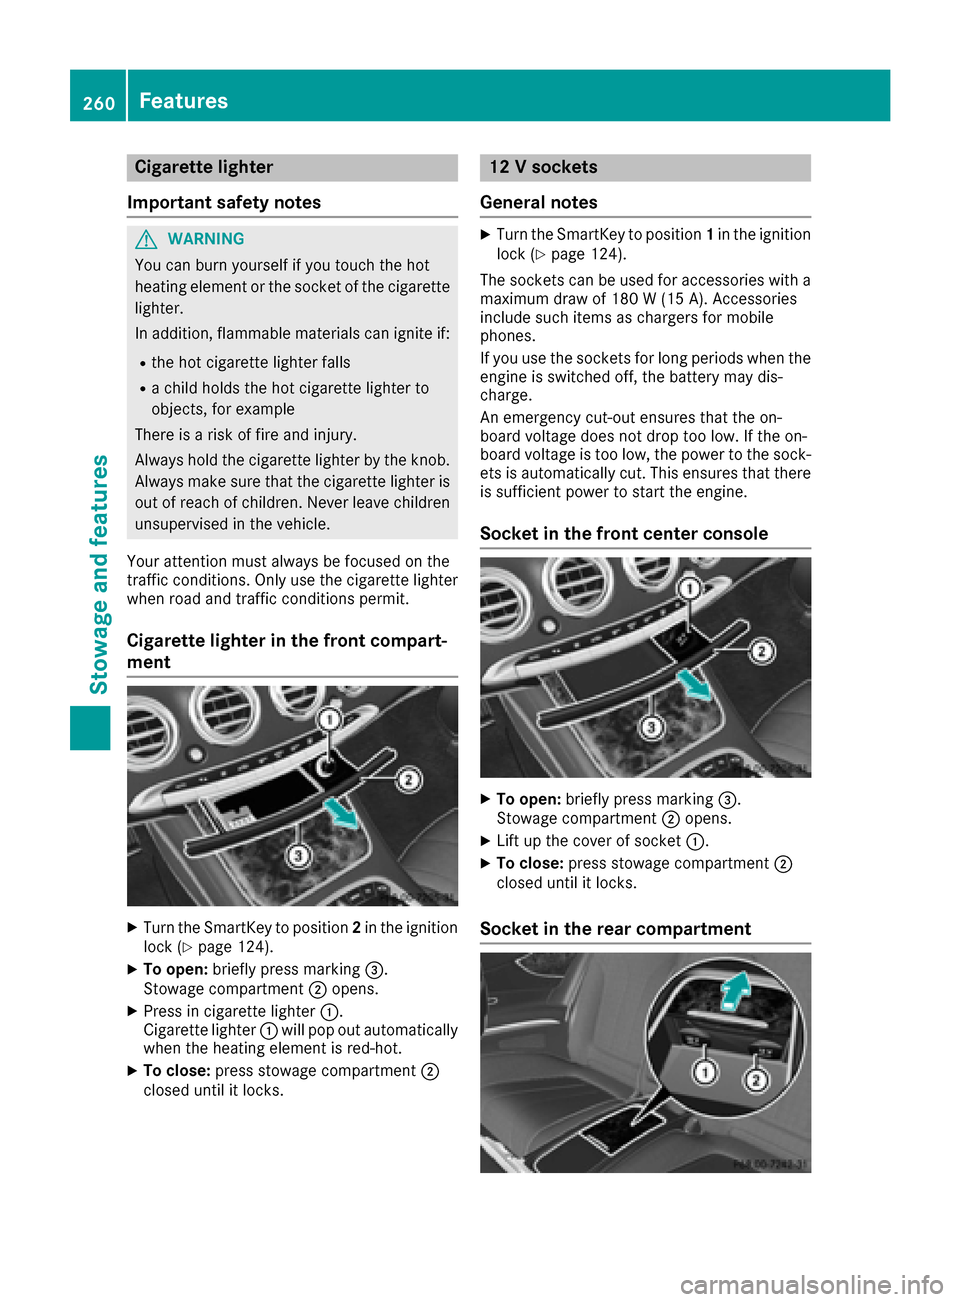
Cigarette lighter in the front compart-
ment
XTurn the SmartKey to position 2in the ignition
lock (Ypage 124).
XTo open: briefly press marking =.
Stowage compartment ;opens.
XPress in cigarette lighter :.
Cigarette lighter :will pop out automatically
when the heating element is red-hot.
XTo close: press stowage compartment ;
closed until it locks.
12 V sockets
General notes
XTurn the SmartKey to position 1in the ignition
lock (Ypage 124).
The sockets can be used for accessories with a maximum draw of 180 W (15 A). Accessories
include such items as chargers for mobile
phones.
If you use the sockets for long periods when the
engine is switched off, the battery may dis-
charge.
An emergency cut-out ensures that the on-
board voltage does not drop too low. If the on-
board voltage is too low, the power to the sock-
ets is automatically cut. This ensures that there is sufficient power to start the engine.
Socket in the front center console
XTo open: briefly press marking =.
Stowage compartment ;opens.
XLift up the cover of socket :.
XTo close:press stowage compartment ;
closed until it locks.
Socket in the rear compartment
260Features
Stowage and features
Page 263 of 338

XTo open:open the stowage compartment
(Ypage 256).
XOpen socket cover :or;.
XTo close: close the cover of the stowage
compartment.
Socket in the trunk
XLift up the cover of socket :.
mbrace
General notes
The mbrace system is only available in the USA.
You must have a license agreement to activate
the mbrace service. Make sure that your system
is activated and operational. To register, press
the ï Info call button. If any of the steps
mentioned are not carried out, the system may
not be activated.
If you have questions about the activation, con-
tact one of the following telephone hotlines:
Mercedes-Benz Customer Assistance Center at 1-800-FOR-MERCedes (1-800-367-6372) or
1-866-990-9007
Shortly after successfully registering with the
mbrace service, a user ID and password will be
sent to you by mail. You can use this password
to log onto the mbrace area under "Owners
Online" at http://www.mbusa.com .
The system is available if:
Rit has been activated and is operational
Rthe corresponding mobile phone network is
available for transmitting data to the Cus-
tomer Center
Ra service subscription is available Determining the location of the vehicle on a map
is only possible if:
RGPS reception is available.
Rthe vehicle position can be forwarded to the
Customer Assistance Center.
The mbrace system
To adjust the volume during a call, proceed as
follows:
XPress the
WorX button on the multi-
function steering wheel.
or
XUse the multimedia system volume control.
The system offers various services, e.g.:
RAutomatic and manual emergency call
RRoadside Assistance call
RInfo call
You can find information and a description of all
available features under "Owners Online" at
http://www.mbusa.co m.
System self-test
After you have switched on the ignition, the sys-
tem carries out a self-diagnosis.
A malfunction in the system has been detected
if one of the following occurs:
RThe indicator lamp in the SOS button does notcome on during the system self-test.
RThe indicator lamp in the FRoadside
Assistance button does not light up during
self-diagnosis of the system.
Rthe indicator lamp in the ïInfo call button
does not light up during the system self-diag-
nosis
RThe indicator lamp in one or more of the fol-
lowing buttons continues to light up red after
the system self-diagnosis:
-SOS button
-F Roadside Assistance call button
-Info call buttonï
Rafter the system self-diagnosis, the Inoper‐ativeorServiceNotActivatedmessage
appears in the multifunction display.
If a malfunction is indicated as outlined above,
the system may not operate as expected. In the
event of an emergency, help will have to be
summoned by other means.
Features261
Stowage and features
Z