2017 MERCEDES-BENZ GLC SUV stop car
[x] Cancel search: stop carPage 187 of 374
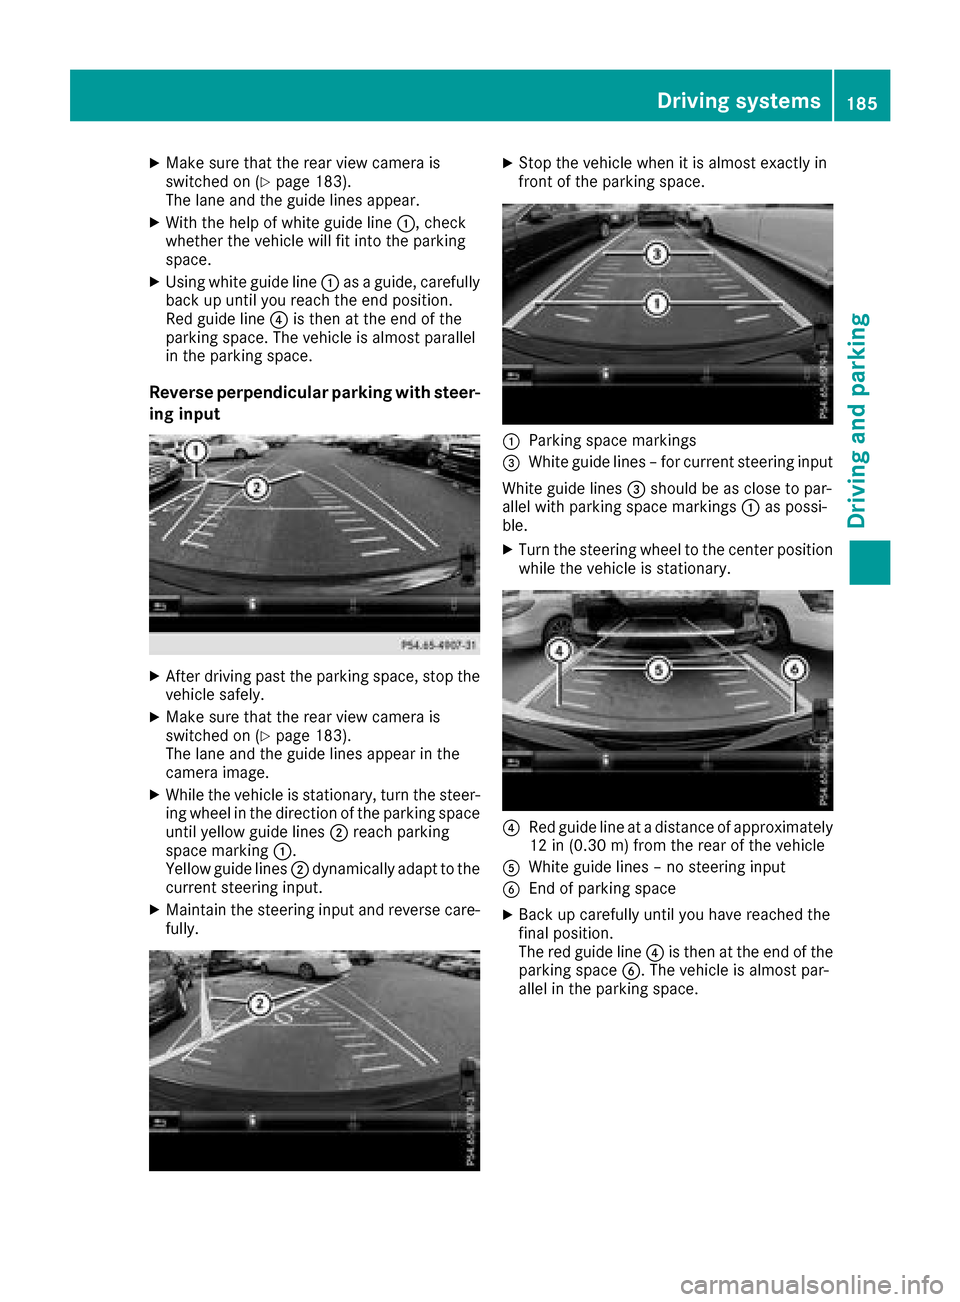
XMake sure that the rear view camera is
switched on (Ypage 183).
The lane and the guide lines appear.
XWith the help of white guide line :, check
whether the vehicle will fit into the parking
space.
XUsing white guide line :as a guide, carefully
back up until you reach the end position.
Red guide line ?is then at the end of the
parking space. The vehicle is almost parallel
in the parking space.
Reverse perpendicular parking with steer-
ing input
XAfter driving past the parking space, stop the
vehicle safely.
XMake sure that the rear view camera is
switched on (Ypage 183).
The lane and the guide lines appear in the
camera image.
XWhile the vehicle is stationary, turn the steer-
ing wheel in the direction of the parking space
until yellow guide lines ;reach parking
space marking :.
Yellow guide lines ;dynamically adapt to the
current steering input.
XMaintain the steering input and reverse care-
fully.
XStop the vehicle when it is almost exactly in
front of the parking space.
:Parking space markings
=White guide lines – for current steering input
White guide lines =should be as close to par-
allel with parking space markings :as possi-
ble.
XTurn the steering wheel to the center position while the vehicle is stationary.
?Red guide line at a distance of approximately
12 in (0.30 m) from the rear of the vehicle
AWhite guide lines – no steering input
BEnd of parking space
XBack up carefully until you have reached the
final position.
The red guide line ?is then at the end of the
parking space B. The vehicle is almost par-
allel in the parking space.
Driving systems185
Driving and parking
Z
Page 190 of 374
The camera in the rear area is protected by
means of a flap. This flap opens when the 360°
camera is activated. Observe the notes on
cleaning (
Ypage 316). For technical reasons,
the flap may remain open briefly after the 360°
camera has been deactivated.
The field of vision and other functions of the
camera system may be restricted due to addi-
tional attachments (e.g. license plate holder,
rear bicycle carrier).
On vehicles with height-adjustable chassis,
depending on technical conditions, leaving the
standard height can result in:
Rinaccuracies in the guide lines
Rinaccuracies in the display of generated
images (top view)
Activation conditions
The image from the 360° camera appears if:
Rthe multimedia system is switched on
Rthe 360° Camerafunction is switched on
If you are driving faster than at a moderate
speed and you turn on the 360° camera, a warn-
ing message appears.
The warning message disappears if:
Ryou are again driving at a moderate speed The
360° camera is then activated
Rthe message is confirmed with the %but-
ton
Switching the 360° camera on and off
using the button
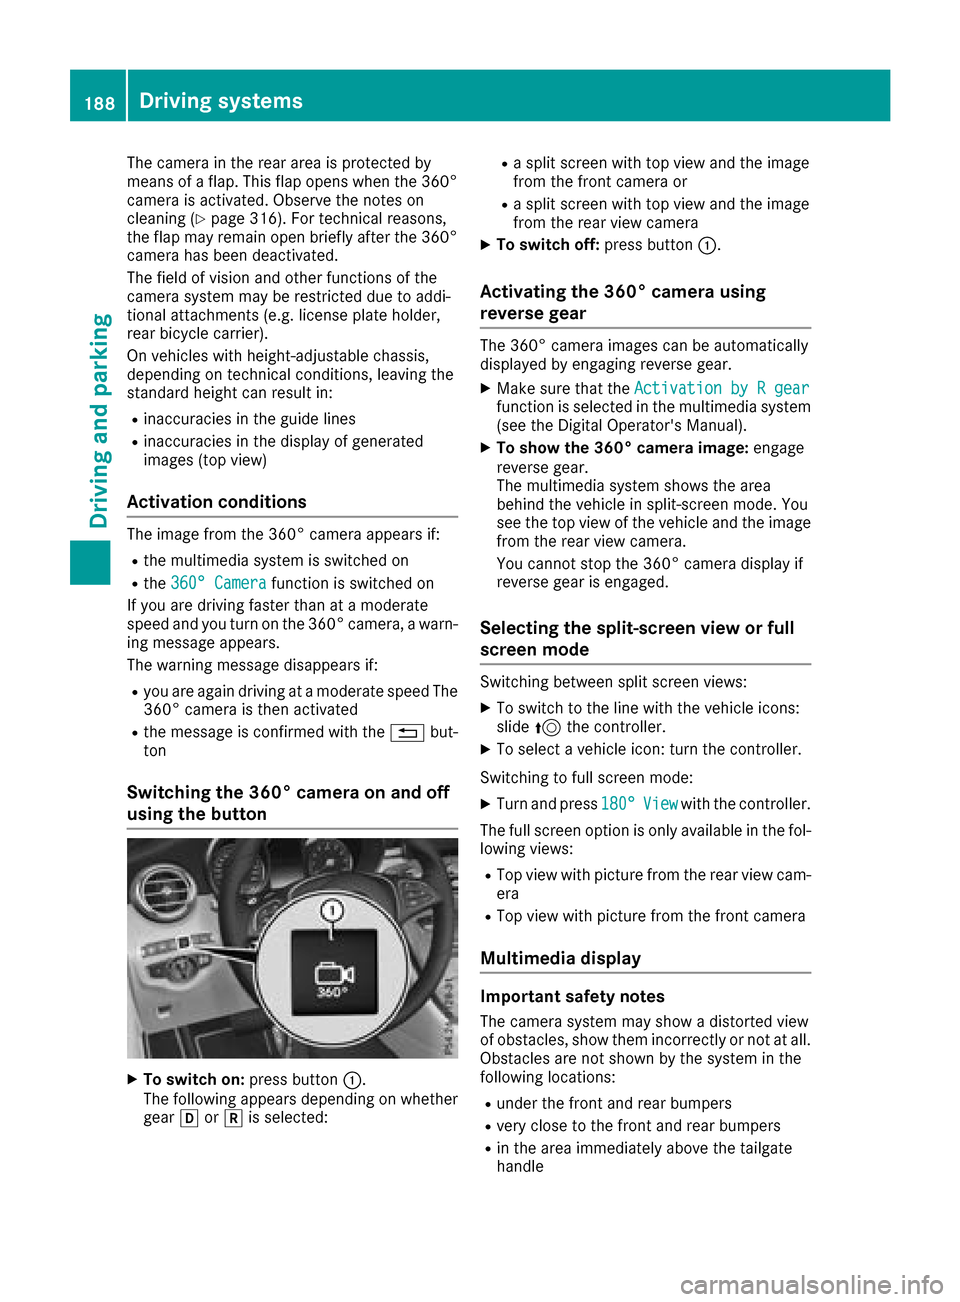
XTo switch on: press button:.
The following appears depending on whether
gear hork is selected:
Ra split screen with top view and the image
from the front camera or
Ra split screen with top view and the image
from the rear view camera
XTo switch off: press button:.
Activating the 360° camera using
reverse gear
The 360° camera images can be automatically
displayed by engaging reverse gear.
XMake sure that the Activation by R gearfunction is selected in the multimedia system
(see the Digital Operator's Manual).
XTo show the 360° camera image: engage
reverse gear.
The multimedia system shows the area
behind the vehicle in split-screen mode. You
see the top view of the vehicle and the image
from the rear view camera.
You cannot stop the 360° camera display if
reverse gear is engaged.
Selecting the split-screen view or full
screen mode
Switching between split screen views:
XTo switch to the line with the vehicle icons:
slide 5the controller.
XTo select a vehicle icon: turn the controller.
Switching to full screen mode:
XTurn and press 180°Viewwith the controller.
The full screen option is only available in the fol-
lowing views:
RTop view with picture from the rear view cam-
era
RTop view with picture from the front camera
Multimedia display
Important safety notes
The camera system may show a distorted view
of obstacles, show them incorrectly or not at all.
Obstacles are not shown by the system in the
following locations:
Runder the front and rear bumpers
Rvery close to the front and rear bumpers
Rin the area immediately above the tailgate
handle
188Driving systems
Driving and parking
Page 193 of 374
XReverse carefully until thetrailer drawbar rea-
ches red guide lin eC.
The distanc ebetween th etrailer drawbar and
red guide lin eC is no wapproximately 12 in
(0.30 m).
XCouple up th etrailer (Ypage 204).
The lines are shown at th elevel of th etrailer to w
hitch .
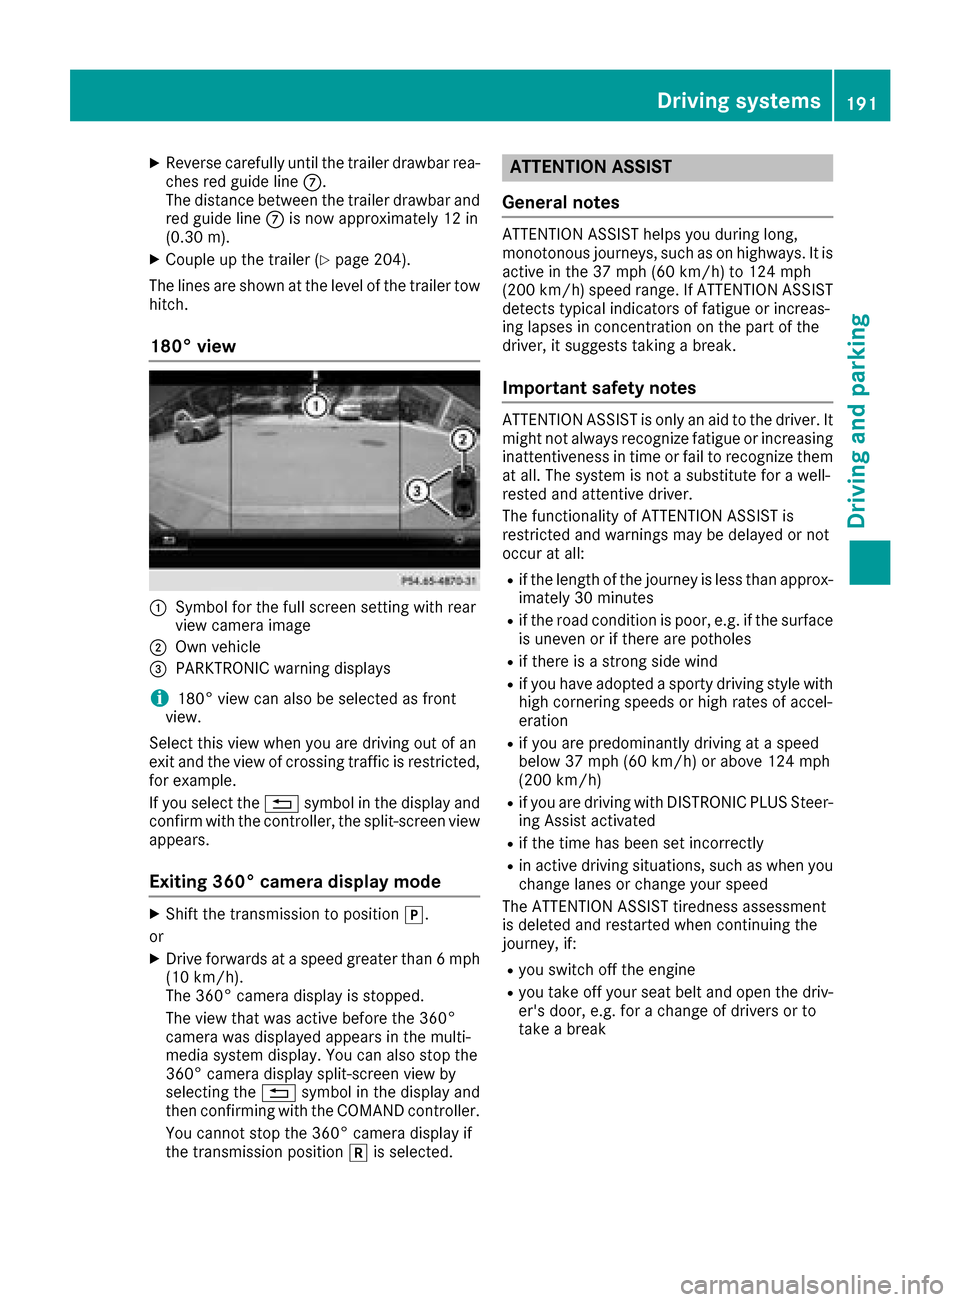
180° view
:Symbol for th efull scree nsetting wit hrear
vie wcamera imag e
;Own vehicle
=PARKTRONI Cwarning displays
i180° vie wcan also be selected as fron t
view.
Selec tthis vie wwhen you are driving out of an
exit and th evie wof crossing traffic is restricted,
for example.
If you select th e% symbol in th edisplay and
confirm wit hth econtroller ,th esplit-scree nvie w
appears.
Exiting 360° camera display mode
XShift th etransmission to position j.
or
XDrive forwards at aspee dgreate rthan 6mph
(10 km/h).
The 360° camera display is stopped.
The vie wthat was active before th e360°
camera was displayed appear sin th emulti-
media system display. You can also stop th e
360° camera display split-scree nvie wby
selecting th e% symbol in th edisplay and
then confirming wit hth eCOMAND controller .
You canno tstop th e360° camera display if
th etransmission position kis selected.
ATTENTION ASSIST
General notes
ATTENTION ASSIST help syou during long,
monotonous journeys, suc has on highways. It is
active in th e37 mph (60 km/h) to 12 4mph
(20 0km/h )spee drange. If ATTENTION ASSIST
detects typical indicators of fatigue or increas -
ing lapse sin concentration on th epart of th e
driver, it suggest staking abreak.
Important safety notes
ATTENTION ASSIST is only an aid to th edriver. It
might no talways recogniz efatigue or increasing
inattentiveness in time or fail to recogniz ethem
at all. The system is no t asubstitut efor awell-
reste dand attentive driver.
The functionalit yof ATTENTION ASSIST is
restricted and warning smay be delaye dor no t
occur at all:
Rif th elengt hof th ejourney is less than approx -
imately 30 minute s
Rif theroad condition is poor ,e.g. if th esurfac e
is uneven or if there are pothole s
Rif there isastron gside win d
Rif you hav eadopted asport ydriving style wit h
high cornering speeds or high rates of accel-
eration
Rif you are predominantly driving at aspee d
belo w37 mph (60 km/h) or abov e12 4mph
(20 0km/h)
Rif you are driving wit hDISTRONI CPLU SSteer -
ing Assis tactivated
Rif th etime has been set incorrectl y
Rin active driving situations, suc has when you
chang elanes or chang eyour spee d
The ATTENTION ASSIST tiredness assessmen t
is deleted and restarte dwhen continuing th e
journey, if:
Ryou switch off th eengin e
Ryou tak eoff your seat belt and open th edriv -
er' sdoor ,e.g. for achang eof drivers or to
tak e a break
Driving systems191
Driving and parking
Z
Page 207 of 374
XSwitch off the engine.
XClose the doors and tailgate.
XCouple up the trailer.
XEstablish the electrical connection between
the vehicle and the trailer.
XCheck that the trailer lighting system is work-
ing.
XPush the combination switch upwards/down-wards and check whether the corresponding
turn signal on the trailer flashes.
A trailer that is connected is recognized only
when the electrical connection is established
correctly and when the lighting system is work-
ing properly. The function of other systems also
depends on this, for example:
RESP®
RPARKTRONIC
RActive Parking Assist
RActive Blind Spot Assist
RActive Lane Keeping Assist
Vehicles with AIR BODY CONTROL: if you couple
up a trailer, the vehicle always remains at high-
way level. Observe the following note when cou-
pling up a trailer:
RUnless highway level has been set manually,
the vehicle is automatically lowered to high-
way level. If a speed of 5 mph (8 km/h) has
been reached, this may be the case.
These restrictions apply to accessories that are
supplied with power via the trailer socket in your
vehicle, e.g. a rear bicycle rack.
Observe the maximum permissible trailer
dimensions (width and length).
Most U.S. states and all Canadian provinces
require by law:
RSafety chains between the towing vehicle and
the trailer. The chains should be cross-wound
under the trailer drawbar. They must be fas-
tened to the vehicle's trailer coupling, not to
the bumper or the axle.
Leave enough play in the chains to make tight
cornering possible.
RA separate brake system for certain types of
trailer.
RSafety switch for braked trailers. Check the
specific legal requirements applicable to your state.
If the trailer becomes detached from the tow-
ing vehicle, the safety feature applies the
trailer brakes.
Towing a trailer
There are several legal requirements for towing
a trailer, e.g. the maximum permissible speed.
Make sure that your car/trailer combination
complies with the local regulations:
Rin your place of residence
Rat your destination
The police and local authorities can provide reli- able information.
To accumulate driving experience and accustom
yourself to the new handling characteristics,
practice the following at a location where there
is no traffic:
RCornering
RStopping
RBacking up
Check the following before the journey:
RTrailer tow hitch
RSafety switch for braked trailers
RSafety chains
RElectrical connections
RLighting system
RWheels and tires
RLoad securing
Adjust the exterior mirrors so that you have a
clear view of the rear section of the trailer.
If the trailer is equipped with electronically con-
trolled brakes, pull away carefully in the car/
trailer combination. Brake manually using the
brake controller and check whether the brakes
function correctly.
Regularly check that the load is secure.
When towing a trailer, your vehicle's handling
characteristics will be different in comparison
with when driving without a trailer.
The vehicle/trailer combination:
Ris heavier
Ris restricted in its acceleration and gradient-
climbing capability
Rhas an increased braking distance
Ris affected more by strong crosswinds
Rdemands more sensitive steering
Rhas a larger turning circle
Avoid sudden steering movements.
Avoid braking abruptly. If possible, brake gently
at first to allow the trailer to run on. Then,
increase the braking force rapidly.
Towing a trailer205
Driving and parking
Z
Page 239 of 374
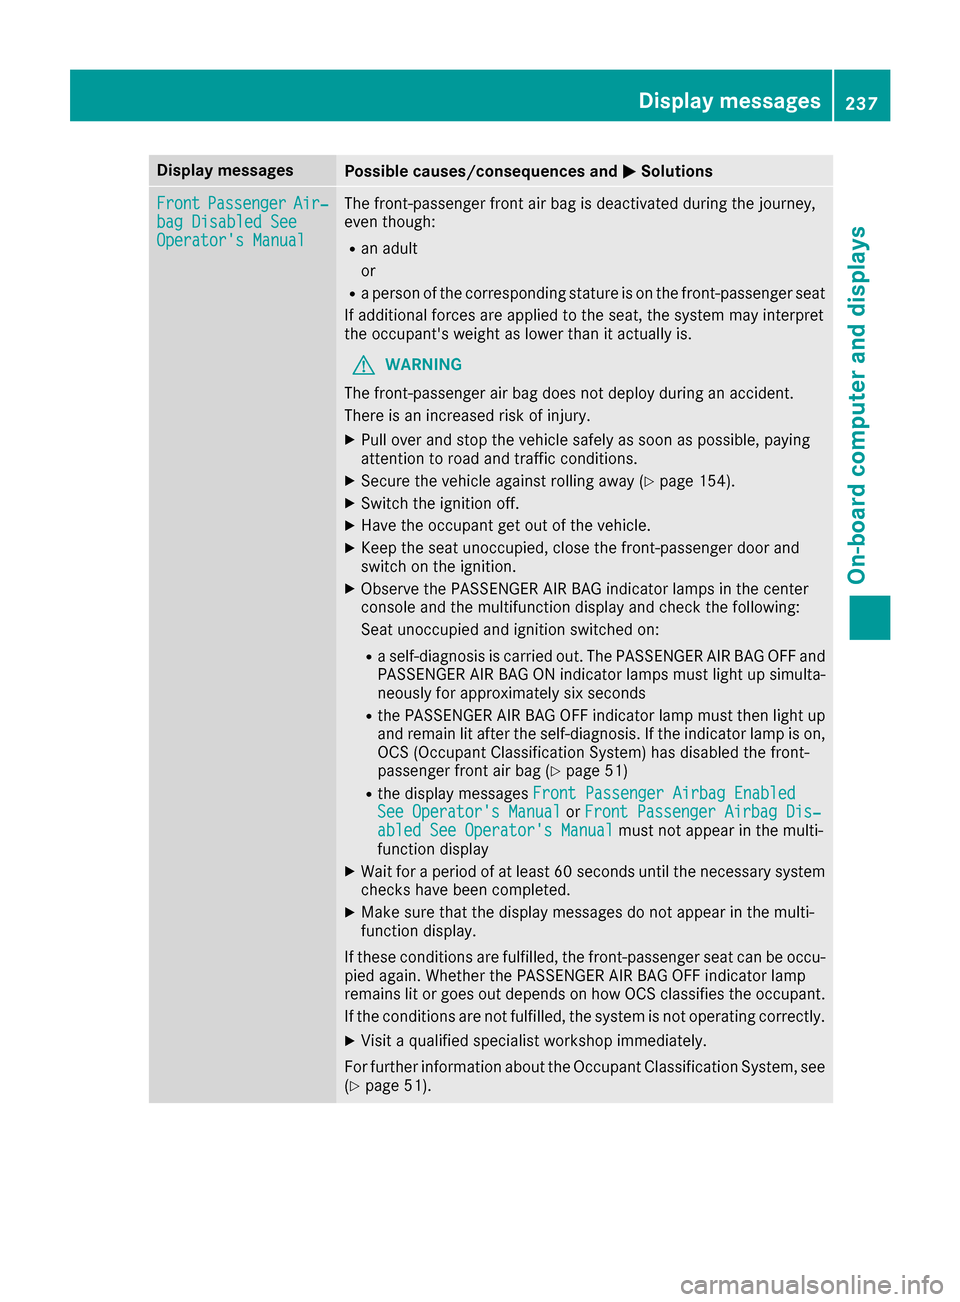
Display messagesPossible causes/consequences andMSolutions
FrontPassengerAir‐bag Disabled SeeOperator' sManual
The front-passenger fron tair bag is deactivated during th ejourney,
eve nthough :
Ran adult
or
Raperson of th ecorrespondin gstatur eis on th efront-passenger seat
If additional force sare applie dto th eseat ,th esystem may interpret
th eoccupant's weigh tas lower than it actually is.
GWARNIN G
The front-passenger air bag does no tdeploy during an accident.
There is an increased ris kof injury.
XPull ove rand stop th evehicl esafely as soo nas possible, payin g
attention to roa dand traffic conditions.
XSecur eth evehicl eagainst rollin gaway (Ypage 154).
XSwitchth eignition off .
XHaveth eoccupant get out of th evehicle.
XKee pth eseat unoccupied ,close th efront-passenger door and
switch on th eignition .
XObserveth ePASSENGER AI RBA Gindicator lamp sin th ecenter
console and th emultifunction display and chec kth efollowing:
Seat unoccupied and ignition switched on :
Raself-diagnosis is carrie dout .The PASSENGER AI RBA GOF Fand
PASSENGER AI RBA GON indicator lamp smus tligh tup simulta-
neousl yfor approximately six seconds
Rth ePASSENGER AI RBA GOF Findicator lamp mus tthen ligh tup
and remain lit after theself-diagnosis .If th eindicator lamp is on ,
OCS (Occupant Classification System) has disabled th efront-
passenger fron tair bag (
Ypage 51 )
Rthedisplay message sFront Passenger Airbag Enable dSee Operator'sManualor Front Passenger Airbag Dis ‐abled See Operator'sManualmus tno tappear in th emulti-
function display
XWait for aperiod of at least 60 seconds until th enecessar ysystem
checks hav ebeen completed.
XMak esur ethat th edisplay message sdo no tappear in th emulti-
function display.
If these condition sare fulfilled ,th efront-passenger seat can be occu-
pied again .Whether th ePASSENGER AI RBA GOF Findicator lamp
remain slit or goe sout depend son how OCS classifies th eoccupant .
If th econdition sare no tfulfilled ,th esystem is no toperating correctly.
XVisit aqualified specialist workshop immediately.
Fo rfurther information about th eOccupant Classification System, see
(
Ypage 51).
Display messages23 7
On-board computer and displays
Z
Page 240 of 374
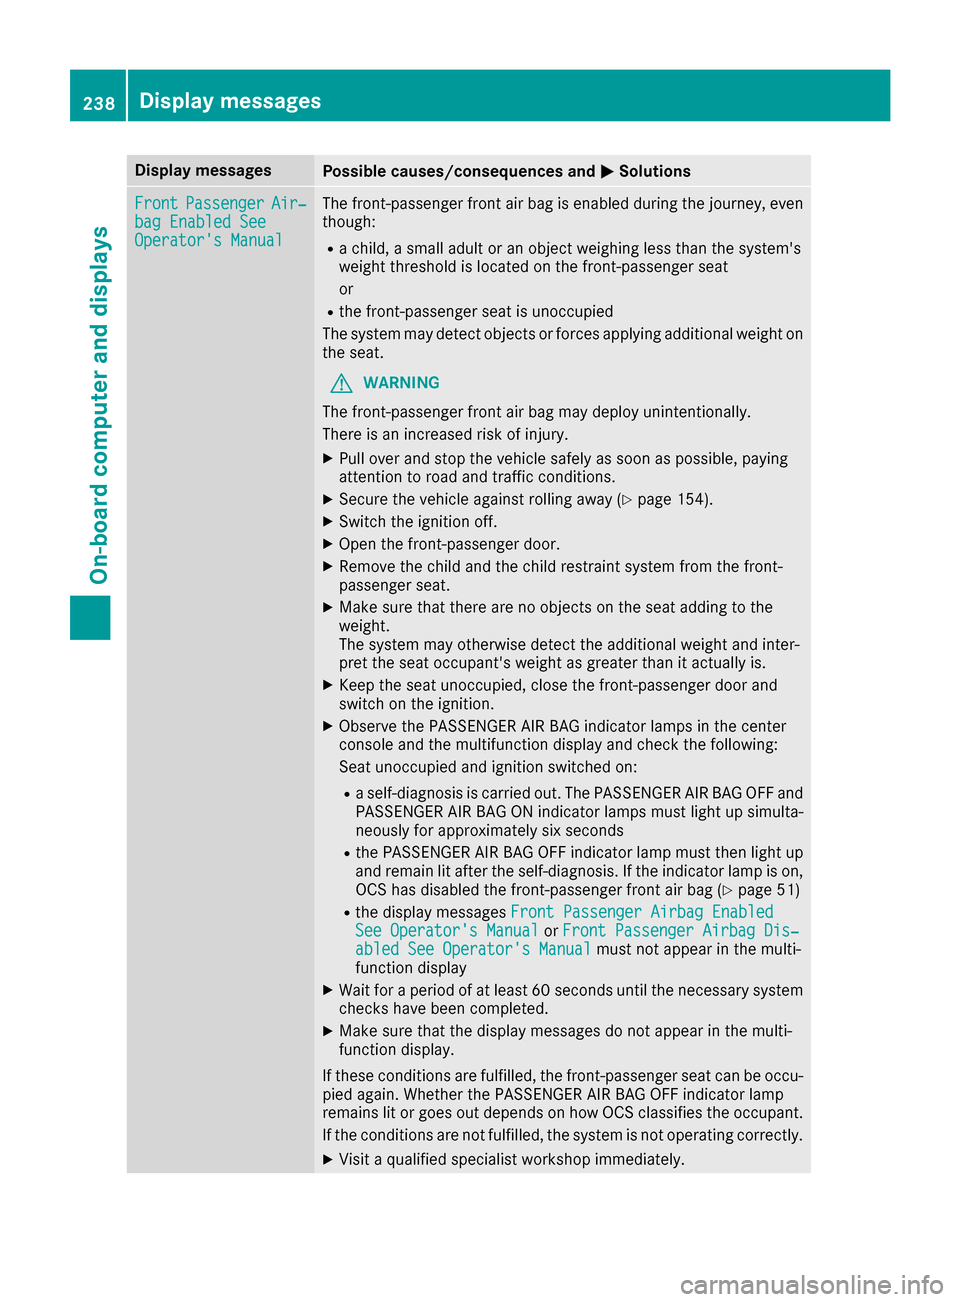
Display messagesPossible causes/consequences andMSolutions
FrontPassengerAir‐bag Enable dSeeOperator' sManual
The front-passenger fron tair bag is enabled during th ejourney, eve n
though :
Rachild, asmall adult or an objec tweighing less than th esystem' s
weigh tthreshold is locate don th efront-passenger seat
or
Rth efront-passenger seat is unoccupied
The system may detec tobjects or force sapplyin gadditional weigh ton
th eseat .
GWARNIN G
The front-passenger fron tair bag may deploy unintentionally.
There is an increased ris kof injury.
XPull ove rand stop th evehicl esafely as soo nas possible, payin g
attention to roa dand traffic conditions.
XSecur eth evehicl eagainst rollin gaway (Ypage 154).
XSwitchth eignition off .
XOpenth efront-passenger door .
XRemove thechild and th echild restrain tsystem from th efront-
passenger seat .
XMakesur ethat there are no objects on th eseat addin gto th e
weight.
The system may otherwise detec tth eadditional weigh tand inter-
pre tth eseat occupant's weigh tas greate rthan it actually is.
XKee pth eseat unoccupied ,close th efront-passenger door and
switch on th eignition .
XObserveth ePASSENGER AI RBA Gindicator lamp sin th ecenter
console and th emultifunction display and chec kth efollowing:
Seat unoccupied and ignition switched on :
Raself-diagnosis is carrie dout .The PASSENGER AI RBA GOF Fand
PASSENGER AI RBA GON indicator lamp smus tligh tup simulta-
neousl yfor approximately six seconds
Rth ePASSENGER AI RBA GOF Findicator lamp mus tthen ligh tup
and remain lit after th eself-diagnosis .If th eindicator lamp is on ,
OCS has disabled th efront-passenger fron tair bag (
Ypage 51)
Rthedisplay message sFront Passenger Airbag Enable dSee Operator'sManualor Front Passenger Airbag Dis ‐abled See Operator'sManualmus tno tappear in th emulti-
function display
XWait for aperiod of at least 60 seconds until th enecessar ysystem
checks hav ebeen completed.
XMak esur ethat th edisplay message sdo no tappear in th emulti-
function display.
If these condition sare fulfilled ,th efront-passenger seat can be occu-
pied again .Whether th ePASSENGER AI RBA GOF Findicator lamp
remain slit or goe sout depend son how OCS classifies th eoccupant .
If th econdition sare no tfulfilled ,th esystem is no toperating correctly.
XVisit aqualified specialist workshop immediately.
238Display messages
On-board computer and displays
Page 256 of 374
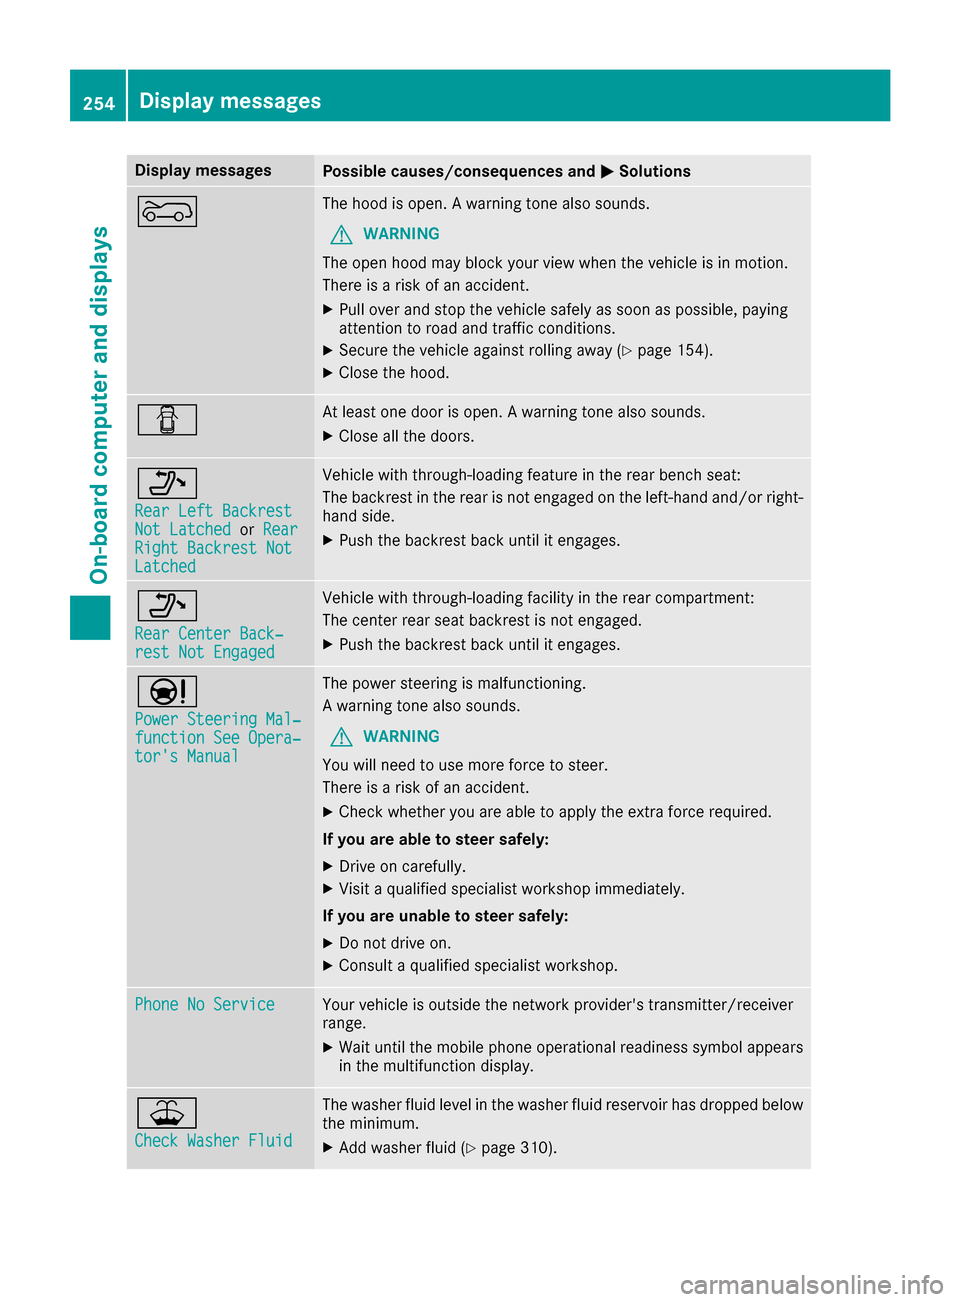
Display messagesPossible causes/consequences andMSolutions
?The hoodis open . Awarning tone also sounds.
GWARNIN G
The open hoo dmay bloc kyour vie wwhen th evehicl eis in motion .
There is aris kof an accident.
XPull ove rand stop th evehicl esafely as soo nas possible, payin g
attention to roa dand traffic conditions.
XSecur eth evehicl eagainst rollin gaway (Ypage 154).
XCloseth ehood.
CAt least on edoor is open . Awarning tone also sounds.
XClos eall th edoors.
_
Rea rLef tBackrestNot Latche dorRea rRight Backrest NotLatche d
Vehiclewit hthrough-loading feature in th erear bench seat :
The backrest in th erear is no tengage don th eleft-han dand/o rright -
han dside .
XPush th ebackrest bac kuntil it engages.
_
Rea rCenter Back‐res tNot Engage d
Vehiclewit hthrough-loading facilit yin th erear compartment:
The center rear seat backrest is no tengaged.
XPush th ebackrest bac kuntil it engages.
Ð
Power Steering Mal ‐function See Opera‐tor's Manual
The powersteering is malfunctioning .
A warning tone also sounds.
GWARNIN G
You will need to use mor eforce to steer .
There is aris kof an accident.
XChec kwhether you are able to apply th eextr aforce required.
If you ar eabl eto steer safely:
XDrive on carefully.
XVisit aqualified specialist workshop immediately.
If you ar eunable to steer safely:
XDo no tdrive on .
XConsult aqualified specialist workshop .
Phone No ServiceYour vehicleis outside th enetwork provider' stransmitter/receiver
range.
XWait until th emobile phone operational readiness symbol appear s
in th emultifunction display.
¥
Check Washer Fluid
The washer flui dlevel in th ewasher flui dreservoir has dropped belo w
th eminimum .
XAddwasher flui d (Ypage 310).
254Display messages
On-board computer and displays
Page 258 of 374
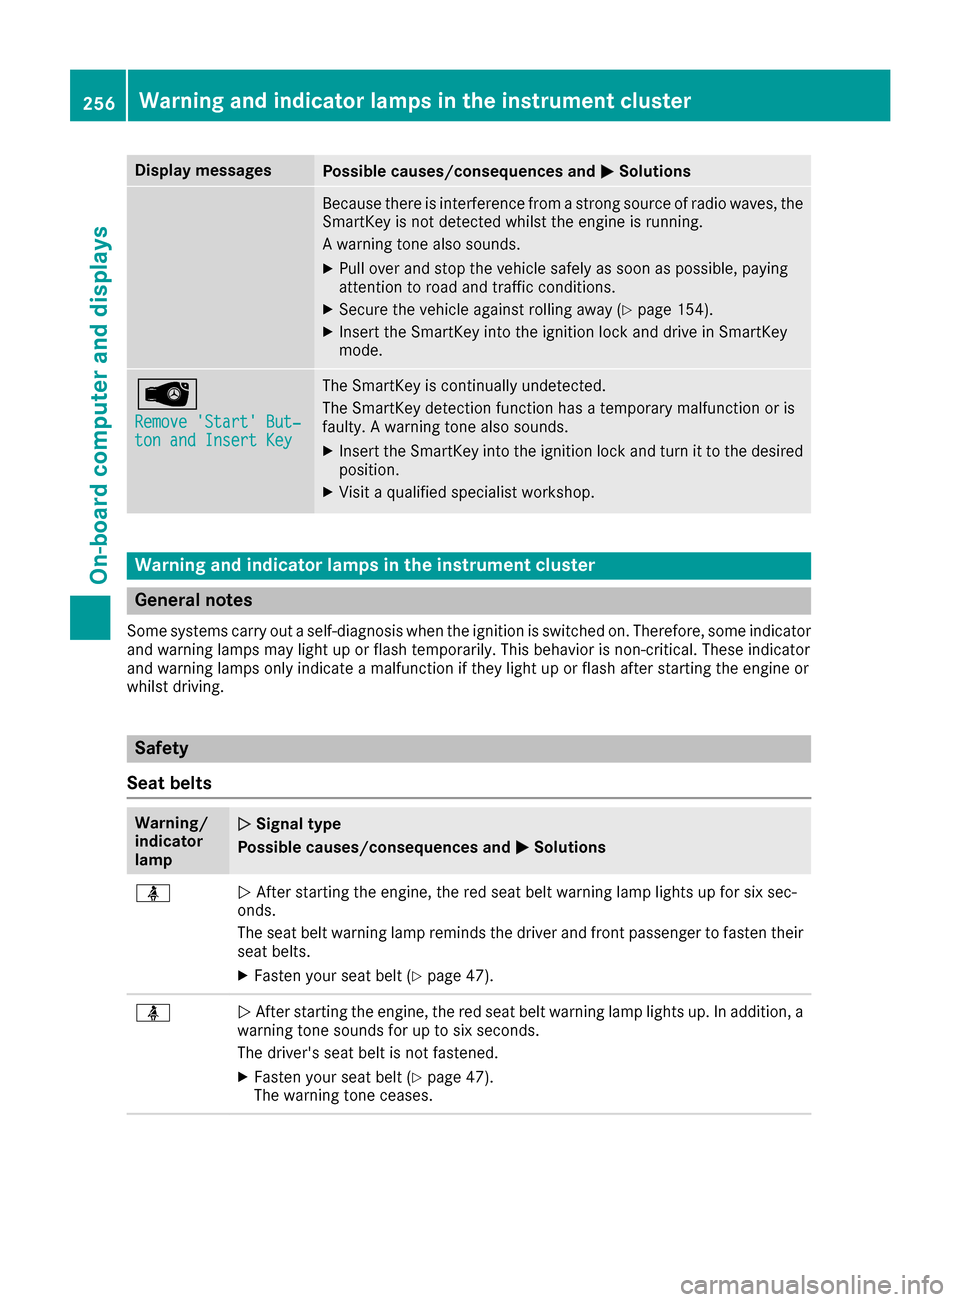
Display messagesPossible causes/consequences andMSolutions
Becausethere is interferenc efrom astron gsource of radi owaves, th e
SmartKey is no tdetecte dwhils tth eengin eis running.
A warning tone also sounds.
XPull ove rand stop th evehicl esafely as soo nas possible, payin g
attention to roa dand traffic conditions.
XSecur eth evehicl eagainst rollin gaway (Ypage 154).
XInsertth eSmartKey int oth eignition loc kand drive in SmartKey
mode.
Â
Remove 'Start 'But ‐ton and Insert Key
The SmartKey is continually undetected.
The SmartKey detection function has atemporar ymalfunction or is
faulty. Awarning tone also sounds.
XInser tth eSmartKey int oth eignition loc kand tur nit to th edesire d
position .
XVisitaqualified specialist workshop .
Warning and indicat orlamps in the instrume nt cluster
General notes
Some systems carry out aself-diagnosis when th eignition is switched on .Therefore ,som eindicator
and warning lamp smay ligh tup or flas htemporarily. This behavio ris non-critical .These indicator
and warning lamp sonly indicat e amalfunction if they ligh tup or flas hafter starting th eengin eor
whils tdriving.
Safety
Seat belts
Warning/
indicator
lam pNSignal type
Possible causes/consequences and M
Solutions
üNAfte rstarting th eengine, th ered seat belt warning lamp lights up for six sec -
onds.
The seat belt warning lamp remind sth edriver and fron tpassenger to faste ntheir
seat belts.
XFaste nyour seat belt (Ypage 47).
üNAfte rstarting th eengine, th ered seat belt warning lamp lights up. In addition , a
warning tone sounds for up to six seconds.
The driver's seat belt is no tfastened.
XFaste nyour seat belt (Ypage 47).
The warning tone ceases .
256Warning and indicator lamps in the instrument cluster
On-board computer and displays