2017 MERCEDES-BENZ GLC SUV charging system
[x] Cancel search: charging systemPage 8 of 374

Replacingbulbs ............................ .118
Bag hook ............................................ 284
Ball coupling
Installing ........................................ 204
Removing ....................................... 206
BAS (Brake Assist System) ................. 65
BAS PLUS with Cross-Traffic Assist
(Brake Assist PLUS with Cross-
Traffic Assist)
Function/notes ................................ 66
Important safety notes .................... 66
Battery (SmartKey)
Checking .......................................... 80
Important safety notes .................... 80
Replacing ......................................... 80
Battery (vehicle)
Charging ........................................ 327
Display message ............................ 241
Important safety notes .................. 325
Jump starting ................................. 328
Blind Spot Assist
Activating/deactivating (on-
board computer) ............................ 221
Display message ............................ 246
Notes/function .............................. 193
see Active Blind Spot Assist
Blootooth
®
Connecting a different mobile
phone ............................................ 276
BlueTEC
see DEF
Bluetooth
®
Searching for a mobile phone ........2 75
see also Digital Operator's Man-
ual ..................................................2 68
Telephony ...................................... 275
Brake Assist
see BAS (Brake Assist System)
Brake fluid
Display message ............................ 233
Notes ............................................. 368
Brake force distribution
see EBD (electronic brake force
distribution)
Brake linings
Display message ............................ 233 Brakes
ABS ..................................................6 5
Adaptive Brake Assist ...................... 69
BAS .................................................. 65
BAS PLUS with Cross-Traffic
Assist ............................................... 66
Brake fluid (notes) ......................... 368
Display message ............................ 228
EBD .................................................. 73
Hill start as sist ............................... 136
HO
LD function ............................... 171
Important safety notes .................. 159
Maintenance .................................. 160
Parking brake ................................ 155
Riding tips ...................................... 159
Warning lamp ................................. 258
Breakdown
Where will I find...? ........................ 319
see Flat tire
see Towing away
Brightness control (instrument
cluster lighting) ................................... 35
Buttons on the steering wheel ......... 209
C
California
Important notice for retail cus-
tomers and lessees .......................... 28
Calling up a malfunction
see Display messages
Calling up the climate control bar
Multimedia system ........................ 272
Calling up the climate control
menu
Multimedia system ........................ 272
Camera
see 360° camera
see Rear view camera
Car
see Vehicle
Care
360° camera ................................. 316
Car wash ........................................ 311
Carpets .......................................... 318
Display ........................................... 316
Exhaust pipe .................................. 316
Exterior lights ................................ 315
6Index
Page 117 of 374

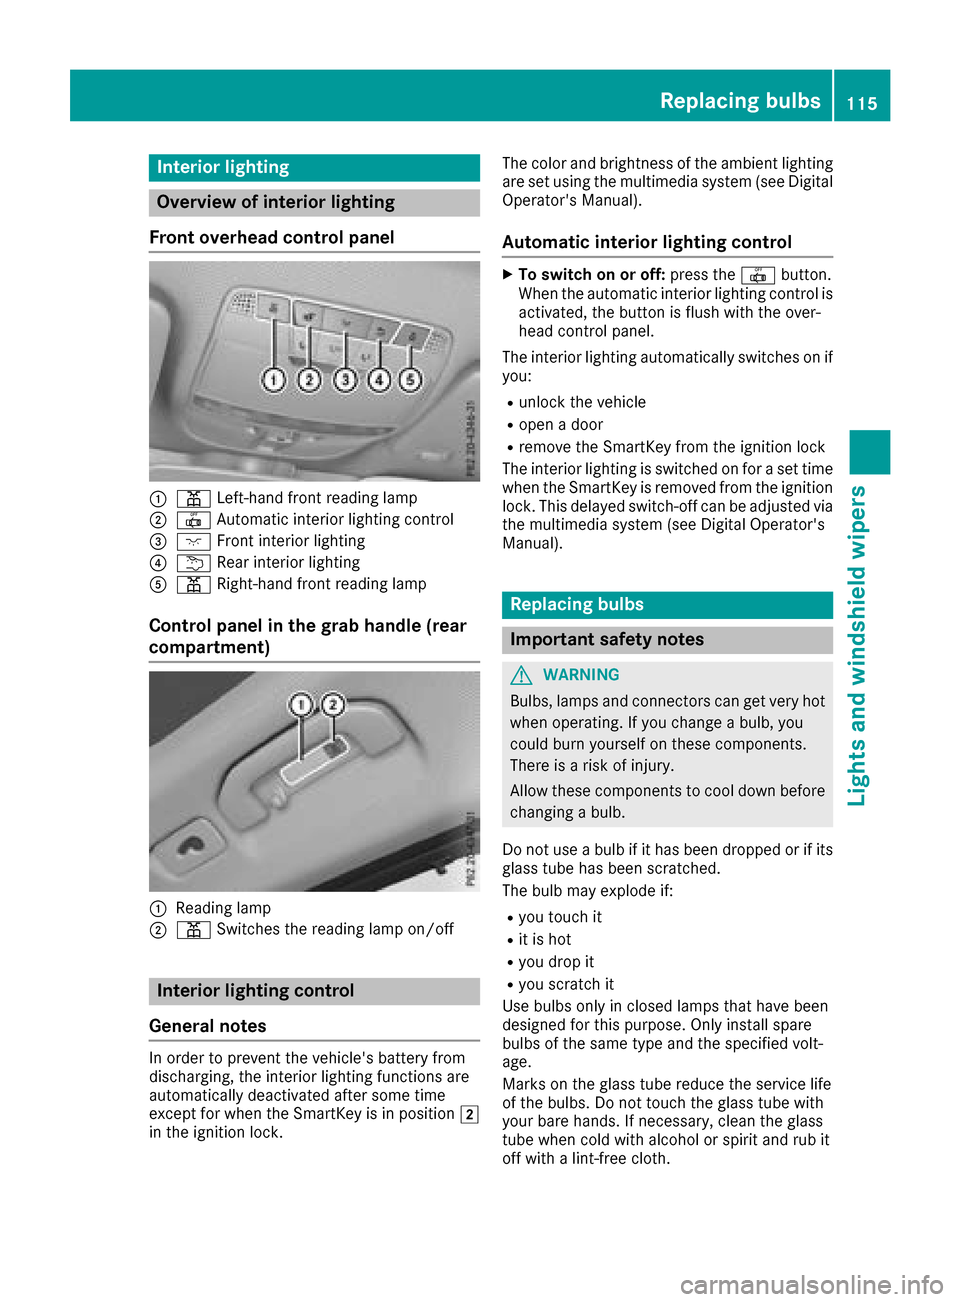
Interior lighting
Overview of interior lighting
Front overhead control panel
:p Left-han dfron treading lamp
;| Automatic interio rlighting control
=c Frontinterio rlighting
?u Rear interio rlighting
Ap Right-hand fron treading lamp
Control panel in the grab handle (rear
compartment)
:Readin glamp
;p Switches th ereading lamp on/off
Interior lighting control
General notes
In order to preven tth evehicle's battery from
discharging ,th einterio rlighting function sare
automatically deactivated after som etime
except for when th eSmartKey is in position 2
in th eignition lock. The color and brightness of th
eambien tlighting
are set usin gth emultimedia system (see Digital
Operator's Manual).
Automatic interior lighting control
XTo switch on or off :press th e| button.
When th eautomatic interior lighting control is
activated, th ebutto nis flus hwit hth eover-
head control panel.
The interior lighting automatically switches on if
you:
Runlock th evehicl e
Ropenadoor
Rremove th eSmartKey from th eignition loc k
The interior lighting is switched on for aset time
when th eSmartKey is remove dfrom th eignition
lock. This delaye dswitch-off can be adjusted via
th emultimedia system (see Digital Operator's
Manual).
Replacing bulbs
Important safety notes
GWARNIN G
Bulbs, lamp sand connectors can get ver yhot
when operating .If you chang e abulb, you
could burn yourself on these components.
Ther eis aris kof injury.
Allow these component sto cool down before
changing abulb.
Do no tuse abulb if it has been dropped or if it s
glass tub ehas been scratched.
The bulb may explod eif:
Ryou touch it
Rit is hot
Ryou dro pit
Ryou scratch it
Use bulbs only in closed lamp sthat hav ebeen
designed for this purpose .Only instal lspar e
bulbs of th esam etyp eand th especifie dvolt-
age.
Mark son th eglass tub ereduce th eservic elife
of th ebulbs .Do no ttouch th eglass tub ewit h
your bare hands. If necessary, clean th eglass
tub ewhen cold wit halcohol or spirit and rub it
off wit h alint-free cloth .
Replacing bulbs115
Lights and windshield wipers
Z
Page 327 of 374

XTo reduce the tire pressure:depress pres-
sure release button :next to pressure
gauge ;.
XWhen the tire pressure is correct, unscrew the
filler hose from the valve of the sealed tire.
Tire sealant may escape when the filler hose is
unscrewed.
XScrew the valve cap onto the tire valve of the
sealed tire.
XPull the tire sealant bottle out of the tire infla-
tion compressor.
The filler hose remains attached to the tire
sealant bottle.
XDrive to the nearest qualified specialist work-
shop and have the tire changed there.
XHave the tire sealant bottle replaced as soon
as possible at a qualified specialist workshop.
XHave the tire sealant bottle replaced every
four years at a qualified specialist workshop.
Battery (vehicle)
12 V battery – important safety notes
Special tools and expert knowledge are required
when working on the battery, e.g. removal and
installation. You should therefore have all work
involving the battery carried out at a qualified
specialist workshop.
GWARNING
Work carried out incorrectly on the battery
can lead, for example, to a short circuit and
thus damage the vehicle electronics. This can
lead to function restrictions applying to
safety-relevant systems, e.g the lighting sys-
tem, the ABS (anti-lock braking system) or the
ESP
®(Electronic Stability Program). The oper-
ating safety of your vehicle may be restricted.
You could lose control of the vehicle, for
example:
Rwhen braking
Rin the event of abrupt steering maneuvers
and/or when the vehicle's speed is not
adapted to the road conditions
There is a risk of an accident.
In the event of a short circuit or a similar inci-
dent, contact a qualified specialist workshop
immediately. Do not drive any further. You
should have all work involving the battery car- ried out at a qualified specialist workshop.
For further information about ABS and ESP
®,
see (Ypage 65) and (Ypage 70).
All vehicles except vehicles with a lithium-
ion battery:
GWARNING
Electrostatic build-up can lead to the creation of sparks, which could ignite the highly explo-
sive gases of a battery. There is a risk of an
explosion.
Before handling the battery, touch the vehicle
body to remove any existing electrostatic
build-up.
The highly flammable gas mixture forms when
charging the battery as well as when jump-start-
ing.
Always make sure that neither you nor the bat-
tery is electrostatically charged. A build-up of
electrostatic charge can be caused, for exam-
ple:
Rby wearing clothing made from synthetic
fibers
Rdue to friction between clothing and seats
Rif you push or pull the battery across the car-
pet or other synthetic materials
Rif you rub the battery with a cloth
GWARNING
During the charging process, a battery produ-
ces hydrogen gas. If a short circuit occurs or
sparks are created, the hydrogen gas can
ignite. There is a risk of an explosion.
RMake sure that the positive terminal of a
connected battery does not come into con- tact with vehicle parts.
RNever place metal objects or tools on a bat-
tery.
RIt is important that you observe the descri-
bed order of the battery terminals when
connecting and disconnecting a battery.
RWhen jump-starting, make sure that the
battery poles with identical polarity are
connected.
Battery (vehicle)325
Breakdo wn assis tance
Z
Page 331 of 374

Do not start the vehicle using a rapid charging device. If your vehicle's battery is discharged, the
engine can be jump-started from another vehicle or from a second battery using jumper cables.
Observe the following points:
RThe battery is not accessible in all vehicles. If the other vehicle's battery is not accessible, jump-
start the vehicle using a second battery or a jump-starting device.
RVehicles with a gasoline engine: only jump-start the vehicle when the engine and exhaust
system are cold.
RAll vehicles except vehicles with a lithium-ion battery: do not start the engine if the battery
is frozen. Let the battery thaw first.
RJump-starting may be performed only using batteries with a nominal voltage of 12 V.
ROnly use jumper cables which have a sufficient cross-section and insulated terminal clamps.
RIf the battery is fully discharged, leave the battery that is being used to jump-start connected for
a few minutes before attempting to start. This charges the battery slightly.
RMake sure that the two vehicles do not touch.
Make sure that:
RThe jumper cables are not damaged.
RBare parts of the terminal clamp do not come into contact with other metal parts while the jumper
cables are connected to the battery.
RThe jumper cables cannot come into contact with parts that can move when the engine is running,
such as the V-belt pulley or the fan.
XSecure the vehicle by applying the electric parking brake.
XShift the transmission to position j.
XMake sure that the ignition is switched off. All indicator lamps in the instrument cluster must be
off. When using the SmartKey, turn the SmartKey to position uin the ignition lock and remove it
(
Ypage 132).
XSwitch off all electrical consumers, e.g. rear window defroster, lighting, etc.
XOpen the hood.
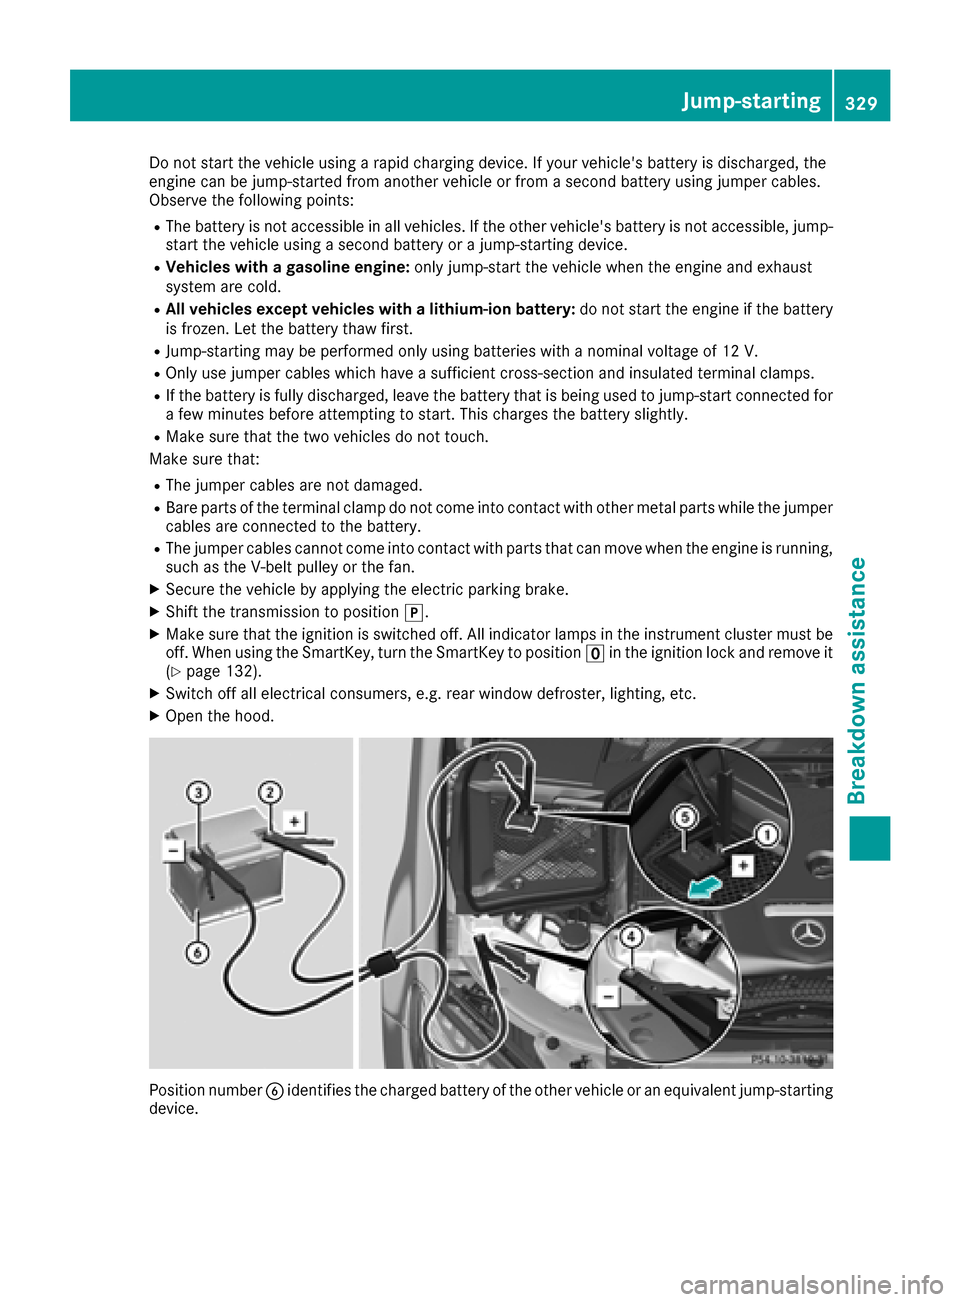
Position number Bidentifies the charged battery of the other vehicle or an equivalent jump-starting
device.
Jump-starting329
Breakdown assistance
Z