2017 MERCEDES-BENZ GLC SUV rear door
[x] Cancel search: rear doorPage 117 of 374
Interior lighting
Overview of interior lighting
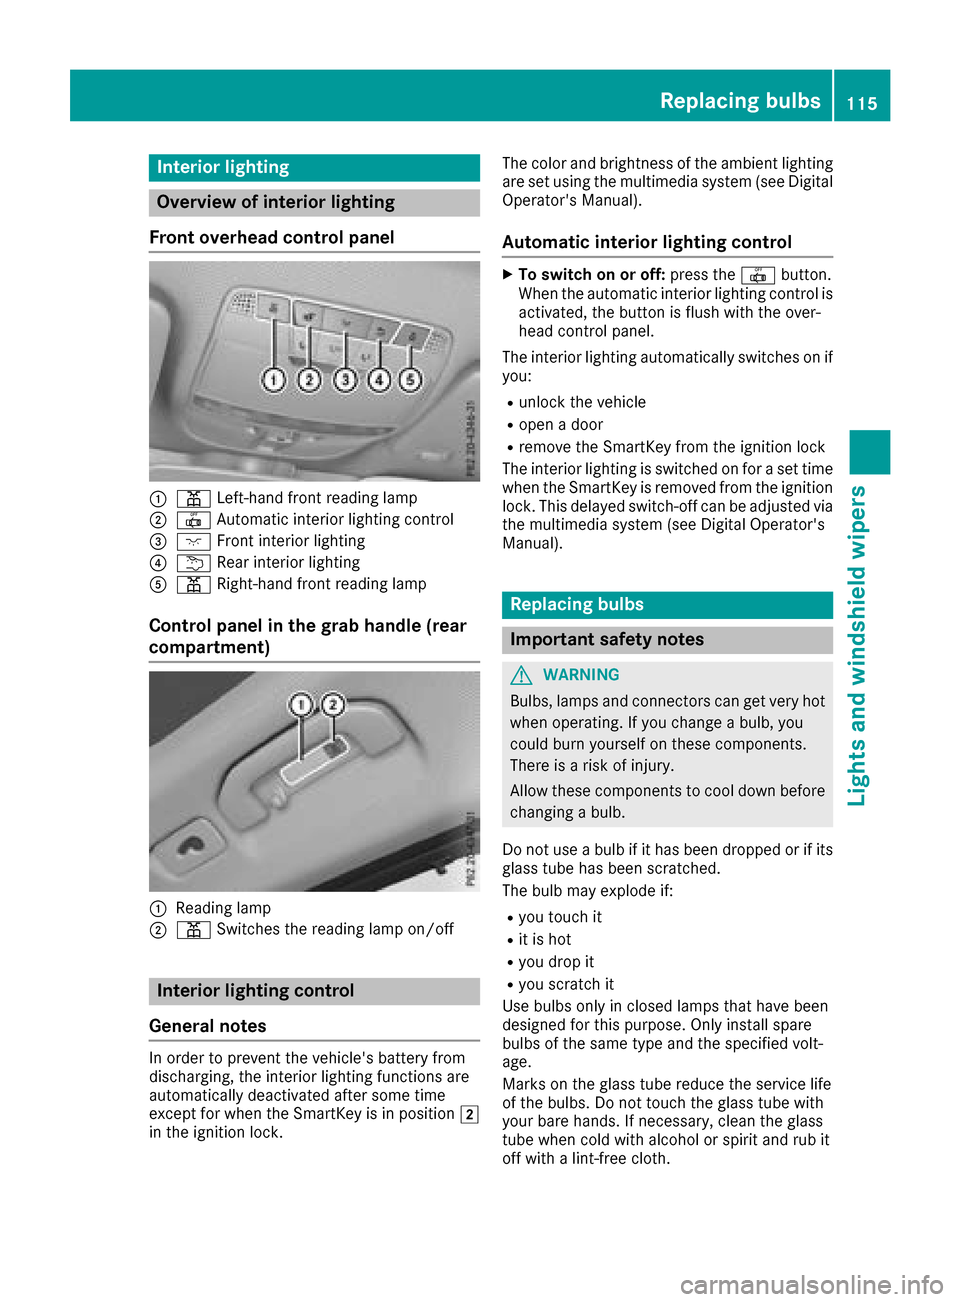
Front overhead control panel
:p Left-han dfron treading lamp
;| Automatic interio rlighting control
=c Frontinterio rlighting
?u Rear interio rlighting
Ap Right-hand fron treading lamp
Control panel in the grab handle (rear
compartment)
:Readin glamp
;p Switches th ereading lamp on/off
Interior lighting control
General notes
In order to preven tth evehicle's battery from
discharging ,th einterio rlighting function sare
automatically deactivated after som etime
except for when th eSmartKey is in position 2
in th eignition lock. The color and brightness of th
eambien tlighting
are set usin gth emultimedia system (see Digital
Operator's Manual).
Automatic interior lighting control
XTo switch on or off :press th e| button.
When th eautomatic interior lighting control is
activated, th ebutto nis flus hwit hth eover-
head control panel.
The interior lighting automatically switches on if
you:
Runlock th evehicl e
Ropenadoor
Rremove th eSmartKey from th eignition loc k
The interior lighting is switched on for aset time
when th eSmartKey is remove dfrom th eignition
lock. This delaye dswitch-off can be adjusted via
th emultimedia system (see Digital Operator's
Manual).
Replacing bulbs
Important safety notes
GWARNIN G
Bulbs, lamp sand connectors can get ver yhot
when operating .If you chang e abulb, you
could burn yourself on these components.
Ther eis aris kof injury.
Allow these component sto cool down before
changing abulb.
Do no tuse abulb if it has been dropped or if it s
glass tub ehas been scratched.
The bulb may explod eif:
Ryou touch it
Rit is hot
Ryou dro pit
Ryou scratch it
Use bulbs only in closed lamp sthat hav ebeen
designed for this purpose .Only instal lspar e
bulbs of th esam etyp eand th especifie dvolt-
age.
Mark son th eglass tub ereduce th eservic elife
of th ebulbs .Do no ttouch th eglass tub ewit h
your bare hands. If necessary, clean th eglass
tub ewhen cold wit halcohol or spirit and rub it
off wit h alint-free cloth .
Replacing bulbs115
Lights and windshield wipers
Z
Page 123 of 374

XHold on to the wiper arm with one hand. With
the other hand, turn the wiper blade in the
direction of arrow:away from the wiper arm
as far as it will go.
XSlide the catch ;in the direction of arrow =
until it engages in the removal position with a
noticeable click.
XRemove the wiper blade in the direction of
arrow ?away from the wiper arm.
Installing the wiper blades
XInsert the new wiper blade into the wiper arm
in the direction of arrow :.
XSlide the catch;in the direction of arrow =
until it engages in the locking position with a
noticeable click.
XMake sure that the wiper blade is seated cor-
rectly.
XFold the wiper arm back onto the windshield.
XRemove the protective film :from the ser-
vice indicator on the tip of the wiper blade.
If the color of the service indicator changes from
black to yellow, the wiper blades should be
replaced.
iThe duration of the color change varies
depending on the usage conditions.
Replacing the rear window wiper blade
Removing a wiper blade
XSwitch off the engine.
XRemove the SmartKey from the ignition lock.
or, on vehicles with KEYLESS-GO or KEY-
LESS‑ GO start function:
XOpen the driver's door.
The vehicle electronics are now in position
u. This is the same as: "Key removed".
Windshield wipers121
Lights and windshield wipers
Z
Page 124 of 374
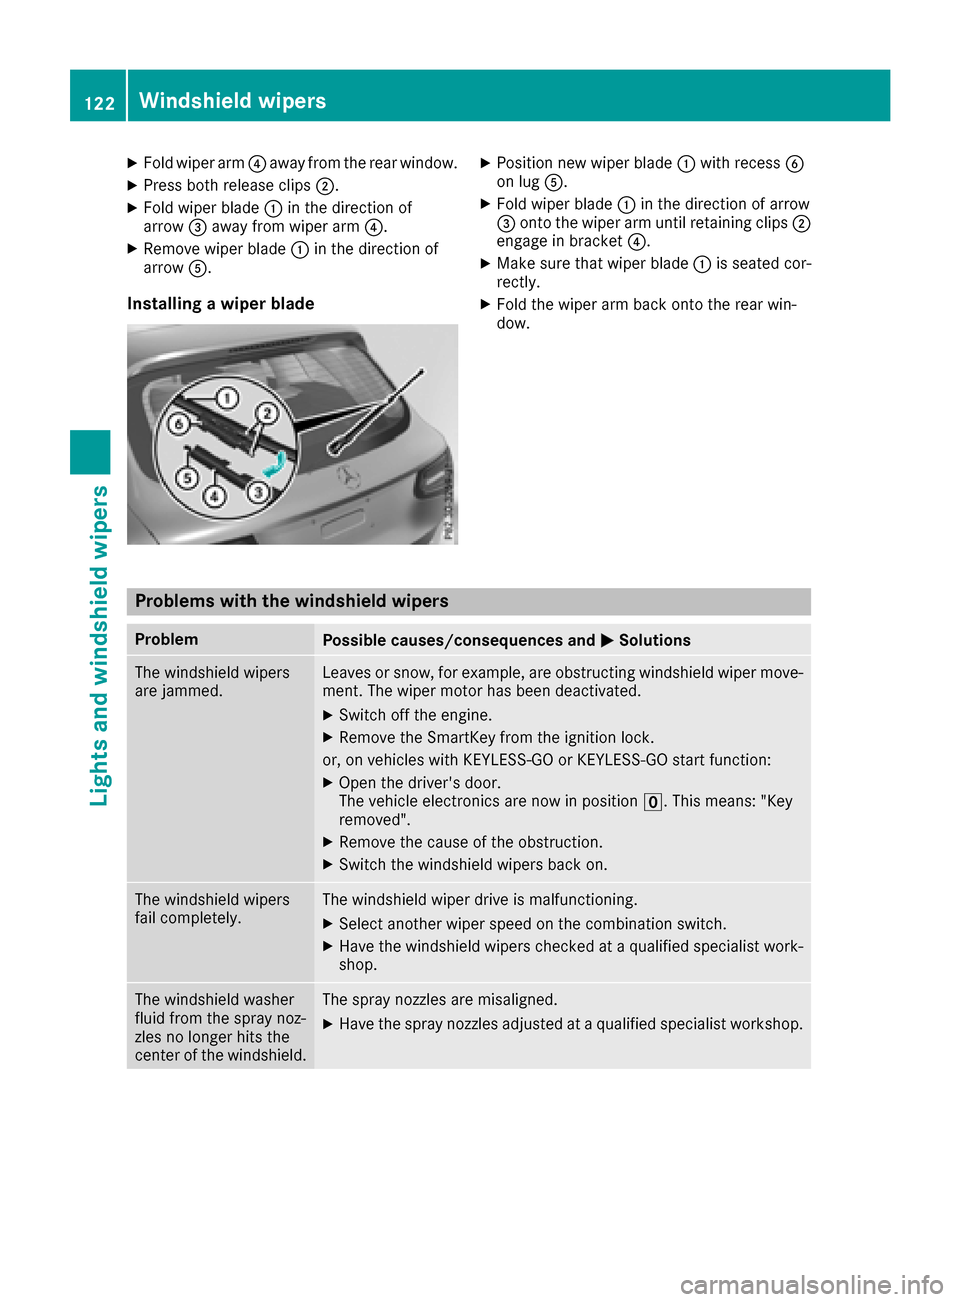
XFold wiper arm?away from the rear window.
XPress both release clips ;.
XFold wiper blade:in the direction of
arrow =away from wiper arm ?.
XRemove wiper blade:in the direction of
arrow A.
Installing a wiper blade
XPosition new wiper blade :with recess B
on lug A.
XFold wiper blade :in the direction of arrow
= onto the wiper arm until retaining clips ;
engage in bracket ?.
XMake sure that wiper blade :is seated cor-
rectly.
XFold the wiper arm back onto the rear win-
dow.
Problems with the windshield wipers
ProblemPossible causes/consequences and MSolutions
The windshield wipers
are jammed.Leaves or snow, for example, are obstructing windshield wiper move-
ment. The wiper motor has been deactivated.
XSwitch off the engine.
XRemove the SmartKey from the ignition lock.
or, on vehicles with KEYLESS-GO or KEYLESS ‑GO start function:
XOpen the driver's door.
The vehicle electronics are now in positionu. This means: "Key
removed".
XRemove the cause of the obstruction.
XSwitch the windshield wipers back on.
The windshield wipers
fail completely.The windshield wiper drive is malfunctioning.
XSelect another wiper speed on the combination switch.
XHave the windshield wipers checked at a qualified specialist work-
shop.
The windshield washer
fluid from the spray noz-
zles no longer hits the
center of the windshield.The spray nozzles are misaligned.
XHave the spray nozzles adjusted at a qualified specialist workshop.
122Windshield wipers
Lights and windshield wipers
Page 168 of 374
RActive Parking Assist must not be activated.
Rthe transmission must be in positionh.
Rthe driver's door must be closed when you
shift the transmission from positionjtoh
or your seat belt must be fastened.
Rthe front-passenger door and rear doors must
be closed.
Rthe vehicle must not slide.
Activating
XBriefly pull the cruise control lever towards
you ?or push it up :or down ;.
DISTRONIC PLUS is activated.
XRemove your foot from the accelerator pedal.
The vehicle adapts its speed to that of the
vehicle in front, but only up to the desired
stored speed.
If you do not fully release the accelerator
pedal, the DISTRONIC
PLUSSuspendedmes-
sage appears on the multifunction display.
The set distance to a slower-moving vehicle in
front will then not be maintained. You will be
driving at the speed you determine by the
position of the accelerator pedal.
You can also activate DISTRONIC PLUS when
stationary. The lowest speed that can be set is
20 mph (30 km/h).
XBriefly pull the cruise control lever towards
you ?or push it up :or down ;.
DISTRONIC PLUS is activated.
Activating at the current speed/last
stored speed
GWARNING
If you call up the stored speed and it differs
from the current speed, the vehicle acceler-
ates or decelerates. If you do not know the
stored speed, the vehicle could accelerate or brake unexpectedly. There is a risk of an acci-
dent.
Pay attention to the road and traffic condi-
tions before calling up the stored speed. If you
do not know the stored speed, store the
desired speed again.
XBriefly pull the cruise control lever towards
you ?.
XRemove your foot from the accelerator pedal.
DISTRONIC PLUS is activated. The first time it
is activated, the current speed is stored. Oth- erwise, it sets the vehicle speed to the previ-
ously stored value.
Driving with DISTRONIC PLUS
Pulling away and driving
XIf you want to pull away with DISTRONIC
PLUS:
remove your foot from the brake pedal.
XBriefly pull the cruise control lever towards
you?.
or
XAccelerate briefly.
The vehicle pulls away and adapts its speed to that of the vehicle in front. If no vehicle is
detected in front, your vehicle accelerates to
the stored speed.
The vehicle can also pull away when it is facing
an unidentified obstacle or is driving on a differ- ent line from another vehicle. The vehicle then
brakes automatically.
If DISTRONIC PLUS does not detect a vehicle in
front, the system operates like a cruise control.
If DISTRONIC PLUS detects that the vehicle in
front is driving slower, your vehicle brakes. In
this way, the specified minimum distance you
have selected is maintained.
If DISTRONIC PLUS detects that the vehicle in
front is driving faster, your vehicle accelerates
to the stored speed.
Selects the drive program
DISTRONIC PLUS supports a sporty driving style
when you have selected the Sor S+ driving pro-
gram (
Ypage 144). Acceleration behind the
vehicle in front or to the set speed is then notice-
ably more dynamic. If you have selected the Cor
E driving program, the vehicle acce lera
tes more
gently. This setting is recommended in stop-
and-start traffic.
Changing lanes
DISTRONIC PLUS aids you when switching to
the overtaking lane, if:
Ryou are driving faster than 45 mph (70 km/h)
Ryou switch on the appropriate turn signal
RDISTRONIC PLUS does not currently detect a danger of a collision
If these conditions are fulfilled, your vehicle is
accelerated. Acceleration will be interrupted if
changing lanes takes too long or if the distance
166Driving systems
Driving an d parking
Page 176 of 374
comfort mode also when driving fast on straight
roads, e.g. on straight stretches of highway.
XSelect theEor Cdrive program with the
DYNAMIC SELECT switch (Ypage 139).
The vehicle is raised to the normal level.
When driving at speeds above 80 mph
(125 km/h), the vehicle is automatically low-
ered by 0.6 in (15 mm) in the Eand Cdrive pro-
grams. When driving at speeds below 50 mph
(80 km/h), the vehicle is raised again.
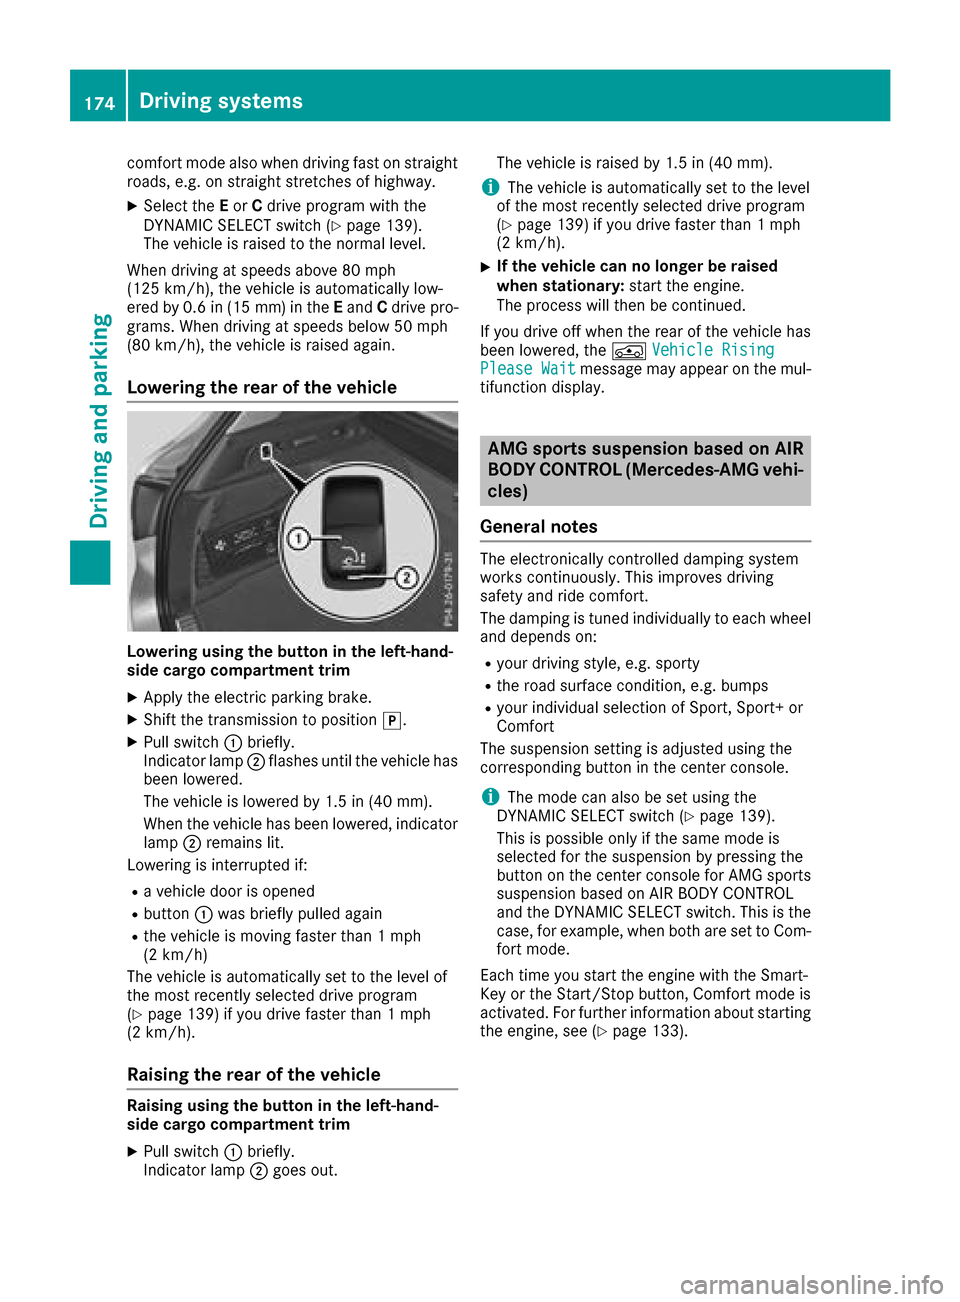
Lowering the rear of the vehicle
Lowering using the button in the left-hand-
side cargo compartment trim
XApply the electric parking brake.
XShift the transmission to position j.
XPull switch:briefly.
Indicator lamp ;flashes until the vehicle has
been lowered.
The vehicle is lowered by 1.5 in (40 mm).
When the vehicle has been lowered, indicator
lamp ;remains lit.
Lowering is interrupted if:
Ra vehicle door is opened
Rbutton :was briefly pulled again
Rthe vehicle is moving faster than 1 mph
(2 km/h)
The vehicle is automatically set to the level of
the most recently selected drive program
(
Ypage 139) if you drive faster than 1 mph
(2 km/h).
Raising the rear of the vehicle
Raising using the button in the left-hand-
side cargo compartment trim
XPull switch :briefly.
Indicator lamp ;goes out. The vehicle is raised by 1.5 in (40 mm).
iThe vehicle is automatically set to the level
of the most recently selected drive program
(
Ypage 139) if you drive faster than 1 mph
(2 km/h).
XIf the vehicle can no longer be raised
when stationary: start the engine.
The process will then be continued.
If you drive off when the rear of the vehicle has
been lowered, the ÁVehicle Rising
Please Waitmessage may appear on the mul-
tifunction display.
AMG sports suspension based on AIR
BODY CONTROL (Mercedes-AMG vehi-
cles)
General notes
The electronically controlled damping system
works continuously. This improves driving
safety and ride comfort.
The damping is tuned individually to each wheel
and depends on:
Ryour driving style, e.g. sporty
Rthe road surface condition, e.g. bumps
Ryour individual selection of Sport, Sport+ or
Comfort
The suspension setting is adjusted using the
corresponding button in the center console.
iThe mode can also be set using the
DYNAMIC SELECT switch (Ypage 139).
This is possible only if the same mode is
selected for the suspension by pressing the
button on the center console for AMG sports
suspension based on AIR BODY CONTROL
and the DYNAMIC SELECT switch. This is the
case, for example, when both are set to Com- fort mode.
Each time you start the engine with the Smart-
Key or the Start/Stop button, Comfort mode is
activated. For further information about starting
the engine, see (
Ypage 133).
174Driving systems
Driving and parking
Page 189 of 374
360° camera
General notes
The 360° camera is a system consisting of four
cameras.
The system processes images from the follow-
ing cameras:
RRear view camera
RFront camera
RTwo side cameras in the exterior mirrors
The cameras cover the immediate surroundings
of the vehicle. The system supports you, for
example when parking or if vision is restricted at
an exit.
You can show images from the 360° camera in
full-screen mode or in seven different split-
screen views on the multimedia system. A split- screen view also includes a top view of the vehi-
cle. This view is calculated from the data sup-
plied by the installed cameras (virtual camera).
The seven split-screen views are:
RTop view and picture from the rear view cam-
era (130° viewing angle)
RTop view and image from the front camera
(130° viewing angle without displaying the
maximum steering wheel angle)
RTop view and enlarged rear view
RTop view and enlarged front view
RTop view and trailer view (vehicles with trailer
tow hitch)
RTop view and images from the rear-facing side
cameras (rear wheel view)
RTop view and images from the forward-facing
side cameras (front wheel view)
When the function is active and you shift the
transmission from hork toi, the guide
lines are hidden in the multimedia system.
When you change between transmission posi-
tions hand k, you see the previously selec-
ted front or rear view.
Distances measured by PARKTRONIC will also
be optically displayed:
Rin split screen view as red or yellow brackets
around the vehicle icon in the top view, or
Rat the bottom right as red or yellow brackets
around the vehicle symbol in full-screen mode
The line thickness and color of the brackets
show how far the vehicle is from an object.
Ryellow brackets with thin lines: PARKTRONIC
is active
Ryellow brackets with normal lines: an object is present in close range of the vehicle
Rred line: an object is present in the immediate
close range of the vehicle
Important safety notes
The 360°camera is only an aid and may show a
distorted view of obstacles, show them incor-
rectly or not at all. The 360°camera is not a
substitute for attentive driving.
You are always responsible for safe maneuver-
ing and parking. Make sure that there are no
persons, animals or objects in the maneuvering
area while maneuvering and parking in parking
spaces.
You are always responsible for safety, and must
always pay attention to your surroundings when
parking and maneuvering. This applies to the
areas behind, in front of and beside the vehicle. You could otherwise endanger yourself and oth-
ers.
The 360° camera will not function or will func-
tion in a limited manner:
Rif the doors are open
Rif the exterior mirrors are folded in
Rif the tailgate is open
Rin heavy rain, snow or fog
Rat night or in very dark places
Rif the cameras are exposed to very bright light
Rif the area is lit by fluorescent bulbs or LED
lighting (the display may flicker)
Rif the camera lenses fog up, e.g. when driving
into a heated garage in winter, causing a rapid
change in temperature
Rif the camera lenses are dirty or covered
Rif the vehicle components in which the cam-
eras are installed are damaged. In this case,
have the camera position and setting checked
at a qualified specialist workshop
Do not use the 360° camera in this case. You
can otherwise injure others or cause damage to
objects or the vehicle.
The guide lines in the multimedia system display
show the distances to your vehicle. The distan-
ces only apply to road level.
In trailer mode, the guide lines are shown at the
level of the trailer tow hitch.
Driving systems187
Driving and parking
Z
Page 193 of 374
XReverse carefully until thetrailer drawbar rea-
ches red guide lin eC.
The distanc ebetween th etrailer drawbar and
red guide lin eC is no wapproximately 12 in
(0.30 m).
XCouple up th etrailer (Ypage 204).
The lines are shown at th elevel of th etrailer to w
hitch .
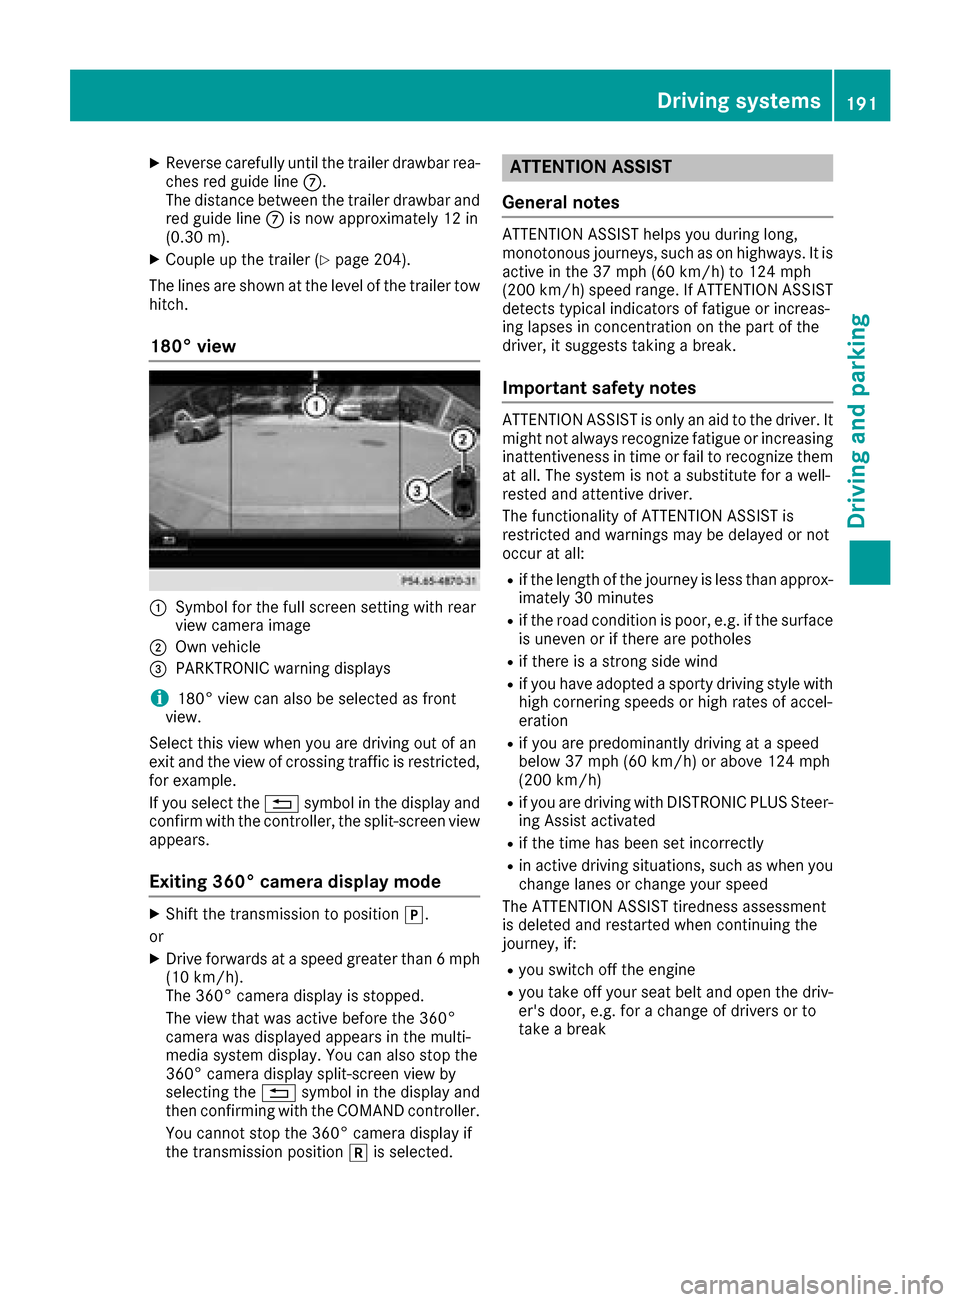
180° view
:Symbol for th efull scree nsetting wit hrear
vie wcamera imag e
;Own vehicle
=PARKTRONI Cwarning displays
i180° vie wcan also be selected as fron t
view.
Selec tthis vie wwhen you are driving out of an
exit and th evie wof crossing traffic is restricted,
for example.
If you select th e% symbol in th edisplay and
confirm wit hth econtroller ,th esplit-scree nvie w
appears.
Exiting 360° camera display mode
XShift th etransmission to position j.
or
XDrive forwards at aspee dgreate rthan 6mph
(10 km/h).
The 360° camera display is stopped.
The vie wthat was active before th e360°
camera was displayed appear sin th emulti-
media system display. You can also stop th e
360° camera display split-scree nvie wby
selecting th e% symbol in th edisplay and
then confirming wit hth eCOMAND controller .
You canno tstop th e360° camera display if
th etransmission position kis selected.
ATTENTION ASSIST
General notes
ATTENTION ASSIST help syou during long,
monotonous journeys, suc has on highways. It is
active in th e37 mph (60 km/h) to 12 4mph
(20 0km/h )spee drange. If ATTENTION ASSIST
detects typical indicators of fatigue or increas -
ing lapse sin concentration on th epart of th e
driver, it suggest staking abreak.
Important safety notes
ATTENTION ASSIST is only an aid to th edriver. It
might no talways recogniz efatigue or increasing
inattentiveness in time or fail to recogniz ethem
at all. The system is no t asubstitut efor awell-
reste dand attentive driver.
The functionalit yof ATTENTION ASSIST is
restricted and warning smay be delaye dor no t
occur at all:
Rif th elengt hof th ejourney is less than approx -
imately 30 minute s
Rif theroad condition is poor ,e.g. if th esurfac e
is uneven or if there are pothole s
Rif there isastron gside win d
Rif you hav eadopted asport ydriving style wit h
high cornering speeds or high rates of accel-
eration
Rif you are predominantly driving at aspee d
belo w37 mph (60 km/h) or abov e12 4mph
(20 0km/h)
Rif you are driving wit hDISTRONI CPLU SSteer -
ing Assis tactivated
Rif th etime has been set incorrectl y
Rin active driving situations, suc has when you
chang elanes or chang eyour spee d
The ATTENTION ASSIST tiredness assessmen t
is deleted and restarte dwhen continuing th e
journey, if:
Ryou switch off th eengin e
Ryou tak eoff your seat belt and open th edriv -
er' sdoor ,e.g. for achang eof drivers or to
tak e a break
Driving systems191
Driving and parking
Z
Page 207 of 374
XSwitch off the engine.
XClose the doors and tailgate.
XCouple up the trailer.
XEstablish the electrical connection between
the vehicle and the trailer.
XCheck that the trailer lighting system is work-
ing.
XPush the combination switch upwards/down-wards and check whether the corresponding
turn signal on the trailer flashes.
A trailer that is connected is recognized only
when the electrical connection is established
correctly and when the lighting system is work-
ing properly. The function of other systems also
depends on this, for example:
RESP®
RPARKTRONIC
RActive Parking Assist
RActive Blind Spot Assist
RActive Lane Keeping Assist
Vehicles with AIR BODY CONTROL: if you couple
up a trailer, the vehicle always remains at high-
way level. Observe the following note when cou-
pling up a trailer:
RUnless highway level has been set manually,
the vehicle is automatically lowered to high-
way level. If a speed of 5 mph (8 km/h) has
been reached, this may be the case.
These restrictions apply to accessories that are
supplied with power via the trailer socket in your
vehicle, e.g. a rear bicycle rack.
Observe the maximum permissible trailer
dimensions (width and length).
Most U.S. states and all Canadian provinces
require by law:
RSafety chains between the towing vehicle and
the trailer. The chains should be cross-wound
under the trailer drawbar. They must be fas-
tened to the vehicle's trailer coupling, not to
the bumper or the axle.
Leave enough play in the chains to make tight
cornering possible.
RA separate brake system for certain types of
trailer.
RSafety switch for braked trailers. Check the
specific legal requirements applicable to your state.
If the trailer becomes detached from the tow-
ing vehicle, the safety feature applies the
trailer brakes.
Towing a trailer
There are several legal requirements for towing
a trailer, e.g. the maximum permissible speed.
Make sure that your car/trailer combination
complies with the local regulations:
Rin your place of residence
Rat your destination
The police and local authorities can provide reli- able information.
To accumulate driving experience and accustom
yourself to the new handling characteristics,
practice the following at a location where there
is no traffic:
RCornering
RStopping
RBacking up
Check the following before the journey:
RTrailer tow hitch
RSafety switch for braked trailers
RSafety chains
RElectrical connections
RLighting system
RWheels and tires
RLoad securing
Adjust the exterior mirrors so that you have a
clear view of the rear section of the trailer.
If the trailer is equipped with electronically con-
trolled brakes, pull away carefully in the car/
trailer combination. Brake manually using the
brake controller and check whether the brakes
function correctly.
Regularly check that the load is secure.
When towing a trailer, your vehicle's handling
characteristics will be different in comparison
with when driving without a trailer.
The vehicle/trailer combination:
Ris heavier
Ris restricted in its acceleration and gradient-
climbing capability
Rhas an increased braking distance
Ris affected more by strong crosswinds
Rdemands more sensitive steering
Rhas a larger turning circle
Avoid sudden steering movements.
Avoid braking abruptly. If possible, brake gently
at first to allow the trailer to run on. Then,
increase the braking force rapidly.
Towing a trailer205
Driving and parking
Z