2017 MERCEDES-BENZ GLC SUV rear door
[x] Cancel search: rear doorPage 256 of 374
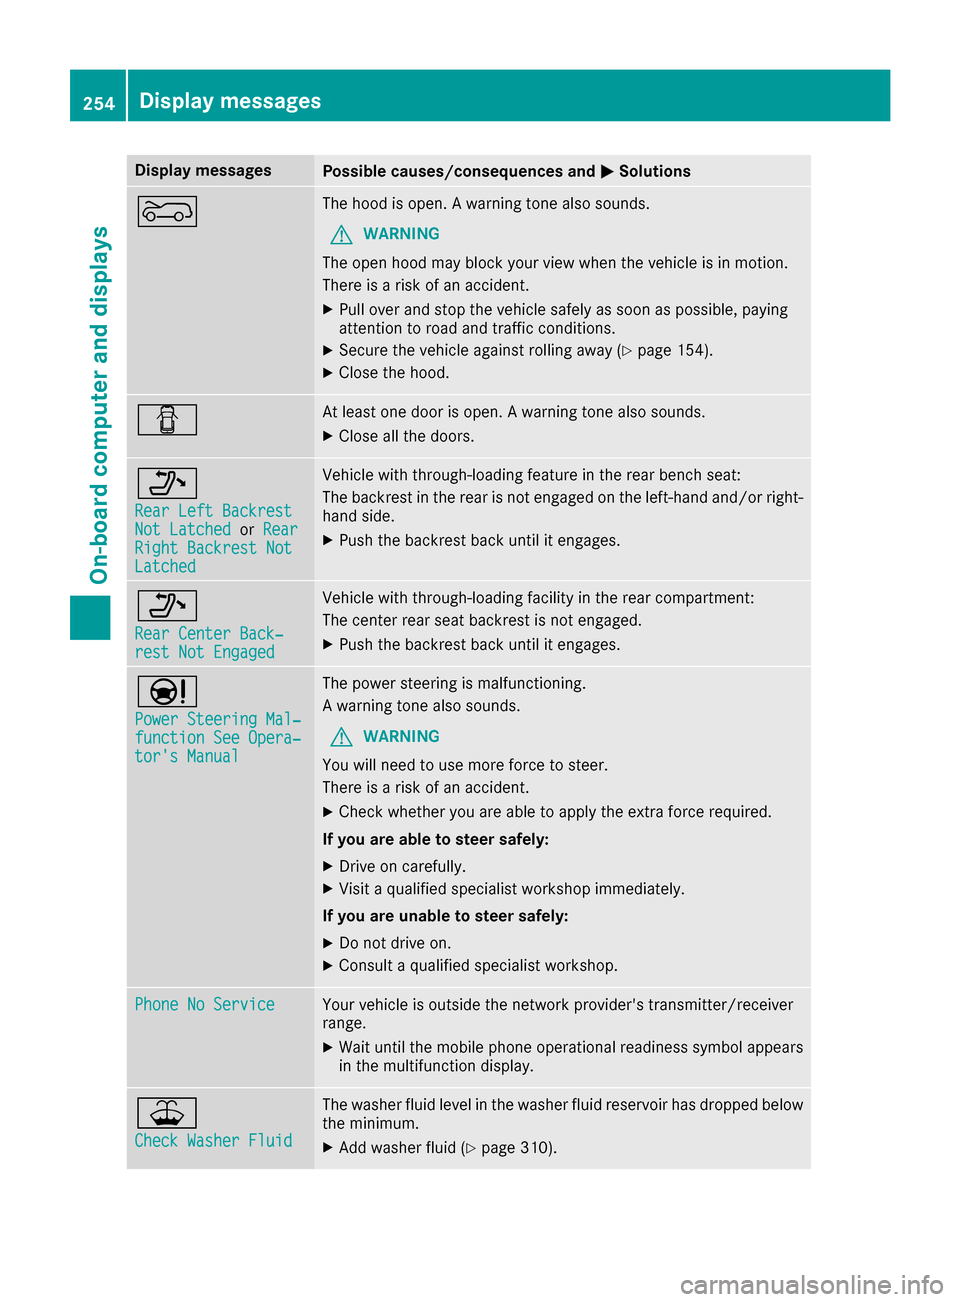
Display messagesPossible causes/consequences andMSolutions
?The hoodis open . Awarning tone also sounds.
GWARNIN G
The open hoo dmay bloc kyour vie wwhen th evehicl eis in motion .
There is aris kof an accident.
XPull ove rand stop th evehicl esafely as soo nas possible, payin g
attention to roa dand traffic conditions.
XSecur eth evehicl eagainst rollin gaway (Ypage 154).
XCloseth ehood.
CAt least on edoor is open . Awarning tone also sounds.
XClos eall th edoors.
_
Rea rLef tBackrestNot Latche dorRea rRight Backrest NotLatche d
Vehiclewit hthrough-loading feature in th erear bench seat :
The backrest in th erear is no tengage don th eleft-han dand/o rright -
han dside .
XPush th ebackrest bac kuntil it engages.
_
Rea rCenter Back‐res tNot Engage d
Vehiclewit hthrough-loading facilit yin th erear compartment:
The center rear seat backrest is no tengaged.
XPush th ebackrest bac kuntil it engages.
Ð
Power Steering Mal ‐function See Opera‐tor's Manual
The powersteering is malfunctioning .
A warning tone also sounds.
GWARNIN G
You will need to use mor eforce to steer .
There is aris kof an accident.
XChec kwhether you are able to apply th eextr aforce required.
If you ar eabl eto steer safely:
XDrive on carefully.
XVisit aqualified specialist workshop immediately.
If you ar eunable to steer safely:
XDo no tdrive on .
XConsult aqualified specialist workshop .
Phone No ServiceYour vehicleis outside th enetwork provider' stransmitter/receiver
range.
XWait until th emobile phone operational readiness symbol appear s
in th emultifunction display.
¥
Check Washer Fluid
The washer flui dlevel in th ewasher flui dreservoir has dropped belo w
th eminimum .
XAddwasher flui d (Ypage 310).
254Display messages
On-board computer and displays
Page 282 of 374
Depending on the vehicle's equipment, the fol-
lowing may be in the stowage space:
Ran SD card slot
Ra multimedia connector unit with two USB
ports, e.g. for iPod®, iPhone®or MP3 player
(see the Digital Operator's Manual)
Ra mobile phone bracket
Ra small stowage space in the upper front sec-
tion
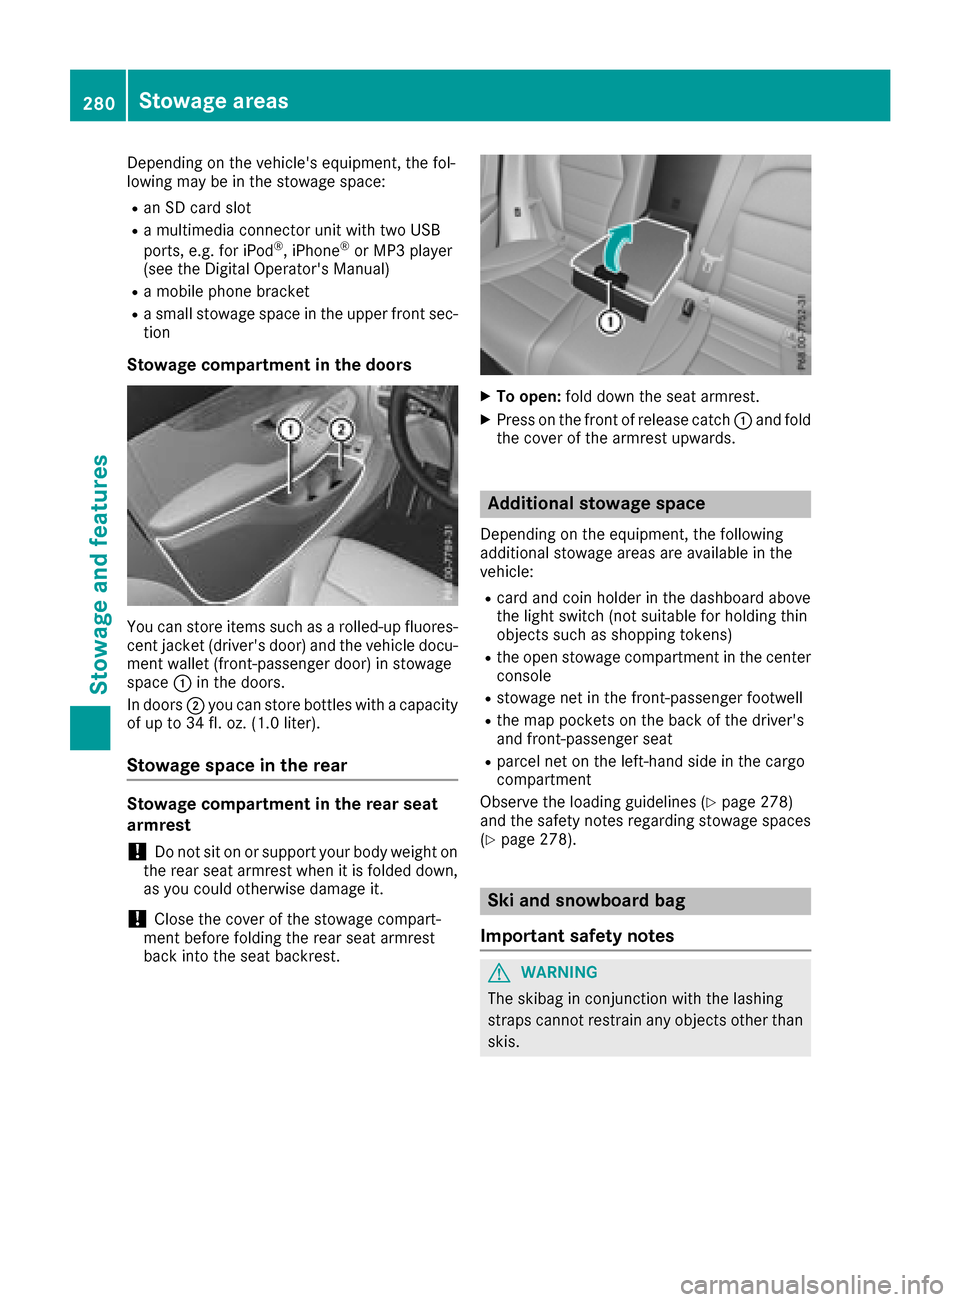
Stowage compartment in the doors
You can store items such as a rolled-up fluores-
cent jacket (driver's door) and the vehicle docu-
ment wallet (front-passenger door) in stowage
space :in the doors.
In doors ;you can store bottles with a capacity
of up to 34 fl. oz. (1.0 liter).
Stowage space in the rear
Stowage compartment in the rear seat
armrest
!Do not sit on or support your body weight on
the rear seat armrest when it is folded down,
as you could otherwise damage it.
!Close the cover of the stowage compart-
ment before folding the rear seat armrest
back into the seat backrest.
XTo open: fold down the seat armrest.
XPress on the front of release catch :and fold
the cover of the armrest upwards.
Additional stowage space
Depending on the equipment, the following
additional stowage areas are available in the
vehicle:
Rcard and coin holder in the dashboard above
the light switch (not suitable for holding thin
objects such as shopping tokens)
Rthe open stowage compartment in the center
console
Rstowage net in the front-passenger footwell
Rthe map pockets on the back of the driver's
and front-passenger seat
Rparcel net on the left-hand side in the cargo
compartment
Observe the loading guidelines (
Ypage 278)
and the safety notes regarding stowage spaces
(
Ypage 278).
Ski and snowboard bag
Important safety notes
GWARNING
The skibag in conjunction with the lashing
straps cannot restrain any objects other than
skis.
280Stowag eareas
Stowag ean d features
Page 304 of 374
The data you receive contains the following
information:
Rthe location where the speed limit was excee-
ded
Rthe time at which the speed limit was excee-
ded
Rthe selected speed limit which was exceeded
Geo fencing
Geo fencing allows you to select areas which the
vehicle should not enter or leave. You will be
informed if the vehicle crosses the boundaries
of the selected areas. You can select the way in
which you receive this information beforehand.
Possible options include text message, e-mail or an automated call.
The area can be determined as either a circle or
a polygon with a maximum of ten corners. You
can specify up to ten areas simultaneously. Dif-
ferent settings are possible for each area.
These settings can be called up under "Owners
Online" at http://www.mbusa.com.
Alternatively, you can trigger an Info call and
notify the customer service representative that
you wish to activate geo-fencing.
Currently inactive areas can be activated by text
message.
Triggering the vehicle alarm
With this function, you can trigger the vehicle's
panic alarm via text message. An alarm sounds
and the exterior lighting flashes. Depending on
the setting, the panic alarm lasts five or ten sec-
onds. Afterwards, the alarm switches off.
Garage door opener
General notes
The HomeLink®garage door opener integrated
in the rear-view mirror allows you to operate up to three different door and gate systems.
Use the integrated garage door opener only on
garage doors that:
Rhave safety stop and reverse features and
Rmeet current U.S. federal safety standards
Once programed, the integrated garage door
opener in the rear-view mirror will assume the
function of the garage door system's remote control. Please also read the operating instruc-
tions for the garage door system.
When programming a garage door opener, park
the vehicle outside the garage. Do not run the
engine while programming.
Certain garage door drives are incompatible
with the integrated garage door opener. If you
have difficulty programing the integrated garage
door opener, contact an authorized Mercedes-
Benz Center.
Alternatively, you can call the following tele-
phone assistance services:
RUSA: Mercedes-Benz Customer Assistance
Center at 1-800-FOR-MERCedes
RCanada: Customer Service at
1-800-387-0100
RHomeLink®hotline 1-800-355-3515 (free of
charge)
More information on HomeLink
®and/or com-
patible products is also available online at
http://www.homelink.com.
Notes on the declaration of conformity
(
Ypage 278).
USA: FCC ID: CB2HMIHL4
Canada: IC: 279B-HMIHL4
Important safety notes
GWARNING
When you operate or program the garage door
with the integrated garage door opener, per-
sons in the range of movement of the garage
door can become trapped or struck by the
garage door. There is a risk of injury.
When using the integrated garage door
opener, always make sure that nobody is
within the range of movement of the garage
door.
GWARNING
Combustion engines emit poisonous exhaust
gases such as carbon monoxide. Inhaling
these exhaust gases leads to poisoning. There
is a risk of fatal injury. Therefore never leave
the engine running in enclosed spaces with-
out sufficient ventilation.
302Features
Stowage and features
Page 305 of 374
Programming
Programming buttons
Pay attention to the "Important safety notes"
(Ypage 302).
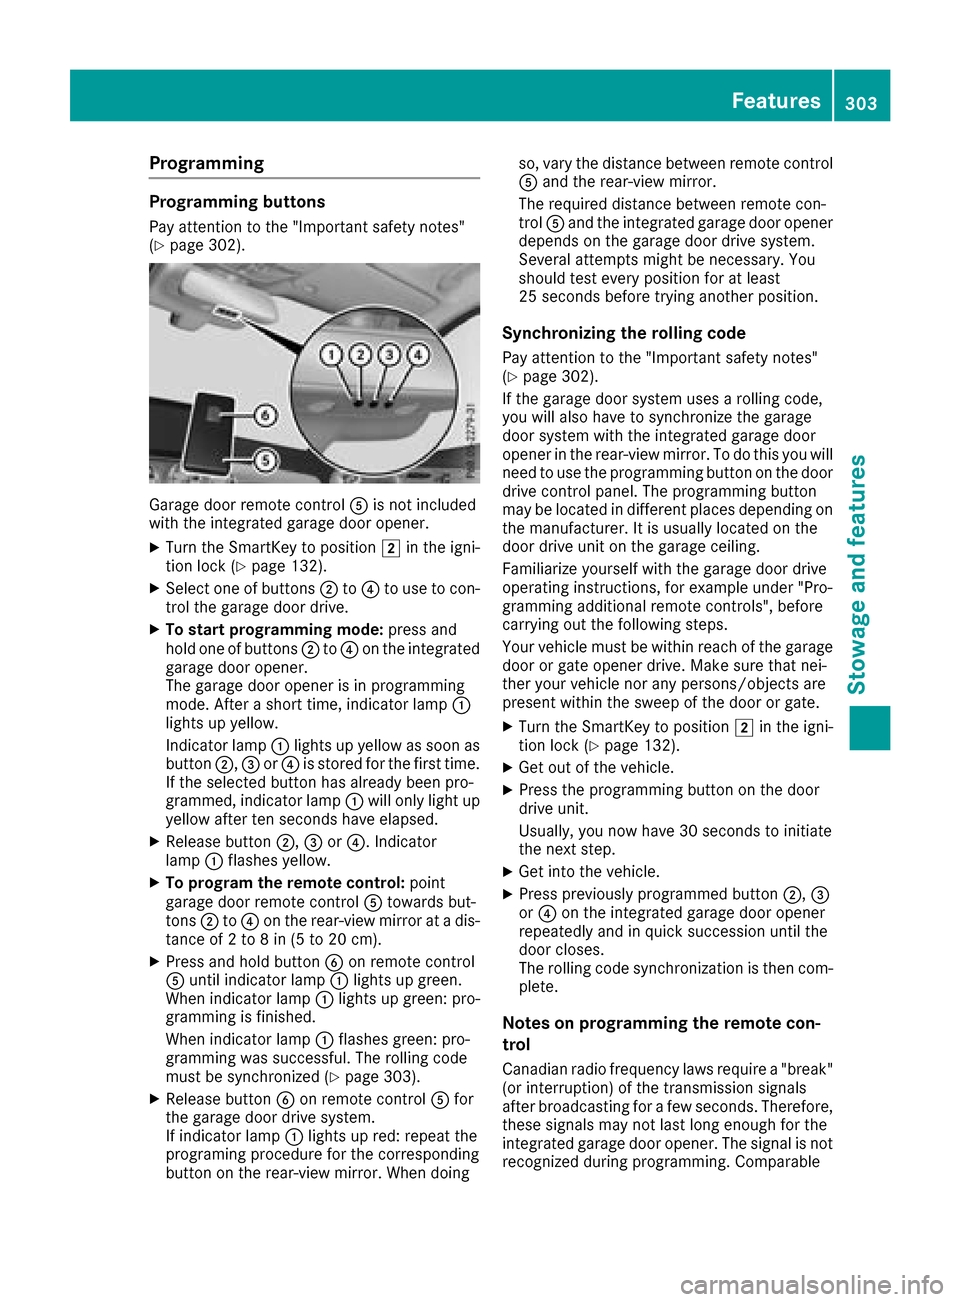
Garage door remote controlAis not included
with the integrated garage door opener.
XTurn the SmartKey to position 2in the igni-
tion lock (Ypage 132).
XSelect one of buttons ;to? to use to con-
trol the garage door drive.
XTo start programming mode: press and
hold one of buttons ;to? on the integrated
garage door opener.
The garage door opener is in programming
mode. After a short time, indicator lamp :
lights up yellow.
Indicator lamp :lights up yellow as soon as
button ;,=or? is stored for the first time.
If the selected button has already been pro-
grammed, indicator lamp :will only light up
yellow after ten seconds have elapsed.
XRelease button ;,=or?. Indicator
lamp :flashes yellow.
XTo program the remote control: point
garage door remote control Atowards but-
tons ;to? on the rear-view mirror at a dis-
tance of 2 to 8 in (5 to 20 cm).
XPress and hold button Bon remote control
A until indicator lamp :lights up green.
When indicator lamp :lights up green: pro-
gramming is finished.
When indicator lamp :flashes green: pro-
gramming was successful. The rolling code
must be synchronized (
Ypage 303).
XRelease button Bon remote control Afor
the garage door drive system.
If indicator lamp :lights up red: repeat the
programing procedure for the corresponding
button on the rear-view mirror. When doing so, vary the distance between remote control
A and the rear-view mirror.
The required distance between remote con-
trol Aand the integrated garage door opener
depends on the garage door drive system.
Several attempts might be necessary. You
should test every position for at least
25 seconds before trying another position.
Synchronizing the rolling code
Pay attention to the "Important safety notes"
(Ypage 302).
If the garage door system uses a rolling code,
you will also have to synchronize the garage
door system with the integrated garage door
opener in the rear-view mirror. To do this you will
need to use the programming button on the door
drive control panel. The programming button
may be located in different places depending on
the manufact
urer. It is usually located on the
door drive unit on the garage ceiling.
Familiarize yourself with the garage door drive
operating instructions, for example under "Pro-
gramming additional remote controls", before
carrying out the following steps.
Your vehicle must be within reach of the garage
door or gate opener drive. Make sure that nei-
ther your vehicle nor any persons/objects are
present within the sweep of the door or gate.
XTurn the SmartKey to position 2in the igni-
tion lock (Ypage 132).
XGet out of the vehicle.
XPress the programming button on the door
drive unit.
Usually, you now have 30 seconds to initiate
the next step.
XGet into the vehicle.
XPress previously programmed button ;,=
or ? on the integrated garage door opener
repeatedly and in quick succession until the
door closes.
The rolling code synchronization is then com-
plete.
Notes on programming the remote con-
trol
Canadian radio frequency laws require a "break" (or interruption) of the transmission signals
after broadcasting for a few seconds. Therefore,
these signals may not last long enough for the
integrated garage door opener. The signal is not
recognized during programming. Comparable
Features303
Stowage and features
Z
Page 306 of 374
with Canadian law, some U.S. garage door open-
ers also feature a "break".
Proceed as follows:
Rif you live in Canada.
Rif you have difficulties programming the
garage door opener (regardless of where youlive) when using the programming steps.
XPress and hold one of buttons ;to? on the
integrated garage door opener.
After a short time, indicator lamp :lights up
yellow.
XRelease the button.
Indicator lamp :flashes yellow.
XPress button Bof garage door remote con-
trol Afor two seconds, then release it for two
seconds.
XPress button Bof the remote control A
again and hold for two seconds.
XRepeat this sequence on button Bof remote
control Auntil indicator lamp :lights up
green.
When indicator lamp :lights up green: pro-
gramming is finished.
When indicator lamp :flashes green: pro-
gramming was successful. The next step is to
synchronize the rolling code.
XRelease button Bof remote control Aof the
garage door drive.
If indicator lamp :lights up red: repeat the
programming process for the corresponding
button on the rear-view mirror. When doing
so, vary the distance between remote control
A and the rear-view mirror.
The required distance between remote con-
trol Aand the integrated garage door opener
depends on the garage door drive system.
Several attempts might be necessary. You
should test every position for at least
25 seconds before trying another position.
Problems when programming
If you are experiencing problems programing
the integrated garage door opener on the rear-
view mirror, take note of the following instruc-
tions:
RCheck the transmitter frequency used by
garage door drive remote control Aand
whether it is supported. The transmitter fre-
quency can usually be found on the back of
remote control Afor the garage door drive. The garage door opener is compatible with
devices which operate in the frequency range
of 280 to 433 MHz.
RReplace the batteries in garage door remote
control
A. This increases the likelihood that
garage door remote control Awill transmit a
strong and precise signal to the integrated
garage door opener.
RWhen programming, hold remote control A
at varying distances and angles and from but-
tons ;to? which you are programming. Try
various angles at a distance between 2and
8 inches (5to 20 cm) or at the same angle but
at varying distances.
RIf another remote control Ais available for
the same garage door drive, repeat the same
programming steps with this remote control
A. Before performing these steps, make sure
that new batteries have been installed in
garage door drive remote control A.
RNote that some remote controls only transmit
for a limited amount of time (the indicator
lamp on the remote control goes out). Press
button Bon remote control Aagain before
transmission ends.
RAlign the antenna cable of the garage door
opener unit. This can improve signal recep-
tion/transmission.
Opening/closing the garage door
After it has been programmed, the integrated
garage door opener performs the function of the
garage door system remote control. Please also
read the operating instructions for the garage
door system.
XTurn the SmartKey to position 2in the igni-
tion lock (Ypage 132).
XPress button ;,=or? which you pro-
grammed to operate the garage door.
Garage door system with a fixed code: indi-
cator lamp :lights up green.
Garage door system with a rolling code: indi-
cator lamp :flashes green.
The transmitter will transmit a signal as long
as the button is pressed. The transmission is
halted after a maximum of ten seconds and
indicator lamp :lights up yellow.
XPress button ;,=or? again if necessary.
304Features
Stowage and features
Page 307 of 374
Clearing the memory
Make sure that you clear the memory of the
integrated garage door opener before selling the
vehicle.
XTurn the SmartKey to position2in the igni-
tion lock (Ypage 132).
XPress and hold buttons ;and ?.
The indicator lamp initially lights up yellow
and then green.
XRelease buttons ;and ?.
The memory of the integrated garage door
opener in the rear-view mirror is cleared.
Floormats
GWARNING
Objects in the driver's footwell can restrict the pedal travel or obstruct a depressed pedal.
The operating and road safety of the vehicle is
jeopardized. There is a risk of an accident.
Make sure that all objects in the vehicle are
stowed correctly, and that they cannot enter
the driver's footwell. Install the floormats
securely and as specified in order to ensure
sufficient clearance for the pedals. Do not use
loose floormats and do not place floormats on
top of one another.
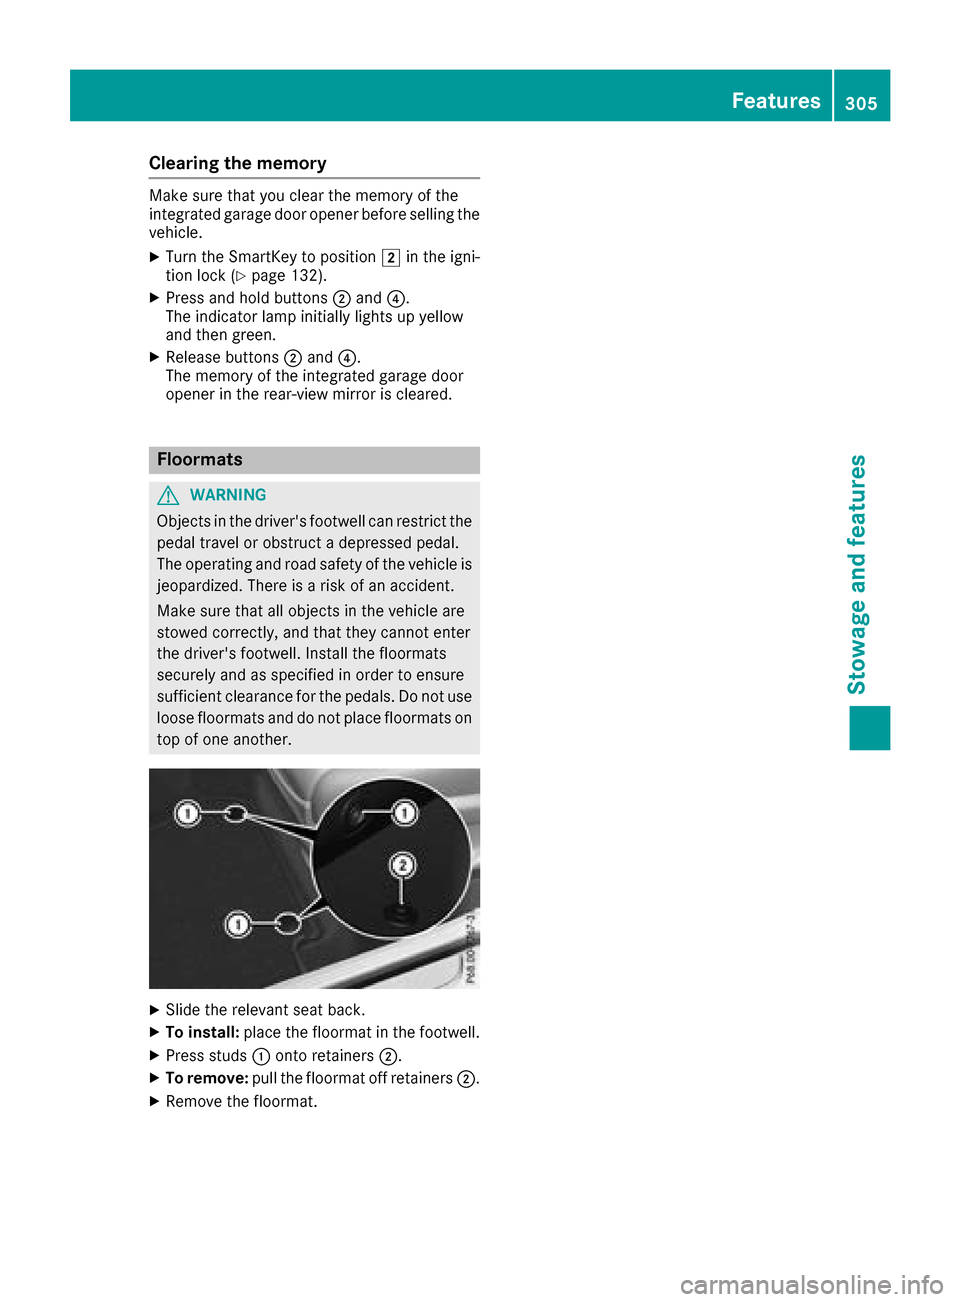
XSlide the relevant seat back.
XTo install: place the floormat in the footwell.
XPress studs :onto retainers ;.
XTo remove:pull the floormat off retainers ;.
XRemove the floormat.
Features305
Stowage and features
Z
Page 314 of 374
To avoid damage to the vehicle, deactivate
DISTRONIC PLUS and the HOLD function in
the following or similar situations:
Rwhen towing the vehicle
Rin the car wash
!Never clean your vehicle in a Touchless
Automatic Car Wash as these use special
cleaning agents. These cleaning agents can
damage the paintwork or plastic parts.
!Make sure that:
Rthe side windows and sliding sunroof are
closed completely
Rthe blower is switched off
Rthe windshield wiper switch is in position 0
Rthe 360° camera or the rear view camera is
deactivated
The vehicle may otherwise be damaged.
!If the SmartKey is within the rear detection
range of KEYLESS-GO, the following situa-
tions, for example, could lead to the uninten-
tional opening of the tailgate:
Rusing a car wash
Rusing a power washer
Make sure that the SmartKey is at least 3 m
away from the vehicle.
!If the SmartKey is within the rear detection
range of KEYLESS-GO, the following situa-
tions, for example, could lead to the uninten-
tional opening of the tailgate:
Rusing a car wash
Rusing a power washer
Make sure that the SmartKey is at least 10 ft (3 m) away from the vehicle.
!Make sure that the automatic transmission
is in neutral position iwhen washing your
vehicle in a tow-through car wash. The vehicle
may otherwise be damaged.
ROperating with the SmartKey:
Do not remove the SmartKey from the igni-
tion lock. Do not open the driver's door
when the engine is switched off or at very
low speeds. Otherwise, when in transmis-
sion position hork, the automatic
transmission will automatically switch to
park position jand block the wheels.
ROperating with the Start/Stop button:
Do not open the driver's door when the
engine is switched off or at very low speeds. Otherwise, when in transmission
position
hork, the automatic transmis-
sion will automatically switch to park posi-
tion jand block the wheels.
Observe the following to make sure that the
automatic transmission stays in neutral position
i:
Operating with the SmartKey and Start/Stop
button:
XMake sure that the ignition is switched on.
XMake sure that the vehicle is stationary.
XDepress and hold the brake pedal.
Operating with the Start/Stop button only:
XEngage park position j.
XRelease the brake pedal.
XRemove Start/Stop button from ignition lock
(Ypage 133).
XInsert the SmartKey into the ignition lock.
XSwitch on the ignition.
XDepress and hold the brake pedal.
Operating with the SmartKey and Start/Stop
button:
XShift to neutral i.
XRelease the brake pedal.
XRelease the electric parking brake, if neces-
sary.
XSwitch off the ignition and leave the SmartKey
in the ignition lock.
You can wash the vehicle in an automatic car
wash from the very start.
If the vehicle is very dirty, pre-wash it before
cleaning it in an automatic car wash.
After using an automatic car wash, wipe off wax
from the windshield and the wiper blades. This
will prevent smears and reduce wiping noises
caused by residue on the windshield.
Washing by hand
In some countries, washing by hand is only
allowed at specially equipped washing bays.
Observe the legal requirements in each country.
XDo not use hot water and do not wash the
vehicle in direct sunlight.
XUse a soft sponge to clean.
XUse a mild cleaning agent, such as a car
shampoo approved by Mercedes-Benz.
312Care
Maintenance and care
Page 315 of 374
XThoroughly hose down the vehicle with a gen-
tle jet of water.
XDo not point the water jet directly towards the
air inlet.
XUse plenty of water and rinse out the sponge
frequently.
XRinse the vehicle with clean water and dry
thoroughly with a chamois.
XDo not let the cleaning agent dry on the paint-work.
Carefully remove all deposits of road salt as
soon as possible when driving in winter.
Power washers
GWARNING
The water jet from a circular jet nozzle (dirt
blasters) can cause invisible exterior damage
to the tires or chassis components. Compo-
nents damaged in this way may fail unexpect-
edly. There is a risk of an accident.
Do not use power washers with circular jet
nozzles to clean the vehicle. Have damaged
tires or chassis components replaced imme-
diately.
!Always maintain a distance of at least
11.8 in (30 cm) between the vehicle and the
power washer nozzle. Information about the
correct distance is available from the equip-
ment manufacturer.
Move the power washer nozzle around when
cleaning your vehicle.
Do not aim directly at any of the following:
RTires
RDoor gaps, roof gaps, joints, etc.
RElectrical components
RBattery
RConnectors
RLamps
RSeals
RTrim
RVentilation slots
Damaged seals or electrical components can
lead to leaks or failures.
!Vehicles with decorative film: parts of your
vehicle are covered with a decorative film.
Maintain a distance of at least 27.5 in (70 cm) between the parts of the vehicle covered with
the film and the nozzle of the high pressure
cleaner.
Information about the correct distance is
available from the equipment manufacturer.
Move the power washer nozzle around when
cleaning your vehicle.
!If the SmartKey is within the rear detection
range of KEYLESS-GO, the following situa-
tions, for example, could lead to the uninten-
tional opening of the tailgate:
Rusing a car wash
Rusing a power washer
Make sure that the SmartKey is at least 3 m
away from the vehicle.
!If the SmartKey is within the rear detection
range of KEYLESS-GO, the following situa-
tions, for example, could lead to the uninten-
tional opening of the tailgate:
Rusing a car wash
Rusing a power washer
Make sure that the SmartKey is at least 10 ft
(3 m) away from the vehicle.
Cleaning the paintwork
!Do not affix:
Rstickers
Rfilms
Rmagnetic plates or similar items
to painted surfaces. You could otherwise
damage the paintwork.
Scratches, corrosive deposits, areas affected by
corrosion and damage caused by inadequate
care cannot always be completely repaired. In
such cases, visit a qualified specialist workshop.
XRemove dirt immediately, where possible,
while avoiding rubbing too hard.
XSoak insect remains with insect remover and
rinse off the treated areas afterwards.
XSoak bird droppings with water and rinse off
the treated areas afterwards.
XRemove coolant, brake fluid, tree resin, oils,
fuels and greases by rubbing gently with a
cloth soaked in petroleum ether or lighter
fluid.
XUse tar remover to remove tar stains.
XUse silicone remover to remove wax.
Care313
Maintenance and care
Z