2017 MERCEDES-BENZ GLC SUV warning
[x] Cancel search: warningPage 318 of 374
Cleaning the rear view camera and 360°
camera
!Do not clean the camera lens and the area
around the rear view camera or 360° camera
with a power washer.
XMake sure that the vehicle is stationary.
XTurn the SmartKey to position 1or2 in the
ignition lock (Ypage 132).
or
XPress the Start/Stop button once or twice on
vehicles with KEYLESS-GO or the KEYLESS-
GO start function (
Ypage 133).
XOpen the camera cover for cleaning via the
multimedia system (see Digital Operator's
Manual).
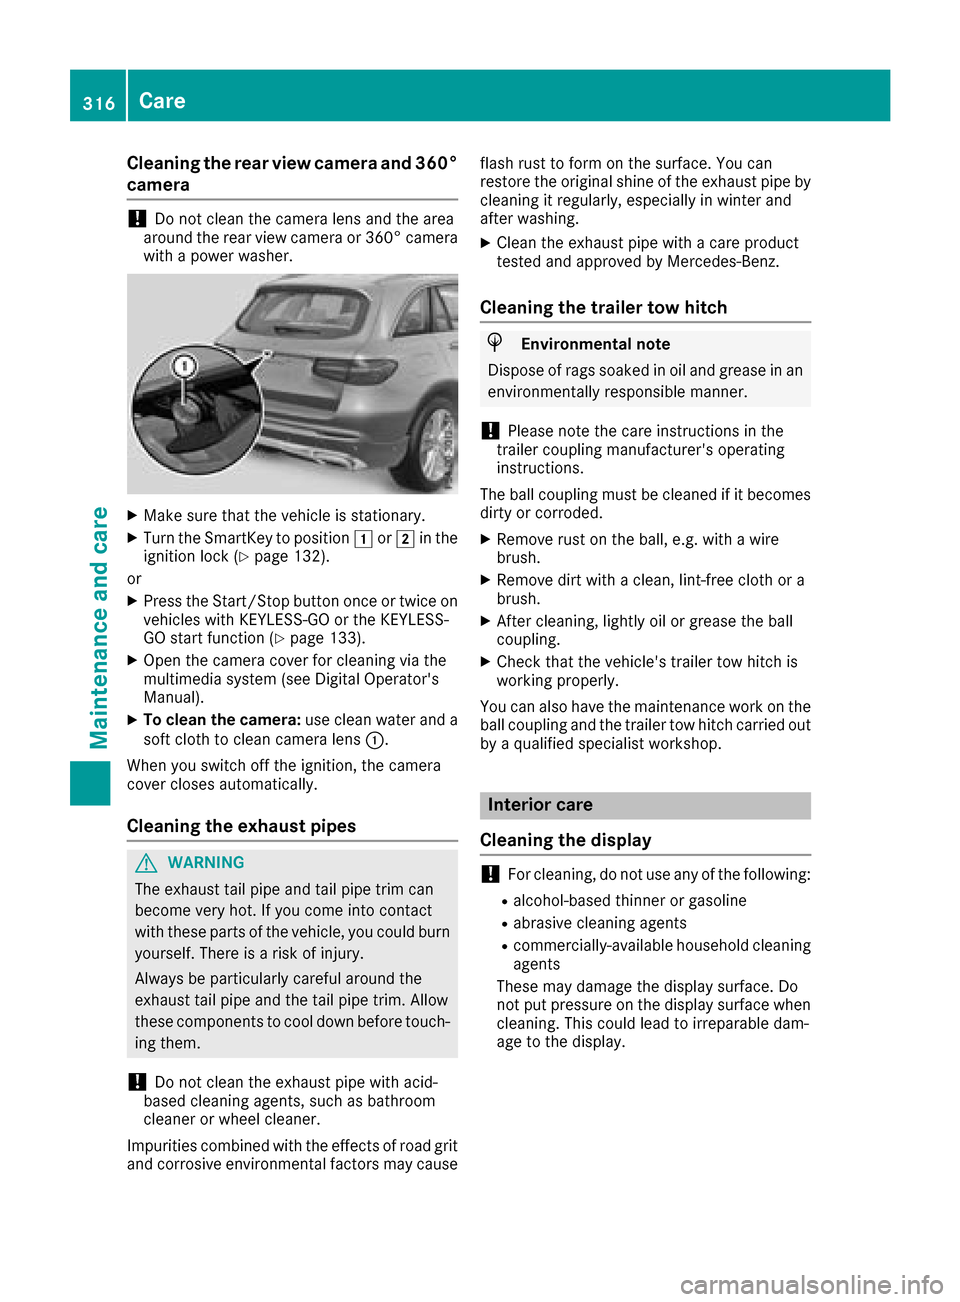
XTo clean the camera: use clean water and a
soft cloth to clean camera lens :.
When you switch off the ignition, the camera
cover closes automatically.
Cleaning the exhaust pipes
GWARNING
The exhaust tail pipe and tail pipe trim can
become very hot. If you come into contact
with these parts of the vehicle, you could burn
yourself. There is a risk of injury.
Always be particularly careful around the
exhaust tail pipe and the tail pipe trim. Allow
these components to cool down before touch-
ing them.
!Do not clean the exhaust pipe with acid-
based cleaning agents, such as bathroom
cleaner or wheel cleaner.
Impurities combined with the effects of road grit and corrosive environmental factors may cause flash rust to form on the surface. You can
restore the original shine of the exhaust pipe by
cleaning it regularly, especially in winter and
after washing.
XClean the exhaust pipe with a care product
tested and approved by Mercedes-Benz.
Cleaning the trailer tow hitch
HEnvironmental note
Dispose of rags soaked in oil and grease in an
environmentally responsible manner.
!Please note the care instructions in the
trailer coupling manufacturer's operating
instructions.
The ball coupling must be cleaned if it becomes dirty or corroded.
XRemove rust on the ball, e.g. with a wire
brush.
XRemove dirt with a clean, lint-free cloth or a
brush.
XAfter cleaning, lightly oil or grease the ball
coupling.
XCheck that the vehicle's trailer tow hitch is
working properly.
You can also have the maintenance work on the ball coupling and the trailer tow hitch carried out
by a qualified specialist workshop.
Interior care
Cleaning the display
!For cleaning, do not use any of the following:
Ralcohol-based thinner or gasoline
Rabrasive cleaning agents
Rcommercially-available household cleaning
agents
These may damage the display surface. Do
not put pressure on the display surface when cleaning. This could lead to irreparable dam-
age to the display.
316Care
Maintenance and care
Page 319 of 374
XBefore cleaning the display, make sure that it
is switched off and has cooled down.
XClean the display surface using a commer-
cially available microfiber cloth and TFT/LCD
display cleaner.
XDry the display surface using a dry microfiber
cloth.
Cleaning the plastic trim
GWARNING
Care products and cleaning agents containing solvents cause surfaces in the cockpit to
become porous. As a result, plastic parts may
come loose in the event of air bag deploy-
ment. There is a risk of injury.
Do not use any care products and cleaning
agents to clean the cockpit.
!Never attach the following to plastic surfa-
ces:
Rstickers
Rfilms
Rperfume oil container or similar
You could otherwise damage the plastic.
!Do not allow cosmetics, insect repellent or
sunscreen to come into contact with the plas-
tic trim. This maintains the high-quality look of
the surfaces.
XWipe the plastic trim with a damp, lint-free
cloth, e.g. a microfiber cloth.
XHeavy soiling: use care and cleaning prod-
ucts recommended and approved by
Mercedes-Benz.
The surface may change color temporarily.
Wait until the surface is dry again.
Cleaning the steering wheel and selec-
tor lever
XThoroughly wipe with a damp cloth or use
leather care agents that have been recom-
mended and approved by Mercedes-Benz.
Cleaning genuine wood and trim ele-
ments
!Do not use solvent-based cleaning agents
such as tar remover, wheel cleaners, polishes or waxes. There is otherwise a risk of damag-
ing the surface.
!Do not use chrome polish on trim pieces.
The trim pieces have a chrome look but are
mostly made of anodized aluminum and can
lose their shine if chrome polish is used. Use
a damp, lint-free cloth instead when cleaning
the trim pieces.
If the chrome-plated trim pieces are very
dirty, you can use a chrome polish. If you are unsure as to whether the trim pieces are
chrome-plated or not, consult an authorized
Mercedes-Benz Center.
XWipe the wooden trim and trim pieces with a
damp, lint-free cloth, e.g. a microfiber cloth.
XTrim elements with piano black finish:
wipe with a soft, damp cotton cloth. Use clean
water.
XHeavy soiling: use care and cleaning prod-
ucts recommended and approved by
Mercedes-Benz.
Cleaning the seat covers
General notes
!Do not use a microfiber cloth to clean covers
made out of real leather, artificial leather or
DINAMICA. If used often, these can damage
the cover.
Note that regular care is essential to ensure that
the appearance and comfort of the covers is
retained over time.
Genuine leather seat covers
!To retain the natural appearance of the
leather, observe the following cleaning
instructions:
RClean genuine leather covers carefully with a damp cloth and then wipe the covers
down with a dry cloth.
RMake sure that the leather does not
become soaked. It may otherwise become
rough and cracked.
ROnly use leather care agents that have
been tested and approved by Mercedes-
Benz. You can obtain these from a qualified
specialist workshop.
Leather is a natural product.
It exhibits natural surface characteristics, for
example:
Care317
Maintenance and care
Z
Page 320 of 374
Rdifferences in the texture
Rmarks caused by growth and injury
Rslight nuances of color
These are characteristics of leather and not
material defects.
Seat covers of other materials
!Observe the following when cleaning:
Rclean artificial leather covers with a cloth
moistened with a solution containing 1%
detergent (e.g. dish washing liquid).
Rclean cloth covers with a microfiber cloth
moistened with a solution containing 1%
detergent (e.g. dish washing liquid). Rub
carefully and always wipe entire seat sec-
tions to avoid leaving visible lines. Leave
the seat to dry afterwards. Cleaning results
depend on the type of dirt and how long it
has been there.
Rclean DINAMICA covers with a damp cloth.
Make sure that you wipe entire seat sec-
tions to avoid leaving visible lines.
Cleaning the seat belts
GWARNING
Seat belts can become severely weakened if
bleached or dyed. This could cause the seat
belts to tear or fail, for instance, in the event of an accident. This poses an increased risk of
injury or fatal injury.
Never bleach or dye the seat belts.
!Do not clean the seat belts using chemical
cleaning agents. Do not dry the seat belts by
heating at temperatures above 176 ‡(80 †)
or in direct sunlight.
XUse clean, lukewarm water and soap solution.
Cleaning the headliner and carpets
XHeadliner: if it is very dirty, use a soft brush or
dry shampoo.
XCarpets: use the carpet and textile cleaning
agents recommended and approved by
Mercedes-Benz.
318Care
Maintenance and care
Page 323 of 374
Flat tire
Preparing the vehicle
Your vehiclemay be equipped with:
RMOExtended tires (tires wit hrun-flat proper -
ties) (Ypage 321)
Vehicl epreparation is no tnecessar yon vehi-
cle swit hMOExtended tires
RaTIREFI Tkit (Ypage 320)
Vehicles equipped wit hMOExtended tires are
no tequipped wit h aTIREFI Tkit at th efactory. It
is therefor erecommended that you additionally
equip your vehicl ewit h a TIREFI Tkit if you moun t
tires that do no tfeature run-flat properties, e.g.
winte rtires . ATIREFI Tkit may be obtained from
a qualified specialist workshop.
Information on changing and mounting wheels
(
Ypage 357).
XStop th evehicl eon solid, non-slippery and
leve lground ,as far away as possible from
traffic.
XSwitc hon th ehazard warning lamps.
XSecur eth evehicl eagainst rollin gaway
(Ypage 154).
XIf possible ,brin gth efron twheels int oth e
straight-ahead position .
XSwitchoff th eengine.
XRemove th eSmartKey from th eignition lock.
or, in vehicles wit hKEYLESS-GO start-function
or KEYLESS‑ GO
XOpen thedriver' sdoor .
The vehicl eelectronics are no win position
u. This means: "Key removed".
XRemove th eStart/Sto pbutto nfrom th eigni-
ti on loc k (Ypage 133).
XMakesure that th eengin ecanno tbe started
via your smartphon e (Ypage 134).
XMakesure that th epassenger sare no tendan -
gered as they do so. Mak esure that no on eis
near th edanger area while awhee lis bein g
changed. Anyon ewho is no tdirectly assisting
in th ewhee lchang eshould, for example ,
stand behind th ebarrier.
XGet out of th evehicle. Pay attention to traffic
condition swhen doin gso.
XClose th edriver' sdoor .
Vehicles with MOExtended tires (tires
with run-flat characteristics)
General notes
Wit hMOExtended tires (tires wit hrun flat char-
acteristics), you can continue to driv eyour vehi-
cle eve nif there is atotal loss of pressur ein on e
or mor etires .The affected tire must no tsho w
any clearly visible damage.
You can recognize aMOExtended tire by th e
MOExtended markin gwhic happear son th e
sidewall of th etire. You will fin dthis markin g
next to th etire siz edesignation ,th eload-bear -
ing capacit yand th espee dindex (
Ypage 351).
MOExtended tires may only be used in conjunc -
tion wit han active tire pressur eloss warning
system or wit han active tire pressur emonitor.
If apressure loss warning messag eappears
in th emultifunction display:
Robserv eth einstruction sin th edisplay mes -
sage s (Ypage 250).
Rcheck th etire for damag e
Rif driving on,observ eth efollowin gnote s
The driving distanc epossible in run-flat mod eis
approximately 50 mile s(80 km) when th evehi-
cle is partially laden .When th evehicl eis fully
laden it is approximately 19 mile s(30 km).
In addition to th evehicl eload, th edriving dis-
tance possible depend supon :
RVehicl espee d
RRoad condition
ROutside temperature
The driving distanc epossible in run-flat mod e
may be reduce dby extreme driv ing condi
tion
s
or maneuvers, or it can be increased throug h a
moderat estyle of driving .
The driving distanc epossible in run-flat mod eis
counted from th emomen tth etire pressur eloss
warning appear sin th emultifunction display.
You must no texcee d amaximum permissible
spee dof 50 mph (80 km/h).
When replacing on eor all tires ,pleas eobserv e
th efollowin gspecification sfor your vehicle's
tires :
Rsize
Rthetyp eand
Rth e"MOExtended" markin g
If atire has gon eflat and canno tbe replace d
wit h a MOExtended tire, astandard tire may be
used as atemporar ymeasure. Mak esure that
Flat tire321
Breakdown assistance
Page 324 of 374
you use theproper siz eand typ e(summer or
winte rtires).
Vehicles equipped wit hMOExtended tires are
no tequipped wit h aTIREFI Tki tat th efactory. It
is therefor erecommended that you additionally
equip your vehicl ewit h a TIREFI Tki tif you moun t
tires that do no tfeature run-flat properties, e.g.
winte rtires . ATIREFI Tki tmay be obtained from
a qualified specialist workshop .
Important safety notes
GWARNIN G
Whe ndrivin gin emergenc ymode, th edrivin g
characteristics deteriorate ,e.g. when corner-
ing, accelerating quickl yand when braking.
There is aris kof an accident.
Do no texceed th estate dmaximum speed.
Avoid abrup tsteerin gand drivin gmaneuvers ,
and drivin gove robstacles (curbs ,potholes,
off-road). This applies in particular to aladen
vehicle.
Stop drivin gin emergenc ymod eif:
Ryou hear bangin gnoises .
Rthevehicl estart sto shake.
Ryou see smok eand smell rubber.
RES P®is intervenin gconstantly.
Rthere are tears in th esidewalls of th etire.
Afte rdrivin gin emergenc ymode, hav eth e
whee lrim schecke dat aqualified specialist
workshop wit hregard to their further use. The
defective tire mus tbe replaced in every case.
TIREFIT kit
Impor tant safety notes
TIREFITis atire sealant .
You can use TIREFI Tto seal punctures of up to
0.16 in (4 mm), particularl ythose in th etire
tread. You can use TIREFI Tat outside tempera-
tures down to Ò4 ‡ (Ò20†).
GWARNING
In th efollowin gsituations, th etire sealant is
unable to provid esufficien tbreakdown assis-
tance ,as it is unable to seal th etire properly:
Rthere are cut sor punctures in th etire larger
than those mentioned above.
Rth ewhee lrim is damaged.
Ryou hav edriven at ver ylow tire pressures or
on aflat tire.
There is aris kof an accident.
Do no tdrive th evehicle. Contac t aqualified
specialist workshop .
GWARNING
The tire sealant is harmful and causes irrita-
tion .It mus tno tcome into contact wit hyour
skin ,eyes or clothin gor be swallowed .Do no t
inhale TIREFI Tfumes. Kee ptire sealant away
from children .There is aris kof injury.
If you come into contact wit hth etire sealant ,
observ eth efollowing:
RRinse off th etire sealant from your skin
immediately wit hwater.
RIf th etire sealant comes into contact wit h
your eyes ,immediately rinse them thor-
oughly wit hclean water.
RIf tire sealant is swallowed ,immediately
rinse your mout hout thoroughl yand drink
plenty of water. Do no tinduc evomiting,
and see kmedica lattention immediately.
RImmediately chang eout of clothin gwhic h
has come into contact wit htire sealant .
RIf an allergic reaction occurs, see kmedica l
attention immediately.
!Afte ruse, excess tire sealant may run out of
th efiller hose. This could caus estains.
Therefore ,plac eth etire sealant bottl ewit h
filler hos ein th eplastic bag whic his con-
taine din th eTIREFI Tkit.
HEnvironmental not e
Hav eth eused tire sealant bottl edispose dof
professionally, e.g. at aqualified specialist
workshop .
322Flat tire
Breakdown assis tance
Page 326 of 374
If your clothes are soiled with tire sealant, have
them cleaned with perchloroethylene at a dry
cleaner as soon as possible.
Tire pressure not reached
If a tire pressure of 200 kPa (2.0 bar/29 psi) has
not been attained after ten minutes:
XSwitch off the tire inflation compressor.
XUnscrew the filler hose from the valve of the
faulty tire.
Tire sealant may escape when the filler hose is
unscrewed.
XVery slowly drive forwards or reverse approx-imately 30 ft (10 m).
XPump up the tire again.
After a maximum of ten minutes, the tire pres-
sure must be at least 200 kPa (2.0 bar/
29 psi).
GWARNING
If the required tire pressure is not reached
after the specified time, the tire is too badly
damaged. The tire sealant cannot repair the
tire in this instance. Damaged tires and a tire
pressure that is too low can significantly
impair the vehicle's braking and driving char-
acteristics. There is a risk of accident.
Do not continue driving. Contact a qualified
specialist workshop.
Tire pressure reached
GWARNING
A tire temporarily sealed with tire sealant
impairs the driving characteristics and is not
suitable for higher speeds. There is a risk of
accident.
You should therefore adapt your driving style
accordingly and drive carefully. Do not exceed the specified maximum speed with a tire that
has been repaired using tire sealant.
The maximum permissible speed for a tire
sealed with tire sealant is 50 mph (80 km/h).
The upper part of the TIREFIT sticker must be
affixed to the instrument cluster in the driver's
field of vision. If a tire pressure of 200 kPa (2.0 bar/29 psi) has
been attained after ten minutes:
XSwitch off the tire inflation compressor.
XUnscrew the filler hose from the valve of the
faulty tire.
Tire sealant may escape when the filler hose is
unscrewed.
XStow the tire sealant bottle and the tire infla-
tion compressor.
XPull away immediately
.
XStop after driving for approximately ten
minutes and check the tire pressure with the
tire inflation compressor.
The tire pressure must now be at least
130 kPa (1.3 bar/19 psi).
GWARNING
If the required tire pressure is not reached
after driving for a short period, the tire is too
badly damaged. The tire sealant cannot repair
the tire in this instance. Damaged tires and a
tire pressure that is too low can significantly
impair the vehicle's braking and driving char-
acteristics. There is a risk of accident.
Do not continue driving. Contact a qualified
specialist workshop.
In cases such as the one mentioned above, con- tact an authorized Mercedes-Benz Center. Or
call 1-800-FOR-MERCedes (in the USA) or
1-800-387-0100 (in Canada).
XCorrect the tire pressure if it is still at least
130 kPa (1.3 bar/19 psi). See the Tire and
Loading Information placard on the B-pillar on
the driver's side or the tire pressure table in
the fuel filler flap for values.
XTo increase the tire pressure: switch on the
tire inflation compressor.
324Flat tire
Breakdown assistance
Page 327 of 374
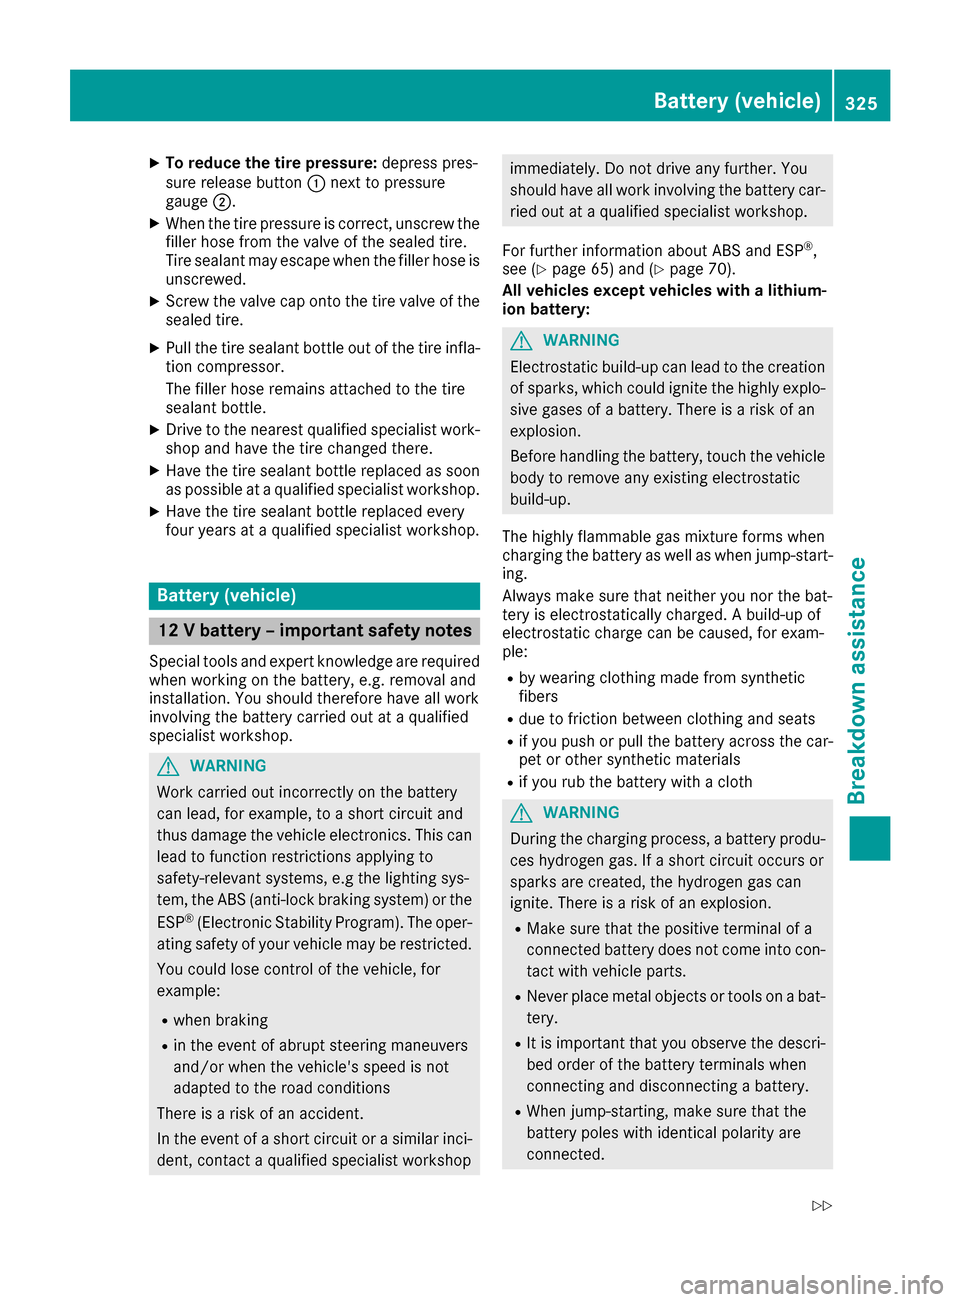
XTo reduce the tire pressure:depress pres-
sure release button :next to pressure
gauge ;.
XWhen the tire pressure is correct, unscrew the
filler hose from the valve of the sealed tire.
Tire sealant may escape when the filler hose is
unscrewed.
XScrew the valve cap onto the tire valve of the
sealed tire.
XPull the tire sealant bottle out of the tire infla-
tion compressor.
The filler hose remains attached to the tire
sealant bottle.
XDrive to the nearest qualified specialist work-
shop and have the tire changed there.
XHave the tire sealant bottle replaced as soon
as possible at a qualified specialist workshop.
XHave the tire sealant bottle replaced every
four years at a qualified specialist workshop.
Battery (vehicle)
12 V battery – important safety notes
Special tools and expert knowledge are required
when working on the battery, e.g. removal and
installation. You should therefore have all work
involving the battery carried out at a qualified
specialist workshop.
GWARNING
Work carried out incorrectly on the battery
can lead, for example, to a short circuit and
thus damage the vehicle electronics. This can
lead to function restrictions applying to
safety-relevant systems, e.g the lighting sys-
tem, the ABS (anti-lock braking system) or the
ESP
®(Electronic Stability Program). The oper-
ating safety of your vehicle may be restricted.
You could lose control of the vehicle, for
example:
Rwhen braking
Rin the event of abrupt steering maneuvers
and/or when the vehicle's speed is not
adapted to the road conditions
There is a risk of an accident.
In the event of a short circuit or a similar inci-
dent, contact a qualified specialist workshop
immediately. Do not drive any further. You
should have all work involving the battery car- ried out at a qualified specialist workshop.
For further information about ABS and ESP
®,
see (Ypage 65) and (Ypage 70).
All vehicles except vehicles with a lithium-
ion battery:
GWARNING
Electrostatic build-up can lead to the creation of sparks, which could ignite the highly explo-
sive gases of a battery. There is a risk of an
explosion.
Before handling the battery, touch the vehicle
body to remove any existing electrostatic
build-up.
The highly flammable gas mixture forms when
charging the battery as well as when jump-start-
ing.
Always make sure that neither you nor the bat-
tery is electrostatically charged. A build-up of
electrostatic charge can be caused, for exam-
ple:
Rby wearing clothing made from synthetic
fibers
Rdue to friction between clothing and seats
Rif you push or pull the battery across the car-
pet or other synthetic materials
Rif you rub the battery with a cloth
GWARNING
During the charging process, a battery produ-
ces hydrogen gas. If a short circuit occurs or
sparks are created, the hydrogen gas can
ignite. There is a risk of an explosion.
RMake sure that the positive terminal of a
connected battery does not come into con- tact with vehicle parts.
RNever place metal objects or tools on a bat-
tery.
RIt is important that you observe the descri-
bed order of the battery terminals when
connecting and disconnecting a battery.
RWhen jump-starting, make sure that the
battery poles with identical polarity are
connected.
Battery (vehicle)325
Breakdo wn assis tance
Z
Page 328 of 374
RIt is particularly important to observe the
described order when connecting and dis-
connecting the jumper cables.
RNever connect or disconnect the battery
terminals while the engine is running.
GWARNING
Battery acid is caustic. There is a risk of injury.
Avoid contact with skin, eyes or clothing. Do
not inhale any battery gases. Do not lean over
the battery. Keep children away from batter-
ies. Wash away battery acid immediately with
plenty of clean water and seek medical atten-
tion.
All vehicles:
HEnvironmental note
Batteries contain dangerous
substances. It is against the
law to dispose of them with
the household rubbish. They
must be collected separately and recycled to protect the
environment.
Dispose of batteries in an
environmentally friendly
manner. Take discharged
batteries to a qualified spe-
cialist workshop or a special
collection point for used bat-
teries.
!Have the battery checked regularly at a
qualified specialist workshop.
Observe the service intervals in the Mainte-
nance Booklet or contact a qualified specialist
workshop for more information.
!Always have work on batteries carried out at
a qualified specialist workshop. Should it, in exceptional circumstances, be
absolutely necessary to disconnect the 12-
volt battery yourself, please observe the fol-
lowing:
RSecure the vehicle to prevent it from rolling
away.
RSwitch off the ignition.
RDisconnect the negative terminal first and
then the positive terminal.
The transmission is locked in position j
after disconnecting the battery.
After the work has been done, install the bat- tery and replace the cover of the positive ter-
minal clamp firmly.
Comply with safety precautions and take pro-
tective measures when handling batteries.
Risk of explosion.
Fire, open flames and smoking are
prohibited when handling the bat-
tery. Avoid creating sparks.
Electrolyte or battery acid is corro-
sive. Avoid contact with skin, eyes or
clothing.
Wear suitable protective clothing,
especially gloves, apron and face-
guard.
Immediately rinse electrolyte or acid
splashes off with clean water. Con-
tact a physician if necessary.
Wear eye protection.
Keep children away.
Observe this Operator's Manual.
For safety reasons, Mercedes-Benz recom-
mends that you only use batteries which have
been tested and approved for your vehicle by
Mercedes-Benz. These batteries provide
increased impact protection to prevent vehicle
occupants from suffering acid burns should the
battery be damaged in the event of an accident.
326Battery (vehicle)
Breakdown assistance