2017 MERCEDES-BENZ GLC COUPE heating
[x] Cancel search: heatingPage 14 of 370

Displaying the current consump-
tion ................................................ 208
Displaying the range ...................... 208
Driving tips .................................... 152
E10 ................................................ 359
Fuel gauge ....................................... 35
Gasoline ......................................... 359
Grade (gasoline) ............................ 359
Important safety notes .................. 359
Low outside temperatures ............. 360
Problem (malfunction) ................... 146
Quality (diesel) ............................... 360
Refueling ........................................ 143
Tank content/reserve fuel ............. 359
Fuel filler flap
Closing ........................................... 145
Fuel filter (display message) ............ 238
Fuel level
Calling up the range (on-board
computer) ...................................... 208
Fuel tank
Capacity ........................................ 359
Problem (malfunction) ................... 146
Fuses
Allocation chart ............................. 328
Before changing ............................. 327
Dashboard fuse box ....................... 328
Fuse box in the cargo compart-
ment .............................................. 328
Fuse box in the engine compart-
ment .............................................. 328
Fuse box in the front-passenger
footwell .......................................... 328
Important safety notes .................. 327
G
G-Meter (on-board computer,
Mercedes-AMG vehicles) .................. 219
Garage door opener
Clearing the memory ..................... 299
General notes ................................ 296
Important safety notes .................. 297
Opening/closing the garage doo r..2 99
Problems when programming ........2 98
Programming (button in the rear-
view mirror) ................................... 297
Synchronizing the rolling code ....... 298 Gasoline
............................................. 359
Gear indicator (on-board com-
puter, Mercedes-AMG vehicles) ....... 219
Genuine parts ...................................... 26
Glove box ...........................................2 74
Google™ Local Search
see also Digital Operator's Man-
ual ..................................................2 63
H
HANDS-FREE ACCESS.......................... 86
Handwriting recognition
Switching text reader function
on/off ............................................ 266
Touchpad ....................................... 265
Hazard warning lamps ......................110
Head restraints
Adjusting (electrically) ..................... 98
Adjusting (manually) ........................ 98
Adjusting (rear) ................................ 98
Adjusting the fore-and-aft posi-
tion manually ................................... 98
General notes .................................. 98
Important safety notes .................... 97
Head-up display
Adjusting the brightness ................ 217
Displays and operating .................. 206
Function/notes .............................2 06
Important safety notes .................. 206
Selecting displays .......................... 216
Setting the position ....................... 217
Storing settings (memory func-
tion) ............................................... 106
Headlamps
Display message ............................ 234
Fogging up ..................................... 111
see Automatic headlamp mode
Heating
see Climate control
High beam flasher .............................1 09
High-beam headlamps
Adaptive Highbeam Assist ............. 110
Display message ............................ 234
Replacing bulbs .............................1 13
Switching on/off ........................... 109
Hill start assist .................................. 131
12Index
Page 20 of 370

Replacing bulbsHigh-beam headlamps ................... 113
Important safety notes .................. 112
Installing/removing the cover
(front wheel arch) .......................... 114
Low-beam headlamps .................... 113
Overview of bulb types .................. 113
Replacing front bulbs (vehicles
with halogen headlamps) ............... 113
Turn signals (front) ......................... 114
Reporting safety defects .................... 30
Rescue card ......................................... 31
Reserve (fuel tank)
see Fuel
Reserve fuel
Display message ............................ 237
Warning lamp ................................. 258
Restraint system
Display message ............................ 230
Introduction ..................................... 42
Warning lamp ................................. 257
Warning lamp (function) ................... 43
Reversing feature
Side windows ................................... 89
Sliding sunroof ................................. 92
Tailgate ............................................ 84
Roadside Assistance (breakdown) .... 28
Roller sunblind
Rear side windows ......................... 286
Roof carrier ........................................ 283
Roof lining and carpets (cleaning
guidelines) ......................................... 312
Roof load (maximum) ........................ 364
Route guidance
see also Digital Operator's Man-
ual .................................................. 263
Route guidance active ...................... 209
S
Safety
Children in the vehicle ..................... 58
see Occupant safety
see Operating safety
SD card
Inserting/removing ........................ 271
Selecting ........................................ 212 SD memory card
see also Digital Operator's Man-
ual .................................................. 263
Search & Send
see also Digital Operator's Man-
ual .................................................. 263
Seat
Correct driver's seat position ........... 95
Seat belts
Adjusting the driver's and front-
passenger seat belt ......................... 46
Adjusting the height ......................... 46
center rear-compartment seat ......... 46
Cleaning ......................................... 312
Correct usage .................................. 45
Fastening ......................................... 46
Important safety guidelines ............. 44
Introduction ..................................... 43
Releasing ......................................... 46
Warning lamp ................................. 251
Warning lamp (function) ................... 46
Seats
Adjusting (AMG Performance
Seat) ................................................ 99
Adjusting (electrically) ..................... 97
Adjusting the 4-way lumbar sup-
port .................................................. 99
Adjusting the head restraint ............ 97
Calling up a stored setting (mem-
ory function) .................................. 106
Cleaning the cover ......................... 311
Folding the backrest (rear com-
partment) forwards/back .............. 276
Important safety notes .................... 95
Seat heating .................................... 99
Seat heating problem .................... 100
Seat ventilation .............................. 100
Seat ventilation problem ................ 100
Storing settings (memory func-
tion) ............................................... 106
Securing a load
see Securing cargo
Securing cargo .................................. 278
Selector lever
Cleaning ......................................... 311
see Automatic transmission
Sensors (cleaning instructions) ....... 309
18Index
Page 22 of 370

Warning lamp ................................. 256
Standing lamps
Display message ............................2 34
Switching on/off ........................... 109
Start button
Display message ............................ 251
Start/Stop button
Key positions ................................. 128
Starting the engine ........................ 129
Start/stop function
see ECO start/stop function
Starting (engine) ................................ 128
STEER CONTROL .................................. 74
Steering
Display message ............................ 249
Warning lamps ............................... 262
Steering Assist and Stop&Go Pilot .. 164
Steering Assist and Stop&Go Pilot
(DISTRONIC PLUS)
Display message ............................ 243
Steering assistant STEER CON-
TROL
see STEER CONTROL
Steering wheel
Adjusting (electrically) ................... 101
Adjusting (manually) ...................... 101
Button overview ............................... 36
Buttons (on-board computer) ......... 204
Cleaning ......................................... 311
EASY ENTRY/EXIT feature ............. 102
Important safety notes .................. 101
Storing settings (memory func-
tion) ............................................... 106
Steering wheel heating
Problem (malfunction) ................... 102
Switching on/off ........................... 101
Steering wheel paddle shifters ........ 140
Stop&Go Pilot and Steering Assist .. 164
Stopwatch (RACETIMER) ................... 220
Stowage areas ................................... 273
Stowage compartments
Armrest (under) ............................. 274
Center console .............................. 274
Cup holders ................................... 284
Door ............................................... 275
Eyeglasses compartment ............... 274
Glove box ....................................... 274 Important safety information ......... 273
Map pockets .................................. 275
Rear ............................................... 275
Stowage net ................................... 275
see Stowage areas
Stowage net ....................................... 275
Summer tires
In winter ........................................ 332
Sun visor ............................................ 285
Suspension settings
AIR BODY CONTROL ...................... 168
Suspe
nsion tuning
AMG sports suspension based on
AIR BODY CONTROL ...................... 169
SETUP (on-board computer,
Mercedes-AMG vehicles) ............... 219
Switching air-recirculation mode
on/off ................................................. 123
Switching on media mode
Via the device list .......................... 271
T
Tachometer ........................................ 204
Tail lamps
Display message ............................ 234
Tailgate
Display message ............................ 248
Emergency unlocking ....................... 88
HANDS-FREE ACCESS ..................... 86
Important safety notes .................... 83
Limiting the opening angle ............... 88
Obstruction detection ...................... 84
Opening dimensions ...................... 364
Opening/closing (automatically
from inside) ...................................... 87
Opening/closing (automatically
from outside) ................................... 84
Reversing feature ............................. 84
Tank content
Fuel gauge ....................................... 35
Technical data
Capacities ...................................... 358
Drawbar load (maximum) ............... 365
Information .................................... 356
Trailer loads ................................... 365
Vehicle data ................................... 364
20Index
Page 43 of 370

Door controlpanel
FunctionPage
:r 45=
Stores settings for the seat,
exterior mirrors and steering
column
106
;Adjusts the seats electrically97
=c Seat heating99
?sSeat ventilation100
AOpens the door82
B%&Unlocks/locks
the vehicle82
CWOpens/closes the rear
left side window88
DW Opens/closes the left
side window88
FunctionPage
E7Zª\
Adjusts and folds the exterior
mirrors out/in electrically
103
FW Opens/closes the right
side window88
GW Opens/closes the rear
right side window88
Hn Override feature for the
controls in the rear compart-
ment
63
Ip Opens/closes the tail-
gate87
Door control panel41
At a glance
Page 83 of 370

ProblemPossible causes/consequences andMSolutions
KEYLESS-GO is malfunctioning.
XLock/unlock the vehicle using the remote control function of the
SmartKey.
XHave the vehicle and SmartKey checked at a qualified specialist
workshop.
If the vehicle can also not be locked/unlocked using the remote con-
trol function:
XLock or unlock the vehicle using the mechanical key (Ypage 83).
XHave the vehicle and SmartKey checked at a qualified specialist
workshop.
The engine cannot be
started using the Smart-
Key.The on-board voltage is too low.
XSwitch off non-essential consumers, e.g. seat heating or interior
lighting, and try to start the engine again.
If this does not work:
XCheck the starter battery and charge it if necessary (Ypage 321).
or
XJump-start the vehicle (Ypage 322).
or
XConsult a qualified specialist workshop.
The engine cannot be
started using the Start/
Stop button. The Smart-
Key is in the vehicle.The vehicle is locked.
XUnlock the vehicle and try to start the vehicle again.
The SmartKey battery is discharged or nearly discharged.
XCheck the SmartKey battery (Ypage 79) and replace it if necessary
(Ypage 79).
If this does not work:
XStart your vehicle with the SmartKey in the ignition lock.
There is interference from a powerful source of radio waves.
XStart your vehicle with the SmartKey in the ignition lock.
You have lost a Smart-
Key.XHave the SmartKey deactivated at a qualified specialist workshop.
XReport the loss immediately to the vehicle insurers.
XIf necessary, have the locks changed as well.
You have lost the
mechanical key.XReport the loss immediately to the vehicle insurers.
XIf necessary, have the locks changed as well.
SmartKey81
Opening and closing
Z
Page 98 of 370

of injury in the head and neck area, e.g. in theevent of an accident or when braking.
Always drive with the head restraints instal-
led. Before driving off, make sure for every
vehicle occupant that the center of the head
restraint supports the back of the head at
about eye level.
Using the fore-and-aft adjustment, adjust the
head restraint so that it is as close as possible to
your head.
GWARNING
If the driver's seat is not engaged, it could
move unexpectedly while the vehicle is in
motion. This could cause you to lose control of the vehicle. There is a risk of an accident.
Always make sure that the driver's seat is
engaged before starting the vehicle.
GWARNING
You could lose control of your vehicle if you do the following while driving:
Radjust the driver's seat, head restraint,
steering wheel or mirrors
Rfasten the seat belt
There is a risk of an accident.
Adjust the driver's seat, head restraint, steer-
ing wheel and mirror and fasten your seat belt before starting the engine.
GWARNING
If you adjust the seat height carelessly, you or
other vehicle occupants could be trapped and
thereby injured. Children in particular could
accidentally press the electrical seat adjust-
ment buttons and become trapped. There is a
risk of injury.
While moving the seats, make sure that your
hands or other body parts do not get under the
lever assembly of the seat adjustment sys-
tem.
GWARNING
The seat belt does not offer the intended level of protection if you have not moved the back-
rest to an almost vertical position. When brak-
ing or in the event of an accident, you could
slide underneath the seat belt and sustain
abdomen or neck injuries, for example. This
poses an increased risk of injury or even fatal
injury.
Adjust the seat properly before beginning
your journey. Always ensure that the backrest
is in an almost vertical position and that the
shoulder section of your seat belt is routed
across the center of your shoulder.
!To avoid damage to the seats and the seat
heating, observe the following information:
Rkeep liquids from spilling on the seats. If
liquid is spilled on the seats, dry them as
soon as possible.
Rif the seat covers are damp or wet, do not
switch on the seat heating. The seat heat-
ing should also not be used to dry the seats.
Rclean the seat covers as recommended;
see "Interior care".
Rdo not transport heavy loads on the seats.
Do not place sharp objects on the seat
cushions, e.g. knives, nails or tools. The
seats should only be occupied by passen-
gers, if possible.
Rwhen the seat heating is in operation, do
not cover the seats with insulating materi-
als, e.g. blankets, coats, bags, seat covers,
child seats or booster seats.
!Make sure that there are no objects in the
footwell under or behind the seats when mov-
ing the seats back. There is a risk that the
seats and/or the objects could be damaged.
iFor more information, contact a qualified
specialist workshop.
iRelated topic:
REASY-PACK Quickfold rear bench seat
(Ypage 276)
96Seats
Seats, steering wheel and mirrors
Page 101 of 370

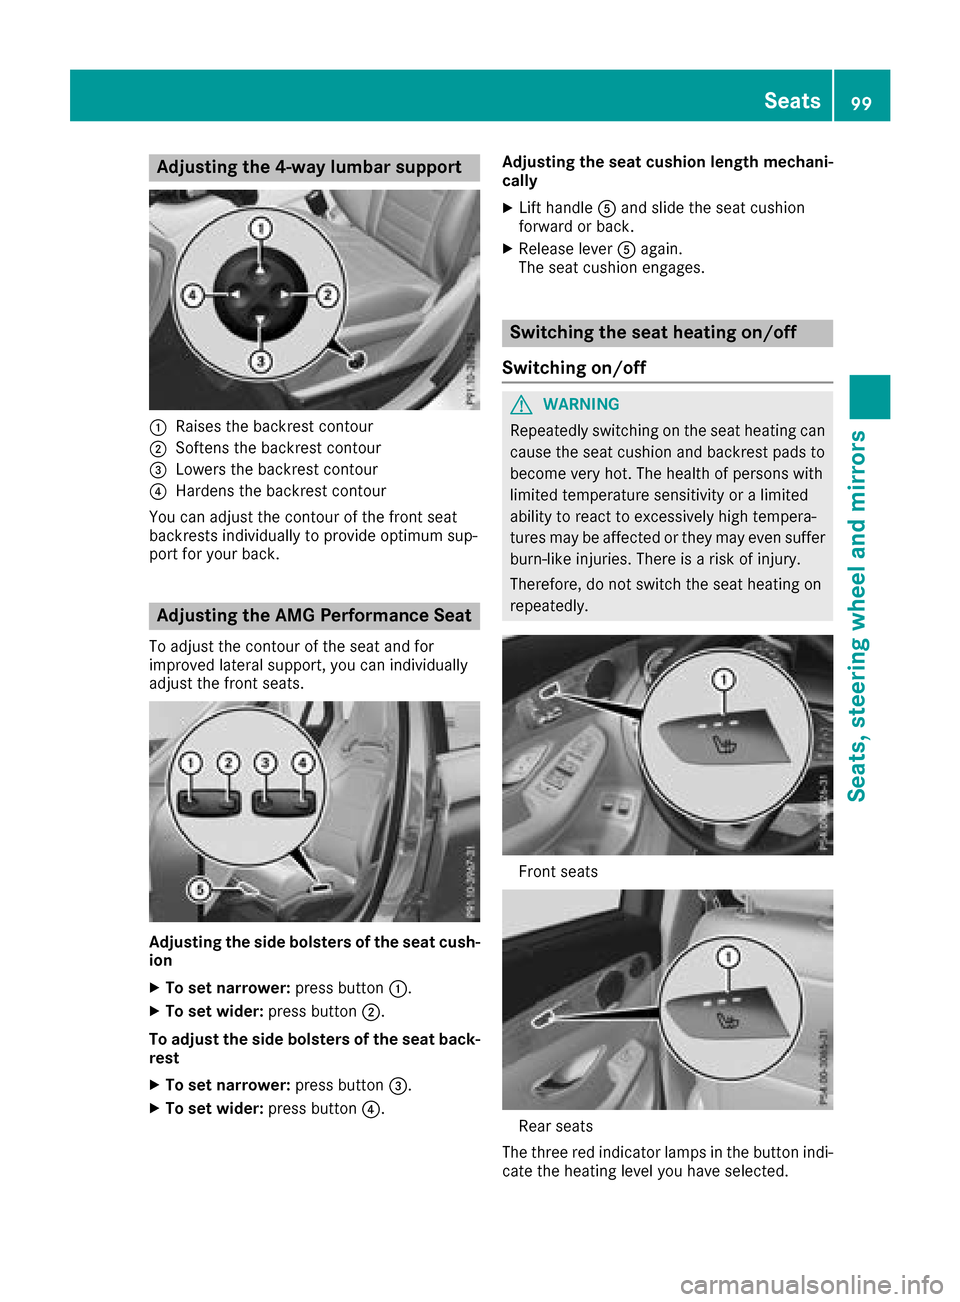
Adjusting the 4-way lumbar support
:Raises thebackrest contour
;Soften sth ebackrest contour
=Lowers th ebackrest contour
?Harden sth ebackrest contour
You can adjust th econtour of th efron tseat
backrest sindividually to provid eoptimum sup-
por tfor your back.
Adjusting the AMG Perfor mance Seat
To adjust th econtour of th eseat and for
improve dlateral support ,you can individually
adjust th efron tseats.
Adjusting th esid ebolsters of th esea tcush -
ion
XTo set narrower: press button:.
XTo set wider: press button;.
To adjust th esid ebolsters of th esea tback -
res t
XTo set narrower: press button=.
XTo set wider: press button?. Adjusting th
esea tcushion lengt hmechani-
call y
XLifthandle Aand slid eth eseat cushion
forward or back.
XReleas elever Aagain .
The seat cushion engages.
Switching the seat heating on/off
Switching on/off
GWARNIN G
Repeatedly switching on th eseat heating can
caus eth eseat cushion and backrest pads to
become ver yhot .The healt hof person swit h
limite dtemperature sensitivit yor alimite d
abilit yto reac tto excessivel yhigh tempera-
tures may be affecte dor they may eve nsuffer
burn-like injuries. There is aris kof injury.
Therefore ,do no tswitch th eseat heating on
repeatedly.
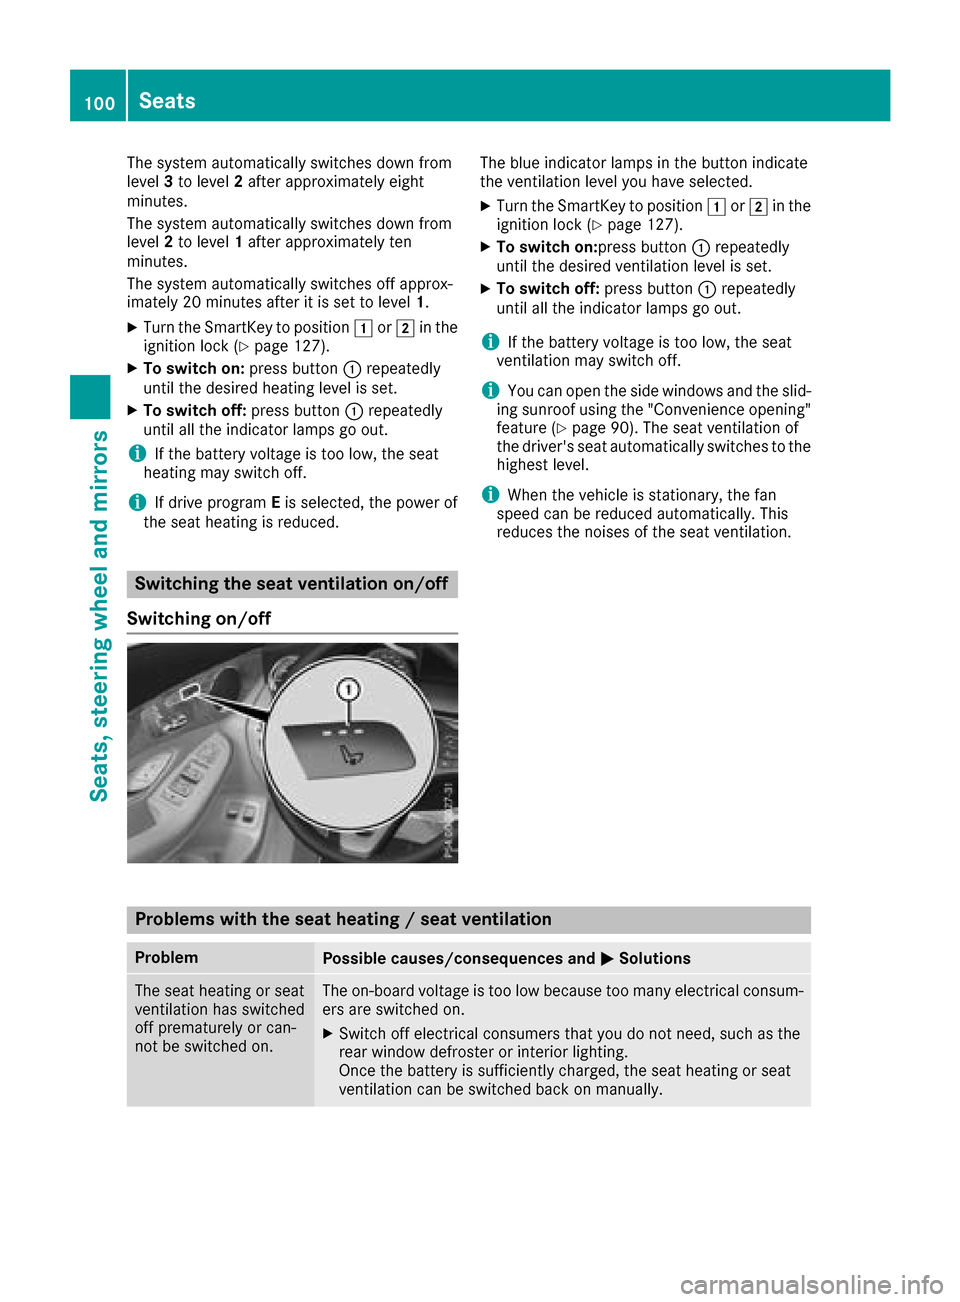
Fron tseat s
Rear seat s
The three red indicator lamp sin th ebutto nindi-
cat eth eheating level you hav eselected.
Seats99
Seats, steering wheel and mirrors
Z
Page 102 of 370

The system automatically switches down from
level3to level 2after approximately eight
minutes.
The system automatically switches down from
level 2to level 1after approximately ten
minutes.
The system automatically switches off approx-
imately 20 minutes after it is set to level 1.
XTurn the SmartKey to position1or2 in the
ignition lock (Ypage 127).
XTo switch on: press button:repeatedly
until the desired heating level is set.
XTo switch off: press button:repeatedly
until all the indicator lamps go out.
iIf the battery voltage is too low, the seat
heating may switch off.
iIf drive program Eis selected, the power of
the seat heating is reduced.
Switching the seat ventilation on/off
Switching on/off
The blue indicator lamps in the button indicate
the ventilation level you have selected.
XTurn the SmartKey to position 1or2 in the
ignition lock (Ypage 127).
XTo switch on:press button :repeatedly
until the desired ventilation level is set.
XTo switch off: press button:repeatedly
until all the indicator lamps go out.
iIf the battery voltage is too low, the seat
ventilation may switch off.
iYou can open the side windows and the slid-
ing sunroof using the "Convenience opening"
feature (
Ypage 90). The seat ventilation of
the driver's seat automatically switches to the
highest level.
iWhen the vehicle is stationary, the fan
speed can be reduced automatically. This
reduces the noises of the seat ventilation.
Problems with the seat heating / seat ventilation
ProblemPossible causes/consequences and MSolutions
The seat heating or seat
ventilation has switched
off prematurely or can-
not be switched on.The on-board voltage is too low because too many electrical consum-
ers are switched on.
XSwitch off electrical consumers that you do not need, such as the
rear window defroster or interior lighting.
Once the battery is sufficiently charged, the seat heating or seat
ventilation can be switched back on manually.
100Seats
Seats, steering wheel and mirrors