2017 MERCEDES-BENZ GLC COUPE jump start
[x] Cancel search: jump startPage 5 of 370

Maintenance and care......................300
Engine compartment ........................... 300
ASSYST PLUS ...................................... 304
Care ..................................................... 305
Breakdown assistance .....................313
Where will I find...? .............................. 313
Flat tire ................................................ 315
Battery (vehicle) .................................. 319
Jump-starting ....................................... 322
Towing and tow-starting ...................... 324
Fuses ...................................................3 27
Wheels and tires............................... 330
Important safety notes ........................ 330
Operation ............................................ 330
Winter operation .................................. 332
Tire pressure ....................................... 333
Loading the vehicle .............................. 340
All about wheels and tires ................... 343
Changing a wheel ................................ 350
Wheel/tire combination ......................3 54
Technical data................................... 356
Information regarding technical data ... 356
Vehicle electronics .............................. 356
Identification plates .............................3 57
Service products and filling capaci-
ties ...................................................... 358
Vehicle data ......................................... 364
Trailer tow hitch ................................... 365
Contents3
Page 8 of 370

Bag hook............................................ 279
Ball coupling
Installing ........................................ 199
Removing ....................................... 201
BAS (Brake Assist System) ................. 64
BAS PLUS with Cross-Traffic Assist
(Brake Assist PLUS with Cross-
Traffic Assist)
Function/notes ................................ 65
Important safety notes .................... 65
Battery (SmartKey)
Checking .......................................... 79
Important safety notes .................... 79
Replacing ......................................... 79
Battery (vehicle)
Charging ........................................ 321
Display message ............................ 236
Important safety notes .................. 319
Jump starting ................................. 322
Blind Spot Assist
Activating/deactivating (on-
board computer) ............................ 216
Display message ............................ 241
Notes/function .............................. 188
see Active Blind Spot Assist
Blootooth
®
Connecting a different mobile
phone ............................................ 271
BlueTEC
see DEF
Bluetooth
®
Searching for a mobile phone ........ 270
see also Digital Operator's Man-
ual .................................................. 263
Telephony ...................................... 270
Brake Assist
see BAS (Brake Assist System)
Brake fluid
Display message ............................ 228
Notes ............................................. 362
Brake force distribution
see EBD (electronic brake force
distribution)
Brake linings
Display message ............................ 228
Brakes
ABS .................................................. 64 Adaptive Brake Assist ...................... 68
BAS .................................................. 64
BAS PLUS with Cross-Traffic
Assist ............................................... 65
Brake fluid (notes) ......................... 362
Display message ............................ 223
EBD .................................................. 72
Hill start assist ............................... 131
HOLD function ............................... 166
Important safety notes .................. 154
Maintenance .................................. 155
Parking brake ................................ 150
Riding tips ...................................... 154
Warning lamp ................................. 253
Breakdown
Where will I find...? ........................ 313
see Flat tire
see Towing away
Brightness contro l (
instrument
cluster lighting) ................................... 34
Buttons on the steering wheel ......... 204
C
California
Important notice for retail cus-
tomers and lessees .......................... 27
Calling up a malfunction
see Display messages
Calling up the climate control bar
Multimedia system ........................ 267
Calling up the climate control
menu
Multimedia system ........................ 268
Camera
see 360° camera
see Rear view camera
Car
see Vehicle
Care
360° camera ................................. 310
Car wash ........................................ 305
Carpets .......................................... 312
Display ........................................... 310
Exhaust pipe .................................. 310
Exterior lights ................................ 309
General notes ................................ 305
Interior ........................................... 310
6Index
Page 13 of 370

Engine number ............................... 358
Irregular running ............................ 133
Jump-starting ................................. 322
Starting (important safety notes) ... 128
Starting problems .......................... 133
Starting the engine with the
SmartKey ....................................... 129
Starting via smartphone ................ 129
Starting with the Start/Stop but-
ton ................................................. 129
Switching off .................................. 150
Tow-starting (vehicle) ..................... 327
Engine electronics
Problem (malfunction) ................... 133
Engine oil
Adding ........................................... 302
Additives ........................................ 362
Checking the oil level ..................... 301
Checking the oil level using the
dipstick .......................................... 302
Display message ............................ 237
Filling capacity ............................... 362
General notes ................................ 361
Notes about oil grades ................... 361
Notes on oil level/consumption .... 301
Temperature (on-board computer,
Mercedes-AMG vehicles) ............... 219
Entering an address
see also Digital Operator's Man-
ual .................................................. 263
ESP
®(Electronic Stability Pro-
gram)
AMG menu (on-board computer) ... 219
Characteristics ................................. 69
Crosswind Assist ............................. 72
Deactivating/activating (button
in Mercedes-AMG vehicles) ............. 70
Deactivating/activating (notes,
except Mercedes-AMG vehicles) ...... 69
Deactivating/activating (on-
board computer, except
Mercedes-AMG vehicles) ............... 215
Display message ............................ 223
Function/notes ................................ 69
General notes .................................. 69
Important safety information ........... 69
Trailer stabilization ........................... 72
Warning lamp ................................. 254 ETS/4ETS (Electronic Traction Sys-
tem)
...................................................... 69
Exhaust
see Exhaust pipe
Exhaust check ................................... 153
Exhaus t pi
pe
Cleaning ......................................... 310
Exterior lighting
Cleaning ......................................... 309
Setting options .............................. 108
see Lights
Exterior mirrors
Adjusting ....................................... 103
Dipping (automatic) ....................... 104
Folding in/out (automatically) ....... 104
Folding in/out (electrically) ........... 104
Out of position (troubleshooting) ... 104
Setting ........................................... 104
Storing settings (memory func-
tion) ............................................... 106
Storing the parking position .......... 105
Eyeglasses compartment ................. 274
F
Favorites
Overview ........................................ 266
Features ............................................. 284
Filler cap
see Refueling
Flat tire
Changing a wheel/mounting the
spare wheel ................................... 350
MOExtended tires .......................... 315
Preparing the vehicle ..................... 315
TIREFIT kit ...................................... 316
Floormats ........................................... 299
Frequencies
Mobile phone ................................. 356
Two-way radio ................................ 356
Front wheel arch
Removing/installing the cover ....... 114
Front wheel arch cover
Installing/removing ....................... 114
Fuel
Additives ........................................ 360
Consumption statistics .................. 208
Diesel ............................................ 360
Index11
Page 15 of 370

HOLD functionActivating ....................................... 167
Activation conditions .....................1 67
Deactivating ................................... 167
Display message ............................ 242
Function/notes .............................1 66
General notes ................................ 166
Home address
see also Digital Operator's Man-
ual ..................................................2 63
Hood
Closing ...........................................3 01
Display message ............................ 249
Important safety notes .................. 300
Opening ......................................... 300
Horn ...................................................... 34
HUD
see Head-up display
Hydroplaning ..................................... 156
I
Ignition lock
see Key positions
Immobilizer .......................................... 75
Indicator and warning lamps
COLLISION PREVENTION ASSIST
PLUS .............................................. 260
Indicator lamps
see Warning and indicator lamps
Indicators
see Turn signals
Insect protection on the radiator .... 301
Instrument cluster
Overview .......................................... 35
Warning and indicator lamps ........... 35
Instrument cluster lighting .............. 203
Interior lighting
Automatic control .......................... 112
Control ...........................................1 12
Overview ........................................ 112
Reading lamp ................................. 112
iPod
®
see also Digital Operator's Man-
ual ..................................................2 63
J
Jack
Using ............................................. 351
Jump starting (engine) ......................322
K
Key positions
SmartKey ....................................... 127
Start/Stop button .......................... 128
KEYLESS-GO
Activating ......................................... 77
Convenience closing feature ............ 90
Deactivation ..................................... 77
Locking ............................................ 77
Removing the Start/Stop button ... 128
Start function ................................... 78
Unlocking ......................................... 77
Kickdown
Driving tips ....................................1 39
Manual gearshifting ....................... 142
Knee bag .............................................. 49
L
Lamps
see Warning and indicator lamps
Lane Keeping Assist
Activating/deactivating ................. 191
Activating/deactivating (on-
board computer) ............................ 216
Display message ............................ 240
Function/information .................... 190
see Active Lane Keeping Assist
Lane Tracking package ..................... 188
Lap time (RACETIMER) ...................... 220
LATCH-type (ISOFIX) child seat
anchors ................................................ 60
Level control
Display message ............................ 240
see AIR BODY CONTROL
License plate lamp (display mes-
sage) ................................................... 234
Light function, active
Display message ............................ 234
Light switch
Operation ....................................... 108
Index13
Page 83 of 370

ProblemPossible causes/consequences andMSolutions
KEYLESS-GO is malfunctioning.
XLock/unlock the vehicle using the remote control function of the
SmartKey.
XHave the vehicle and SmartKey checked at a qualified specialist
workshop.
If the vehicle can also not be locked/unlocked using the remote con-
trol function:
XLock or unlock the vehicle using the mechanical key (Ypage 83).
XHave the vehicle and SmartKey checked at a qualified specialist
workshop.
The engine cannot be
started using the Smart-
Key.The on-board voltage is too low.
XSwitch off non-essential consumers, e.g. seat heating or interior
lighting, and try to start the engine again.
If this does not work:
XCheck the starter battery and charge it if necessary (Ypage 321).
or
XJump-start the vehicle (Ypage 322).
or
XConsult a qualified specialist workshop.
The engine cannot be
started using the Start/
Stop button. The Smart-
Key is in the vehicle.The vehicle is locked.
XUnlock the vehicle and try to start the vehicle again.
The SmartKey battery is discharged or nearly discharged.
XCheck the SmartKey battery (Ypage 79) and replace it if necessary
(Ypage 79).
If this does not work:
XStart your vehicle with the SmartKey in the ignition lock.
There is interference from a powerful source of radio waves.
XStart your vehicle with the SmartKey in the ignition lock.
You have lost a Smart-
Key.XHave the SmartKey deactivated at a qualified specialist workshop.
XReport the loss immediately to the vehicle insurers.
XIf necessary, have the locks changed as well.
You have lost the
mechanical key.XReport the loss immediately to the vehicle insurers.
XIf necessary, have the locks changed as well.
SmartKey81
Opening and closing
Z
Page 135 of 370

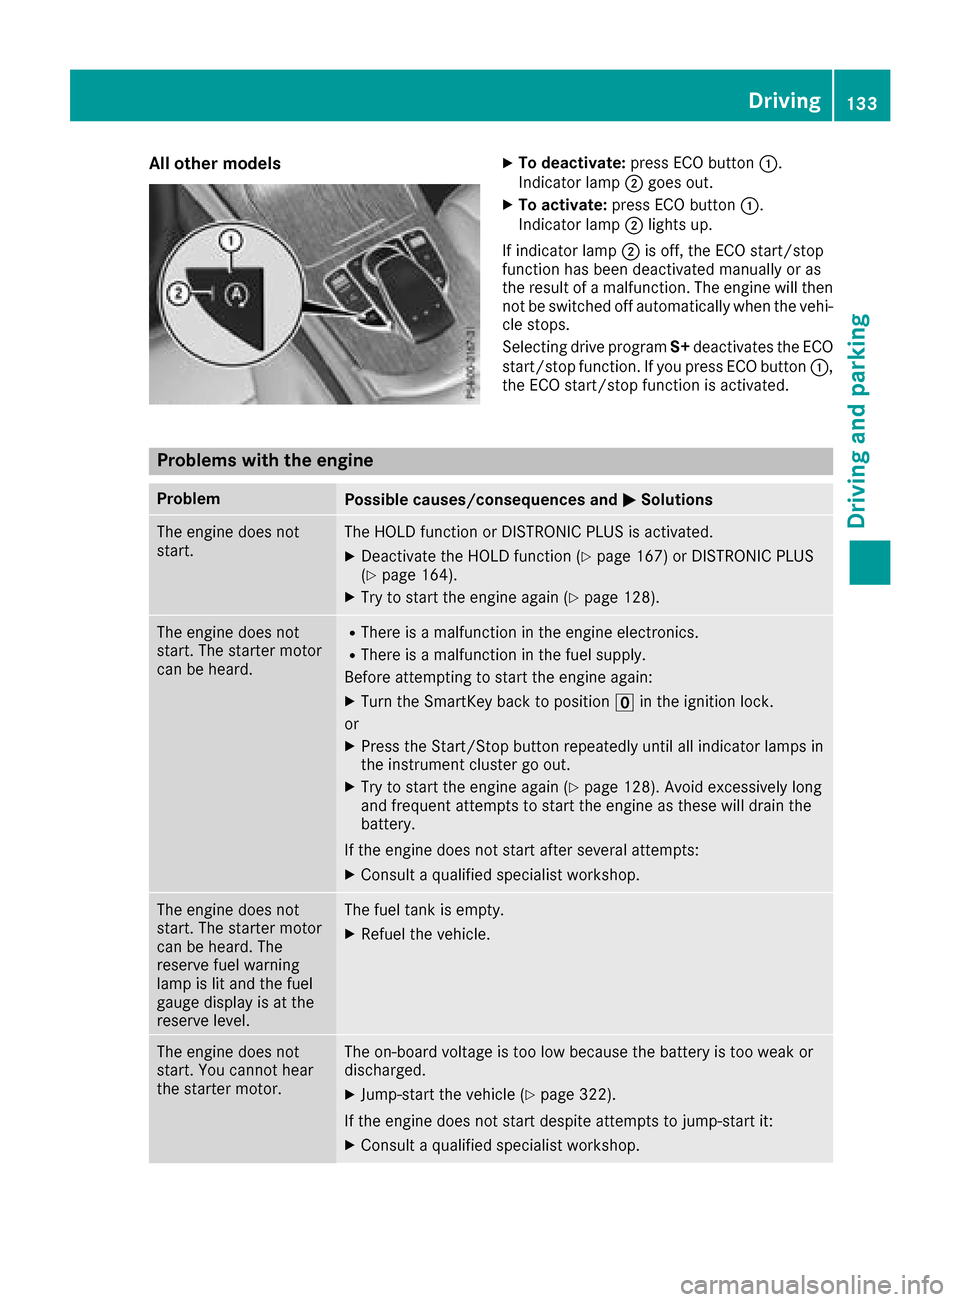
All othermodelsXTo deacti vate:press ECO butto n:.
Indicato rlamp ;goes out .
XTo activate:press ECO butto n:.
Indicato rlamp ;lights up.
If indicator lamp ;is off ,th eECO start/sto p
function has been deactivate dmanually or as
th eresult of amalfunction. The engin ewill then
no tbe switched off automatically when th evehi-
cle stops.
Selectin gdriv eprogram S+deactivate sth eECO
start/sto pfunction .If you press ECO butto n:,
th eECO start/sto pfunction is activated.
Problems with the engine
ProblemPossible causes/consequence sand MSolutions
The engin edoes no t
start .The HOLD function or DISTRONI CPLU Sis activated.
XDeactivat eth eHOLD function (Ypage 167) or DISTRONI CPLU S
(Ypage 164).
XTry to start th eengin eagain (Ypage 128).
The engin edoes no t
start .The starter motor
can be heard.RTher eis amalfunctio nin th eengin eelectronics .
RThereis amalfunctio nin th efuel supply.
Before attemptin gto start th eengin eagain :
XTurn th eSmartKey bac kto positio nu in th eignition lock.
or
XPress th eStart/Sto pbutto nrepeatedly until all indicator lamps in
th einstrumen tcluste rgo out .
XTry to start th eengin eagain (Ypage 128). Avoid excessively lon g
and frequen tattempts to start th eengin eas these will drain th e
battery.
If th eengin edoes no tstart after several attempts :
XConsultaqualified specialist workshop.
The engin edoes no t
start .The starter motor
can be heard. The
reserv efuel warning
lamp is lit and th efuel
gauge display is at th e
reserv elevel.The fuel tan kis empty.
XRefue lth evehicle.
The engin edoes no t
start .You canno thear
th estarter motor.The on-board voltag eis to olow because th ebattery is to oweak or
discharged.
XJump-start th evehicl e (Ypage 322).
If th eengin edoes no tstart despite attempts to jump-start it:
XConsult aqualified specialist workshop.
Driving133
Driving and parking
Z
Page 321 of 370

XTo reduce the tire pressure:depress pres-
sure release button :next to pressure
gauge ;.
XWhen the tire pressure is correct, unscrew the
filler hose from the valve of the sealed tire.
Tire sealant may escape when the filler hose is
unscrewed.
XScrew the valve cap onto the tire valve of the
sealed tire.
XPull the tire sealant bottle out of the tire infla-
tion compressor.
The filler hose remains attached to the tire
sealant bottle.
XDrive to the nearest qualified specialist work-
shop and have the tire changed there.
XHave the tire sealant bottle replaced as soon
as possible at a qualified specialist workshop.
XHave the tire sealant bottle replaced every
four years at a qualified specialist workshop.
Battery (vehicle)
12 V battery – important safety notes
Special tools and expert knowledge are required
when working on the battery, e.g. removal and
installation. You should therefore have all work
involving the battery carried out at a qualified
specialist workshop.
GWARNING
Work carried out incorrectly on the battery
can lead, for example, to a short circuit and
thus damage the vehicle electronics. This can
lead to function restrictions applying to
safety-relevant systems, e.g the lighting sys-
tem, the ABS (anti-lock braking system) or the
ESP
®(Electronic Stability Program). The oper-
ating safety of your vehicle may be restricted.
You could lose control of the vehicle, for
example:
Rwhen braking
Rin the event of abrupt steering maneuvers
and/or when the vehicle's speed is not
adapted to the road conditions
There is a risk of an accident.
In the event of a short circuit or a similar inci-
dent, contact a qualified specialist workshop
immediately. Do not drive any further. You
should have all work involving the battery car- ried out at a qualified specialist workshop.
For further information about ABS and ESP
®,
see (Ypage 64) and (Ypage 69).
All vehicles except vehicles with a lithium-
ion battery:
GWARNING
Electrostatic build-up can lead to the creation of sparks, which could ignite the highly explo-
sive gases of a battery. There is a risk of an
explosion.
Before handling the battery, touch the vehicle
body to remove any existing electrostatic
build-up.
The highly flammable gas mixture forms when
charging the battery as well as when jump-start-
ing.
Always make sure that neither you nor the bat-
tery is electrostatically charged. A build-up of
electrostatic charge can be caused, for exam-
ple:
Rby wearing clothing made from synthetic
fibers
Rdue to friction between clothing and seats
Rif you push or pull the battery across the car-
pet or other synthetic materials
Rif you rub the battery with a cloth
GWARNING
During the charging process, a battery produ-
ces hydrogen gas. If a short circuit occurs or
sparks are created, the hydrogen gas can
ignite. There is a risk of an explosion.
RMake sure that the positive terminal of a
connected battery does not come into con- tact with vehicle parts.
RNever place metal objects or tools on a bat-
tery.
RIt is important that you observe the descri-
bed order of the battery terminals when
connecting and disconnecting a battery.
RWhen jump-starting, make sure that the
battery poles with identical polarity are
connected.
Battery (vehicle)319
Breakdo wn assis tance
Z
Page 323 of 370

In order for the battery to achieve the maximum
possible service life, it must always be suffi-
ciently charged.
Like other batteries, the vehicle battery may
discharge over time if you do not use the vehicle.
In this case, have the battery disconnected at a
qualified specialist workshop. You can also
charge the battery with a charger recommended
by Mercedes-Benz. Contact a qualified special-
ist workshop for further information.
Have the battery condition of charge checked
more frequently if you use the vehicle mainly for
short trips or if you leave it standing idle for a
lengthy period. Consult a qualified specialist
workshop if you wish to leave your vehicle
parked for a long period of time.
Remove the SmartKey if you park the vehicle
and do not require any electrical consumers.
The vehicle will then use very little energy, thus
conserving battery power.
Charging the 12 V battery
Vehicles with a lithium-ion battery:
!Only use battery chargers with a maximum
charging voltage of 14.4 V.
All vehicles except vehicles with a lithium-
ion battery:
!Only use battery chargers with a maximum
charging voltage of 14.8 V.
GWARNING
During charging and jump-starting, explosive
gases can escape from the battery. There is a risk of an explosion.
Particularly avoid fire, open flames, creating
sparks and smoking. Ensure there is sufficient
ventilation while charging and jump-starting.
Do not lean over a battery.
GWARNING
Battery acid is caustic. There is a risk of injury.
Avoid contact with skin, eyes or clothing. Do
not inhale any battery gases. Do not lean over
the battery. Keep children away from batter-
ies. Wash away battery acid immediately with
plenty of clean water and seek medical atten-
tion.
GWARNING
A discharged battery can freeze at tempera-
tures below freezing point. When jump-start-
ing the vehicle or charging the battery, gases can escape from the battery. There is a risk of
an explosion.
Allow the frozen battery to thaw out before
charging it or jump-starting.
All vehicles:
!Only charge the battery using the jump-
starting connection point.
The jump-starting connection point is in the
engine compartment (
Ypage 322).
XOpen the hood.
XConnect the battery charger to the positive
terminal and ground point in the same order
as when connecting the donor battery in the
jump-starting procedure (
Ypage 322).
Keep away from fire and open flames. Do not
lean over a battery. Never charge the battery if it
is still installed in the vehicle, unless you use a
battery charger which has been tested and
approved by Mercedes-Benz. A battery charger
unit specially adapted for Mercedes-Benz vehi-
cles and tested and approved by Mercedes-
Benz is available as an accessory. It permits the
charging of the battery in its installed position.
Contact an authorized Mercedes-Benz Center
for further information and availability. Read the
battery charger's operating instructions before
charging the battery.
All vehicles except vehicles with a lithium-
ion battery: if the warning and indicator lamps
on the instrument cluster do not light up at low
temperatures, it is very likely that the dis-
charged battery has frozen. In this case you may
neither jump-start the vehicle nor charge the
battery. The service life of a thawed-out battery
may be shorter. The starting characteristics can
be impaired, particularly at low temperatures.
Have the thawed-out battery checked at a quali-
fied specialist workshop.
Vehicles with a lithium-ion battery: at low
temperatures, do not charge a battery which has
been removed using a battery charger. Allow the
battery to warm up gently first, if necessary.
Otherwise, the service life can be shortened and
the starting characteristics impaired, especially
at low temperatures.
Battery (vehicle)321
Breakdown assistance
Z