2017 MERCEDES-BENZ GLA SUV clock setting
[x] Cancel search: clock settingPage 91 of 369
X
To deactivate: press and hold button :for
approximately five seconds until a tone
sounds.
X To activate: press and hold button ;for
approximately five seconds until a tone
sounds.
If you press one of the two buttons and do not
hear a tone, the relevant setting has already
been selected.
The vehicle is locked automatically when the
ignition is switched on and the wheels are turn-
ing.
You could therefore be locked out if:
R the vehicle is being pushed
R the vehicle is being towed
R the vehicle is being tested on a dynamometer
You can also activate and deactivate the auto-
matic locking function using the on-board com- puter (Y page 229). Unlocking the driver's door (emer-
gency key element)
If the vehicle can no longer be unlocked with the key or KEYLESS-GO, use the emergency key ele-
ment.
If you use the emergency key element to unlock
and open the driver's door, the anti-theft alarm
system will be triggered. Switch off the alarm
(Y page 76).
X Take the emergency key element out of the
key (Y page 81).
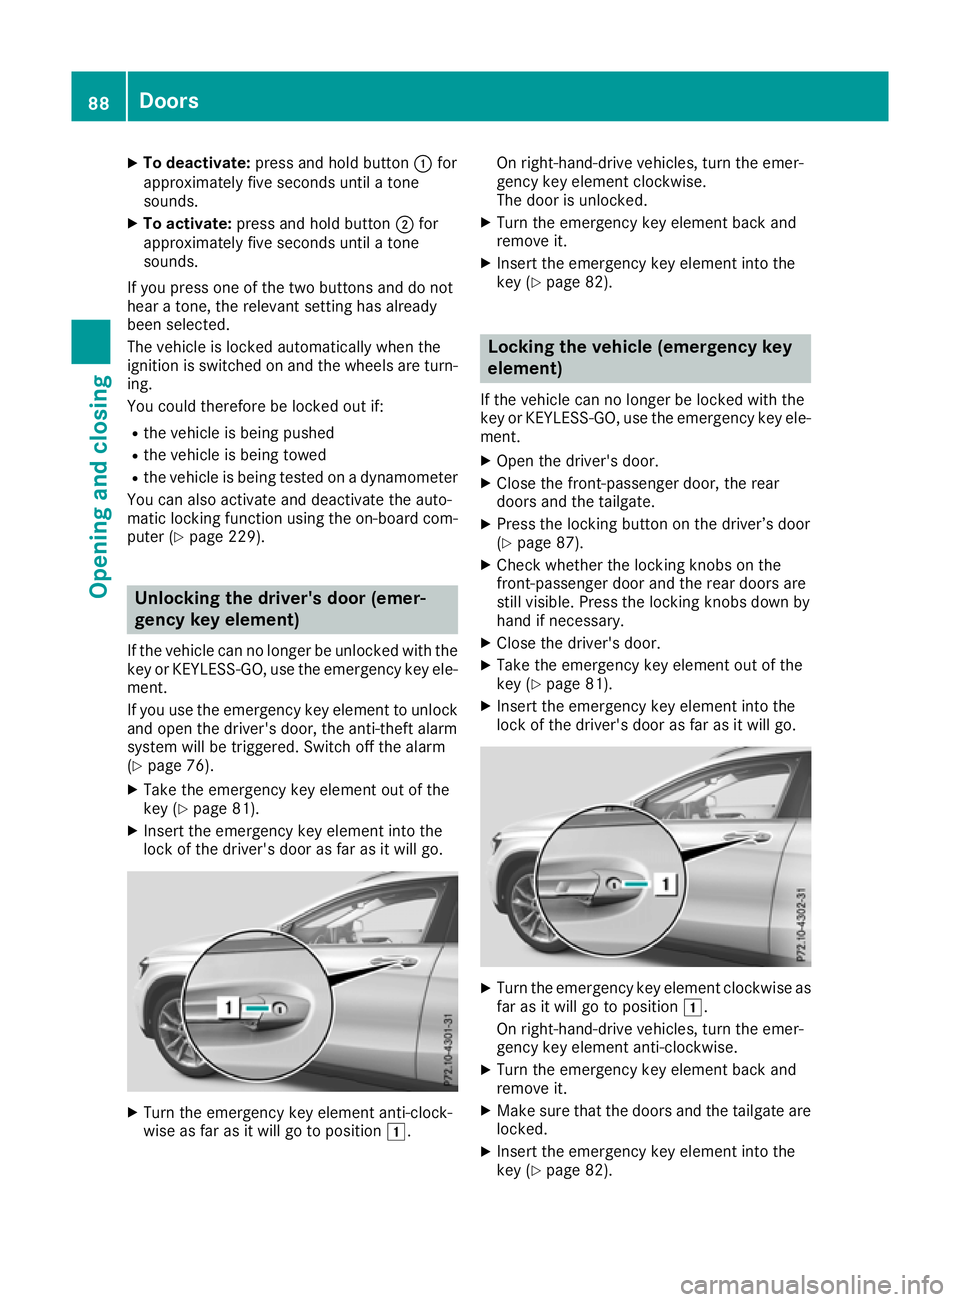
X Insert the emergency key element into the
lock of the driver's door as far as it will go. X
Turn the emergency key element anti-clock-
wise as far as it will go to position 1.On right-hand-drive vehicles, turn the emer-
gency key element clockwise.
The door is unlocked.
X Turn the emergency key element back and
remove it.
X Insert the emergency key element into the
key (Y page 82). Locking the vehicle (emergency key
element)
If the vehicle can no longer be locked with the
key or KEYLESS-GO, use the emergency key ele-
ment.
X Open the driver's door.
X Close the front-passenger door, the rear
doors and the tailgate.
X Press the locking button on the driver’s door
(Y page 87).
X Check whether the locking knobs on the
front-passenger door and the rear doors are
still visible. Press the locking knobs down by
hand if necessary.
X Close the driver's door.
X Take the emergency key element out of the
key (Y page 81).
X Insert the emergency key element into the
lock of the driver's door as far as it will go. X
Turn the emergency key element clockwise as
far as it will go to position 1.
On right-hand-drive vehicles, turn the emer-
gency key element anti-clockwise.
X Turn the emergency key element back and
remove it.
X Make sure that the doors and the tailgate are
locked.
X Insert the emergency key element into the
key (Y page 82). 88
DoorsOpening and closing
Page 132 of 369

Control panel for air-conditioning system
:
To set the temperature (Y page 133)
; To demist the windscreen (Y page 134)
= To set the air distribution (Y page 133)
? To activate/deactivate air-recirculation mode (Y page 135)
A To set the airflow (Y page 134)
B To activate/deactivate cooling with air dehumidification (Y page 132)
C To switch the rear window heating on/off (Y page 135)Notes on using the air-conditioning
system
Air-conditioning system Below, you can find a number of tips and rec-
ommendations for optimum use of the air-con-
ditioning system.
R Switch on the air-conditioning system by turn-
ing control knob Aclockwise to the desired
position (except position 0).
R Set the temperature to 22 †.
R Recommendation for avoiding misted
windows at low exterior temperatures or
in rain: switch on the ¿cooling with dehu-
midification function (Y page 132).
Set air distribution to ¯and if possible
switch off PandO( Ypage 133).
Deactivate air-recirculation mode e
(Y page 135).
Set airflow control Ato a setting between 3
and 6(Y page 134). R
Recommendation for rapid cooling or
heating of the vehicle interior: briefly set
airflow control Ato a setting between 3and
6 (Y page 134).
R Recommendation for a constant vehicle
interior temperature: set airflow controlA
to a setting between 1and 3(Y page 134).
R Recommendation for air distribution in
winter: select the Oand¯ settings
(Y page 133).
Recommendation for air distribution in
summer: select the PorP and¯
settings (Y page 133).
R Use the "Windscreen demisting" function only
briefly until the windscreen is clear again.
R Use the "Air-recirculation mode" function only
briefly, e.g. if there are unpleasant outside
odours or when in a tunnel. The windows
could otherwise mist up as no fresh air is
drawn into the vehicle in air-recirculation
mode.
R If you change the settings of the climate con-
trol system, the climate status display Overview of climate control systems
129Climate control
Page 134 of 369
I
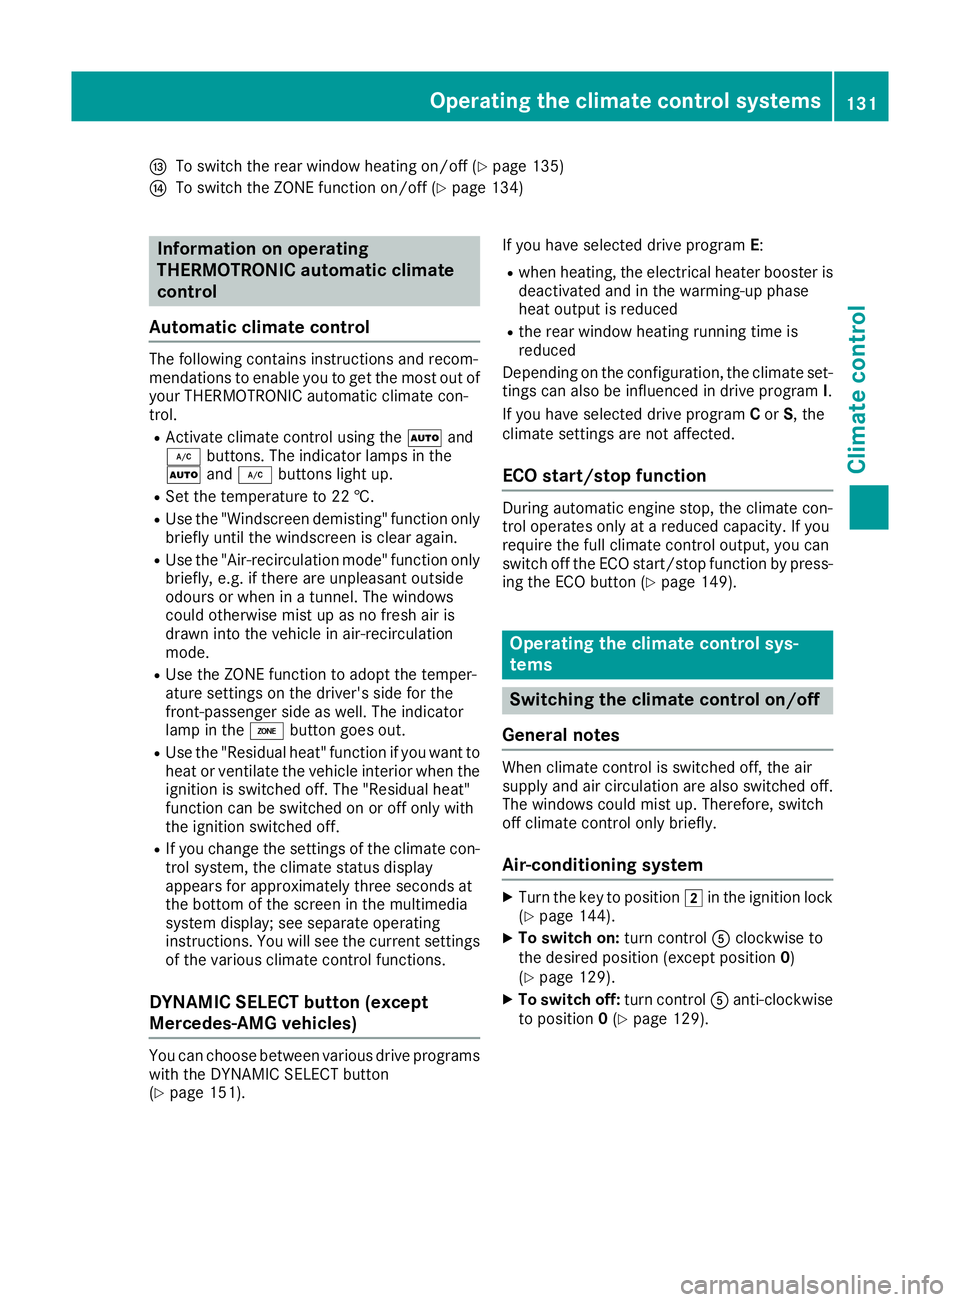
To switch the rear window heating on/off (Y page 135)
J To switch the ZONE function on/off (Y page 134)Information on operating
THERMOTRONIC automatic climate
control
Automatic climate control The following contains instructions and recom-
mendations to enable you to get the most out of
your THERMOTRONIC automatic climate con-
trol.
R Activate climate control using the Ãand
¿ buttons. The indicator lamps in the
à and¿ buttons light up.
R Set the temperature to 22 †.
R Use the "Windscreen demisting" function only
briefly until the windscreen is clear again.
R Use the "Air-recirculation mode" function only
briefly, e.g. if there are unpleasant outside
odours or when in a tunnel. The windows
could otherwise mist up as no fresh air is
drawn into the vehicle in air-recirculation
mode.
R Use the ZONE function to adopt the temper-
ature settings on the driver's side for the
front-passenger side as well. The indicator
lamp in the ábutton goes out.
R Use the "Residual heat" function if you want to
heat or ventilate the vehicle interior when the
ignition is switched off. The "Residual heat"
function can be switched on or off only with
the ignition switched off.
R If you change the settings of the climate con-
trol system, the climate status display
appears for approximately three seconds at
the bottom of the screen in the multimedia
system display; see separate operating
instructions. You will see the current settings of the various climate control functions.
DYNAMIC SELECT button (except
Mercedes-AMG vehicles) You can choose between various drive programs
with the DYNAMIC SELECT button
(Y page 151). If you have selected drive program
E:
R when heating, the electrical heater booster is
deactivated and in the warming-up phase
heat output is reduced
R the rear window heating running time is
reduced
Depending on the configuration, the climate set-
tings can also be influenced in drive program I.
If you have selected drive program Cor S, the
climate settings are not affected.
ECO start/stop function During automatic engine stop, the climate con-
trol operates only at a reduced capacity. If you
require the full climate control output, you can
switch off the ECO start/stop function by press-
ing the ECO button (Y page 149). Operating the climate control sys-
tems
Switching the climate control on/off
General notes When climate control is switched off, the air
supply and air circulation are also switched off.
The windows could mist up. Therefore, switch
off climate control only briefly.
Air-conditioning system X
Turn the key to position 2in the ignition lock
(Y page 144).
X To switch on: turn controlAclockwise to
the desired position (except position 0)
(Y page 129).
X To switch off: turn controlAanti-clockwise
to position 0(Y page 129). Operating the climate control systems
131Climate control
Page 136 of 369
Setting climate control to automatic
mode X
Turn the key to position 2in the ignition lock
(Y page 144).
X Set the desired temperature.
X To activate: press theÃbutton.
The indicator lamp in the Ãbutton lights
up. Automatic air distribution and airflow are
activated.
X To switch to manual mode: press theÉ
or Ë button.
or
X Press the KorI button.
The indicator lamp in the Ãbutton goes
out. Automatic air distribution and airflow are deactivated. Setting the temperature
Air-conditioning system You can set the temperature for the entire vehi-
cle. The set temperature is automatically main-
tained at a constant level.
X Turn the key to position 2in the ignition lock
(Y page 144).
X To increase or reduce: turn control:anti-
clockwise or clockwise (Y page 129). Change
the temperature setting only in small incre-
ments. Start at 22 †.
THERMOTRONIC automatic climate
control Different temperatures can be set for the driv-
er's and front-passenger sides. The set temper- ature is automatically maintained at a constant
level.
X Turn the key to position 2in the ignition lock
(Y page 144).
X To increase or decrease: turn control:or
E anti-clockwise or clockwise (Y page 130).
Change the temperature setting only in small
increments. Start at 22 †. Setting the air distribution
Air-conditioning system Air distribution settings
¯ Directs the airflow through the demister
vents
P Directs the airflow through the centre
and side air vents
O Directs the airflow through the footwell
air vents
i You can also activate several of the air dis-
tribution settings simultaneously. In order to
do this, press several of the air distribution
buttons. The air is then routed through differ-
ent air vents.
i Regardless of the air distribution setting,
airflow is always directed through the side air vents. The side air vents can only be closed if
the adjusters are turned clockwise until they
engage.
Setting the air distribution X Turn the key to position 2in the ignition lock
(Y page 144).
X Press one or more of the P,O,¯
buttons.
The corresponding indicator lamp comes on.
THERMOTRONIC automatic climate
control Air distribution settings
¯ Directs the airflow through the demister
vents
P Directs the airflow through the centre
and side air vents
O Directs the airflow through the footwell
air vents
S Directs the airflow through the centre
and side air vents as well as the footwell
air vents
b Directs the airflow through the centre
and side air vents as well as the demister
vents
a Directs the airflow through the footwell
and demister vents
_ Directs the airflow through the demister
vents, the centre and side air vents as
well as the footwell air vents Operating the climate control systems
133Climate control
Page 137 of 369
i
Regardless of the air distribution setting,
airflow is always directed through the side air
vents. The side air vents can only be closed if the adjusters are turned clockwise until they
engage.
Setting the air distribution X Turn the key to position 2in the ignition lock
(Y page 144).
X Press the ÉorË button repeatedly
until the required symbol appears in the dis-
play. Setting the airflow
Air-conditioning system X
Turn the key to position 2in the ignition lock
(Y page 144).
X To increase or reduce: turn controlAanti-
clockwise or clockwise (Y page 129).
THERMOTRONIC automatic climate
control X
Turn the key to position 2in the ignition lock
(Y page 144).
X To increase or reduce: press theKor
I button. Switching the ZONE function on/off
This function is only available with
THERMOTRONIC automatic climate control.
X To activate: press theábutton.
The indicator lamp in the ábutton lights
up.
The temperature setting for the driver's side
is not adopted for the front-passenger side.
X To deactivate: press theábutton.
The indicator lamp in the ábutton goes
out.
The temperature setting for the driver's side
is adopted for the front-passenger side. Demisting the windscreen
General notes You can use this function to defrost the wind-
screen or to demist the inside of the windscreen
and the side windows.
i You should only select the "Windscreen
demisting" function until the windscreen is
clear again.
Switching the "Windscreen demisting"
function on or off X
Turn the key to position 2in the ignition lock
(Y page 144).
X To activate: press the¬button.
The indicator lamp in the ¬button lights
up.
The climate control system switches to the
following functions:
R high airflow
R high temperature
R air distribution to the windscreen and front
side windows
R air-recirculation mode off
i The "Windscreen demisting" function auto-
matically sets the blower level to the optimum
demisting effect. As a result, the airflow may
increase or decrease automatically after the
¬ button is pressed.
i You can adjust the blower level manually
while the "Windscreen demisting" function is
in operation:
R Air-conditioning system: turn airflow con-
trol Aanti-clockwise or clockwise
(Y page 129).
R THERMOTRONIC automatic climate con-
trol: press the óorô button.
X To deactivate: press the¬button.
The indicator lamp in the ¬button goes
out. The previous settings are reactivated.
"Air-recirculation" mode remains deactiva-
ted.
or
X THERMOTRONIC automatic climate control:
press the Ãbutton.
The indicator lamp in the ¬button goes
out. Airflow and air distribution are set to
automatic mode. 134
Operating the climate control systemsClimate cont
rol
Page 138 of 369
or
X Air-conditioning system: turn temperature
control :anti-clockwise or clockwise
(Y page 129).
THERMOTRONIC automatic climate control:
turn temperature control :orE anti-clock-
wise or clockwise (Y page 130). Demisting the windows
Windows misted up on the inside Air-conditioning system
X Activate the ¿"Cooling with air dehumid-
ification" function.
X If the windows continue to mist up, activate
the ¬ "Windscreen demisting" function.
i You should only select this setting until the
windscreen is clear again.
THERMOTRONIC automatic climate con-
trol
X Activate the ¿"Cooling with air dehumid-
ification" function.
X Activate automatic mode Ã.
X If the windows continue to mist up, activate
the ¬ "Windscreen demisting" function.
i You should only select this setting until the
windscreen is clear again. Windows misted up on the outside X
Activate the windscreen wipers.
X Set the air distribution to PorO.
i You should only select this setting until the
windscreen is clear again. Rear window heating
General notes The rear window heating has a high current
draw. You should therefore switch it off as soon
as the window is clear. The rear window heating otherwise switches off automatically after sev-
eral minutes.
If the battery voltage is too low, the rear window
heating may switch off.
Switching on/off X
Turn the key to position 2in the ignition lock
(Y page 144).
X Press the ¤button.
The indicator lamp in the ¤button lights
up or goes out.
Problems with the rear window heating Problem
Possible causes/consequences and
M MSolutions The rear window heating
has switched off prema-
turely or cannot be
switched on. The battery has not been sufficiently charged.
X Switch off any consumers that are not required, e.g. reading lamps,
interior lighting or the seat heating.
When the battery is sufficiently charged, the rear window heating
can be switched on again. Activating/deactivating air-recircula-
tion mode
General notes You can deactivate the flow of fresh air tempo-
rarily if unpleasant odours are entering the vehi-
cle from outside. The air already inside the vehi- cle will then be recirculated. If you activate air-recirculation mode, the win-
dows can mist up more quickly, particularly at
low temperatures. Activate air-recirculation
mode only briefly to prevent the windows from
misting up.
The operation of air-recirculation mode is the
same for all control panels. Operating the climate control systems
135Climate control
Page 232 of 369
Selecting permanent display
United Kingdom: this function is unavailable.
The Permanent display:
Permanent display: function allows you
to choose whether the multifunction display
always shows the outside temperature or the
speed.
The speed display is inverse to your speedome- ter.
X Press the =or; button on the steering
wheel to select the Settings
Settings menu.
X Press the :or9 button to select the
Instrument cluster Instrument cluster submenu.
X Press ato confirm.
X Press the :or9 button to select the
Permanent display:
Permanent display: function.
The current setting, outside temperature
outside temperature
or Dig. speedo [mph]:
Dig. speedo [mph]:, appears.
X Press the abutton to save the setting.
Lights Switching the daytime driving lights
on/off
The Daytime driving lights Daytime driving lights function can
only be switched on with the engine turned off.
X Press the =or; button on the steering
wheel to select the Settings
Settingsmenu.
X Press the :or9 button to select the
Lights
Lights submenu.
X Press ato confirm.
X Press the :or9 button to select the
Daytime driving lights
Daytime driving lights function.
If the Daytime
Daytime driving
drivinglights
lightsfunction has
been switched on, the cone of light and the
W symbol in the multifunction display are
shown in orange.
X Press the abutton to save the setting.
Further information on daytime driving lights
(Y page 116).
Vehicle Setting permanent SPEEDTRONIC
You can set the permanent limiter using the
Limit speed (winter tyres):
Limit speed (winter tyres): function.
X Press the =or; button on the steering
wheel to select the Settings Settingsmenu.
X Press the :or9 button to select the
Vehicle
Vehicle submenu. X
Press ato confirm.
X Press :or9 to select the Limit
Limit
speed (winter tyres):
speed (winter tyres): function.
You will see the current setting.
X Press ato confirm.
X Press the :or9 button to adjust the
permanent speed limiter in increments of ten
(160 km/h 160 km/h to240 km/h
240 km/h). The Off
Offsetting
switches the permanent speed limiter off.
X Press the abutton to store the entry.
Further information on the permanent speed
limiter (Y page 180).
Activating/deactivating the automatic
locking feature
X Press the =or; button on the steering
wheel to select the Settings Settingsmenu.
X Press the :or9 button to select the
Vehicle
Vehicle submenu.
X Press ato confirm.
X Press the :or9 button to select the
Automatic door locks
Automatic door locks function.
If the Automatic door locks
Automatic door locks function is
switched on, the multifunction display shows
the vehicle's doors in orange.
X Press ato save the setting.
If you activate the Automatic door locks
Automatic door locks
function, the vehicle is centrally locked above a
speed of around 15 km/h.
For further information on the automatic locking feature; see (Y page 87).
Activating/deactivating the acoustic
locking confirmation
If you switch on the Acoustic AcousticLock
Lockfunction, an
acoustic signal sounds when you lock the vehi-
cle.
X Press the =or; button on the steering
wheel to select the Settings Settingsmenu.
X Press the :or9 button to select the
Vehicle
Vehicle submenu.
X Press ato confirm.
X Press the :or9 button to select the
Acoustic Lock
Acoustic Lock function.
If the Acoustic Lock
Acoustic Lock function is activated,
the & symbol in the multifunction display
lights up orange.
X Press the abutton to save the setting. Menus and submenus
229On-board computer and displays Z
Page 319 of 369
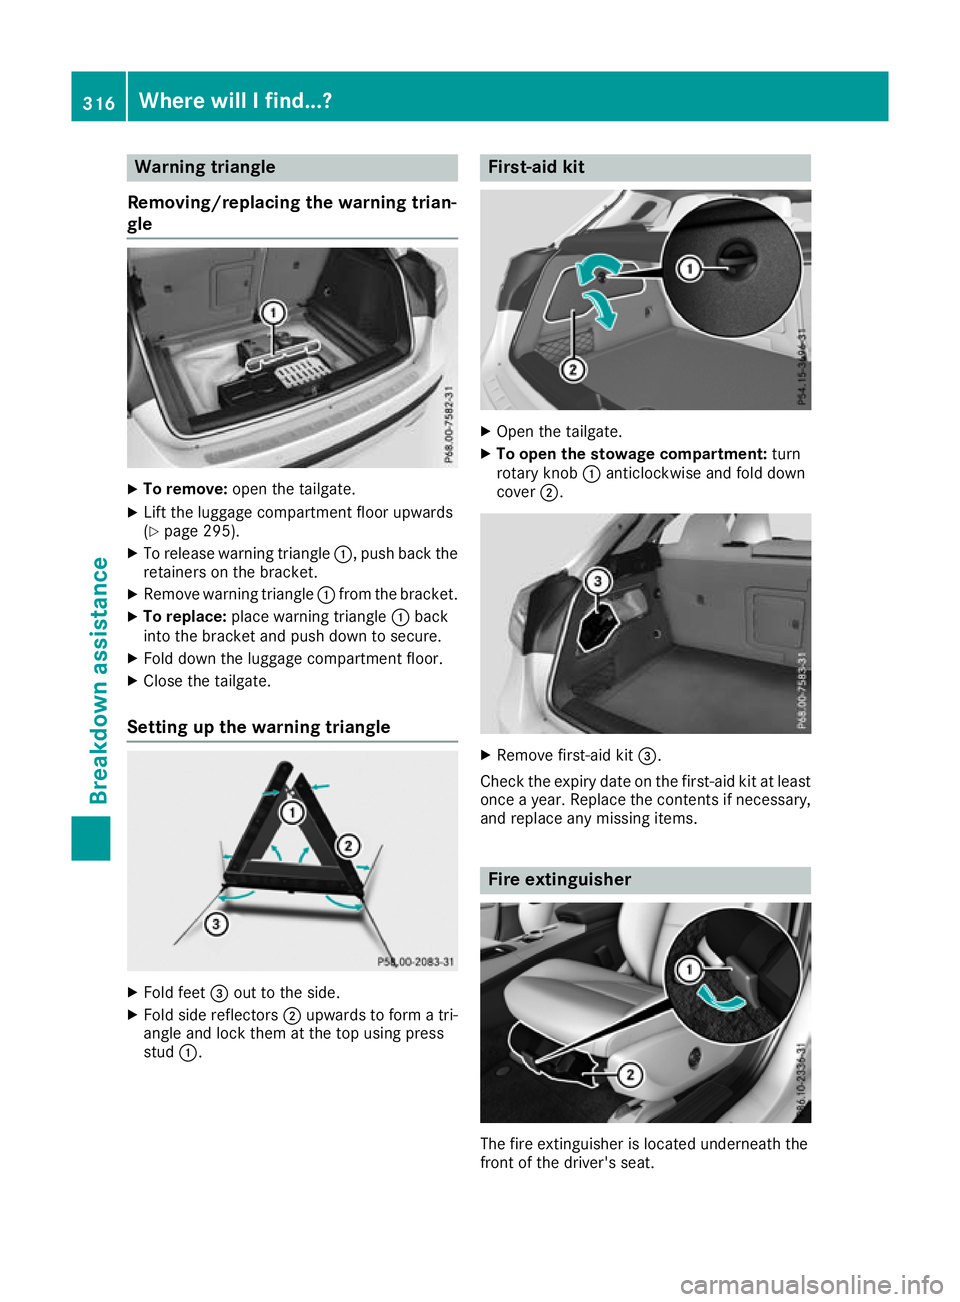
Warning triangle
Removing/replacing the warning trian-
gle X
To remove: open the tailgate.
X Lift the luggage compartment floor upwards
(Y page 295).
X To release warning triangle :, push back the
retainers on the bracket.
X Remove warning triangle :from the bracket.
X To replace: place warning triangle :back
into the bracket and push down to secure.
X Fold down the luggage compartment floor.
X Close the tailgate.
Setting up the warning triangle X
Fold feet =out to the side.
X Fold side reflectors ;upwards to form a tri-
angle and lock them at the top using press
stud :. First-aid kit
X
Open the tailgate.
X To open the stowage compartment: turn
rotary knob :anticlockwise and fold down
cover ;. X
Remove first-aid kit =.
Check the expiry date on the first-aid kit at least once a year. Replace the contents if necessary,and replace any missing items. Fire extinguisher
The fire extinguisher is located underneath the
front of the driver's seat. 316
Where will I find...?Breakdown assistance