2017 MERCEDES-BENZ GLA SUV manual transmission
[x] Cancel search: manual transmissionPage 234 of 369
X
Press the :or9 button to set the
selected display.
X Press the abutton to store the entry.
The yellow indicator lamp on the auxiliary
heating button lights up.
Comfort Switching belt adjustment on/off
X Press the =or; button on the steering
wheel to select the Settings Settingsmenu.
X Press the :or9 button to select the
Convenience
Convenience submenu.
X Press ato confirm.
X Press the :or9 button to select the
Belt adjustment
Belt adjustment function.
When the Belt adjustment
Belt adjustment function is acti-
vated, the seat belt is displayed in orange in
the multifunction display.
X Press the abutton to save the setting.
Further information on belt adjustment
(Y page 45).
Switching the fold mirrors in when lock-
ing function on/off This function is only available when the vehicle is
equipped with the electrical fold-in function.
When you activate the Auto. fold-in mir‐
Auto. fold-in mir‐
rors
rors function, the exterior mirrors are folded in
when the vehicle is locked. When you unlock the vehicle and then open the driver's or front-
passenger door, the exterior mirrors fold out
again.
If you have switched on the Auto. fold-in
Auto. fold-in
mirrors
mirrors function and you fold in the exterior
mirrors using the button on the door
(Y page 113), they will not fold out automati-
cally. The exterior mirrors can then only be fol-
ded out using the button on the door.
X Press the =or; button on the steering
wheel to select the Settings
Settings menu.
X Press the :or9 button to select the
Convenience Convenience submenu.
X Press ato confirm.
X Press the :or9 button to select the
Auto. fold-in mirrors
Auto. fold-in mirrors function.
If the Auto. fold-in mirrors
Auto. fold-in mirrors function is
switched on, the multifunction display shows the exterior mirror in orange.
X Press ato save the setting. Resetting to factory settings X
Press the =or; button on the steering
wheel to select the Settings
Settingsmenu.
X Press the :or9 button to select the
Factory setting
Factory setting submenu.
X Press ato confirm.
The Reset all settings?
Reset all settings? function
appears.
X Press the :or9 button to select No
Noor
Yes
Yes.
X Press the abutton to confirm the selec-
tion.
If you have selected Yes Yes, the multifunction
display shows a confirmation message.
For safety reasons, not all functions are reset:
the Limit Limit speed
speed(winter
(winter tyres)
tyres)function of
the permanent speed limiter can only be set in
the Vehicle
Vehicle submenu.
If you want to reset the Daytime driving Daytime driving
lights
lights function in the Lights
Lightssubmenu, you
must turn the key to position 1in the ignition
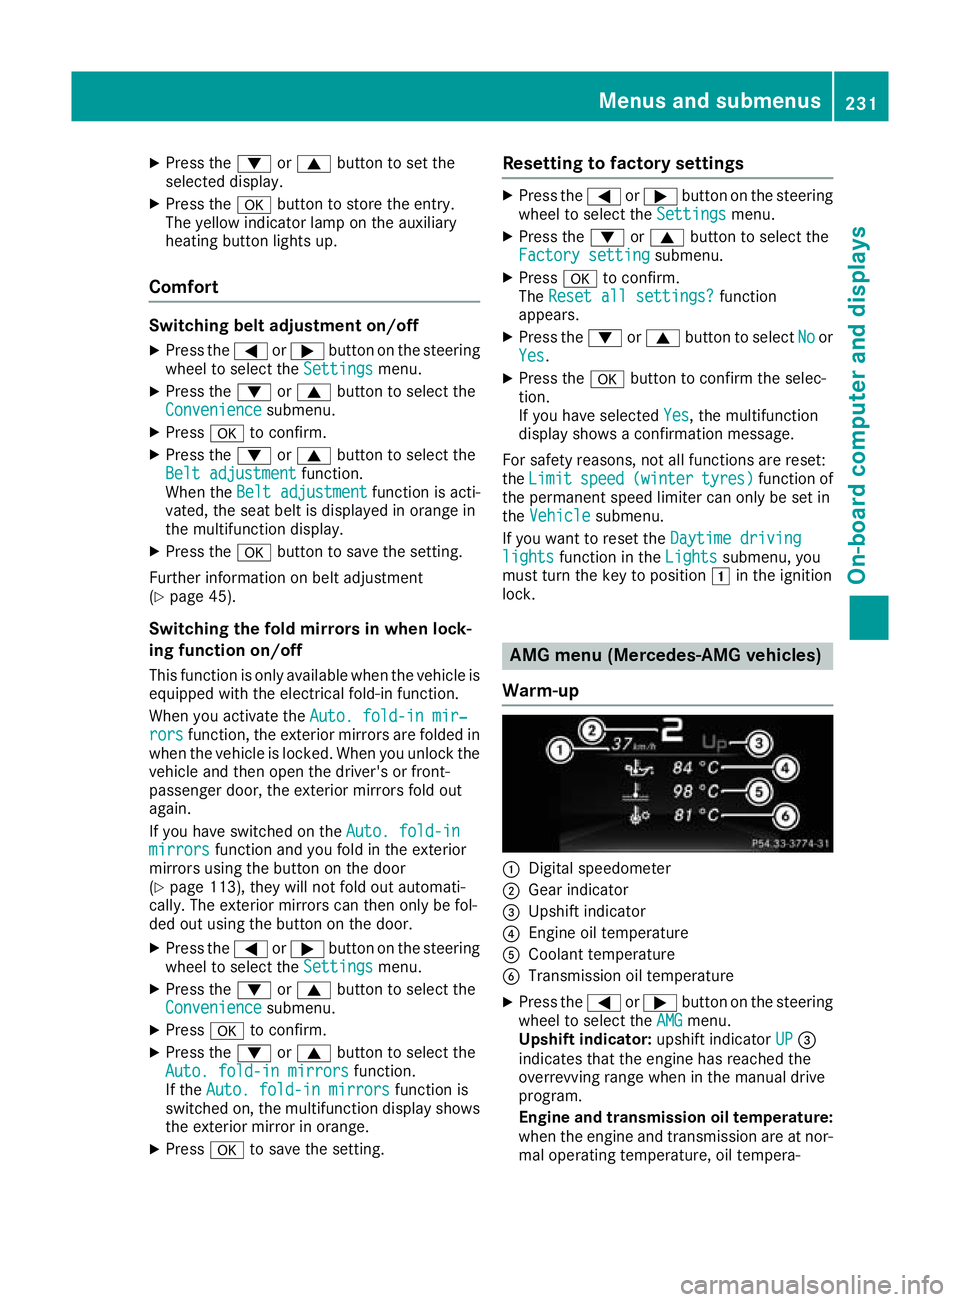
lock. AMG menu (Mercedes-AMG vehicles)
Warm-up :
Digital speedometer
; Gear indicator
= Upshift indicator
? Engine oil temperature
A Coolant temperature
B Transmission oil temperature
X Press the =or; button on the steering
wheel to select the AMG AMGmenu.
Upshift indicator: upshift indicatorUP UP=
indicates that the engine has reached the
overrevving range when in the manual drive
program.
Engine and transmission oil temperature: when the engine and transmission are at nor-
mal operating temperature, oil tempera- Menus and submenus
231On-board computer and displays Z
Page 240 of 369
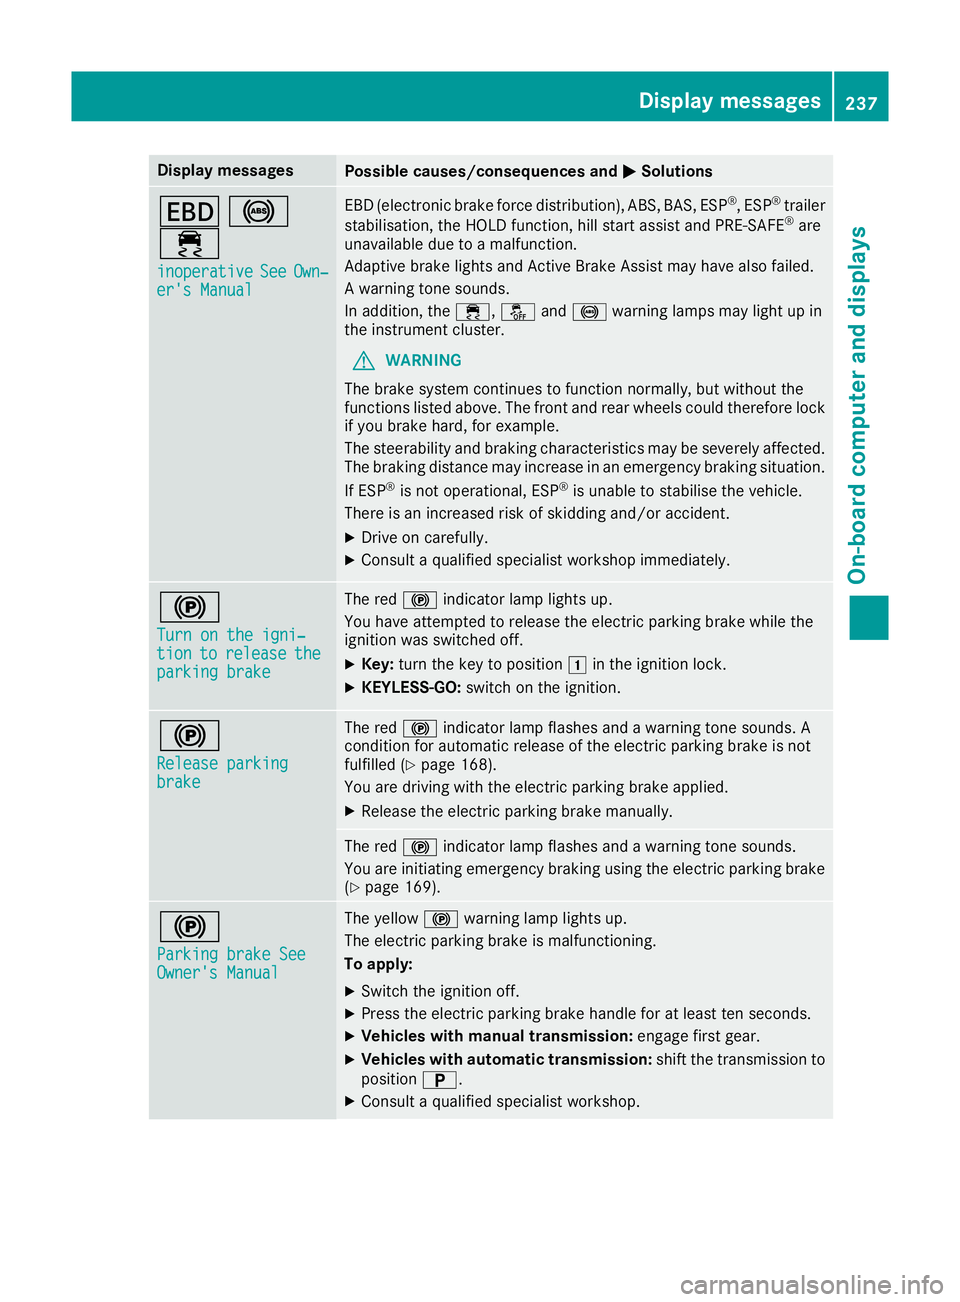
Display messages
Possible causes/consequences and
M
MSolutions T
!
÷ inoperative
inoperative See
SeeOwn‐
Own‐
er's Manual
er's Manual EBD (electronic brake force distribution), ABS, BAS, ESP
®
, ESP ®
trailer
stabilisation, the HOLD function, hill start assist and PRE-SAFE ®
are
unavailable due to a malfunction.
Adaptive brake lights and Active Brake Assist may have also failed.
A warning tone sounds.
In addition, the ÷,åand! warning lamps may light up in
the instrument cluster.
G WARNING
The brake system continues to function normally, but without the
functions listed above. The front and rear wheels could therefore lock
if you brake hard, for example.
The steerability and braking characteristics may be severely affected. The braking distance may increase in an emergency braking situation.
If ESP ®
is not operational, ESP ®
is unable to stabilise the vehicle.
There is an increased risk of skidding and/or accident.
X Drive on carefully.
X Consult a qualified specialist workshop immediately. !
Turn on the igni‐ Turn on the igni‐
tion tion
to
torelease
release the
the
parking brake
parking brake The red
!indicator lamp lights up.
You have attempted to release the electric parking brake while the
ignition was switched off.
X Key: turn the key to position 1in the ignition lock.
X KEYLESS-GO: switch on the ignition. !
Release parking Release parking
brake brake The red
!indicator lamp flashes and a warning tone sounds. A
condition for automatic release of the electric parking brake is not
fulfilled (Y page 168).
You are driving with the electric parking brake applied.
X Release the electric parking brake manually. The red
!indicator lamp flashes and a warning tone sounds.
You are initiating emergency braking using the electric parking brake
(Y page 169). !
Parking brake See Parking brake See
Owner's Manual Owner's Manual The yellow
!warning lamp lights up.
The electric parking brake is malfunctioning.
To apply:
X Switch the ignition off.
X Press the electric parking brake handle for at least ten seconds.
X Vehicles with manual transmission: engage first gear.
X Vehicles with automatic transmission: shift the transmission to
position B.
X Consult a qualified specialist workshop. Display
messages
237On-board computer and displays Z
Page 241 of 369
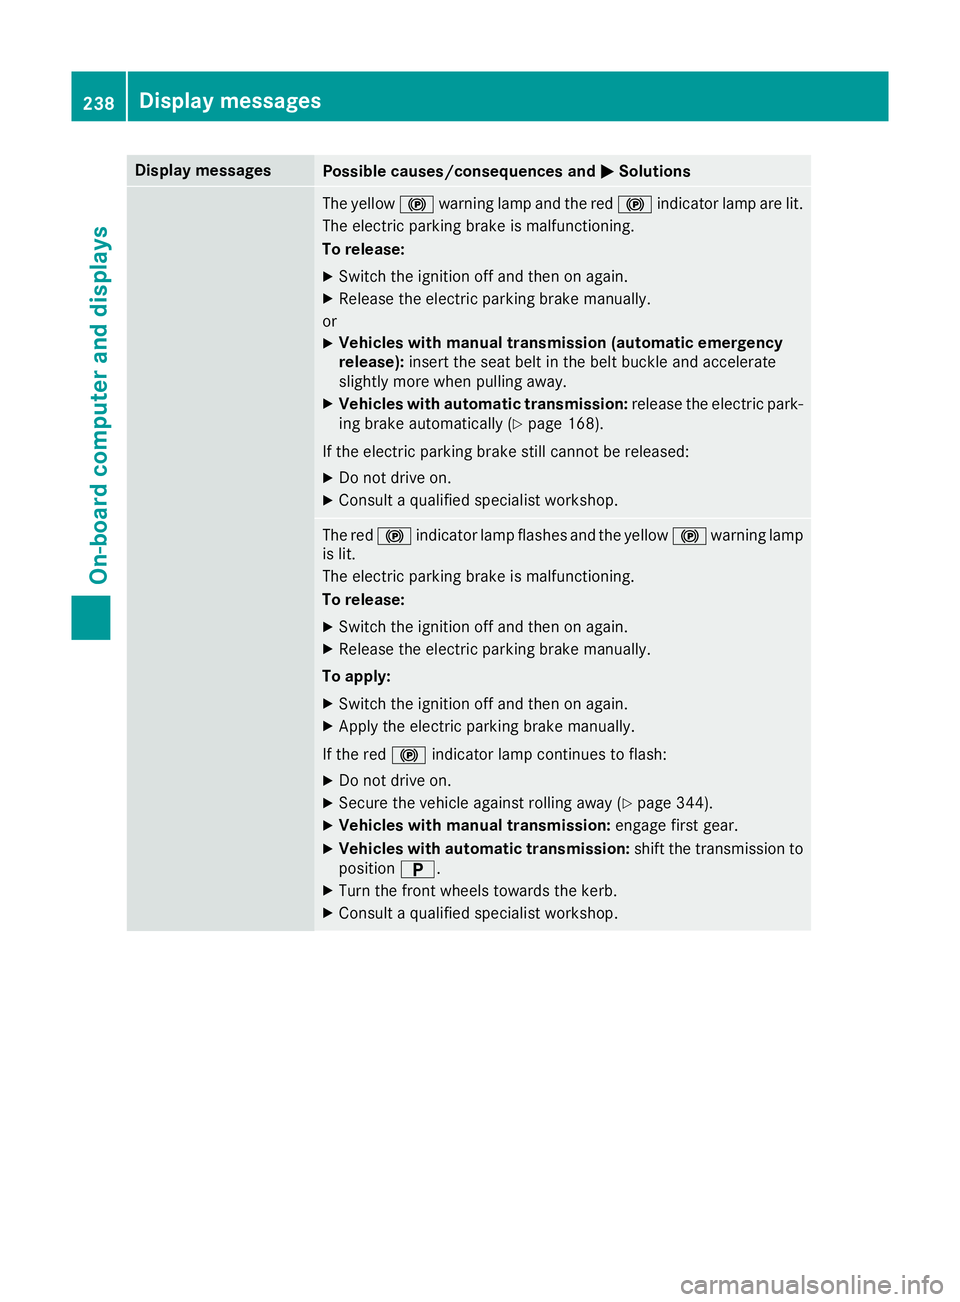
Display messages
Possible causes/consequences and
M
MSolutions The yellow
!warning lamp and the red !indicator lamp are lit.
The electric parking brake is malfunctioning.
To release:
X Switch the ignition off and then on again.
X Release the electric parking brake manually.
or X Vehicles with manual transmission (automatic emergency
release): insert the seat belt in the belt buckle and accelerate
slightly more when pulling away.
X Vehicles with automatic transmission: release the electric park-
ing brake automatically (Y page 168).
If the electric parking brake still cannot be released:
X Do not drive on.
X Consult a qualified specialist workshop. The red
!indicator lamp flashes and the yellow !warning lamp
is lit.
The electric parking brake is malfunctioning.
To release:
X Switch the ignition off and then on again.
X Release the electric parking brake manually.
To apply: X Switch the ignition off and then on again.
X Apply the electric parking brake manually.
If the red !indicator lamp continues to flash:
X Do not drive on.
X Secure the vehicle against rolling away (Y page 344).
X Vehicles with manual transmission: engage first gear.
X Vehicles with automatic transmission: shift the transmission to
position B.
X Turn the front wheels towards the kerb.
X Consult a qualified specialist workshop. 238
Display
messagesOn-board computer and displays
Page 242 of 369
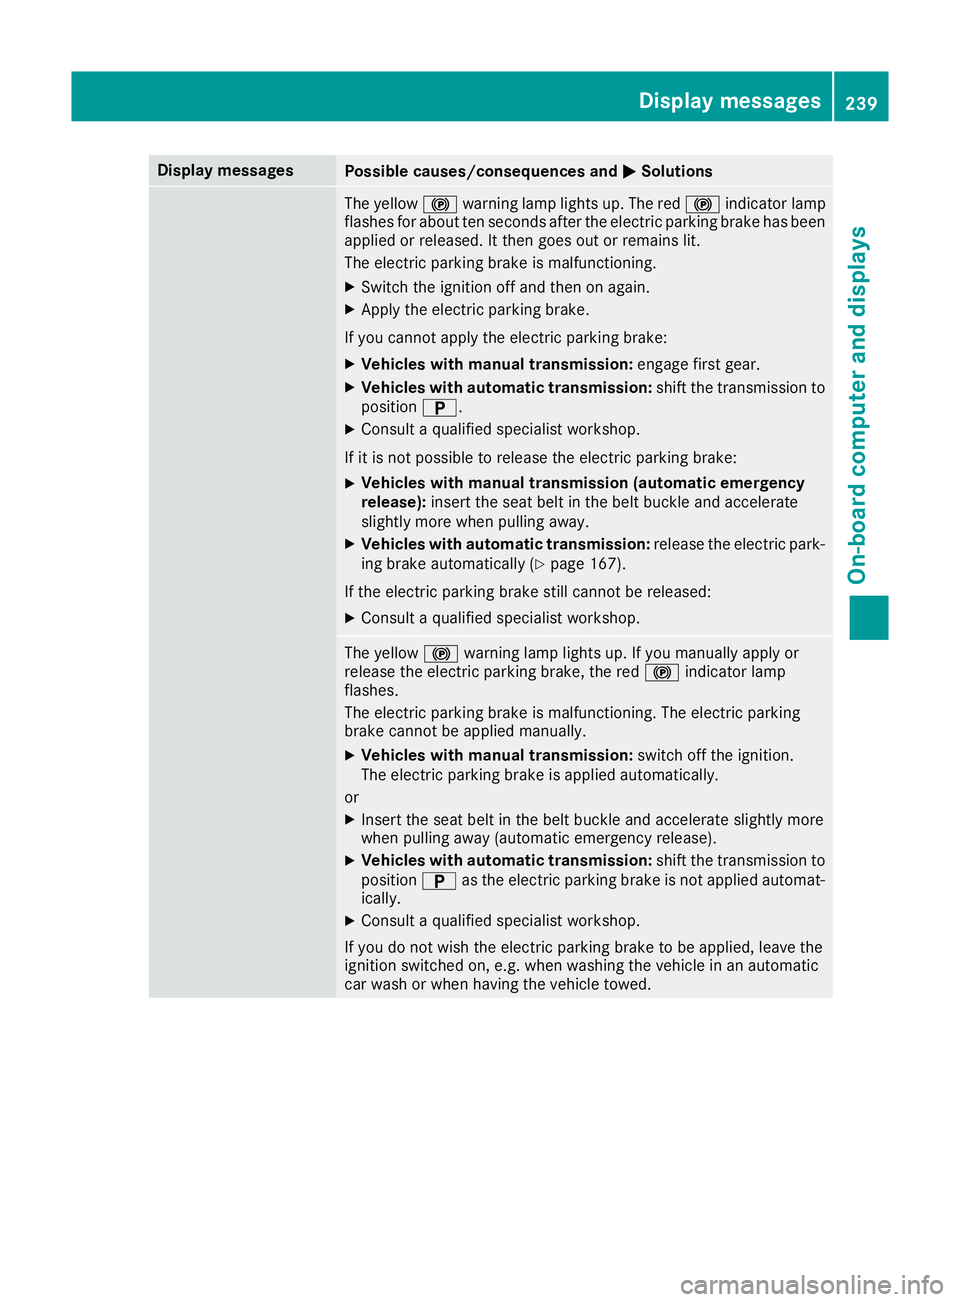
Display messages
Possible causes/consequences and
M
MSolutions The yellow
!warning lamp lights up. The red !indicator lamp
flashes for about ten seconds after the electric parking brake has been applied or released. It then goes out or remains lit.
The electric parking brake is malfunctioning.
X Switch the ignition off and then on again.
X Apply the electric parking brake.
If you cannot apply the electric parking brake:
X Vehicles with manual transmission: engage first gear.
X Vehicles with automatic transmission: shift the transmission to
position B.
X Consult a qualified specialist workshop.
If it is not possible to release the electric parking brake:
X Vehicles with manual transmission (automatic emergency
release):
insert the seat belt in the belt buckle and accelerate
slightly more when pulling away.
X Vehicles with automatic transmission: release the electric park-
ing brake automatically (Y page 167).
If the electric parking brake still cannot be released:
X Consult a qualified specialist workshop. The yellow
!warning lamp lights up. If you manually apply or
release the electric parking brake, the red !indicator lamp
flashes.
The electric parking brake is malfunctioning. The electric parking
brake cannot be applied manually.
X Vehicles with manual transmission: switch off the ignition.
The electric parking brake is applied automatically.
or
X Insert the seat belt in the belt buckle and accelerate slightly more
when pulling away (automatic emergency release).
X Vehicles with automatic transmission: shift the transmission to
position Bas the electric parking brake is not applied automat-
ically.
X Consult a qualified specialist workshop.
If you do not wish the electric parking brake to be applied, leave the
ignition switched on, e.g. when washing the vehicle in an automatic
car wash or when having the vehicle towed. Display
messages
239On-board computer and displays Z
Page 243 of 369
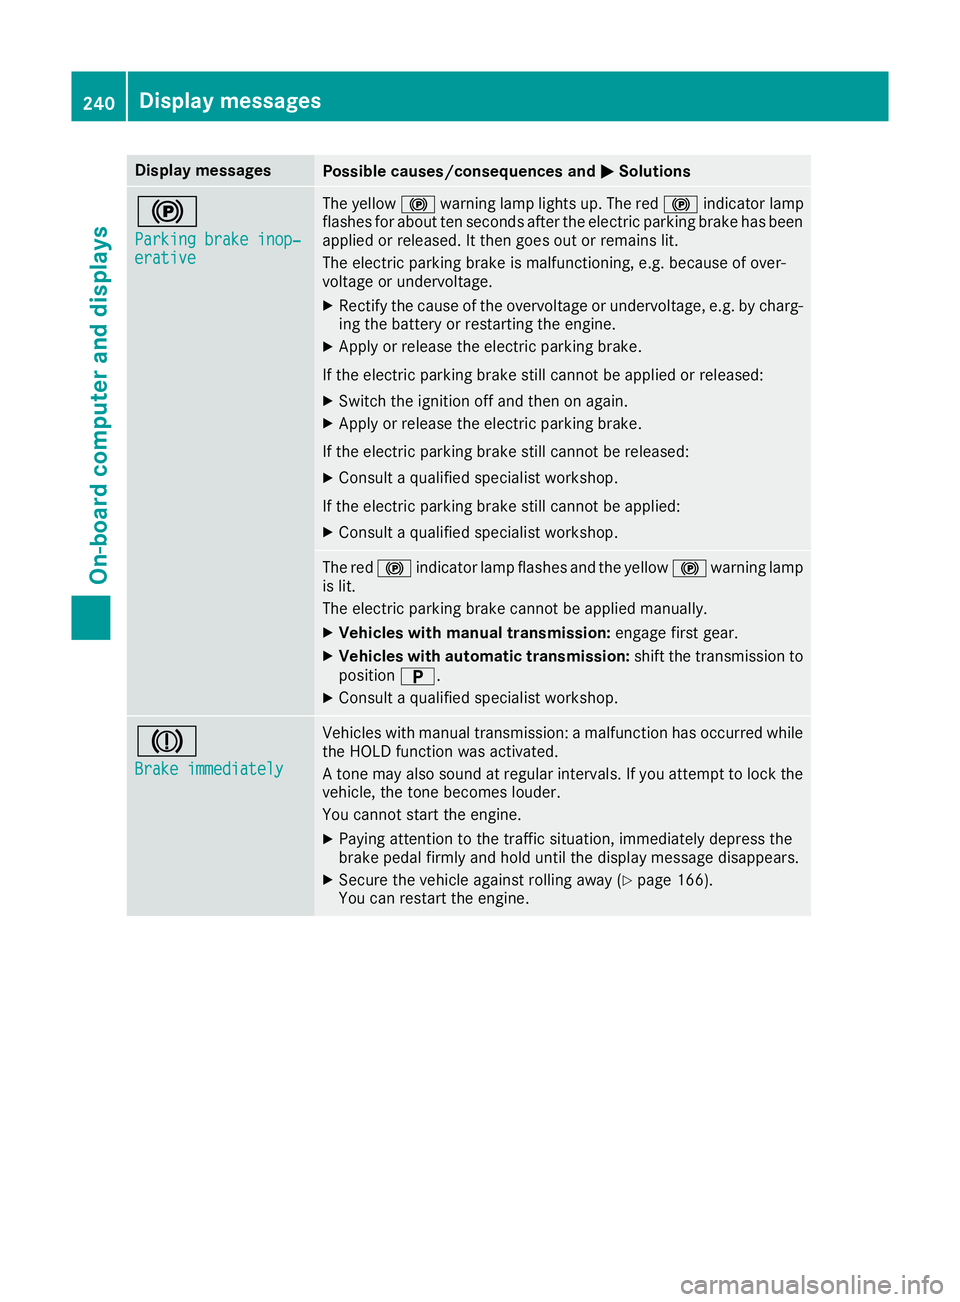
Display messages
Possible causes/consequences and
M
MSolutions !
Parking brake inop‐ Parking brake inop‐
erative erative The yellow
!warning lamp lights up. The red !indicator lamp
flashes for about ten seconds after the electric parking brake has been applied or released. It then goes out or remains lit.
The electric parking brake is malfunctioning, e.g. because of over-
voltage or undervoltage.
X Rectify the cause of the overvoltage or undervoltage, e.g. by charg-
ing the battery or restarting the engine.
X Apply or release the electric parking brake.
If the electric parking brake still cannot be applied or released: X Switch the ignition off and then on again.
X Apply or release the electric parking brake.
If the electric parking brake still cannot be released: X Consult a qualified specialist workshop.
If the electric parking brake still cannot be applied:
X Consult a qualified specialist workshop. The red
!indicator lamp flashes and the yellow !warning lamp
is lit.
The electric parking brake cannot be applied manually.
X Vehicles with manual transmission: engage first gear.
X Vehicles with automatic transmission: shift the transmission to
position B.
X Consult a qualified specialist workshop. J
Brake immediately Brake immediately Vehicles with manual transmission: a malfunction has occurred while
the HOLD function was activated.
A tone may also sound at regular intervals. If you attempt to lock the
vehicle, the tone becomes louder.
You cannot start the engine.
X Paying attention to the traffic situation, immediately depress the
brake pedal firmly and hold until the display message disappears.
X Secure the vehicle against rolling away (Y page 166).
You can restart the engine. 240
Display
messagesOn-board computer and displays
Page 264 of 369
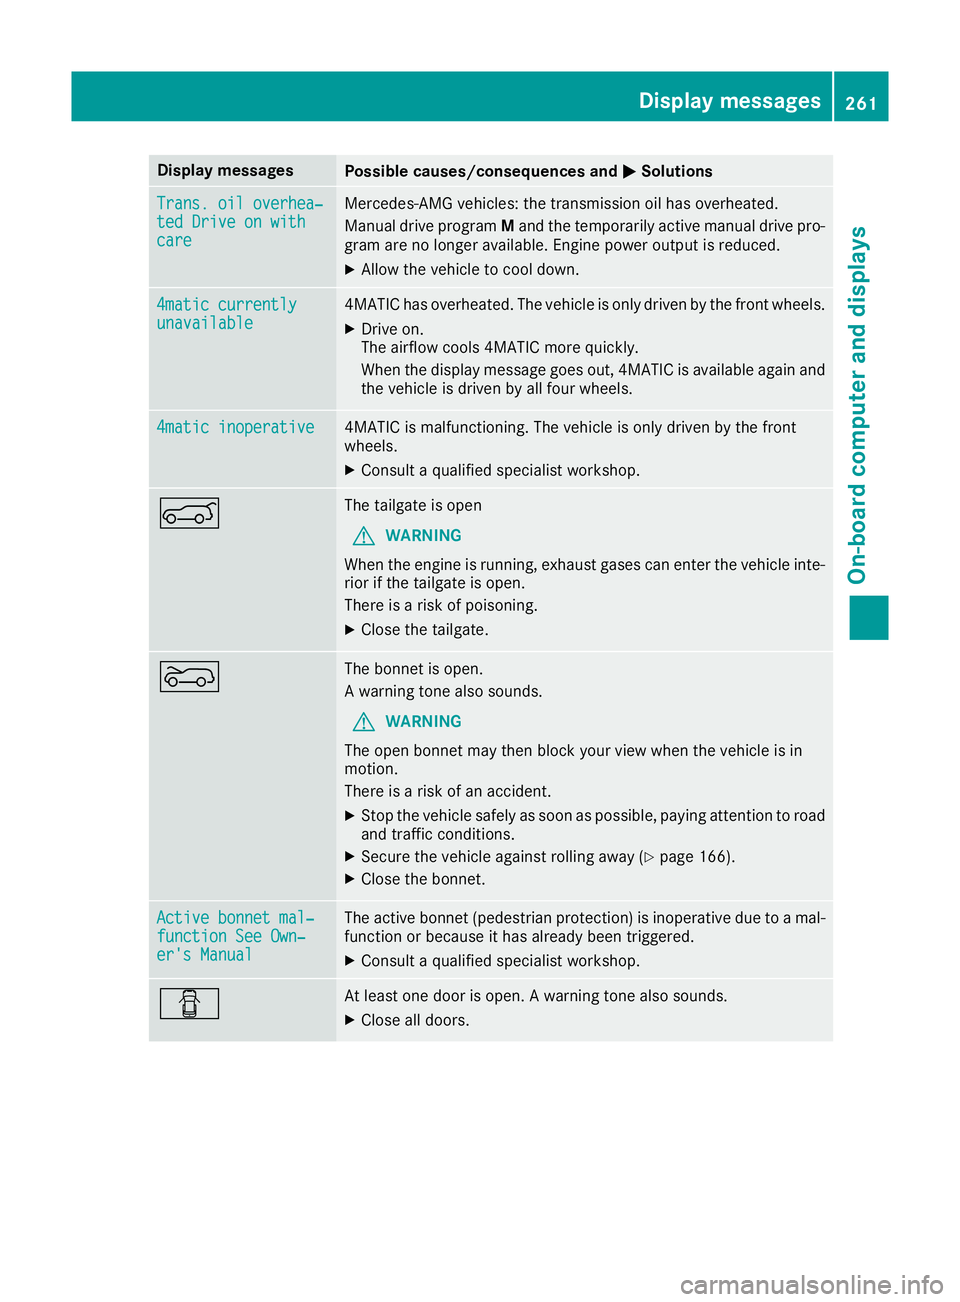
Display messages
Possible causes/consequences and
M
MSolutions Trans. oil overhea‐
Trans. oil overhea‐
ted Drive on with ted Drive on with
care care Mercedes-AMG vehicles: the transmission oil has overheated.
Manual drive program Mand the temporarily active manual drive pro-
gram are no longer available. Engine power output is reduced.
X Allow the vehicle to cool down. 4matic currently
4matic currently
unavailable unavailable 4MATIC has overheated. The vehicle is only driven by the front wheels.
X Drive on.
The airflow cools 4MATIC more quickly.
When the display message goes out, 4MATIC is available again and
the vehicle is driven by all four wheels. 4matic inoperative 4matic inoperative 4MATIC is malfunctioning. The vehicle is only driven by the front
wheels.
X Consult a qualified specialist workshop. A The tailgate is open
G WARNING
When the engine is running, exhaust gases can enter the vehicle inte- rior if the tailgate is open.
There is a risk of poisoning.
X Close the tailgate. ? The bonnet is open.
A warning tone also sounds.
G WARNING
The open bonnet may then block your view when the vehicle is in
motion.
There is a risk of an accident.
X Stop the vehicle safely as soon as possible, paying attention to road
and traffic conditions.
X Secure the vehicle against rolling away (Y page 166).
X Close the bonnet. Active bonnet mal‐ Active bonnet mal‐
function See Own‐ function See Own‐
er's Manual er's Manual The active bonnet (pedestrian protection) is inoperative due to a mal-
function or because it has already been triggered.
X Consult a qualified specialist workshop. C At least one door is open. A warning tone also sounds.
X Close all doors. Display
messages
261On-board computer and displays Z
Page 288 of 369
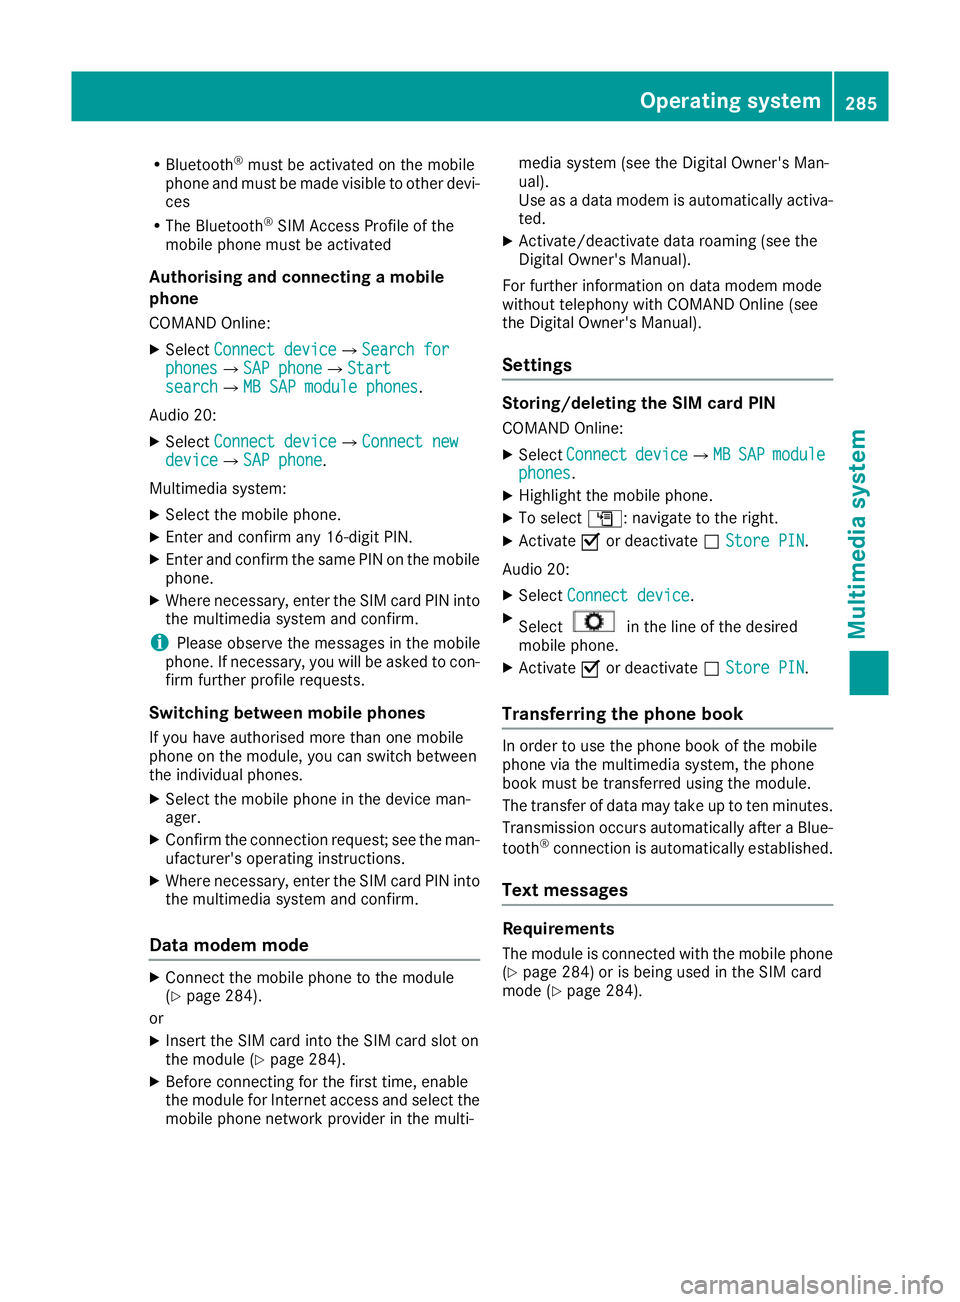
R
Bluetooth ®
must be activated on the mobile
phone and must be made visible to other devi-
ces
R The Bluetooth ®
SIM Access Profile of the
mobile phone must be activated
Authorising and connecting a mobile
phone
COMAND Online:
X Select Connect device
Connect deviceQSearch for Search for
phones
phonesQSAP phone SAP phoneQStart Start
search
searchQMB SAP module phones MB SAP module phones.
Audio 20:
X Select Connect device
Connect deviceQConnect new Connect new
device
deviceQSAP phone SAP phone.
Multimedia system: X Select the mobile phone.
X Enter and confirm any 16-digit PIN.
X Enter and confirm the same PIN on the mobile
phone.
X Where necessary, enter the SIM card PIN into
the multimedia system and confirm.
i Please observe the messages in the mobile
phone. If necessary, you will be asked to con-
firm further profile requests.
Switching between mobile phones If you have authorised more than one mobile
phone on the module, you can switch between
the individual phones.
X Select the mobile phone in the device man-
ager.
X Confirm the connection request; see the man-
ufacturer's operating instructions.
X Where necessary, enter the SIM card PIN into
the multimedia system and confirm.
Data modem mode X
Connect the mobile phone to the module
(Y page 284).
or
X Insert the SIM card into the SIM card slot on
the module (Y page 284).
X Before connecting for the first time, enable
the module for Internet access and select the mobile phone network provider in the multi- media system (see the Digital Owner's Man-
ual).
Use as a data modem is automatically activa-
ted.
X Activate/deactivate data roaming (see the
Digital Owner's Manual).
For further information on data modem mode
without telephony with COMAND Online (see
the Digital Owner's Manual).
Settings Storing/deleting the SIM card PIN
COMAND Online:
X Select Connect Connect device deviceQMB MBSAP
SAP module
module
phones
phones.
X Highlight the mobile phone.
X To select G: navigate to the right.
X Activate Oor deactivate ªStore PIN
Store PIN.
Audio 20:
X Select Connect device
Connect device.
X Select in the line of the desired
mobile phone.
X Activate Oor deactivate ªStore PIN
Store PIN.
Transferring the phone book In order to use the phone book of the mobile
phone via the multimedia system, the phone
book must be transferred using the module.
The transfer of data may take up to ten minutes.
Transmission occurs automatically after a Blue-
tooth ®
connection is automatically established.
Text messages Requirements
The module is connected with the mobile phone
(Y page 284) or is being used in the SIM card
mode (Y page 284). Operating system
285Multimedia system Z
Page 326 of 369
R
It is particularly important to observe the
described order when connecting and dis-
connecting the jump leads.
R Never connect or disconnect the battery
terminals while the engine is running. G
WARNING
Battery acid is caustic. There is a risk of injury. Avoid contact with the skin, eyes or clothing.
Do not breathe in any battery gases. Do not
lean over the battery. Keep the batteries out
of the reach of children. Immediately rinse off
battery acid thoroughly with plenty of clean
water and seek medical attention at once. H
Environmental note Batteries contain pollutants.
It is illegal to dispose of them with the household rubbish.
They must be collected sep-
arately and disposed of in anenvironmentally responsible
recycling system. Dispose of batteries in an
environmentally responsible
manner. Take discharged
batteries to a qualified spe-
cialist workshop or to a col-
lection point for used batter-
ies.
! Have the battery checked regularly at a
qualified specialist workshop.
Observe the service intervals in the Service
Booklet or contact a qualified specialist work- shop for more information.
! You should have all work involving the bat-
tery carried out at a qualified specialist work-
shop. In the exceptional case that it is neces-
sary for you to disconnect the battery your-
self, make sure that:
R you switch off the engine and remove the
key. On vehicles with KEYLESS-GO, ensure
that the ignition is switched off. Check that all the indicator lamps in the instrument
cluster are off. Otherwise, electronic com- ponents, such as the alternator, may be
damaged.
R you first remove the negative terminal
clamp and then the positive terminal
clamp. Never swap the terminal clamps.
Otherwise, the vehicle's electronic system
may be damaged.
R in vehicles with automatic transmission,
the transmission is locked in position P
after disconnecting the battery. The vehicle
is secured against rolling away. You can
then no longer move the vehicle.
The battery and the cover of the positive ter-
minal clamp must be fitted securely during
operation.
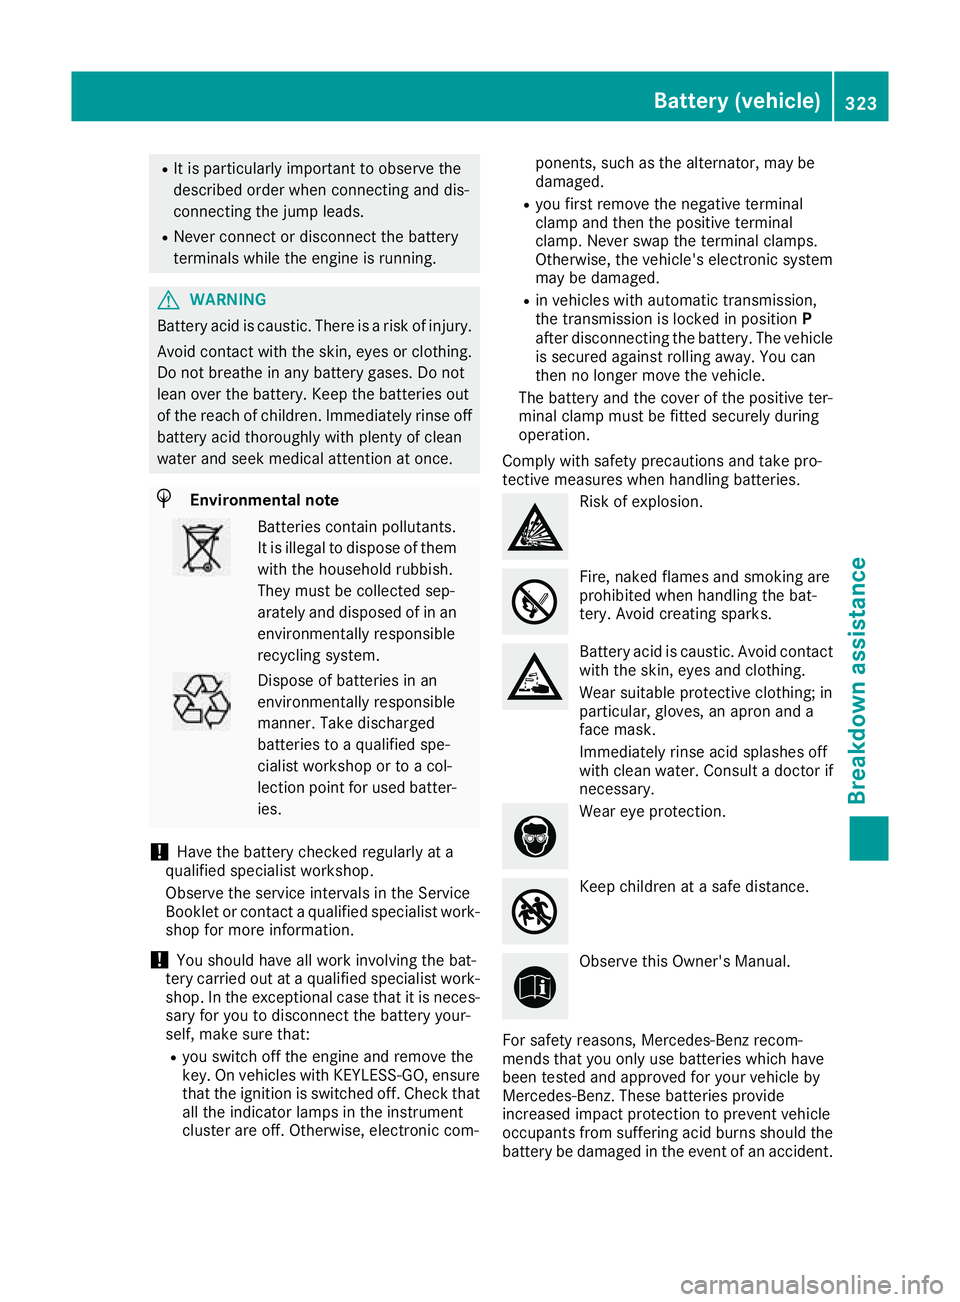
Comply with safety precautions and take pro-
tective measures when handling batteries. Risk of explosion.
Fire, naked flames and smoking are
prohibited when handling the bat-
tery. Avoid creating sparks. Battery acid is caustic. Avoid contact
with the skin, eyes and clothing.
Wear suitable protective clothing; in
particular, gloves, an apron and a
face mask.
Immediately rinse acid splashes off
with clean water. Consult a doctor if
necessary. Wear eye protection.
Keep children at a safe distance.
Observe this Owner's Manual.
For safety reasons, Mercedes-Benz recom-
mends that you only use batteries which have
been tested and approved for your vehicle by
Mercedes-Benz. These batteries provide
increased impact protection to prevent vehicle
occupants from suffering acid burns should the battery be damaged in the event of an accident. Battery (vehicle)
323Breakdown assistance Z