2017 MERCEDES-BENZ GLA SUV manual transmission
[x] Cancel search: manual transmissionPage 193 of 369
The
AMG Ride Control COMFORT
AMG Ride Control COMFORT message
appears in the multifunction display. 4MATIC
! Never tow the vehicle with one axle raised.
This may damage the differential. Damage of
this sort is not covered by the Mercedes-Benz
implied warranty. All wheels must remain
either on the ground or be fully raised.
Observe the instructions for towing the vehi-
cle with all wheels in full contact with the
ground.
4MATIC, together with ESP ®
, improves the trac-
tion of your vehicle whenever a drive wheel
spins due to insufficient grip.
If you fail to adapt your driving style, 4MATIC can neither reduce the risk of an accident nor over-
ride the laws of physics. 4MATIC cannot take
account of road, weather and traffic conditions.
4MATIC is only an aid. You are responsible for
the distance to the vehicle in front, for vehicle
speed, for braking in good time and for staying in
lane.
If a drive wheel spins due to insufficient grip:
R when pulling away, only depress the acceler-
ator pedal as far as is necessary.
R accelerate less when driving.
i In wintry driving conditions, the maximum
effect of 4MATIC can only be achieved if you
use winter tyres (M+S tyres), with snow
chains if necessary. DSR
General notes i
DSR (Downhill Speed Regulation) is only
available for vehicles with the ON&OFFROAD
package.
DSR is an aid to assist you when driving down-
hill. It keeps the speed of travel at the speed
selected on the on-board computer. The steeper
the downhill gradient, the greater the DSR brak-
ing effect on the vehicle. When driving on flat
stretches of road or on an uphill gradient, the
DSR braking effect is minimal or non-existent.
DSR controls the vehicle’s speed when it is acti- vated and the transmission is in position h,k
or i. By accelerating or braking, you can always drive at a higher or a lower speed than
that set on the on-board computer.
Important safety notes G
WARNING
If the speed driven and the set speed deviate and you activate DSR on a slippery road sur-
face, the wheels may lose traction. This
increases the risk of skidding and having an
accident.
Before switching DSR on, please take into
consideration the road surface and the differ-
ence between driving speed and the set
speed.
If you fail to adapt your driving style, DSR can
neither reduce the risk of accident nor override the laws of physics. DSR cannot take account ofroad, weather and traffic conditions. DSR is only
an aid. You are responsible for the distance to
the vehicle in front, for vehicle speed, for brak-
ing in good time and for staying in lane.
You are always responsible for keeping control
of the vehicle and for assessing whether the
downhill gradient can be managed. DSR may not
always be able to keep to the set speed, depend-
ing on road surface and tyre conditions. Select a set speed suitable for the prevailing conditions
and when necessary, apply the brakes manually.
Further information about "Driving off-road"
(Y page 173).
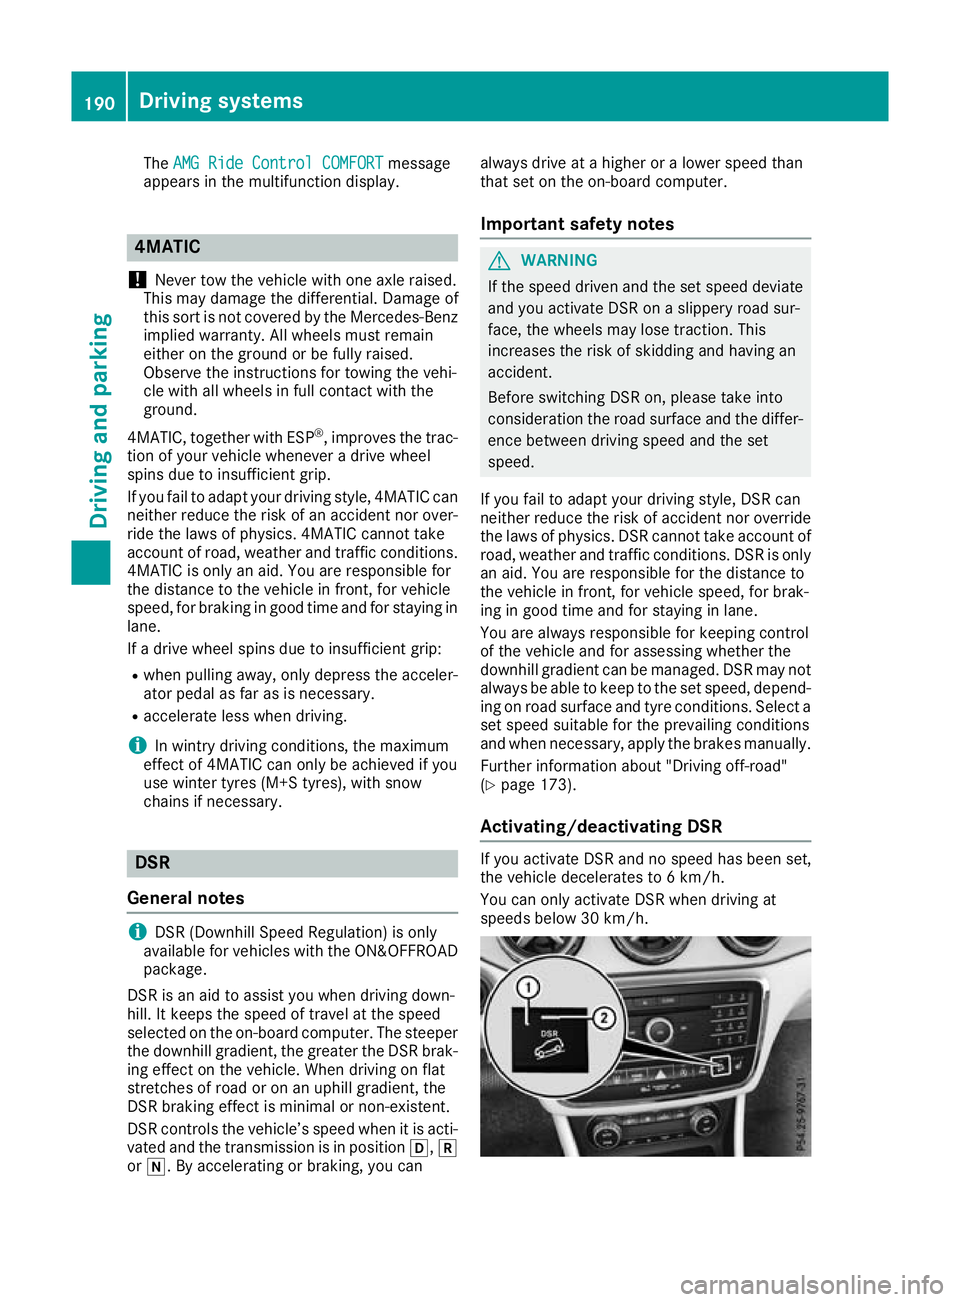
Activating/deactivating DSR If you activate DSR and no speed has been set,
the vehicle decelerates to 6 km/h.
You can only activate DSR when driving at
speeds below 30 km/h.190
Driving systemsDriving and parking
Page 197 of 369
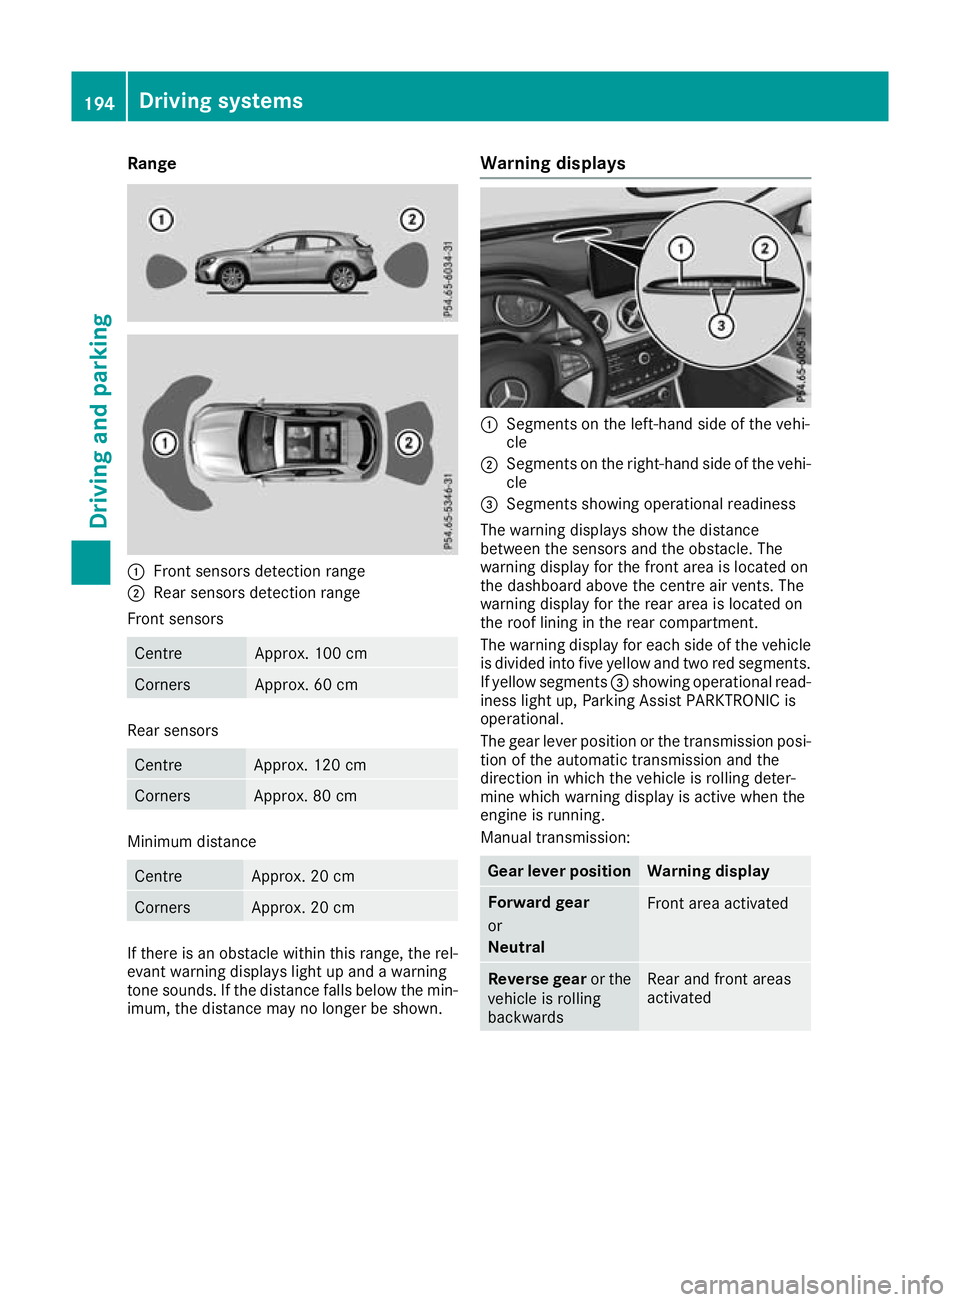
Range
:
Front sensors detection range
; Rear sensors detection range
Front sensors Centre Approx. 100 cm
Corners Approx. 60 cm
Rear sensors
Centre Approx. 120 cm
Corners Approx. 80 cm
Minimum distance
Centre Approx. 20 cm
Corners Approx. 20 cm
If there is an obstacle within this range, the rel-
evant warning displays light up and a warning
tone sounds. If the distance falls below the min- imum, the distance may no longer be shown. Warning displays :
Segments on the left-hand side of the vehi-
cle
; Segments on the right-hand side of the vehi-
cle
= Segments showing operational readiness
The warning displays show the distance
between the sensors and the obstacle. The
warning display for the front area is located on
the dashboard above the centre air vents. The
warning display for the rear area is located on
the roof lining in the rear compartment.
The warning display for each side of the vehicle
is divided into five yellow and two red segments.
If yellow segments =showing operational read-
iness light up, Parking Assist PARKTRONIC is
operational.
The gear lever position or the transmission posi- tion of the automatic transmission and the
direction in which the vehicle is rolling deter-
mine which warning display is active when the
engine is running.
Manual transmission: Gear lever position Warning display
Forward gear
or
Neutral
Front area activated
Reverse gear
or the
vehicle is rolling
backwards Rear and front areas
activated194
Driving systemsDriving and parking
Page 201 of 369
the vehicle is parking. You are responsible for
braking in good time.
X Stop the vehicle when the parking symbol
shows the desired parking space in the instru-
ment cluster.
X Vehicles with automatic transmission:
shift the transmission to position k.
Vehicles with manual transmission: shift
to reverse gear.
The Start Parking Pilot? Start Parking Pilot? Yes: OK Yes: OKNo:
No:
% message appears in the multifunction
display.
X To cancel the procedure: press the%
button on the multifunction steering wheel or
pull away.
or X To park using Parking Pilot: press thea
button on the multifunction steering wheel.
The Parking Pilot active Accelerate
Parking Pilot active Accelerate
and brake
and brake Observe surroundings
Observe surroundings mes-
sage appears in the multifunction display.
X Release the multifunction steering wheel.
X Reverse the vehicle, being ready to brake at
all times. When reversing, drive at a speed
below approximately 10 km/h. Otherwise,
Parking Pilot is cancelled.
Vehicles with automatic transmission:
Parking Pilot brakes the vehicle to a standstill when the vehicle approaches the rear border
of the parking space.
Manoeuvring may be required in tight parking spaces.
X Vehicles with manual transmission: stop
as soon as Parking Assist PARKTRONIC
sounds the continuous warning tone, if not
before.
Manoeuvring may be required in tight parking
spaces.
Vehicles with automatic transmission: the
Park Park Pilot
Pilot active
active Select D
Select D Observe
Observesur‐
sur‐
roundings
roundings message appears in the multifunc-
tion display.
Vehicles with manual transmission: the
Park Pilot active Engage forward gear Park Pilot active Engage forward gear
Observe surroundings Observe surroundings message appears in
the multifunction display.
X Vehicles with automatic transmission:
shift the transmission to position
hwhile the
vehicle is stationary. Vehicles with manual transmission:
shift
to first gear while the vehicle is stationary.
Parking Pilot steers immediately in the other
direction.
The Parking Pilot active Accelerate
Parking Pilot active Accelerate
and brake and brake Observe surroundings
Observe surroundings mes-
sage appears in the multifunction display.
i You will achieve the best results by waiting
for the steering procedure to complete before
pulling away.
X Drive forwards and be ready to brake at all
times.
Vehicles with automatic transmission:
Parking Pilot brakes the vehicle to a standstill
when the vehicle approaches the front border
of the parking space.
Manoeuvring may be required in tight parking spaces.
X Vehicles with manual transmission: stop
as soon as Parking Assist PARKTRONIC
sounds the continuous warning tone, if not
before.
Vehicles with automatic transmission: the
Park Park Pilot
Pilot active
active Select R
Select R Observe
Observesur‐
sur‐
roundings
roundings message appears in the multifunc-
tion display.
Vehicles with manual transmission: the
Park Pilot active Engage reverse gear Park Pilot active Engage reverse gear
Observe surroundings Observe surroundings message appears in
the multifunction display.
As soon as the parking procedure is complete,
the Park
Park Pilot Pilot ended
endedmessage appears and a
warning tone sounds. The vehicle is now parked.
Vehicles with automatic transmission: the
vehicle is kept stationary without the driver hav- ing to depress the brake pedal. The braking
effect is cancelled when you depress the accel-
erator pedal.
Parking Pilot no longer supports you with steer- ing interventions and brake applications. When
Parking Pilot is finished, you must steer and
brake again yourself. Parking Assist
PARKTRONIC is still available.
Parking tips:
R The way your vehicle is positioned in the park-
ing space after parking is dependent on vari-
ous factors. These include the position and
shape of the vehicles parked in front of and
behind it and the conditions of the location. It
is possible that Parking Pilot could guide you
too far or not far enough into a parking space. In some cases, it may also lead you across or 198
Driving systemsDriving an
d parking
Page 202 of 369
onto the kerb. If necessary, you should cancel
the parking procedure with Parking Pilot.
R You can also preselect transmission position
h. The vehicle redirects and does not drive
as far into the parking space. Should the
transmission change take place too early, the
parking procedure is cancelled. A sensible
parking position can no longer be achieved
from this position.
Exiting a parking space In order that Parking Pilot can support you when
exiting the parking space:
R you need to have parked using Parking Pilot
R the border of the parking space must be high
enough at the front and the rear. A kerb stone is too small, for example
R the border of the parking space must not be
too wide, as the position of the vehicle must
not exceed an angle of 45° to the starting
position as it is manoeuvred into the parking
space
R a manoeuvring distance of at least 1.0 mmust
be available
Parking Pilot can assist you with exiting a park-
ing space only if you have parked the vehicle
parallel to the direction of travel using the Park- ing Pilot.
i Vehicles with automatic transmission:
If Parking Assist PARKTRONIC detects obsta-
cles, Parking Pilot brakes automatically whilst the vehicle is exiting the parking space. You
are responsible for braking in good time.
X Start the engine.
X Release the electric parking brake.
X Switch on the turn signal in the direction you
will drive out of the parking space.
X Vehicles with automatic transmission:
shift the transmission to position hork.
Vehicles with manual transmission: shift
to forward or reverse gear.
The Start Parking Pilot?
Start Parking Pilot? Yes: OK Yes: OKNo:
No:
% message appears in the multifunction
display.
X To cancel the procedure: press the%
button on the multifunction steering wheel or
pull away.
or X
To exit a parking space using Parking
Pilot:
press the abutton on the multi-
function steering wheel.
The Parking Pilot active Accelerate
Parking Pilot active Accelerate
and brake and brake Observe surroundings
Observe surroundings mes-
sage appears in the multifunction display.
X Release the multifunction steering wheel.
X Pull away, being ready to brake at all times. Do
not exceed a maximum speed of approx-
imately 10 km/h when exiting a parking
space. Otherwise, Parking Pilot is cancelled.
X Vehicles with manual transmission: stop,
when Parking Assist PARKTRONIC sounds the continuous warning tone, if not before.
X Vehicles with automatic transmission:
depending on the message or as required,
shift the transmission to position
hork.
Vehicles with manual transmission:
depending on the message or as required,
engage forward or reverse gear.
Parking Pilot steers immediately in the other
direction. The Parking Pilot active Parking Pilot active
Accelerate and brake
Accelerate and brake Observe sur‐
Observe sur‐
roundings
roundings message appears in the multi-
function display.
i You will achieve the best results by waiting
for the steering procedure to complete before
pulling away.
If you reverse after activation, the steering
wheel is moved to the straight-ahead posi-
tion.
X Drive forwards and reverse as prompted by
the Parking Assist PARKTRONIC warning dis-
plays, several times if necessary.
Once you have exited the parking space com-
pletely, the steering wheel is moved to the
straight-ahead position. You hear a tone and the
Parking Parking Pilot
Pilotended
endedmessage appears in the
multifunction display. You will then have to steer
and merge into traffic on your own. Parking
Assist PARKTRONIC is still available. You can
take over the steering before the vehicle has
exited the parking space completely. This is
useful, for example, when you recognise that it
is already possible to pull out of the parking
space. Driving systems
199Driving and parking Z
Page 204 of 369
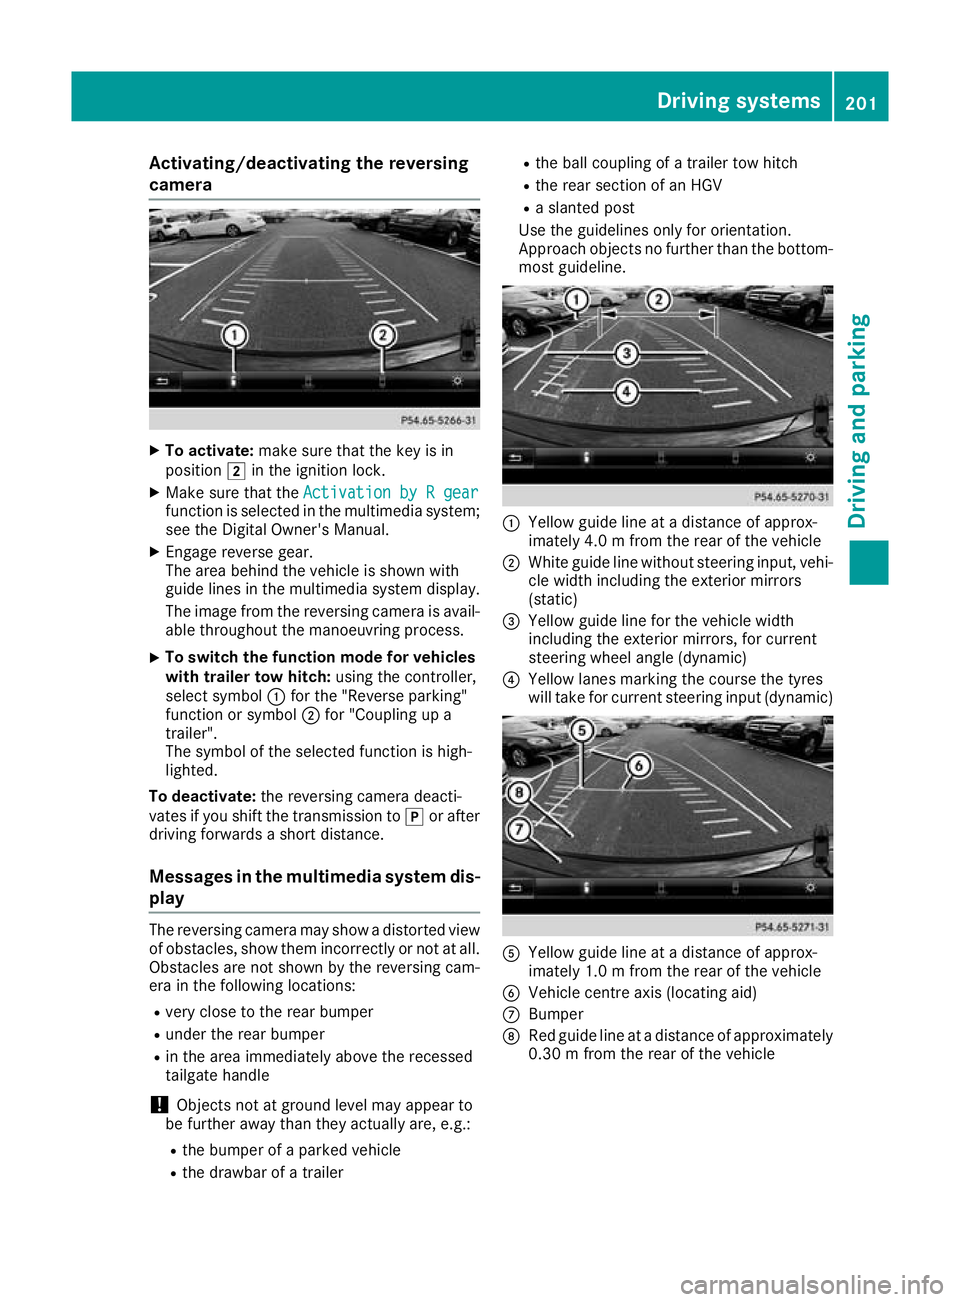
Activating/deactivating the reversing
camera X
To activate: make sure that the key is in
position 2in the ignition lock.
X Make sure that the Activation by R gear
Activation by R gear
function is selected in the multimedia system; see the Digital Owner's Manual.
X Engage reverse gear.
The area behind the vehicle is shown with
guide lines in the multimedia system display.
The image from the reversing camera is avail-
able throughout the manoeuvring process.
X To switch the function mode for vehicles
with trailer tow hitch: using the controller,
select symbol :for the "Reverse parking"
function or symbol ;for "Coupling up a
trailer".
The symbol of the selected function is high-
lighted.
To deactivate: the reversing camera deacti-
vates if you shift the transmission to jor after
driving forwards a short distance.
Messages in the multimedia system dis-
play The reversing camera may show a distorted view
of obstacles, show them incorrectly or not at all. Obstacles are not shown by the reversing cam-
era in the following locations:
R very close to the rear bumper
R under the rear bumper
R in the area immediately above the recessed
tailgate handle
! Objects not at ground level may appear to
be further away than they actually are, e.g.:
R the bumper of a parked vehicle
R the drawbar of a trailer R
the ball coupling of a trailer tow hitch
R the rear section of an HGV
R a slanted post
Use the guidelines only for orientation.
Approach objects no further than the bottom-
most guideline. :
Yellow guide line at a distance of approx-
imately 4.0 m from the rear of the vehicle
; White guide line without steering input, vehi-
cle width including the exterior mirrors
(static)
= Yellow guide line for the vehicle width
including the exterior mirrors, for current
steering wheel angle (dynamic)
? Yellow lanes marking the course the tyres
will take for current steering input (dynamic) A
Yellow guide line at a distance of approx-
imately 1.0 m from the rear of the vehicle
B Vehicle centre axis (locating aid)
C Bumper
D Red guide line at a distance of approximately
0.30 m from the rear of the vehicle Driving systems
201Driving and parking Z
Page 216 of 369
Only release the ball coupling if the pivoting
range is unobstructed. Always make sure that the ball coupling engages when folding in.
When reversing the towing vehicle, make sure
there is nobody between the trailer and the vehi- cle.
Couple and uncouple the trailer carefully. If youdo not couple the trailer to the towing vehicle
correctly, the trailer could become detached.
When towing a trailer, your vehicle's handling
characteristics will be different to when driving
without a trailer.
The vehicle/trailer combination:
R is heavier
R is restricted in its acceleration and gradient-
climbing capability
R has an increased braking distance
R is affected more by strong crosswinds
R demands more sensitive steering
R has a larger turning circle
This can impair the vehicle's handling charac-
teristics. Adapt your driving style accordingly.
Maintain a safe distance. Drive carefully.
When towing a trailer, always adjust your speed to the current road and weather conditions. Do
not exceed the maximum permissible speed for
your vehicle/trailer combination. Notes on towing a trailer
General notes Trailer towing is not possible on the following
models:
R Mercedes‑AMG GLA 45 4MATIC
Items of optional equipment may influence the
effective trailer loads for the vehicle. Please find the applicable trailer loads for your vehicle on
the registration certificate.
When towing a trailer, set the tyre pressure on
the rear axle of the towing vehicle for a maxi-
mum load. Further information on the tyre pres-
sure table in the fuel filler flap (Y page 337).
Please note that when towing a trailer, the fol-
lowing driving systems have limited availability
or are not available at all:
R Parking Assist PARKTRONIC (Y page 193)
R Blind Spot Assist (Y page 209) The height of the ball coupling changes with the
load of the vehicle. If necessary, use a trailer
with a height-adjustable drawbar.
You will find fitting dimensions and loads under"Technical data" (Y page 359).
Driving tips Observe the information on ESP
®
trailer stabili-
sation (Y page 75).
The maximum permissible speed for vehicle/
trailer combinations depends on the type of
trailer. Before beginning the journey, check the
trailer's documents to see what the maximum
permitted speed is. Observe the legally prescri-
bed maximum speed in the relevant country.
For certain Mercedes-Benz vehicles, the maxi-
mum permissible rear axle load is increased
when towing a trailer. See the "Technical data"
section to find out whether this applies to your
vehicle. If when towing, the rear axle load is
increased even partly, the vehicle/trailer com-
bination may not exceed a maximum speed of
100 km/h for reasons concerning the operating
permit. This also applies in countries in which
the permissible maximum speed for vehicle/
trailer combinations is above 100 km/h.
When towing a trailer, your vehicle's handling
characteristics will be different to when driving
without a trailer and the vehicle will consume
more fuel.
Shift to a lower gear in good time on long and
steep downhill gradients. For vehicles with auto-
matic transmission, you need to have selected
manual drive program M(Y page 161).
This also applies if you have activated cruise
control, the speed limiter or Distance Pilot
DISTRONIC.
This will use the braking effect of the engine, so less braking will be required to maintain the
vehicle speed. This relieves the load on the
brake system and prevents the brakes from
overheating and wearing too quickly. If you need
additional braking, depress the brake pedal
repeatedly rather than continuously.
Briefly depressing the accelerator pedal on
downhill gradients while the manual drive pro-
gram Mis temporarily activated (vehicles with
automatic transmission): the automatic trans-
mission may switch back to the last active auto-
matic drive program Eor S. The automatic trans-
mission may shift to a higher gear. This can
reduce the engine's braking effect. Towing a trailer
213Driving and parking Z
Page 223 of 369
~ R
Rejecting or ending a call
R Exits the telephone book/redial memory 6 R
Makes or accepts a call
R Switches to the redial memory Multifunction display
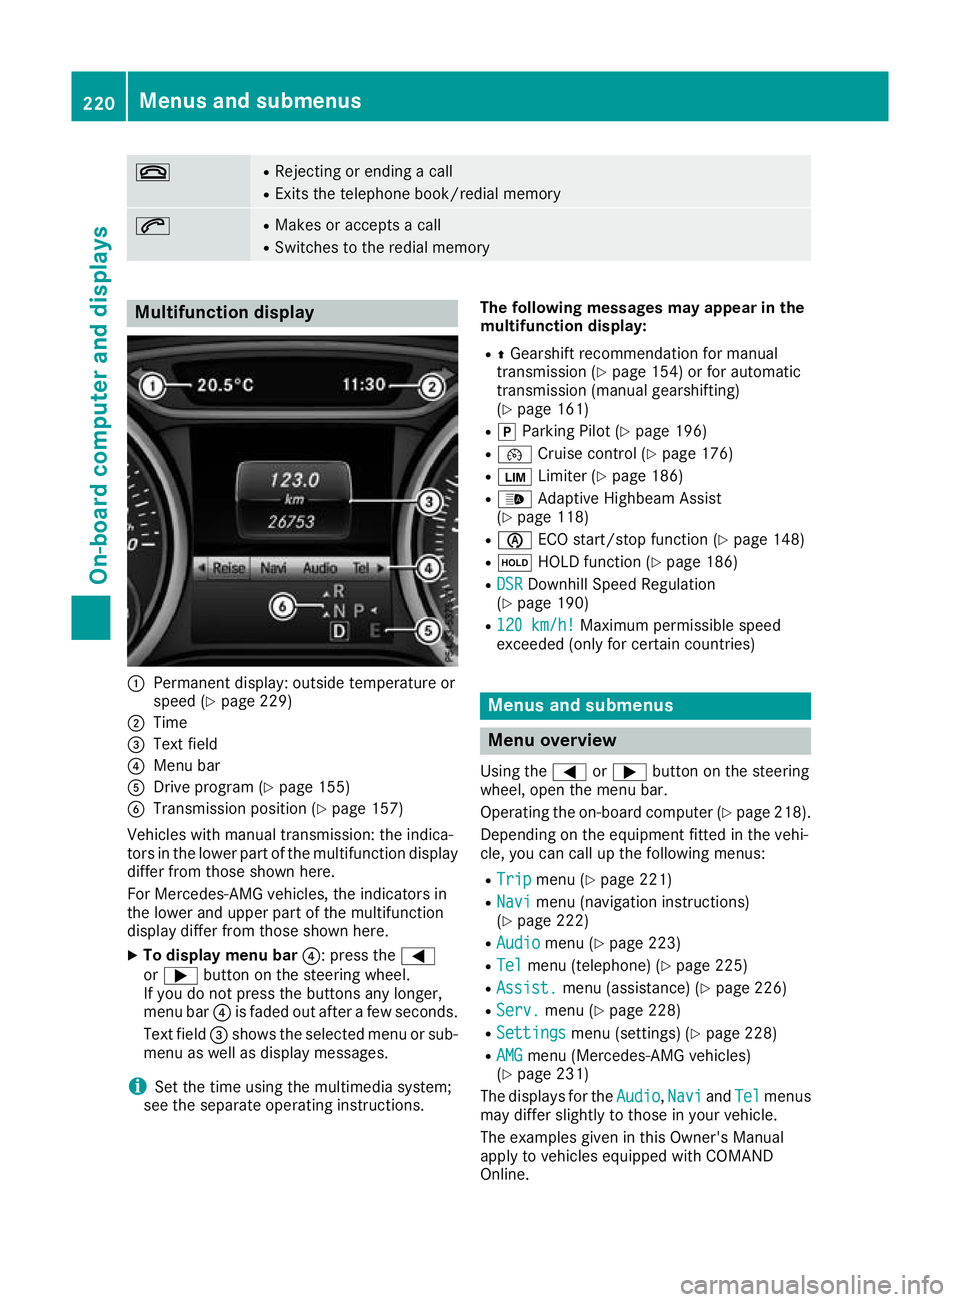
:
Permanent display: outside temperature or
speed (Y page 229)
; Time
= Text field
? Menu bar
A Drive program (Y page 155)
B Transmission position (Y page 157)
Vehicles with manual transmission: the indica-
tors in the lower part of the multifunction display
differ from those shown here.
For Mercedes-AMG vehicles, the indicators in
the lower and upper part of the multifunction
display differ from those shown here.
X To display menu bar ?: press the=
or ; button on the steering wheel.
If you do not press the buttons any longer,
menu bar ?is faded out after a few seconds.
Text field =shows the selected menu or sub-
menu as well as display messages.
i Set the time using the multimedia system;
see the separate operating instructions. The following messages may appear in the
multifunction display:
R ZGearshift recommendation for manual
transmission (Y page 154) or for automatic
transmission (manual gearshifting)
(Y page 161)
R j Parking Pilot (Y page 196)
R ¯ Cruise control (Y page 176)
R È Limiter (Y page 186)
R _ Adaptive Highbeam Assist
(Y page 118)
R è ECO start/stop function (Y page 148)
R ë HOLD function (Y page 186)
R DSR
DSR Downhill Speed Regulation
(Y page 190)
R 120 km/h! 120 km/h! Maximum permissible speed
exceeded (only for certain countries) Menus and submenus
Menu overview
Using the =or; button on the steering
wheel, open the menu bar.
Operating the on-board computer (Y page 218).
Depending on the equipment fitted in the vehi-
cle, you can call up the following menus:
R Trip Trip menu (Y page 221)
R Navi
Navi menu (navigation instructions)
(Y page 222)
R Audio
Audio menu (Y page 223)
R Tel Tel menu (telephone) (Y page 225)
R Assist. Assist. menu (assistance) (Y page 226)
R Serv.
Serv. menu (Y page 228)
R Settings
Settings menu (settings) (Y page 228)
R AMG
AMG menu (Mercedes-AMG vehicles)
(Y page 231)
The displays for the Audio
Audio,Navi
NaviandTel
Tel menus
may differ slightly to those in your vehicle.
The examples given in this Owner's Manual
apply to vehicles equipped with COMAND
Online. 220
Menus and submenusOn-board computer and displays
Page 225 of 369
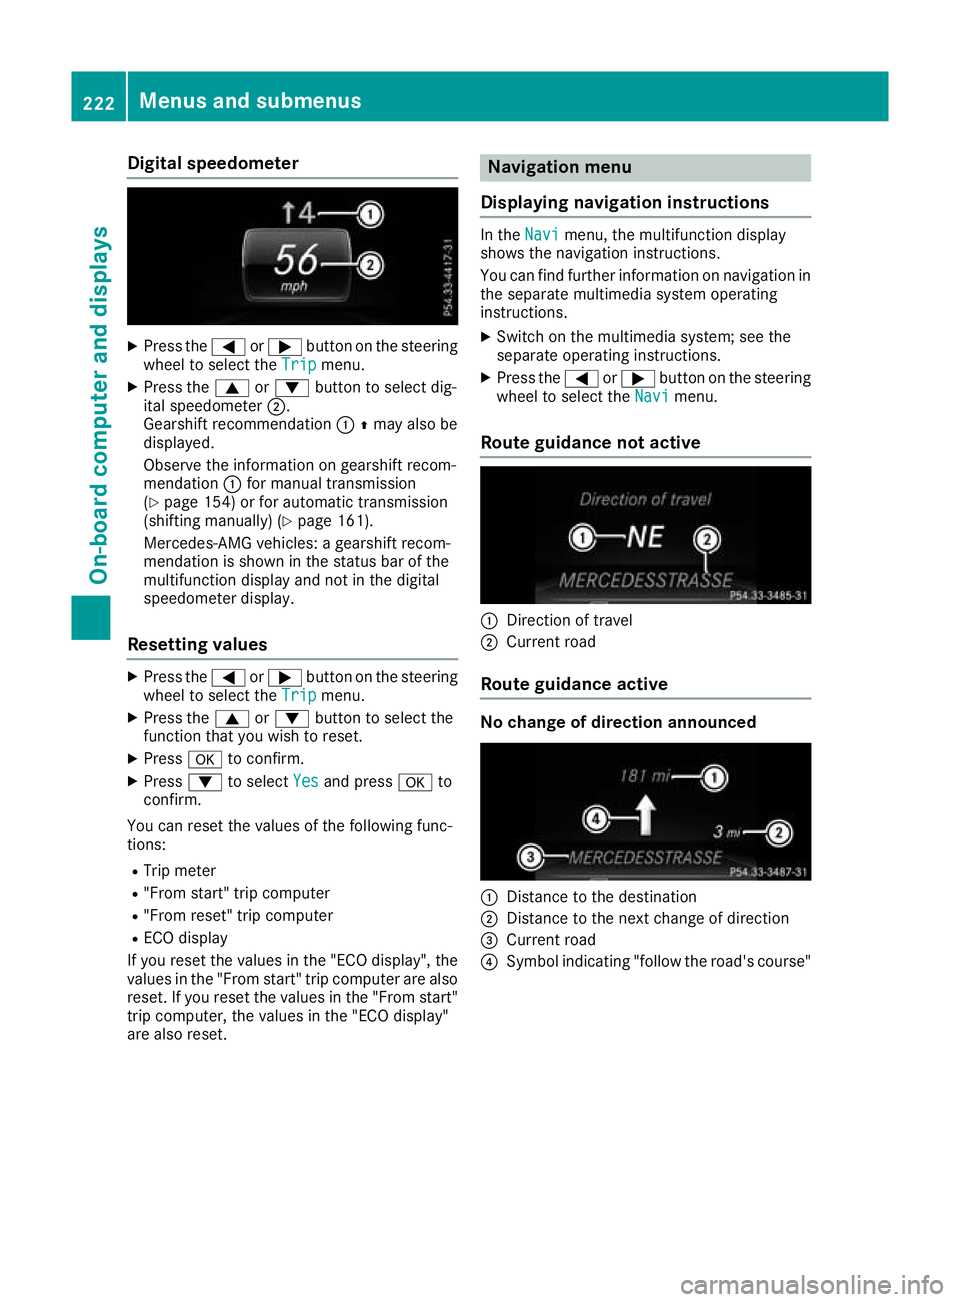
Digital speedometer
X
Press the =or; button on the steering
wheel to select the Trip
Trip menu.
X Press the 9or: button to select dig-
ital speedometer ;.
Gearshift recommendation :Zmay also be
displayed.
Observe the information on gearshift recom-
mendation :for manual transmission
(Y page 154) or for automatic transmission
(shifting manually) (Y page 161).
Mercedes-AMG vehicles: a gearshift recom-
mendation is shown in the status bar of the
multifunction display and not in the digital
speedometer display.
Resetting values X
Press the =or; button on the steering
wheel to select the Trip Tripmenu.
X Press the 9or: button to select the
function that you wish to reset.
X Press ato confirm.
X Press :to select Yes
Yes and press ato
confirm.
You can reset the values of the following func-
tions:
R Trip meter
R "From start" trip computer
R "From reset" trip computer
R ECO display
If you reset the values in the "ECO display", the
values in the "From start" trip computer are also
reset. If you reset the values in the "From start" trip computer, the values in the "ECO display"
are also reset. Navigation menu
Displaying navigation instructions In the
Navi
Navimenu, the multifunction display
shows the navigation instructions.
You can find further information on navigation in the separate multimedia system operating
instructions.
X Switch on the multimedia system; see the
separate operating instructions.
X Press the =or; button on the steering
wheel to select the Navi Navimenu.
Route guidance not active :
Direction of travel
; Current road
Route guidance active No change of direction announced
:
Distance to the destination
; Distance to the next change of direction
= Current road
? Symbol indicating "follow the road's course" 222
Menus and submenusOn-boa
rdcompu ter and displays