2017 MERCEDES-BENZ GLA SUV wheel
[x] Cancel search: wheelPage 112 of 369
Adjust the head restraint fore-and-aft position
so that it is as close as possible to the back of
your head.
General notes For vehicles with sports seats you cannot adjust
the front head restraints or the outer rear head
restraints.
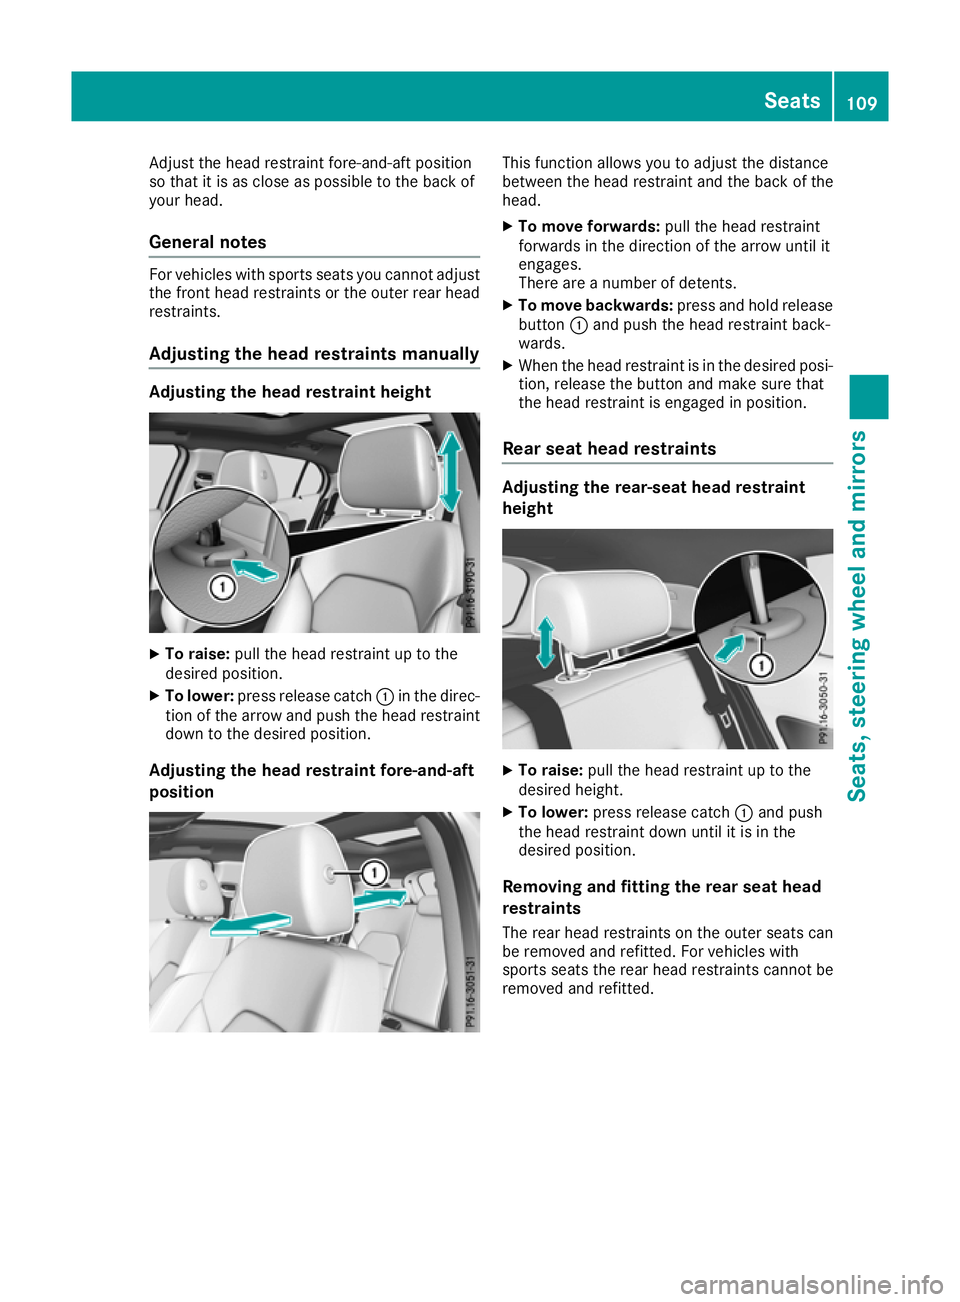
Adjusting the head restraints manually Adjusting the head restraint height
X
To raise: pull the head restraint up to the
desired position.
X To lower: press release catch :in the direc-
tion of the arrow and push the head restraint down to the desired position.
Adjusting the head restraint fore-and-aft
position This function allows you to adjust the distance
between the head restraint and the back of the
head.
X To move forwards: pull the head restraint
forwards in the direction of the arrow until it
engages.
There are a number of detents.
X To move backwards: press and hold release
button :and push the head restraint back-
wards.
X When the head restraint is in the desired posi-
tion, release the button and make sure that
the head restraint is engaged in position.
Rear seat head restraints Adjusting the rear-seat head restraint
height
X
To raise: pull the head restraint up to the
desired height.
X To lower: press release catch :and push
the head restraint down until it is in the
desired position.
Removing and fitting the rear seat head
restraints
The rear head restraints on the outer seats can
be removed and refitted. For vehicles with
sports seats the rear head restraints cannot be
removed and refitted. Seats
109Seats, steering wheel and mirrors Z
Page 113 of 369
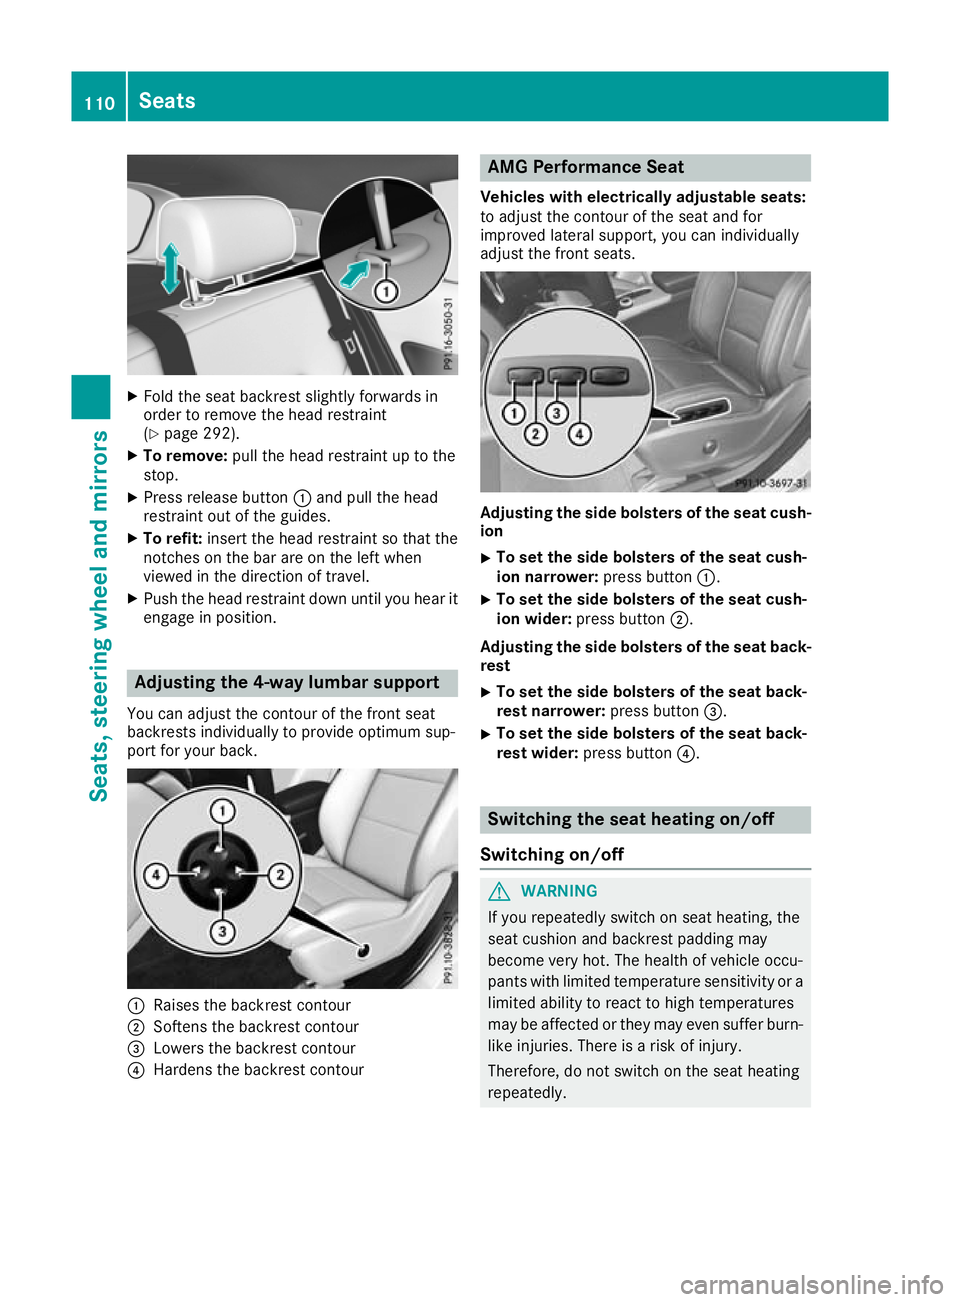
X
Fold the seat backrest slightly forwards in
order to remove the head restraint
(Y page 292).
X To remove: pull the head restraint up to the
stop.
X Press release button :and pull the head
restraint out of the guides.
X To refit: insert the head restraint so that the
notches on the bar are on the left when
viewed in the direction of travel.
X Push the head restraint down until you hear it
engage in position. Adjusting the 4-way lumbar support
You can adjust the contour of the front seat
backrests individually to provide optimum sup-
port for your back. :
Raises the backrest contour
; Softens the backrest contour
= Lowers the backrest contour
? Hardens the backrest contour AMG Performance Seat
Vehicles with electrically adjustable seats:
to adjust the contour of the seat and for
improved lateral support, you can individually
adjust the front seats. Adjusting the side bolsters of the seat cush-
ion
X To set the side bolsters of the seat cush-
ion narrower:
press button:.
X To set the side bolsters of the seat cush-
ion wider:
press button ;.
Adjusting the side bolsters of the seat back-
rest
X To set the side bolsters of the seat back-
rest narrower: press button=.
X To set the side bolsters of the seat back-
rest wider:
press button ?. Switching the seat heating on/off
Switching on/off G
WARNING
If you repeatedly switch on seat heating, the
seat cushion and backrest padding may
become very hot. The health of vehicle occu-
pants with limited temperature sensitivity or a limited ability to react to high temperatures
may be affected or they may even suffer burn-
like injuries. There is a risk of injury.
Therefore, do not switch on the seat heating
repeatedly. 110
SeatsSeats, steering wheel and mirrors
Page 114 of 369
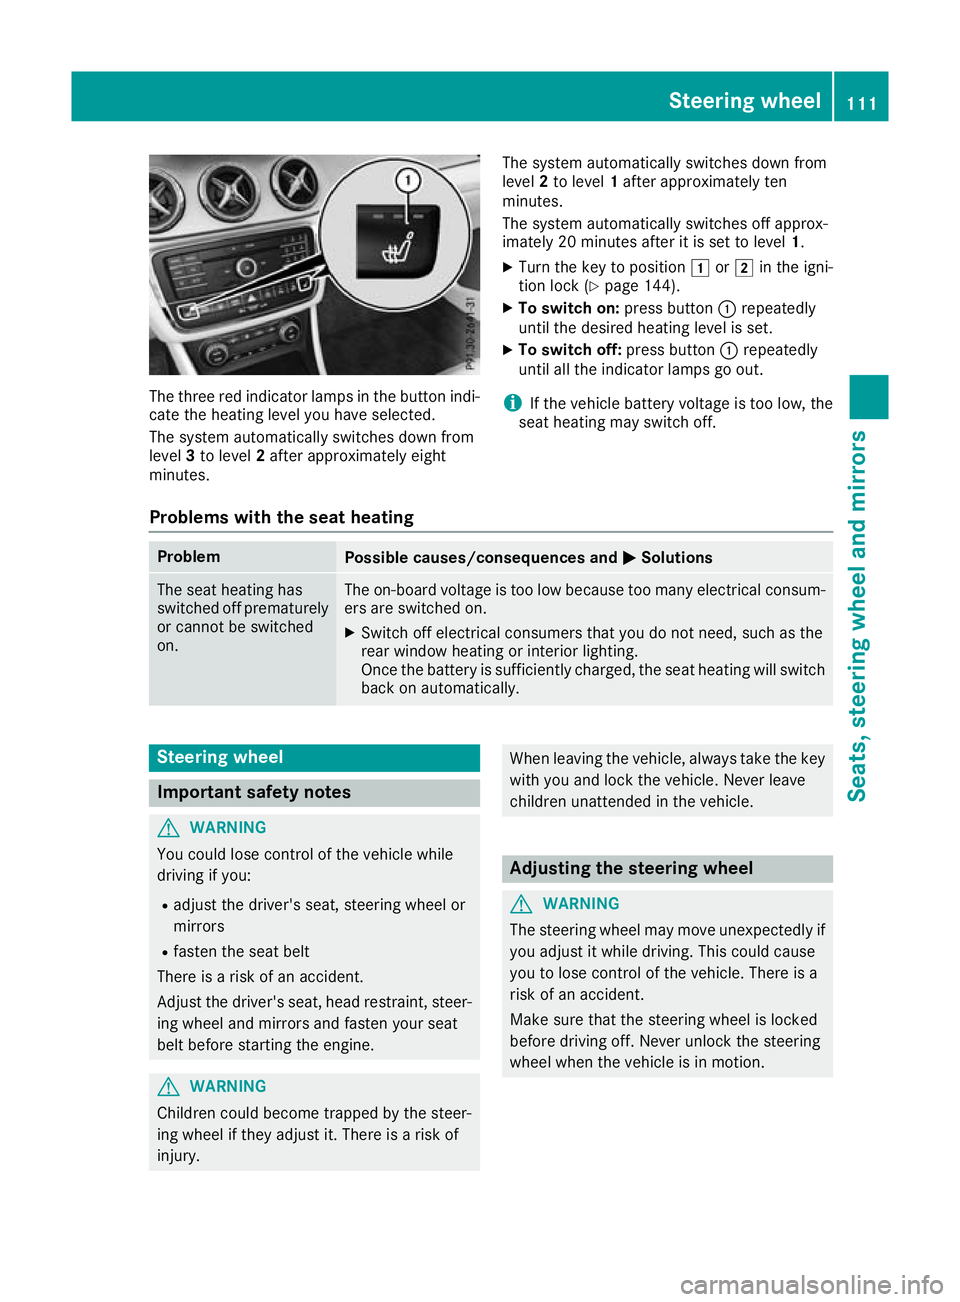
The three red indicator lamps in the button indi-
cate the heating level you have selected.
The system automatically switches down from
level 3to level 2after approximately eight
minutes. The system automatically switches down from
level 2to level 1after approximately ten
minutes.
The system automatically switches off approx-
imately 20 minutes after it is set to level 1.
X Turn the key to position 1or2 in the igni-
tion lock (Y page 144).
X To switch on: press button:repeatedly
until the desired heating level is set.
X To switch off: press button:repeatedly
until all the indicator lamps go out.
i If the vehicle battery voltage is too low, the
seat heating may switch off.
Problems with the seat heating Problem
Possible causes/consequences and
M MSolutions The seat heating has
switched off prematurely
or cannot be switched
on. The on-board voltage is too low because too many electrical consum-
ers are switched on.
X Switch off electrical consumers that you do not need, such as the
rear window heating or interior lighting.
Once the battery is sufficiently charged, the seat heating will switch
back on automatically. Steering wheel
Important safety notes
G
WARNING
You could lose control of the vehicle while
driving if you:
R adjust the driver's seat, steering wheel or
mirrors
R fasten the seat belt
There is a risk of an accident.
Adjust the driver's seat, head restraint, steer-
ing wheel and mirrors and fasten your seat
belt before starting the engine. G
WARNING
Children could become trapped by the steer-
ing wheel if they adjust it. There is a risk of
injury. When leaving the vehicle, always take the key
with you and lock the vehicle. Never leave
children unattended in the vehicle. Adjusting the steering wheel
G
WARNING
The steering wheel may move unexpectedly if you adjust it while driving. This could cause
you to lose control of the vehicle. There is a
risk of an accident.
Make sure that the steering wheel is locked
before driving off. Never unlock the steering
wheel when the vehicle is in motion. Steering wheel
111Seats, steering wheel and mirrors Z
Page 115 of 369
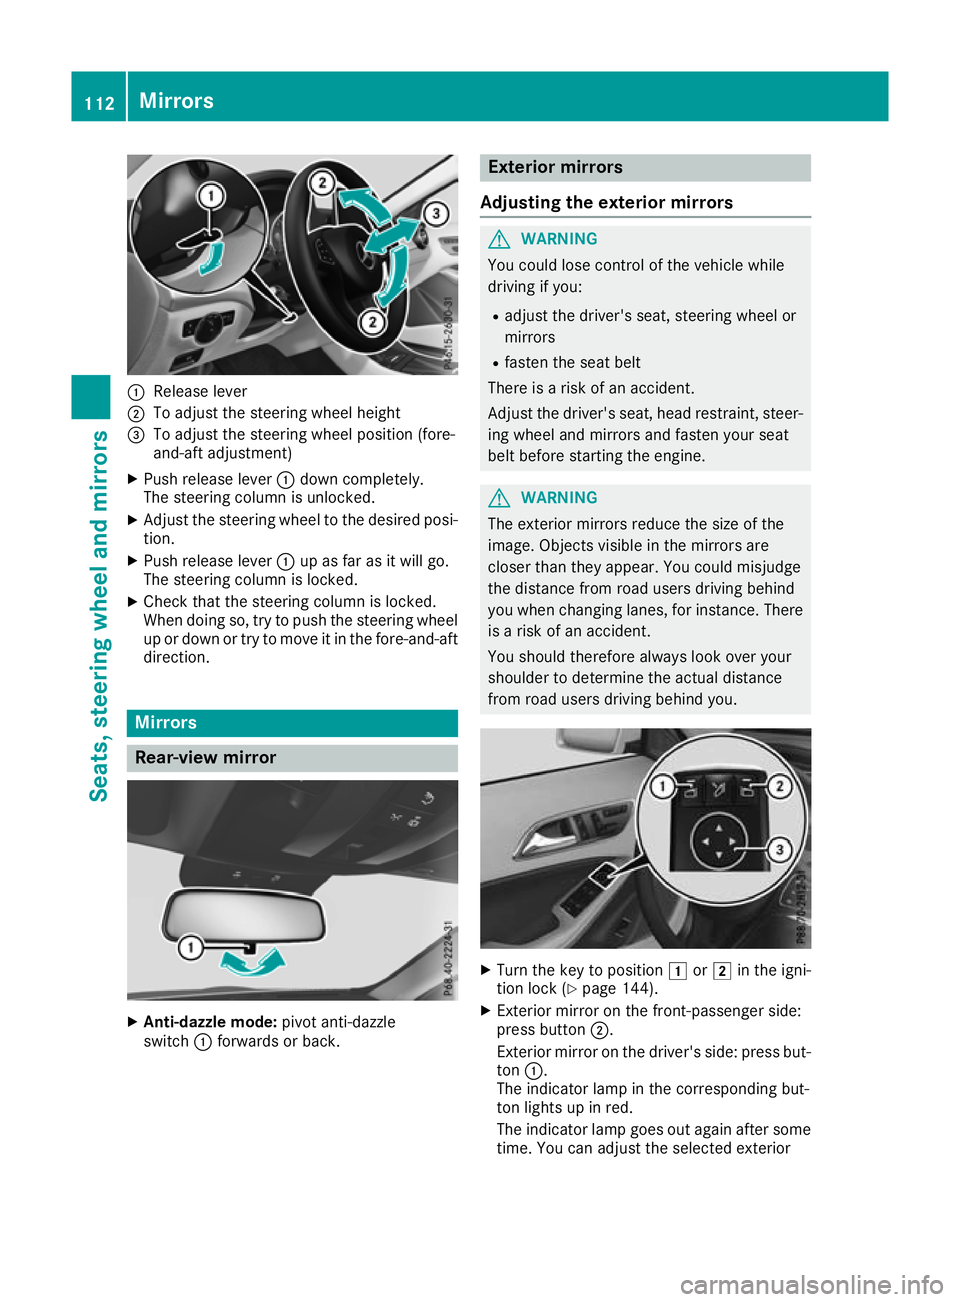
:
Release lever
; To adjust the steering wheel height
= To adjust the steering wheel position (fore-
and-aft adjustment)
X Push release lever :down completely.
The steering column is unlocked.
X Adjust the steering wheel to the desired posi-
tion.
X Push release lever :up as far as it will go.
The steering column is locked.
X Check that the steering column is locked.
When doing so, try to push the steering wheel
up or down or try to move it in the fore-and-aft
direction. Mirrors
Rear-view mirror
X
Anti-dazzle mode: pivot anti-dazzle
switch :forwards or back. Exterior mirrors
Adjusting the exterior mirrors G
WARNING
You could lose control of the vehicle while
driving if you:
R adjust the driver's seat, steering wheel or
mirrors
R fasten the seat belt
There is a risk of an accident.
Adjust the driver's seat, head restraint, steer-
ing wheel and mirrors and fasten your seat
belt before starting the engine. G
WARNING
The exterior mirrors reduce the size of the
image. Objects visible in the mirrors are
closer than they appear. You could misjudge
the distance from road users driving behind
you when changing lanes, for instance. There is a risk of an accident.
You should therefore always look over your
shoulder to determine the actual distance
from road users driving behind you. X
Turn the key to position 1or2 in the igni-
tion lock (Y page 144).
X Exterior mirror on the front-passenger side:
press button ;.
Exterior mirror on the driver's side: press but-
ton :.
The indicator lamp in the corresponding but-
ton lights up in red.
The indicator lamp goes out again after some
time. You can adjust the selected exterior 112
MirrorsSeats
, steering wheel and mirrors
Page 116 of 369
mirror using button
=as long as the indicator
lamp is lit.
X Press button =up, down, or to the right or
left until you have adjusted the exterior mirror
to the correct position. You should have a
good overview of traffic conditions.
The convex exterior mirrors provide a larger field of vision.
After the engine has been started, the exterior
mirrors are automatically heated at low outside
temperatures. Heating takes a maximum of ten
minutes.
i The exterior mirrors can also be heated
manually by switching on the rear window
heating.
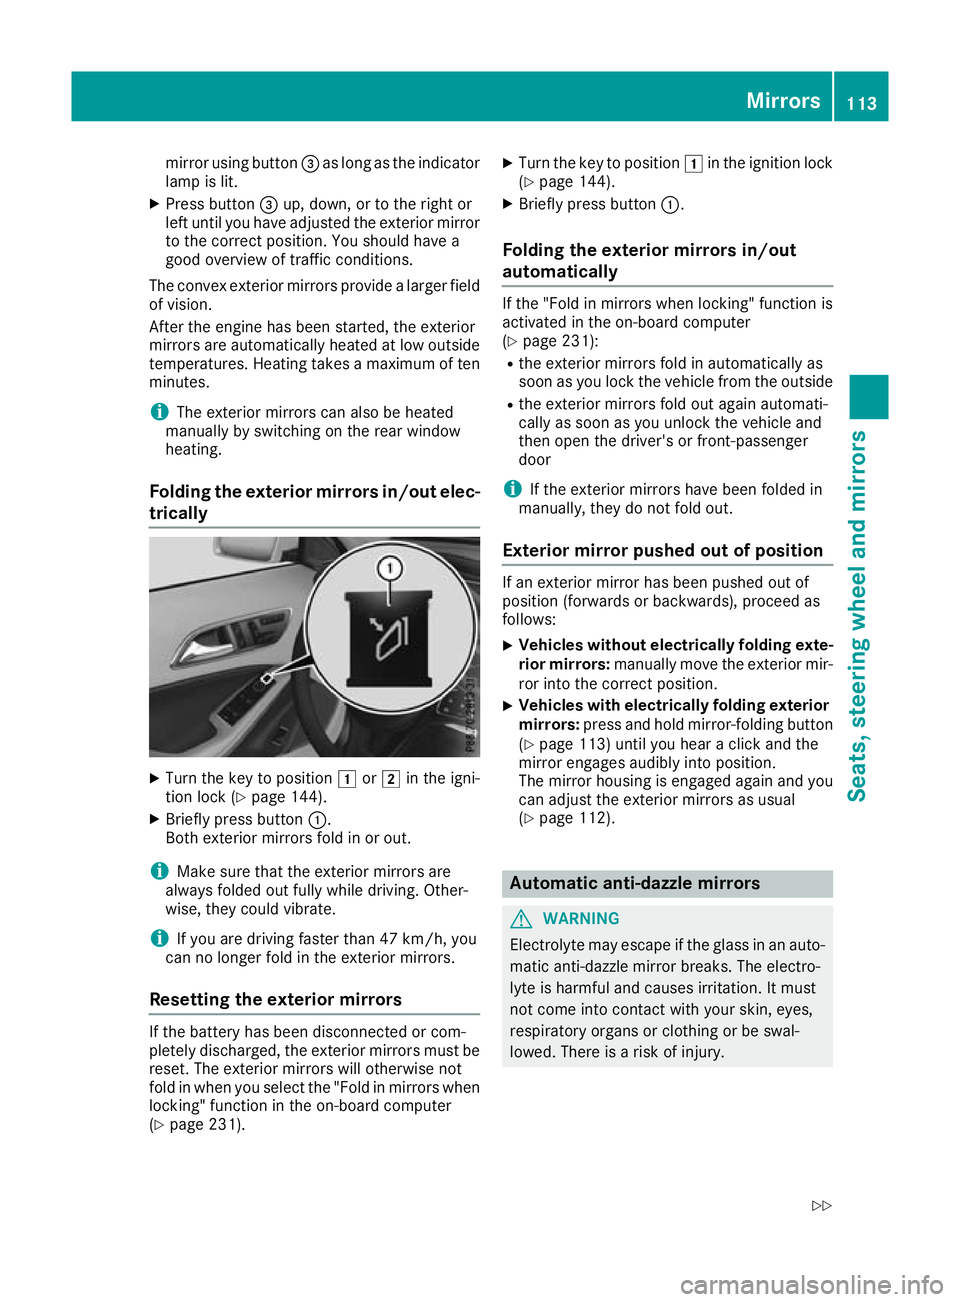
Folding the exterior mirrors in/out elec- trically X
Turn the key to position 1or2 in the igni-
tion lock (Y page 144).
X Briefly press button :.
Both exterior mirrors fold in or out.
i Make sure that the exterior mirrors are
always folded out fully while driving. Other-
wise, they could vibrate.
i If you are driving faster than 47 km/h, you
can no longer fold in the exterior mirrors.
Resetting the exterior mirrors If the battery has been disconnected or com-
pletely discharged, the exterior mirrors must be
reset. The exterior mirrors will otherwise not
fold in when you select the "Fold in mirrors when locking" function in the on-board computer
(Y page 231). X
Turn the key to position 1in the ignition lock
(Y page 144).
X Briefly press button :.
Folding the exterior mirrors in/out
automatically If the "Fold in mirrors when locking" function is
activated in the on-board computer
(Y page 231):
R the exterior mirrors fold in automatically as
soon as you lock the vehicle from the outside
R the exterior mirrors fold out again automati-
cally as soon as you unlock the vehicle and
then open the driver's or front-passenger
door
i If the exterior mirrors have been folded in
manually, they do not fold out.
Exterior mirror pushed out of position If an exterior mirror has been pushed out of
position (forwards or backwards), proceed as
follows:
X Vehicles without electrically folding exte-
rior mirrors: manually move the exterior mir-
ror into the correct position.
X Vehicles with electrically folding exterior
mirrors: press and hold mirror-folding button
(Y page 113) until you hear a click and the
mirror engages audibly into position.
The mirror housing is engaged again and you
can adjust the exterior mirrors as usual
(Y page 112). Automatic anti-dazzle mirrors
G
WARNING
Electrolyte may escape if the glass in an auto- matic anti-dazzle mirror breaks. The electro-
lyte is harmful and causes irritation. It must
not come into contact with your skin, eyes,
respiratory organs or clothing or be swal-
lowed. There is a risk of injury. Mirrors
113Seats, steering wheel and mirrors
Z
Page 117 of 369
If you come into contact with the electrolyte,
observe the following:
R Rinse off the electrolyte from your skin
immediately with water.
R Immediately rinse the electrolyte out of
your eyes thoroughly with clean water.
R If the electrolyte is swallowed, immediately
rinse your mouth out thoroughly. Do not
induce vomiting.
R If electrolyte comes into contact with your
skin or hair or is swallowed, seek medical
attention immediately.
R Immediately change out of clothing which
has come into contact with electrolyte.
R If an allergic reaction occurs, seek medical
attention immediately.
The "Automatic anti-dazzle mirrors" function is
only available if the vehicle is equipped with the
"Mirror package".
The rear-view mirror and the exterior mirror on
the driver's side automatically go into anti-daz-
zle mode if:
R the ignition is switched on and
R incident light from headlamps strikes the sen-
sor in the rear-view mirror
The mirrors do not go into anti-dazzle mode if
reverse gear is engaged or if the interior lighting
is switched on. Parking position of the exterior mirror
on the front-passenger side
Setting and storing the parking position You can adjust the front-passenger-side exterior
mirror such that you can see the rear wheel on
that side as soon as you engage reverse gear.
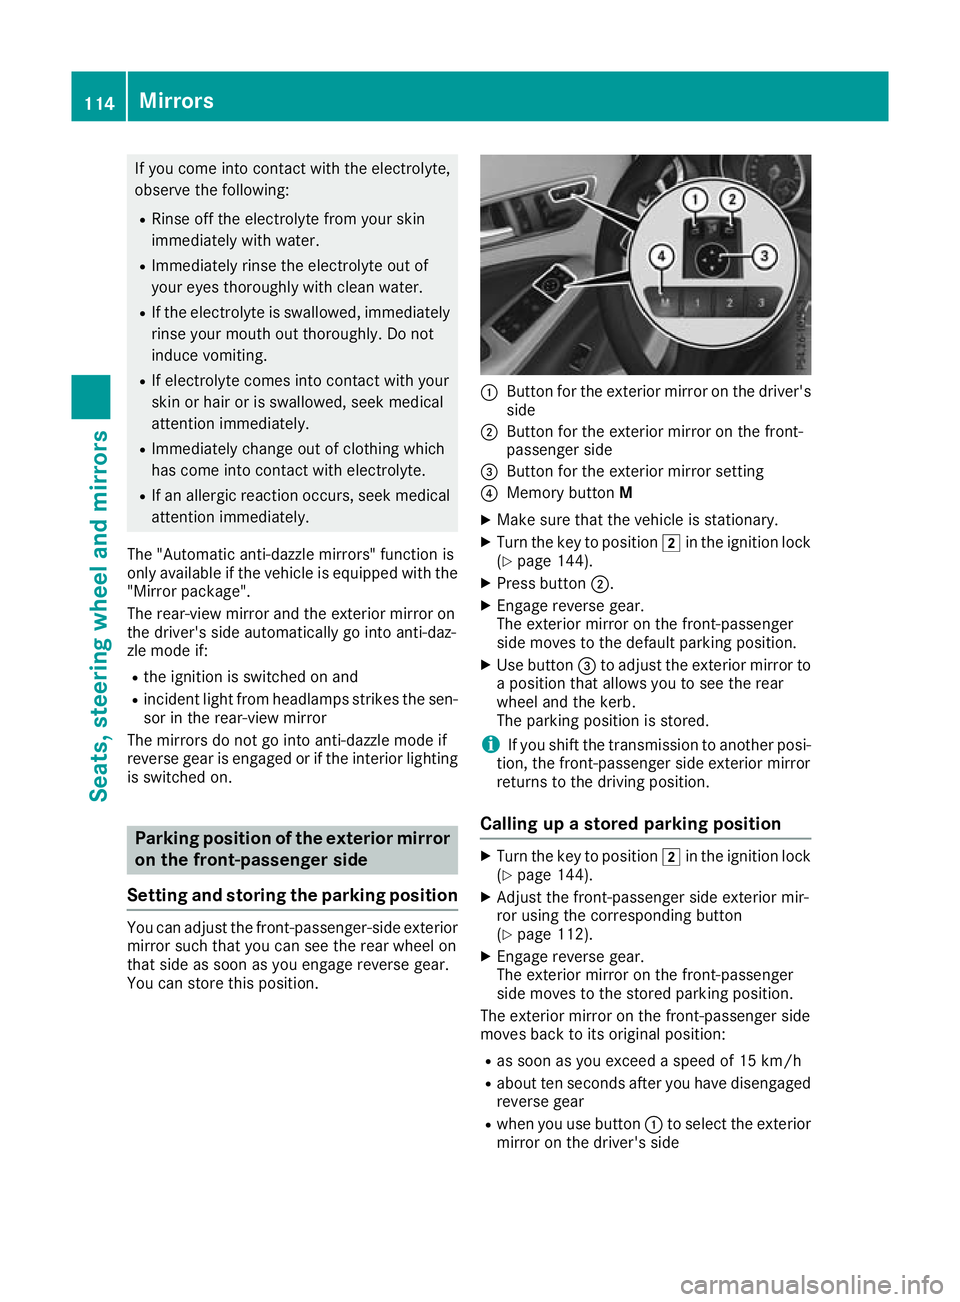
You can store this position. :
Button for the exterior mirror on the driver's
side
; Button for the exterior mirror on the front-
passenger side
= Button for the exterior mirror setting
? Memory button M
X Make sure that the vehicle is stationary.
X Turn the key to position 2in the ignition lock
(Y page 144).
X Press button ;.
X Engage reverse gear.
The exterior mirror on the front-passenger
side moves to the default parking position.
X Use button =to adjust the exterior mirror to
a position that allows you to see the rear
wheel and the kerb.
The parking position is stored.
i If you shift the transmission to another posi-
tion, the front-passenger side exterior mirror
returns to the driving position.
Calling up a stored parking position X
Turn the key to position 2in the ignition lock
(Y page 144).
X Adjust the front-passenger side exterior mir-
ror using the corresponding button
(Y page 112).
X Engage reverse gear.
The exterior mirror on the front-passenger
side moves to the stored parking position.
The exterior mirror on the front-passenger side
moves back to its original position:
R as soon as you exceed a speed of 15 km/h
R about ten seconds after you have disengaged
reverse gear
R when you use button :to select the exterior
mirror on the driver's side 114
MirrorsSeats, steering wheel and mirrors
Page 118 of 369
Memory function
Important safety notes
G
WARNING
If you use the memory function on the driver's side while driving, the adjustments could
cause you to lose control of the vehicle. There
is a risk of an accident.
Only use the memory function on the driver's
side while the vehicle is stationary. G
WARNING
If the memory function adjusts the seat, you
and other vehicle occupants – particularly
children – could become trapped. There is a
risk of injury.
While the memory function is making adjust-
ments, make sure that no one has any part of their body within the sweep of the seat. If
someone becomes trapped, immediately
release the memory function position button.
The adjustment is stopped. G
WARNING
If children activate the memory function, they
could become trapped, especially if they are
unattended. There is a risk of injury.
When leaving the vehicle, always take the key with you and lock the vehicle. Never leave
children unattended in the vehicle.
The memory function can be used at any time,
e.g. even when the key is not in the ignition lock. Storing settings
Using the memory function, you can store up to three different settings, e.g. for three different
people.
The following settings are stored as a single
memory preset:
R seat and backrest position
R driver's side: position of the exterior mirrors
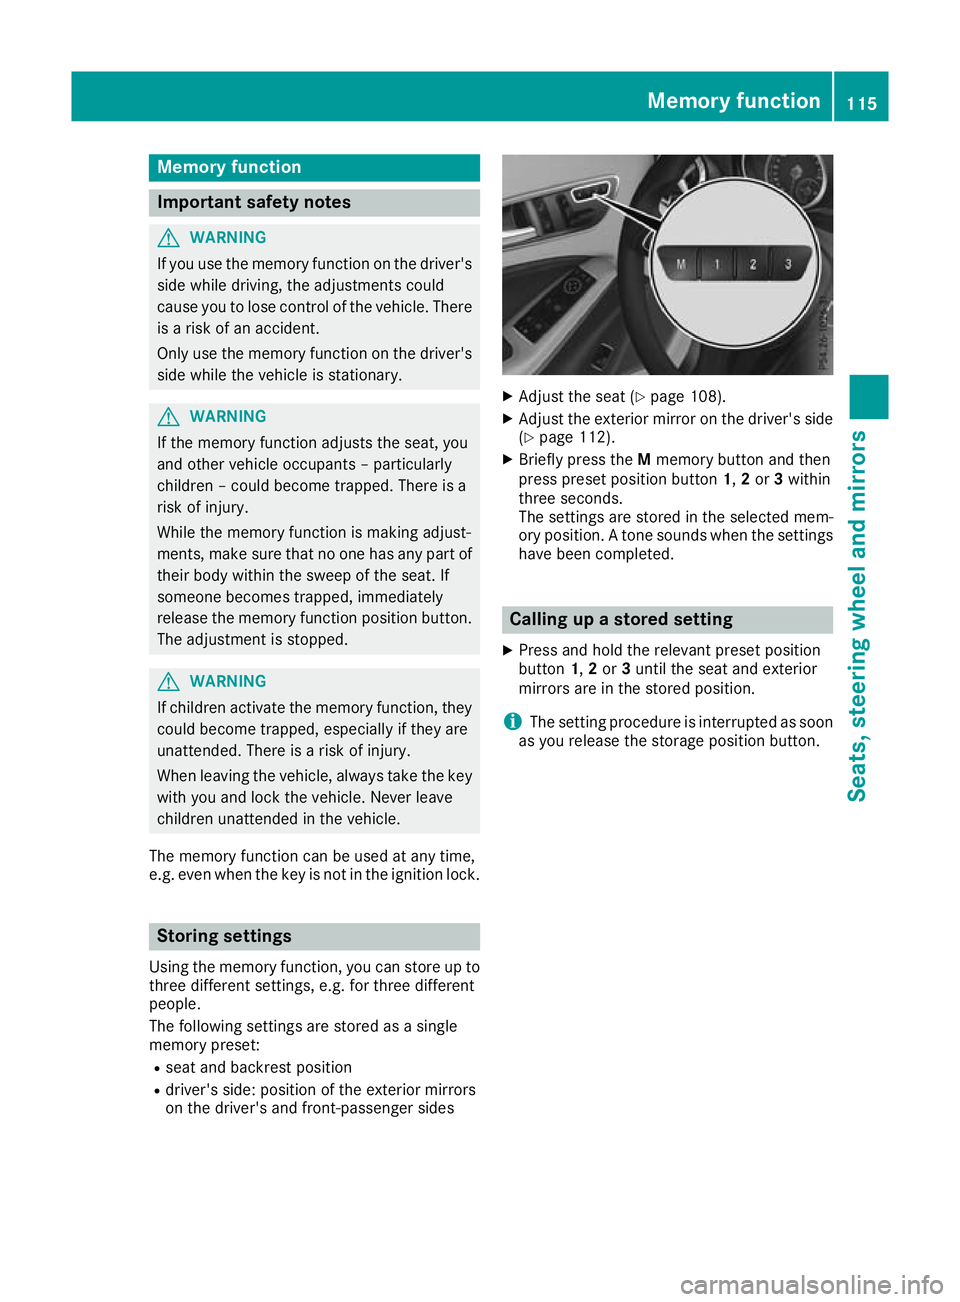
on the driver's and front-passenger sides X
Adjust the seat (Y page 108).
X Adjust the exterior mirror on the driver's side
(Y page 112).
X Briefly press the Mmemory button and then
press preset position button 1,2or 3within
three seconds.
The settings are stored in the selected mem-
ory position. A tone sounds when the settings
have been completed. Calling up a stored setting
X Press and hold the relevant preset position
button 1,2or 3until the seat and exterior
mirrors are in the stored position.
i The setting procedure is interrupted as soon
as you release the storage position button. Memory function
115Seats, steering wheel and mirrors Z
Page 124 of 369
Protect bulbs from moisture during operation.
Do not allow bulbs to come into contact with
liquids.
Replace only the bulbs listed (Y page 121).
Have the bulbs that you cannot change yourself replaced at a qualified specialist workshop.
If you require assistance replacing bulbs, con-
sult a qualified specialist workshop.
If the new bulb still does not light up, consult a
qualified specialist workshop.
Headlamps and lights are an important aspect of
vehicle safety. You must therefore make sure
that these function correctly at all times. Have
the headlamp setting verified regularly.
Vehicles with LED headlamps: the front and
rear lamp clusters of your vehicle are equipped
with LED bulbs. Do not replace the bulbs your-
self. Contact a qualified specialist workshop
with the necessary specialist knowledge and
tools to carry out the work required. Overview of bulb types
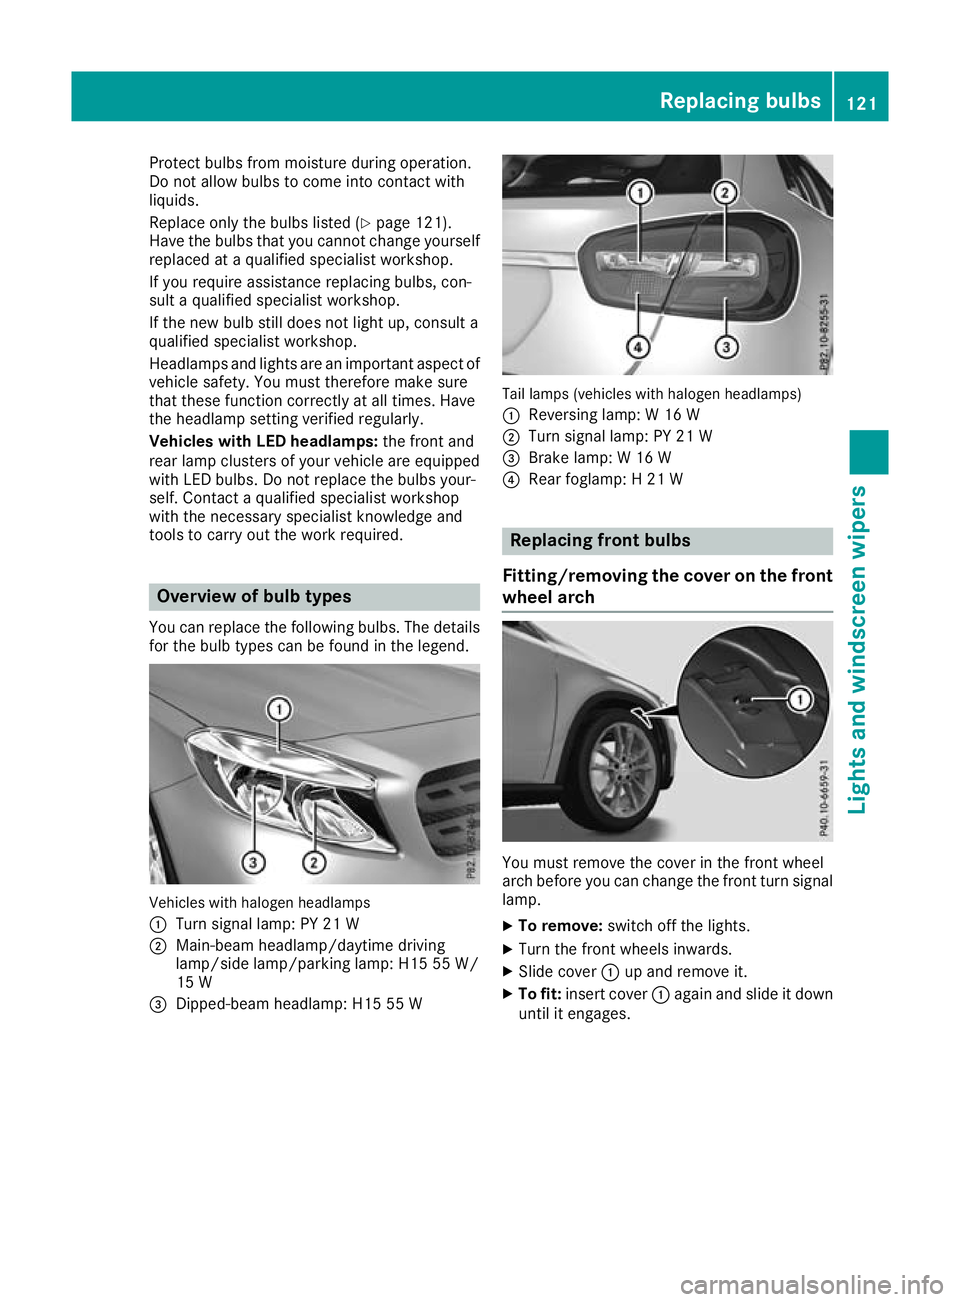
You can replace the following bulbs. The details for the bulb types can be found in the legend. Vehicles with halogen headlamps
:
Turn signal lamp: PY 21 W
; Main-beam headlamp/daytime driving
lamp/side lamp/parking lamp: H15 55 W/
15 W
= Dipped-beam headlamp: H15 55 W Tail lamps (vehicles with halogen headlamps)
: Reversing lamp: W 16 W
; Turn signal lamp: PY 21 W
= Brake lamp: W 16 W
? Rear foglamp: H 21 W Replacing front bulbs
Fitting/removing the cover on the front wheel arch You must remove the cover in the front wheel
arch before you can change the front turn signal
lamp.
X To remove: switch off the lights.
X Turn the front wheels inwards.
X Slide cover :up and remove it.
X To fit: insert cover :again and slide it down
until it engages. Replacing bulbs
121Lights and windscreen wipers Z