2017 MERCEDES-BENZ GLA SUV ECU
[x] Cancel search: ECUPage 181 of 369
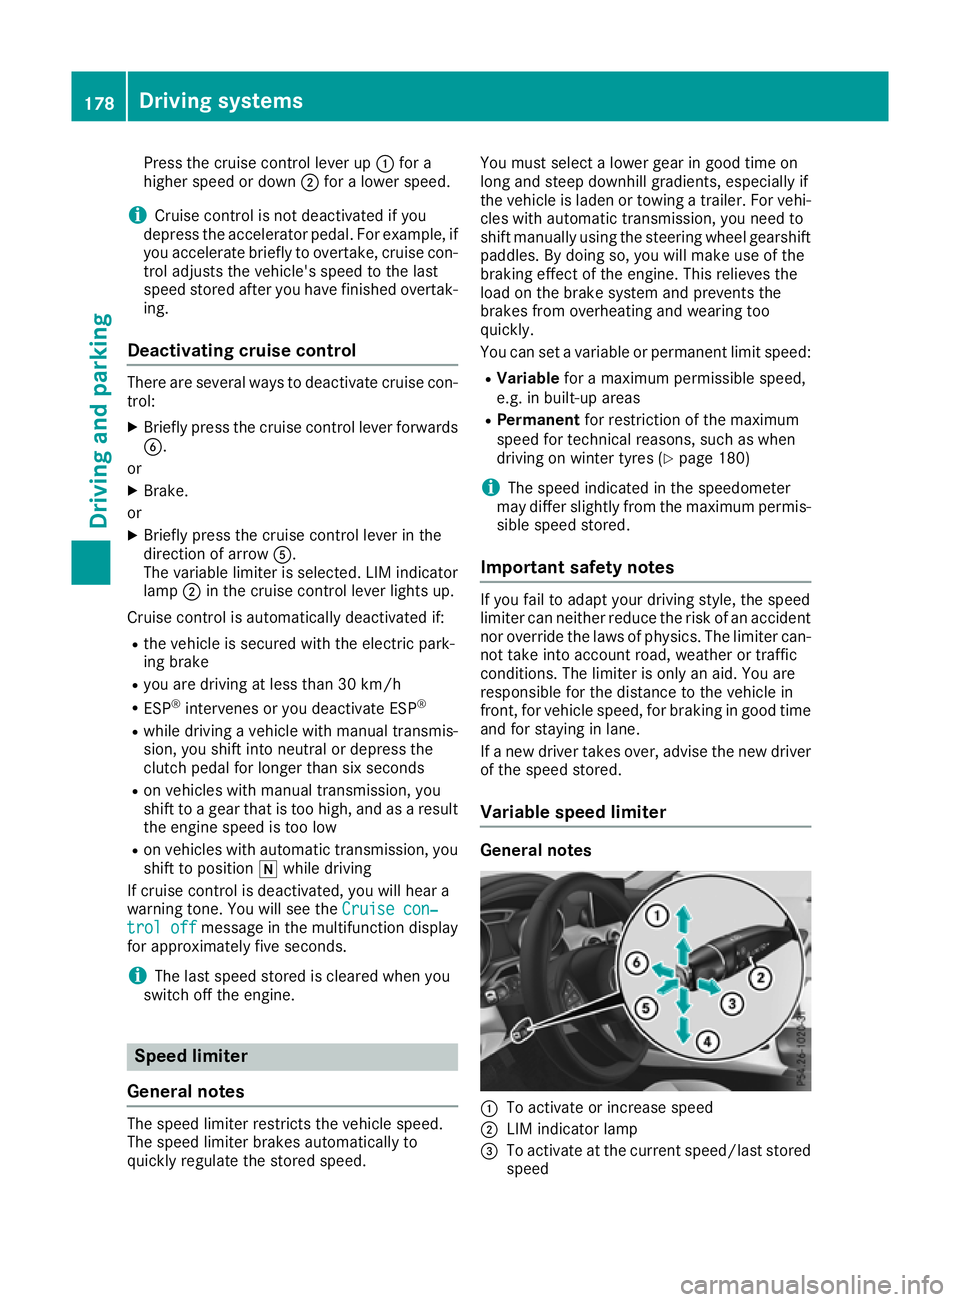
Press the cruise control lever up
:for a
higher speed or down ;for a lower speed.
i Cruise control is not deactivated if you
depress the accelerator pedal. For example, if
you accelerate briefly to overtake, cruise con-
trol adjusts the vehicle's speed to the last
speed stored after you have finished overtak-
ing.
Deactivating cruise control There are several ways to deactivate cruise con-
trol:
X Briefly press the cruise control lever forwards
B.
or X Brake.
or X Briefly press the cruise control lever in the
direction of arrow A.
The variable limiter is selected. LIM indicator lamp ;in the cruise control lever lights up.
Cruise control is automatically deactivated if:
R the vehicle is secured with the electric park-
ing brake
R you are driving at less than 30 km/h
R ESP ®
intervenes or you deactivate ESP ®
R while driving a vehicle with manual transmis-
sion, you shift into neutral or depress the
clutch pedal for longer than six seconds
R on vehicles with manual transmission, you
shift to a gear that is too high, and as a result
the engine speed is too low
R on vehicles with automatic transmission, you
shift to position iwhile driving
If cruise control is deactivated, you will hear a
warning tone. You will see the Cruise con‐
Cruise con‐
trol off trol off message in the multifunction display
for approximately five seconds.
i The last speed stored is cleared when you
switch off the engine. Speed limiter
General notes The speed limiter restricts the vehicle speed.
The speed limiter brakes automatically to
quickly regulate the stored speed. You must select a lower gear in good time on
long and steep downhill gradients, especially if
the vehicle is laden or towing a trailer. For vehi-
cles with automatic transmission, you need to
shift manually using the steering wheel gearshiftpaddles. By doing so, you will make use of the
braking effect of the engine. This relieves the
load on the brake system and prevents the
brakes from overheating and wearing too
quickly.
You can set a variable or permanent limit speed:
R Variable for a maximum permissible speed,
e.g. in built-up areas
R Permanent for restriction of the maximum
speed for technical reasons, such as when
driving on winter tyres (Y page 180)
i The speed indicated in the speedometer
may differ slightly from the maximum permis- sible speed stored.
Important safety notes If you fail to adapt your driving style, the speed
limiter can neither reduce the risk of an accident nor override the laws of physics. The limiter can-
not take into account road, weather or traffic
conditions. The limiter is only an aid. You are
responsible for the distance to the vehicle in
front, for vehicle speed, for braking in good time
and for staying in lane.
If a new driver takes over, advise the new driver
of the speed stored.
Variable speed limiter General notes
:
To activate or increase speed
; LIM indicator lamp
= To activate at the current speed/last stored
speed 178
Driving systemsDriving and parking
Page 186 of 369
If there is no vehicle in front, Distance Pilot
DISTRONIC operates in the same way as cruise control.
If Distance Pilot DISTRONIC detects a slower-
moving vehicle in front, it brakes your vehicle. In
this way, the distance you have selected is main- tained.
If Distance Pilot DISTRONIC detects a faster-
moving vehicle in front, it increases the driving
speed. However, the vehicle is only accelerated
up to the speed you have stored.
i Distance Pilot DISTRONIC is deactivated
when you depress the brake, except when the vehicle is stationary.
Selecting the drive program Distance Pilot DISTRONIC supports a sporty
driving style when you select the S+drive pro-
gram (Y page 159) or manual gearshifting
(Y page 161). Acceleration behind the vehicle in
front or to the set speed is then noticeably more dynamic. If you have selected the E(C in
Mercedes-AMG vehicles:) drive program, the
vehicle accelerates more gently. This setting is
recommended in stop-start traffic.
Changing lanes If you want to change to the overtaking lane on
multi-lane roads, Distance Pilot DISTRONIC sup-
ports you if:
R you are driving faster than 70 km/h
R Distance Pilot DISTRONIC is maintaining the
distance to a vehicle in front
R you switch on the respective turn signal
R Distance Pilot DISTRONIC does not currently
detect a danger of collision
If these conditions are met, your vehicle accel-
erates. Acceleration will be interrupted if chang-
ing lanes takes too long or if the distance
between your vehicle and the vehicle in front
becomes too small.
Stopping If Distance Pilot DISTRONIC detects that the
vehicle in front is stopping, it brakes your vehicle
until it is stationary.
Once your vehicle is stationary, it remains sta-
tionary and you do not need to depress the
brake.
i After a short period, the vehicle is secured
by the electric parking brake, thus relieving
the service brake. i
Depending on the specified minimum dis-
tance, your vehicle will come to a standstill at
a sufficient distance behind the vehicle in
front. The specified minimum distance is set
using the control on the cruise control lever.
When Distance Pilot DISTRONIC is activated,
the transmission is shifted automatically to
position jif:
R the driver's seat belt is not fastened and the
driver's door is open
R the engine is switched off, unless it is auto-
matically switched off by the ECO start/stop
function
The electric parking brake is applied automati-
cally if Distance Pilot DISTRONIC is active when
the vehicle is stationary and:
R a system fault occurs
R the power supply is insufficient
If a fault occurs, the transmission may also shift
to position jautomatically.
Setting a speed Bear in mind that it may take a brief moment
until the vehicle has accelerated or braked to
the set speed.
X
Press the cruise control lever up :for a
higher speed or down ;for a lower speed.
X Keep the cruise control lever pressed until the
desired speed is reached or press the cruise
control lever repeatedly until the desired
speed is reached.
X Release the cruise control lever.
The new speed is stored. Distance Pilot
DISTRONIC is activated and adjusts the vehi-
cle's speed to the new speed stored.
X To adjust the set speed in 1 km/h incre-
ments:
briefly press the cruise control lever
up : or down Ato the pressure point.
The last stored speed increases or decreases
in 1 km/h increments.
X To adjust the set speed in 10 km/h incre-
ments: briefly press the cruise control lever
up : or down Abeyond the pressure point.
The last stored speed increases or decreases in 10 km/h increments.
i Distance Pilot DISTRONIC is not deactivated
if you depress the accelerator pedal. If you
accelerate to overtake, Distance Pilot
DISTRONIC adjusts the vehicle's speed to the Driving systems
183Driving and parking Z
Page 187 of 369
last speed stored after you have finished over-
taking.
Setting the specified minimum distance You can set the specified minimum distance for
Distance Pilot DISTRONIC by varying the time
span between one and two seconds. With this
function, you can set the minimum distance that
Distance Pilot DISTRONIC maintains to the vehi- cle in front, dependent on the vehicle speed. You
can see this distance in the multifunction dis-
play (Y page 185).
The specified minimum distance can be
changed while Distance Pilot DISTRONIC is
switched on or off.
i Make sure that you maintain the minimum
distance to the vehicle in front as required by law. Adjust the distance to the vehicle in front
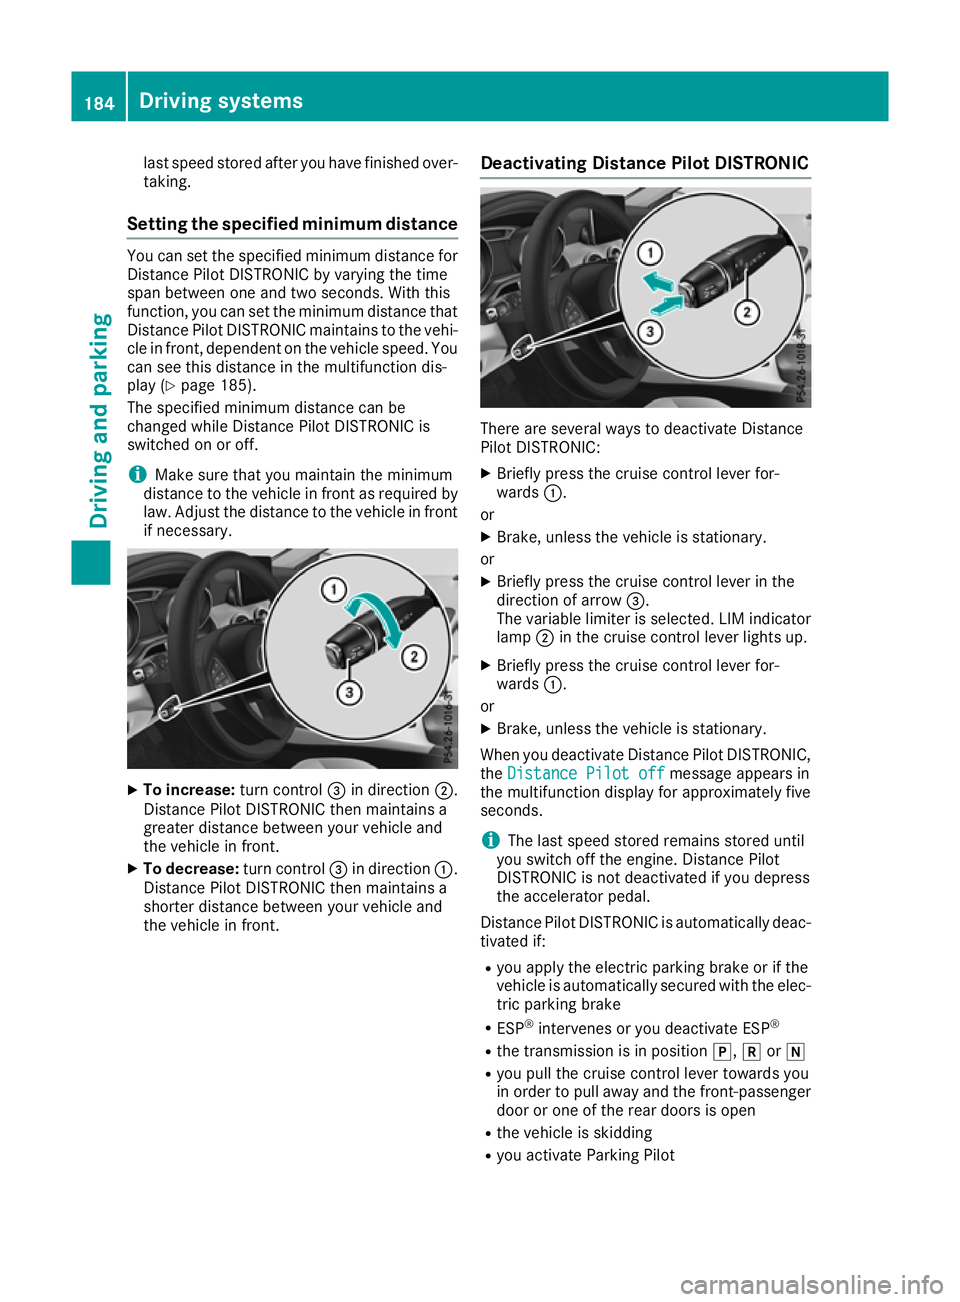
if necessary. X
To increase: turn control=in direction ;.
Distance Pilot DISTRONIC then maintains a
greater distance between your vehicle and
the vehicle in front.
X To decrease: turn control=in direction :.
Distance Pilot DISTRONIC then maintains a
shorter distance between your vehicle and
the vehicle in front. Deactivating Distance Pilot DISTRONIC There are several ways to deactivate Distance
Pilot DISTRONIC:
X Briefly press the cruise control lever for-
wards :.
or X Brake, unless the vehicle is stationary.
or X Briefly press the cruise control lever in the
direction of arrow =.
The variable limiter is selected. LIM indicator lamp ;in the cruise control lever lights up.
X Briefly press the cruise control lever for-
wards :.
or
X Brake, unless the vehicle is stationary.
When you deactivate Distance Pilot DISTRONIC, the Distance Pilot off Distance Pilot off message appears in
the multifunction display for approximately five
seconds.
i The last speed stored remains stored until
you switch off the engine. Distance Pilot
DISTRONIC is not deactivated if you depress
the accelerator pedal.
Distance Pilot DISTRONIC is automatically deac- tivated if:
R you apply the electric parking brake or if the
vehicle is automatically secured with the elec-
tric parking brake
R ESP ®
intervenes or you deactivate ESP ®
R the transmission is in position j,kori
R you pull the cruise control lever towards you
in order to pull away and the front-passenger door or one of the rear doors is open
R the vehicle is skidding
R you activate Parking Pilot 184
Driving systemsDriving and parking
Page 189 of 369
Tips for driving with Distance Pilot
DISTRONIC General notes
Pay particular attention in the following traffic
situations:
R Cornering, entering and exiting a bend: the
ability of Distance Pilot DISTRONIC to detect
vehicles when cornering is limited. Your vehi-
cle may brake unexpectedly or late.
R Driving on a different line: Distance Pilot
DISTRONIC may not detect vehicles driving in
a different lane. The distance to the vehicle in front will be too short.
R Other vehicles changing lane: Distance Pilot
DISTRONIC has not detected the vehicle cut-
ting in yet. The distance to this vehicle will be
too short.
R Narrow vehicles: Distance Pilot DISTRONIC
does not detect the vehicle in front on the
edge of the carriageway because of its narrow
width. The distance to the vehicle in front will
be too short.
R Obstacles and stationary vehicles: Distance
Pilot DISTRONIC does not brake for obstacles
or stationary vehicles. If, for example, the
detected vehicle turns a corner and an obsta-
cle or stationary vehicle is revealed, Distance Pilot DISTRONIC will not brake for them.
R Distance Pilot DISTRONIC may mistakenly
detect vehicles that are crossing your lane. If
you activate Distance Pilot DISTRONIC under the following conditions, the vehicle could
pull away unintentionally:
- at traffic lights with crossing traffic, for
example
- if there is a vehicle in front after a crossing
with the HOLD function activated
In such situations, brake if necessary. Distance Pilot DISTRONIC is then switched off. HOLD function
General notes The HOLD function can assist the driver in the
following situations:
R when pulling away, especially on steep slopes
R when manoeuvring on steep slopes
R when waiting in traffic The vehicle is kept stationary without the driver
having to depress the brake pedal.
The braking effect is cancelled and the HOLD
function deactivated when you depress the
accelerator pedal to pull away.
Important safety notes G
WARNING
When leaving the vehicle, it can still roll away despite being braked by the HOLD function if:
R there is a malfunction in the system or in
the voltage supply
R the HOLD function is deactivated by the
accelerator pedal being depressed, e.g. by
a vehicle occupant
R the electrical system in the engine com-
partment, the battery or the fuses are tam-
pered with
R the battery is disconnected
There is a risk of an accident.
Before leaving the vehicle, always deactivate
the HOLD function and secure the vehicle
from rolling away.
! When Distance Pilot DISTRONIC or the
HOLD function is activated, the vehicle
brakes automatically in certain situations.
To avoid damage to the vehicle, deactivate
Distance Pilot DISTRONIC and the HOLD
function in the following or similar situations:
R when towing away
R in a car wash
Deactivating the HOLD function (Y page 187).
Activation conditions You can activate the HOLD function if:
R
the vehicle is stationary
R the engine is running or if it has been auto-
matically switched off by the ECO start/stop
function
R the driver's door is closed or if your seat belt
is fastened
R the electric parking brake is released
R Distance Pilot DISTRONIC is deactivated
R the transmission is in position h,kori
on vehicles with automatic transmission 186
Driving systemsDriving an
d parking
Page 190 of 369
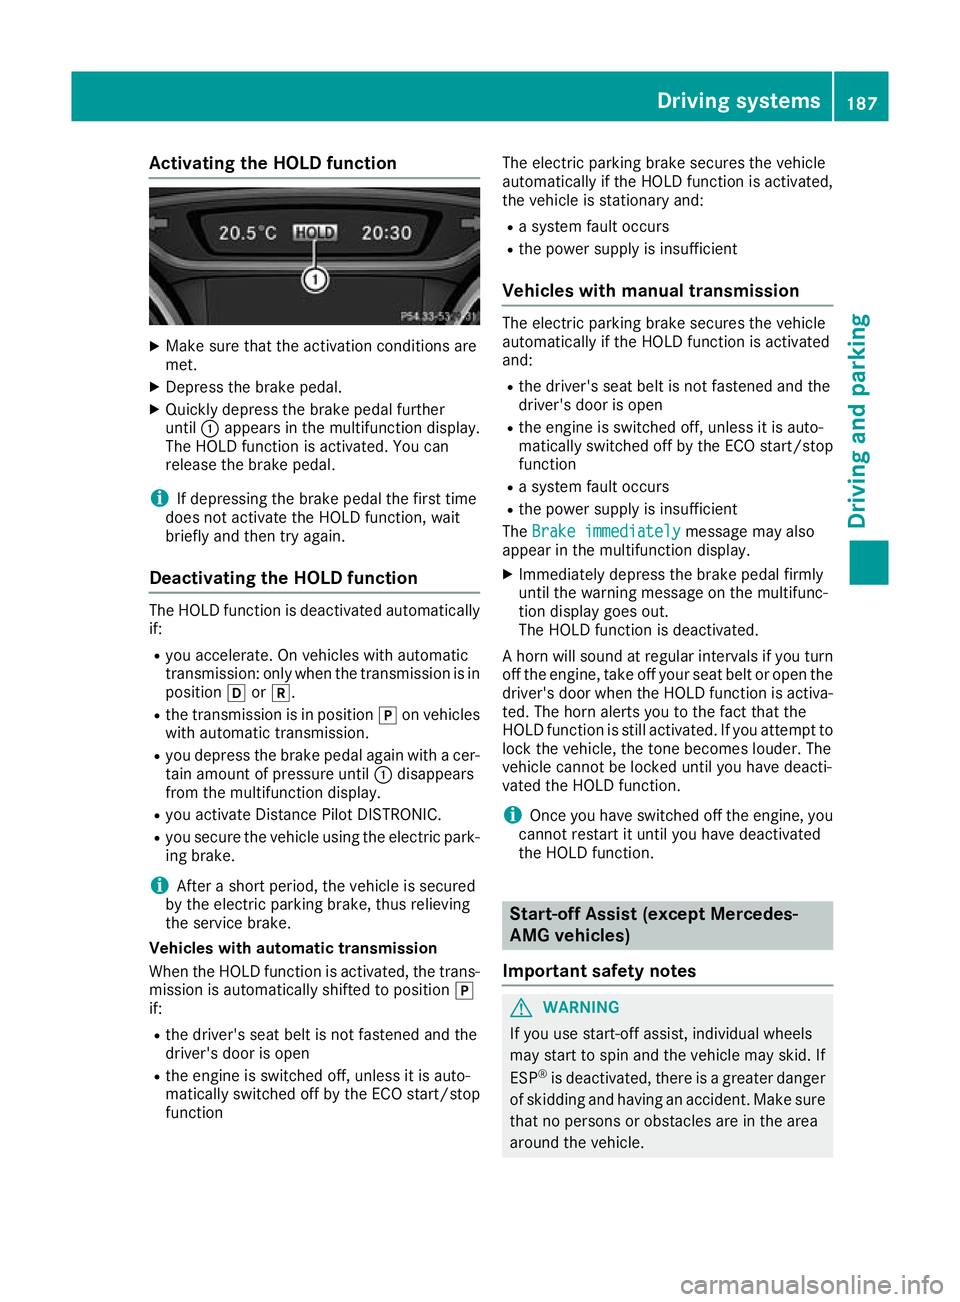
Activating the HOLD function
X
Make sure that the activation conditions are
met.
X Depress the brake pedal.
X Quickly depress the brake pedal further
until :appears in the multifunction display.
The HOLD function is activated. You can
release the brake pedal.
i If depressing the brake pedal the first time
does not activate the HOLD function, wait
briefly and then try again.
Deactivating the HOLD function The HOLD function is deactivated automatically
if:
R you accelerate. On vehicles with automatic
transmission: only when the transmission is in
position hork.
R the transmission is in position jon vehicles
with automatic transmission.
R you depress the brake pedal again with a cer-
tain amount of pressure until :disappears
from the multifunction display.
R you activate Distance Pilot DISTRONIC.
R you secure the vehicle using the electric park-
ing brake.
i After a short period, the vehicle is secured
by the electric parking brake, thus relieving
the service brake.
Vehicles with automatic transmission
When the HOLD function is activated, the trans-
mission is automatically shifted to position j
if:
R the driver's seat belt is not fastened and the
driver's door is open
R the engine is switched off, unless it is auto-
matically switched off by the ECO start/stop
function The electric parking brake secures the vehicle
automatically if the HOLD function is activated,
the vehicle is stationary and:
R a system fault occurs
R the power supply is insufficient
Vehicles with manual transmission The electric parking brake secures the vehicle
automatically if the HOLD function is activated
and:
R the driver's seat belt is not fastened and the
driver's door is open
R the engine is switched off, unless it is auto-
matically switched off by the ECO start/stop
function
R a system fault occurs
R the power supply is insufficient
The Brake immediately
Brake immediately message may also
appear in the multifunction display.
X Immediately depress the brake pedal firmly
until the warning message on the multifunc-
tion display goes out.
The HOLD function is deactivated.
A horn will sound at regular intervals if you turn
off the engine, take off your seat belt or open the driver's door when the HOLD function is activa-ted. The horn alerts you to the fact that the
HOLD function is still activated. If you attempt to
lock the vehicle, the tone becomes louder. The
vehicle cannot be locked until you have deacti-
vated the HOLD function.
i Once you have switched off the engine, you
cannot restart it until you have deactivated
the HOLD function. Start-off Assist (except Mercedes-
AMG vehicles)
Important safety notes G
WARNING
If you use start-off assist, individual wheels
may start to spin and the vehicle may skid. If
ESP ®
is deactivated, there is a greater danger
of skidding and having an accident. Make sure that no persons or obstacles are in the area
around the vehicle. Driving systems
187Driving and parking Z
Page 200 of 369
Parking Pilot does not assist you parking in
spaces parallel or at right angles to the direction of travel if:
R the parking space is on a kerb
R the system reads the parking space as being
blocked, such as by foliage or grass paving
blocks
R the area is too small for the vehicle to
manoeuvre into
R the parking space is bordered by an obstacle,
e.g. a tree, a post or a trailer
Further information on the detection range
(Y page 193). G
WARNING
If there are objects above the detection range:
R Parking Pilot may steer in too early
R the vehicle may not stop in front of these
objects
This could cause a collision. There is a risk of
an accident.
If objects are located above the detection
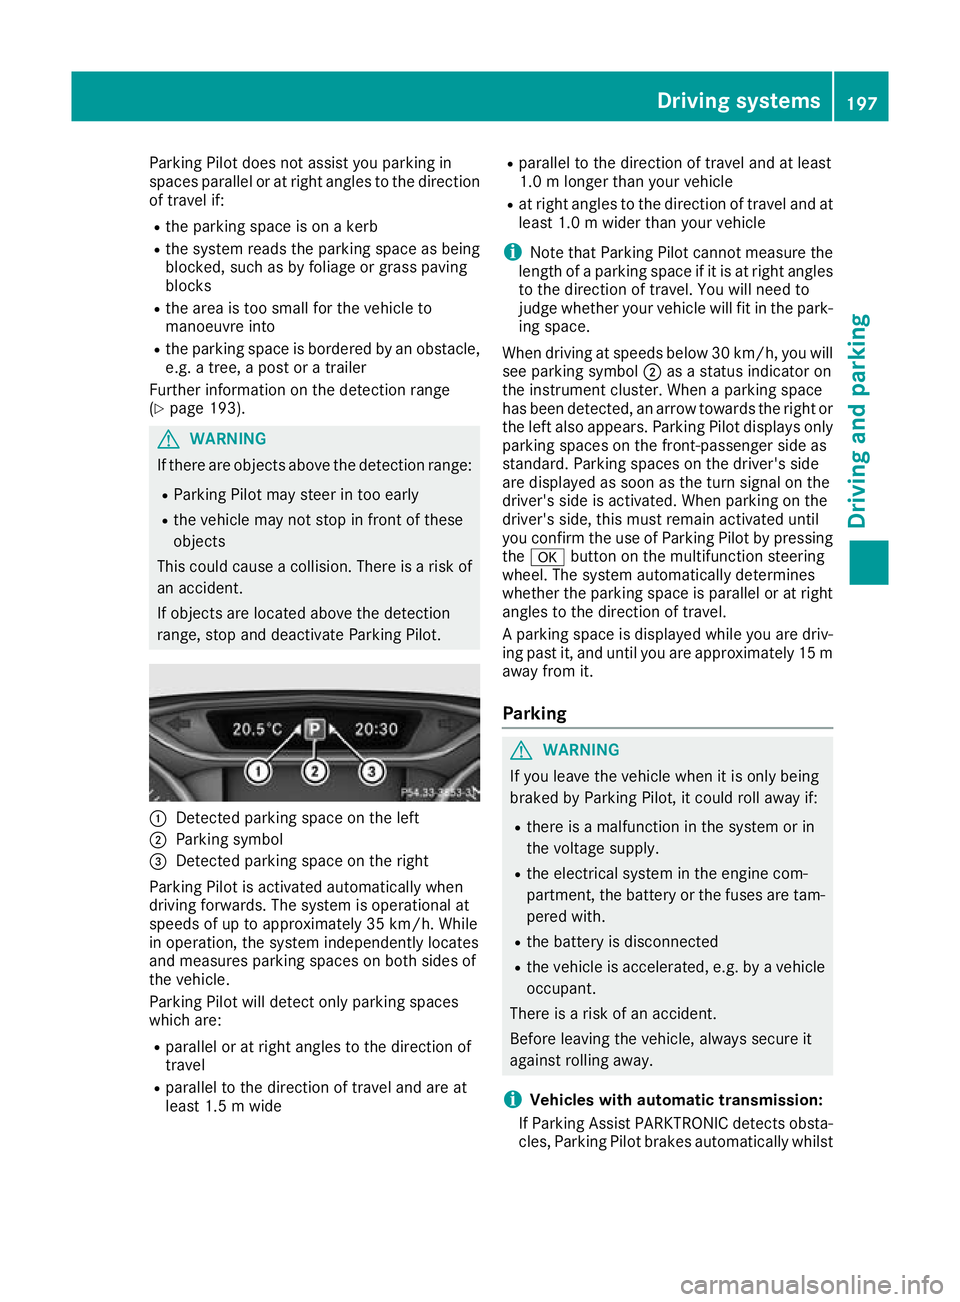
range, stop and deactivate Parking Pilot. :
Detected parking space on the left
; Parking symbol
= Detected parking space on the right
Parking Pilot is activated automatically when
driving forwards. The system is operational at
speeds of up to approximately 35 km/h. While
in operation, the system independently locates
and measures parking spaces on both sides of
the vehicle.
Parking Pilot will detect only parking spaces
which are:
R parallel or at right angles to the direction of
travel
R parallel to the direction of travel and are at
least 1.5 m wide R
parallel to the direction of travel and at least
1.0 m longer than your vehicle
R at right angles to the direction of travel and at
least 1.0 m wider than your vehicle
i Note that Parking Pilot cannot measure the
length of a parking space if it is at right angles to the direction of travel. You will need to
judge whether your vehicle will fit in the park-
ing space.
When driving at speeds below 30 km/h, you will
see parking symbol ;as a status indicator on
the instrument cluster. When a parking space
has been detected, an arrow towards the right or the left also appears. Parking Pilot displays only
parking spaces on the front-passenger side as
standard. Parking spaces on the driver's side
are displayed as soon as the turn signal on the
driver's side is activated. When parking on the
driver's side, this must remain activated until
you confirm the use of Parking Pilot by pressing the a button on the multifunction steering
wheel. The system automatically determines
whether the parking space is parallel or at right
angles to the direction of travel.
A parking space is displayed while you are driv- ing past it, and until you are approximately 15 m
away from it.
Parking G
WARNING
If you leave the vehicle when it is only being
braked by Parking Pilot, it could roll away if:
R there is a malfunction in the system or in
the voltage supply.
R the electrical system in the engine com-
partment, the battery or the fuses are tam-
pered with.
R the battery is disconnected
R the vehicle is accelerated, e.g. by a vehicle
occupant.
There is a risk of an accident.
Before leaving the vehicle, always secure it
against rolling away.
i Vehicles with automatic transmission:
If Parking Assist PARKTRONIC detects obsta- cles, Parking Pilot brakes automatically whilst Driving systems
197Driving and parking Z
Page 218 of 369
The multifunction display shows the
Check
Check
trailer hitch lock
trailer hitch lock display message until
the ball coupling is engaged.
X Remove the protective cap from the ball cou-
pling and store it in a safe place.
X Make sure that the ball of the ball coupling is
clean and that it is either greased or dry
(grease free), depending on the instructions
for the trailer.
Folding in the ball coupling G
WARNING
If you release the ball coupling or it does not
engage correctly when folding in, it will swing out. Within pivoting range of the ball coupling,
there is an increased risk of an accident and
injury.
Only release the ball coupling if the pivoting
range is unobstructed. Always make sure that the ball coupling engages when folding in.
i Fold the ball coupling in if you are not using
the trailer tow hitch.
X Make sure that the vehicle is stationary and
the trailer cables are disconnected.
X Place the protective cap on the ball coupling.
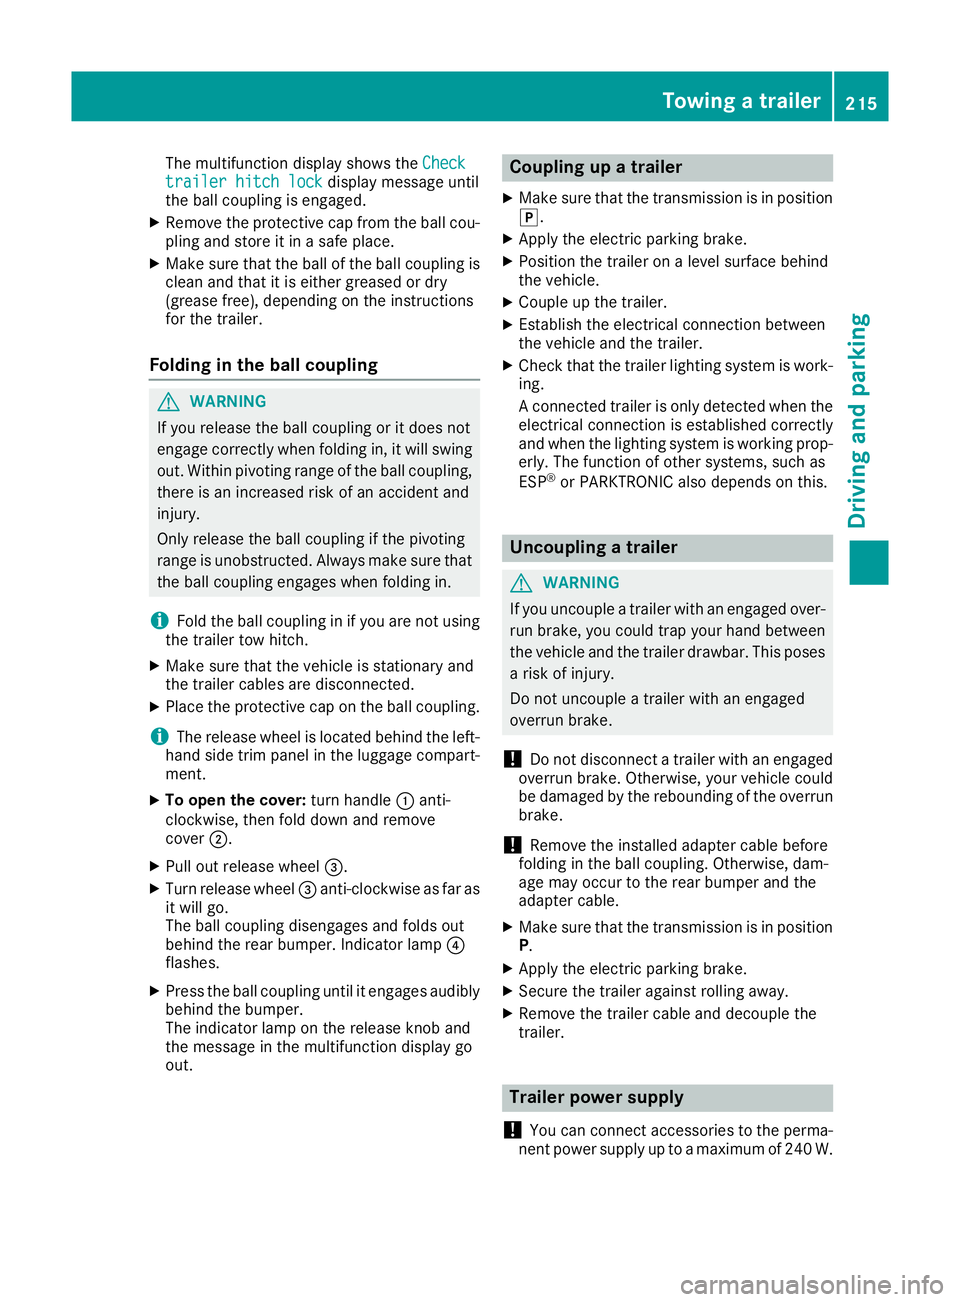
i The release wheel is located behind the left-
hand side trim panel in the luggage compart- ment.
X To open the cover: turn handle:anti-
clockwise, then fold down and remove
cover ;.
X Pull out release wheel =.
X Turn release wheel =anti-clockwise as far as
it will go.
The ball coupling disengages and folds out
behind the rear bumper. Indicator lamp ?
flashes.
X Press the ball coupling until it engages audibly
behind the bumper.
The indicator lamp on the release knob and
the message in the multifunction display go
out. Coupling up a trailer
X Make sure that the transmission is in position
j.
X Apply the electric parking brake.
X Position the trailer on a level surface behind
the vehicle.
X Couple up the trailer.
X Establish the electrical connection between
the vehicle and the trailer.
X Check that the trailer lighting system is work-
ing.
A connected trailer is only detected when the
electrical connection is established correctly
and when the lighting system is working prop- erly. The function of other systems, such as
ESP ®
or PARKTRONIC also depends on this. Uncoupling a trailer
G
WARNING
If you uncouple a trailer with an engaged over- run brake, you could trap your hand between
the vehicle and the trailer drawbar. This poses a risk of injury.
Do not uncouple a trailer with an engaged
overrun brake.
! Do not disconnect a trailer with an engaged
overrun brake. Otherwise, your vehicle could
be damaged by the rebounding of the overrun brake.
! Remove the installed adapter cable before
folding in the ball coupling. Otherwise, dam-
age may occur to the rear bumper and the
adapter cable.
X Make sure that the transmission is in position
P.
X Apply the electric parking brake.
X Secure the trailer against rolling away.
X Remove the trailer cable and decouple the
trailer. Trailer power supply
! You can connect accessories to the perma-
nent power supply up to a maximum of 240 W. Towing a trailer
215Driving and parking Z
Page 219 of 369
You cannot charge a trailer battery using the
power supply.
When it leaves the factory, your vehicle's trailer
socket is equipped with a permanent power
supply and a power supply that is switched on
via the ignition lock.
The permanent power supply is supplied via
trailer socket pin 9.
The power supply that is switched on via the
ignition lock is supplied via trailer socket pin 10.
The trailer's permanent power supply is
switched off in the event of low vehicle supply
voltage and after six hours at the latest.
You can find more information about fitting the
trailer electrics at a qualified specialist work-
shop.
X To switch the connected power supply on
or off: turn the key to position 2or 0respec-
tively (Y page 144). Failure check for LEDs
If LED lamps are fitted in the trailer, a malfunc-
tion message may appear in the multifunction
display even if there is no fault. The reason for
the error message may be that the current has
fallen below the minimum of 50 mA.
To ensure reliable operation of the failure indi-
cator, each LED chain in the trailer lighting must
be guaranteed a minimum current of 50 mA. Trailer with 7-pin connector
General notes Trailer with 7-pin connector:
you can connect
to the 13-pin socket on the ball coupling using
an adapter or, if necessary, an adapter cable.
Both can be obtained at a qualified specialist
workshop.
Fitting the adapter !
Make sure that there is sufficient cable play
so that the cable cannot become detached
when cornering.
! Remove the installed adapter cable before
folding in the ball coupling. Otherwise, dam-
age may occur to the rear bumper and the
adapter cable. X
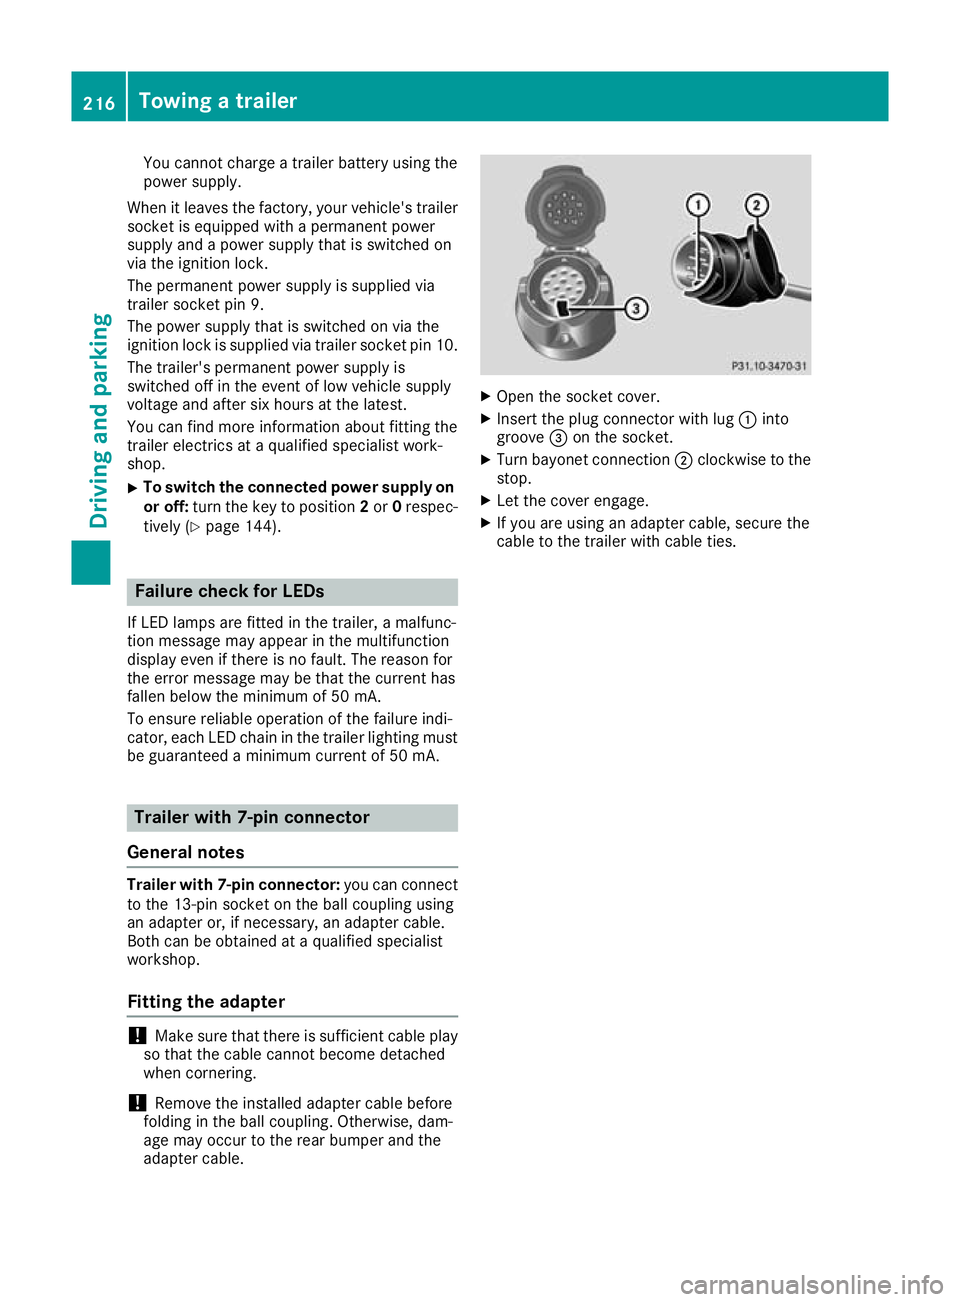
Open the socket cover.
X Insert the plug connector with lug :into
groove =on the socket.
X Turn bayonet connection ;clockwise to the
stop.
X Let the cover engage.
X If you are using an adapter cable, secure the
cable to the trailer with cable ties. 216
Towing a trailerDriving and parking