2017 MERCEDES-BENZ GLA SUV airbag
[x] Cancel search: airbagPage 66 of 369
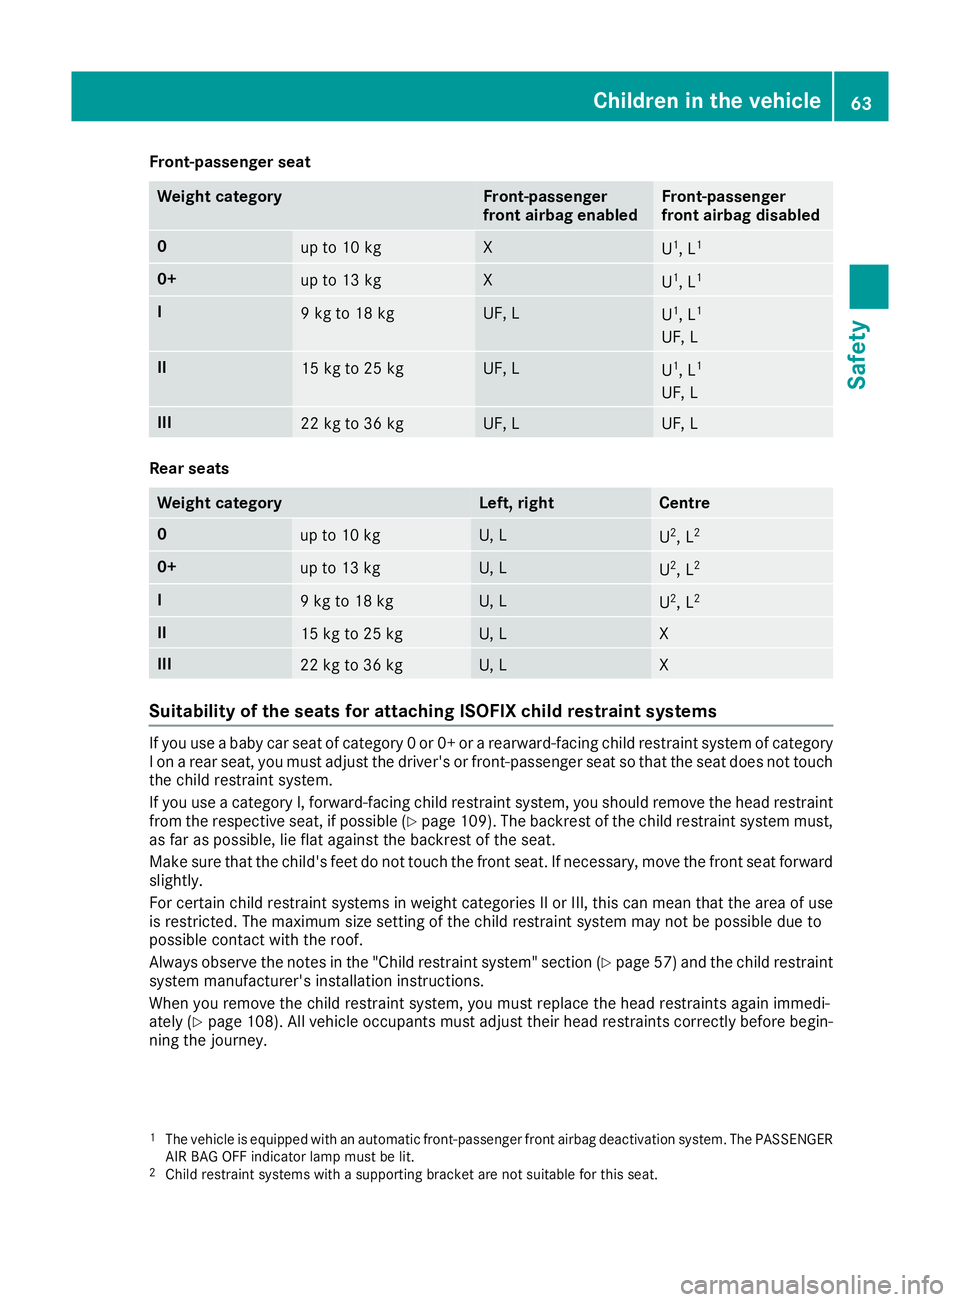
Front-passenger seat
Weight category Front-passenger
front airbag enabled Front-passenger
front airbag disabled
0
up to 10 kg X
U
1
, L 1 0+
up to 13 kg X
U
1
, L 1 I
9 kg to 18 kg UF, L
U
1
, L 1
UF, L II
15 kg to 25 kg UF, L
U
1
, L 1
UF, L III
22 kg to 36 kg UF, L UF, L
Rear seats
Weight category Left, right Centre
0
up to 10 kg U, L
U
2
, L 2 0+
up to 13 kg U, L
U
2
, L 2 I
9 kg to 18 kg U, L
U
2
, L 2 II
15 kg to 25 kg U, L X
III
22 kg to 36 kg U, L X
Suitability of the seats for attaching ISOFIX child restraint systems
If you use a baby car seat of category 0 or 0+ or a rearward-facing child restraint system of category
I on a rear seat, you must adjust the driver's or front-passenger seat so that the seat does not touch the child restraint system.
If you use a category I, forward-facing child restraint system, you should remove the head restraintfrom the respective seat, if possible (Y page 109). The backrest of the child restraint system must,
as far as possible, lie flat against the backrest of the seat.
Make sure that the child's feet do not touch the front seat. If necessary, move the front seat forward
slightly.
For certain child restraint systems in weight categories II or III, this can mean that the area of use is restricted. The maximum size setting of the child restraint system may not be possible due to
possible contact with the roof.
Always observe the notes in the "Child restraint system" section (Y page 57)and the child restraint
system manufacturer's installation instructions.
When you remove the child restraint system, you must replace the head restraints again immedi-
ately (Y page 108). All vehicle occupants must adjust their head restraints correctly before begin-
ning the journey.
1 The vehicle is equipped with an automatic front-passenger front airbag deactivation system. The PASSENGER
AIR BAG OFF indicator lamp must be lit.
2 Child restraint systems with a supporting bracket are not suitable for this seat. Children in the vehicle
63Safety Z
Page 109 of 369
Correct driver's seat position
G
WARNING
You could lose control of the vehicle while
driving if you:
R adjust the driver's seat, steering wheel or
mirrors
R fasten the seat belt
There is a risk of an accident.
Adjust the driver's seat, head restraint, steer-
ing wheel and mirrors and fasten your seat
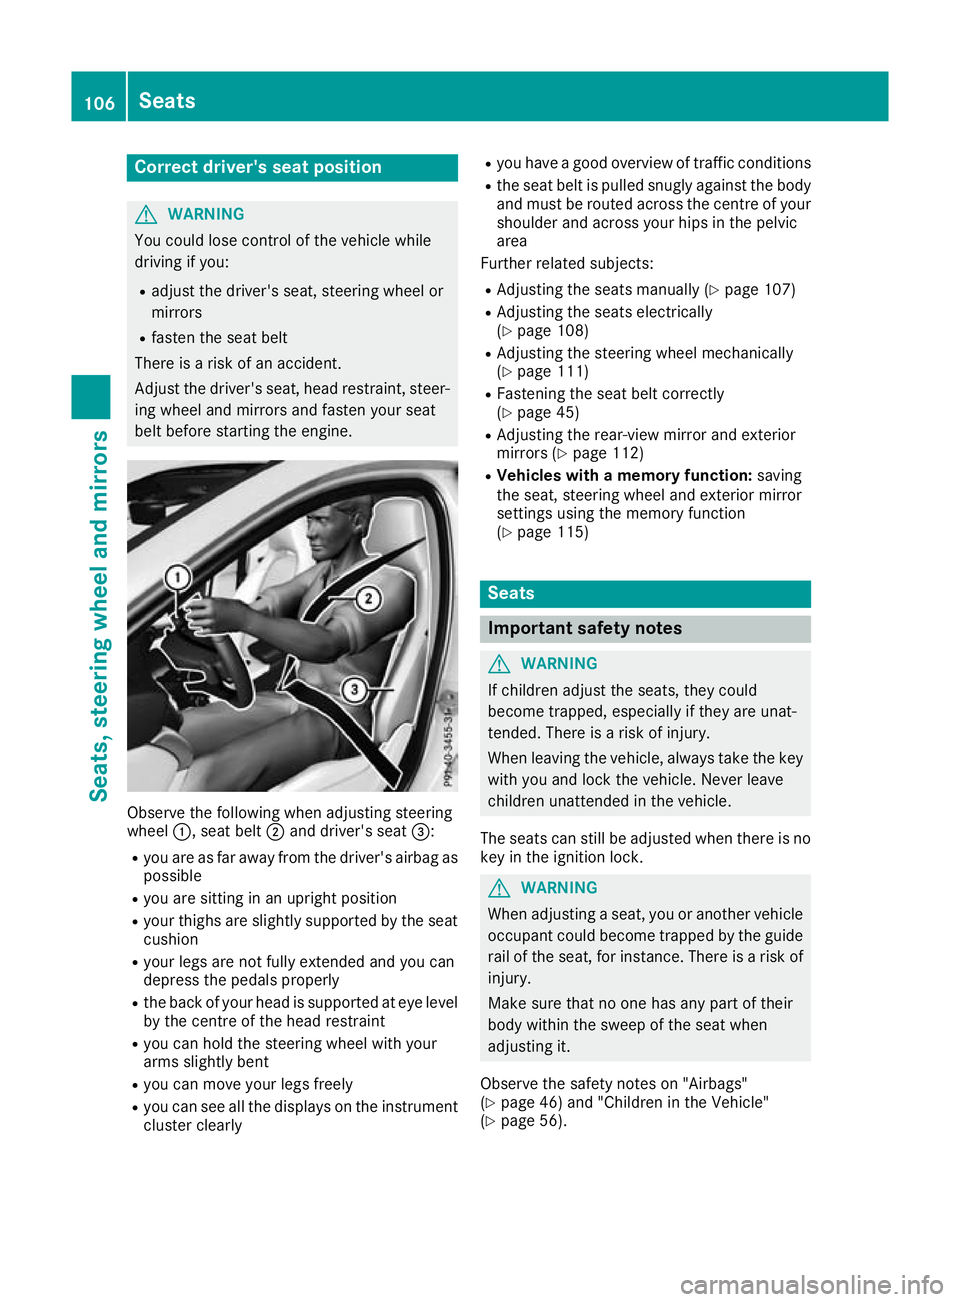
belt before starting the engine. Observe the following when adjusting steering
wheel
:, seat belt ;and driver's seat =:
R you are as far away from the driver's airbag as
possible
R you are sitting in an upright position
R your thighs are slightly supported by the seat
cushion
R your legs are not fully extended and you can
depress the pedals properly
R the back of your head is supported at eye level
by the centre of the head restraint
R you can hold the steering wheel with your
arms slightly bent
R you can move your legs freely
R you can see all the displays on the instrument
cluster clearly R
you have a good overview of traffic conditions
R the seat belt is pulled snugly against the body
and must be routed across the centre of your
shoulder and across your hips in the pelvic
area
Further related subjects:
R Adjusting the seats manually (Y page 107)
R Adjusting the seats electrically
(Y page 108)
R Adjusting the steering wheel mechanically
(Y page 111)
R Fastening the seat belt correctly
(Y page 45)
R Adjusting the rear-view mirror and exterior
mirrors (Y page 112)
R Vehicles with a memory function: saving
the seat, steering wheel and exterior mirror
settings using the memory function
(Y page 115) Seats
Important safety notes
G
WARNING
If children adjust the seats, they could
become trapped, especially if they are unat-
tended. There is a risk of injury.
When leaving the vehicle, always take the key with you and lock the vehicle. Never leave
children unattended in the vehicle.
The seats can still be adjusted when there is no
key in the ignition lock. G
WARNING
When adjusting a seat, you or another vehicle occupant could become trapped by the guiderail of the seat, for instance. There is a risk of
injury.
Make sure that no one has any part of their
body within the sweep of the seat when
adjusting it.
Observe the safety notes on "Airbags"
(Y page 46) and "Children in the Vehicle"
(Y page 56). 106
SeatsSeats, steering wheel and
mirrors
Page 121 of 369
2
Driver's seat, front-passenger seat and rear
seats occupied, luggage compartment
laden
3 Driver's and front-passenger seat occupied
and maximum permissible rear axle load uti- lised, e.g. when towing a trailer
The headlamp range control allows you to adjust
the cone of light from the headlamps to suit the
vehicle load.
X Start the engine.
X Turn the headlamp range controller to the
position that corresponds to the load in your
vehicle. Combination switch
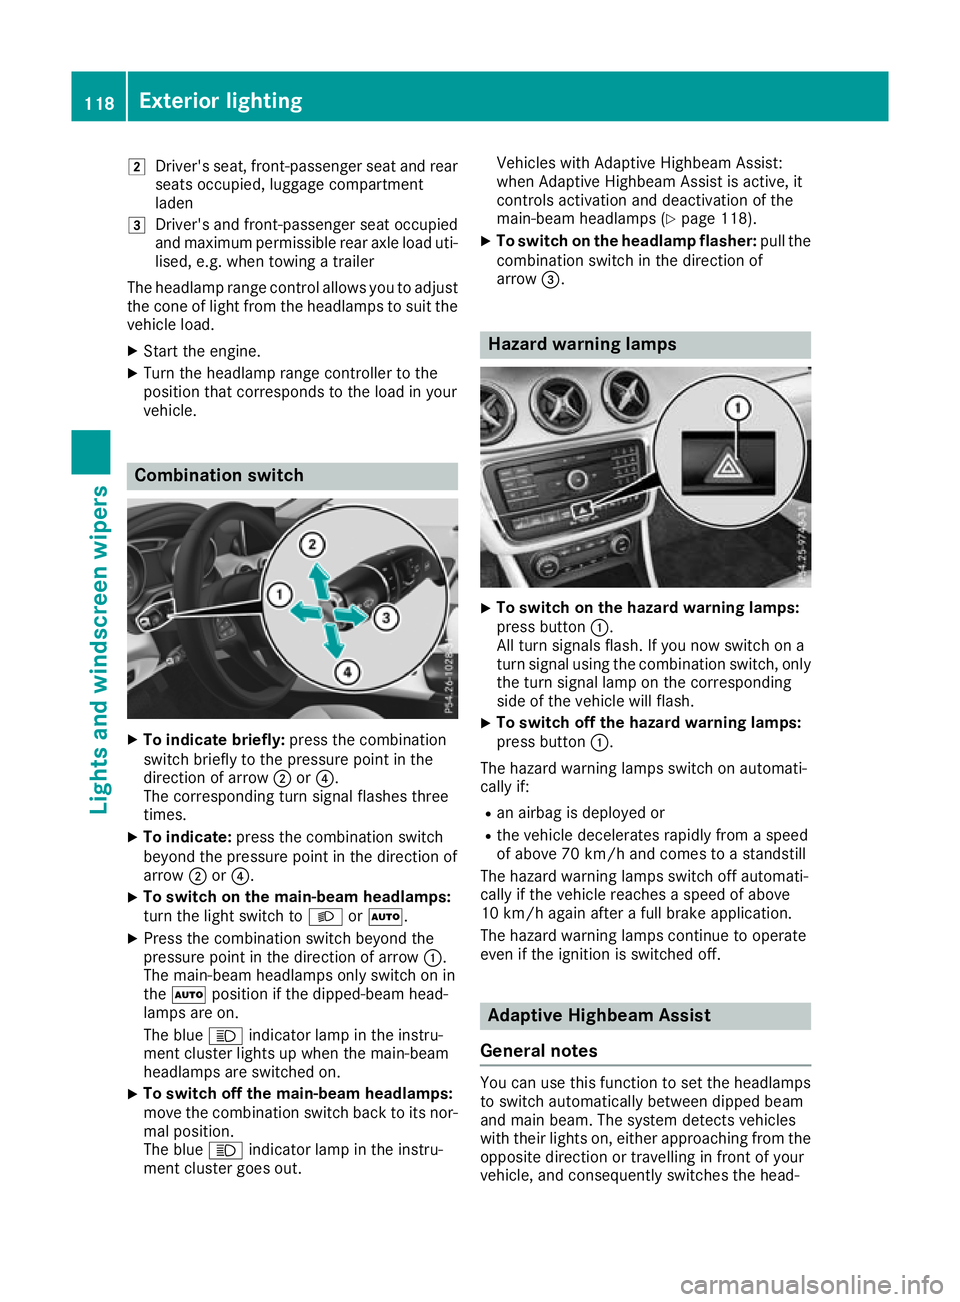
X
To indicate briefly: press the combination
switch briefly to the pressure point in the
direction of arrow ;or?.
The corresponding turn signal flashes three
times.
X To indicate: press the combination switch
beyond the pressure point in the direction of
arrow ;or?.
X To switch on the main-beam headlamps:
turn the light switch to LorÃ.
X Press the combination switch beyond the
pressure point in the direction of arrow :.
The main-beam headlamps only switch on in
the à position if the dipped-beam head-
lamps are on.
The blue Kindicator lamp in the instru-
ment cluster lights up when the main-beam
headlamps are switched on.
X To switch off the main-beam headlamps:
move the combination switch back to its nor-
mal position.
The blue Kindicator lamp in the instru-
ment cluster goes out. Vehicles with Adaptive Highbeam Assist:
when Adaptive Highbeam Assist is active, it
controls activation and deactivation of the
main-beam headlamps (Y page 118).
X To switch on the headlamp flasher: pull the
combination switch in the direction of
arrow =. Hazard warning lamps
X
To switch on the hazard warning lamps:
press button :.
All turn signals flash. If you now switch on a
turn signal using the combination switch, only the turn signal lamp on the corresponding
side of the vehicle will flash.
X To switch off the hazard warning lamps:
press button
:.
The hazard warning lamps switch on automati-
cally if:
R an airbag is deployed or
R the vehicle decelerates rapidly from a speed
of above 70 km/h and comes to a standstill
The hazard warning lamps switch off automati-
cally if the vehicle reaches a speed of above
10 km/h again after a full brake application.
The hazard warning lamps continue to operate
even if the ignition is switched off. Adaptive Highbeam Assist
General notes You can use this function to set the headlamps
to switch automatically between dipped beam
and main beam. The system detects vehicles
with their lights on, either approaching from the
opposite direction or travelling in front of your
vehicle, and consequently switches the head- 118
Exterior lightingLights and
windscreen wipers
Page 244 of 369
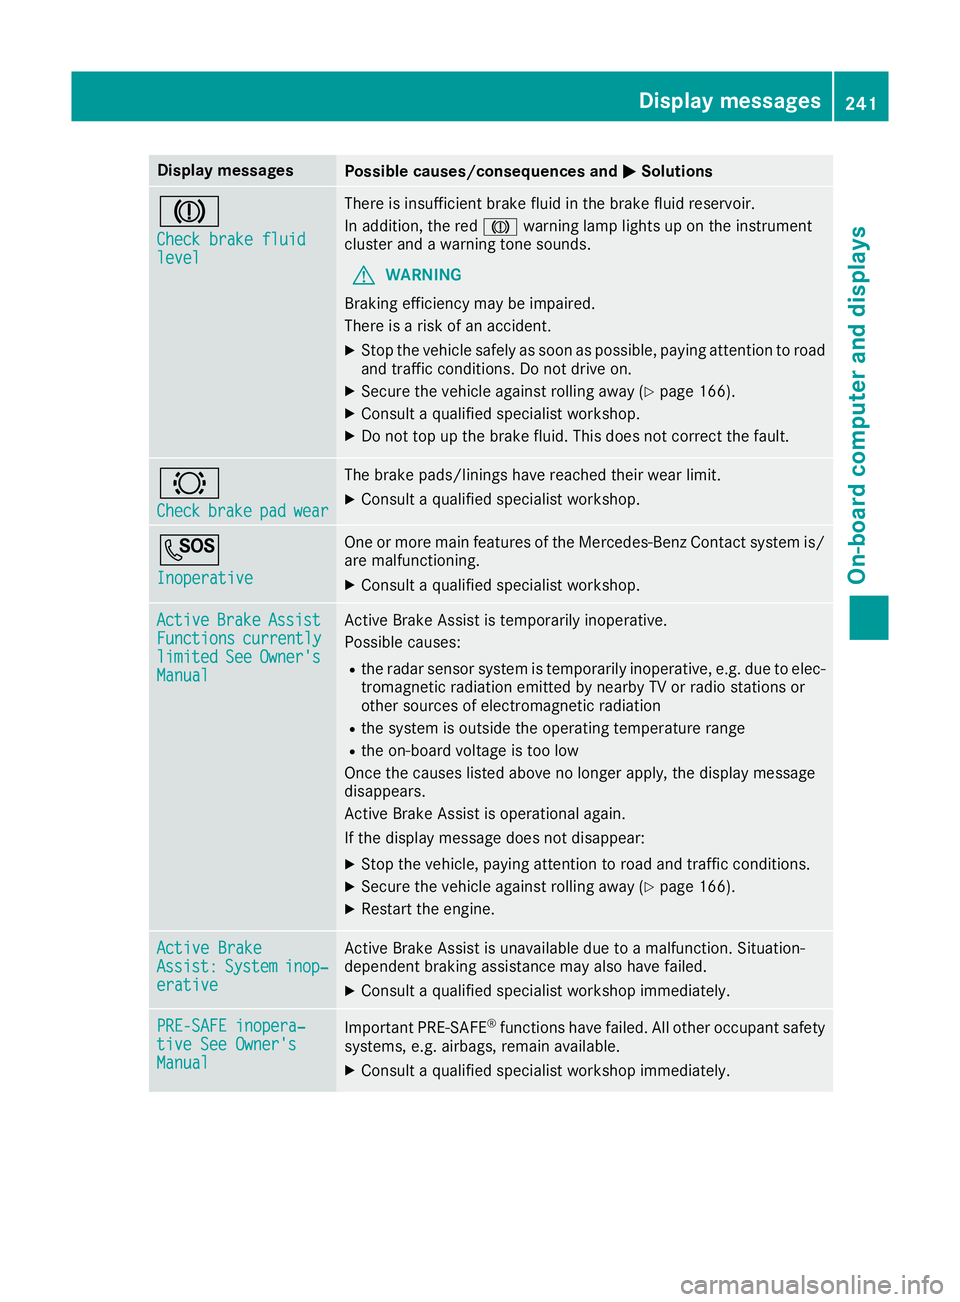
Display messages
Possible causes/consequences and
M
MSolutions J
Check brake fluid Check brake fluid
level level There is insufficient brake fluid in the brake fluid reservoir.
In addition, the red Jwarning lamp lights up on the instrument
cluster and a warning tone sounds.
G WARNING
Braking efficiency may be impaired.
There is a risk of an accident.
X Stop the vehicle safely as soon as possible, paying attention to road
and traffic conditions. Do not drive on.
X Secure the vehicle against rolling away (Y page 166).
X Consult a qualified specialist workshop.
X Do not top up the brake fluid. This does not correct the fault. #
Check Check
brake
brakepad
padwear
wear The brake pads/linings have reached their wear limit.
X Consult a qualified specialist workshop. G
Inoperative Inoperative One or more main features of the Mercedes-Benz Contact system is/
are malfunctioning.
X Consult a qualified specialist workshop. Active
Active
Brake
BrakeAssist
Assist
Functions
Functions currently
currently
limited
limited See
SeeOwner's
Owner's
Manual
Manual Active Brake Assist is temporarily inoperative.
Possible causes:
R the radar sensor system is temporarily inoperative, e.g. due to elec-
tromagnetic radiation emitted by nearby TV or radio stations or
other sources of electromagnetic radiation
R the system is outside the operating temperature range
R the on-board voltage is too low
Once the causes listed above no longer apply, the display message
disappears.
Active Brake Assist is operational again.
If the display message does not disappear:
X Stop the vehicle, paying attention to road and traffic conditions.
X Secure the vehicle against rolling away (Y page 166).
X Restart the engine. Active Brake Active Brake
Assist: Assist:
System
Systeminop‐
inop‐
erative
erative Active Brake Assist is unavailable due to a malfunction. Situation-
dependent braking assistance may also have failed.
X Consult a qualified specialist workshop immediately. PRE-SAFE inopera‐
PRE-SAFE inopera‐
tive See Owner's tive See Owner's
Manual Manual
Important PRE-SAFE
®
functions have failed. All other occupant safety
systems, e.g. airbags, remain available.
X Consult a qualified specialist workshop immediately. Display
messages
241On-board computer and displays Z
Page 246 of 369
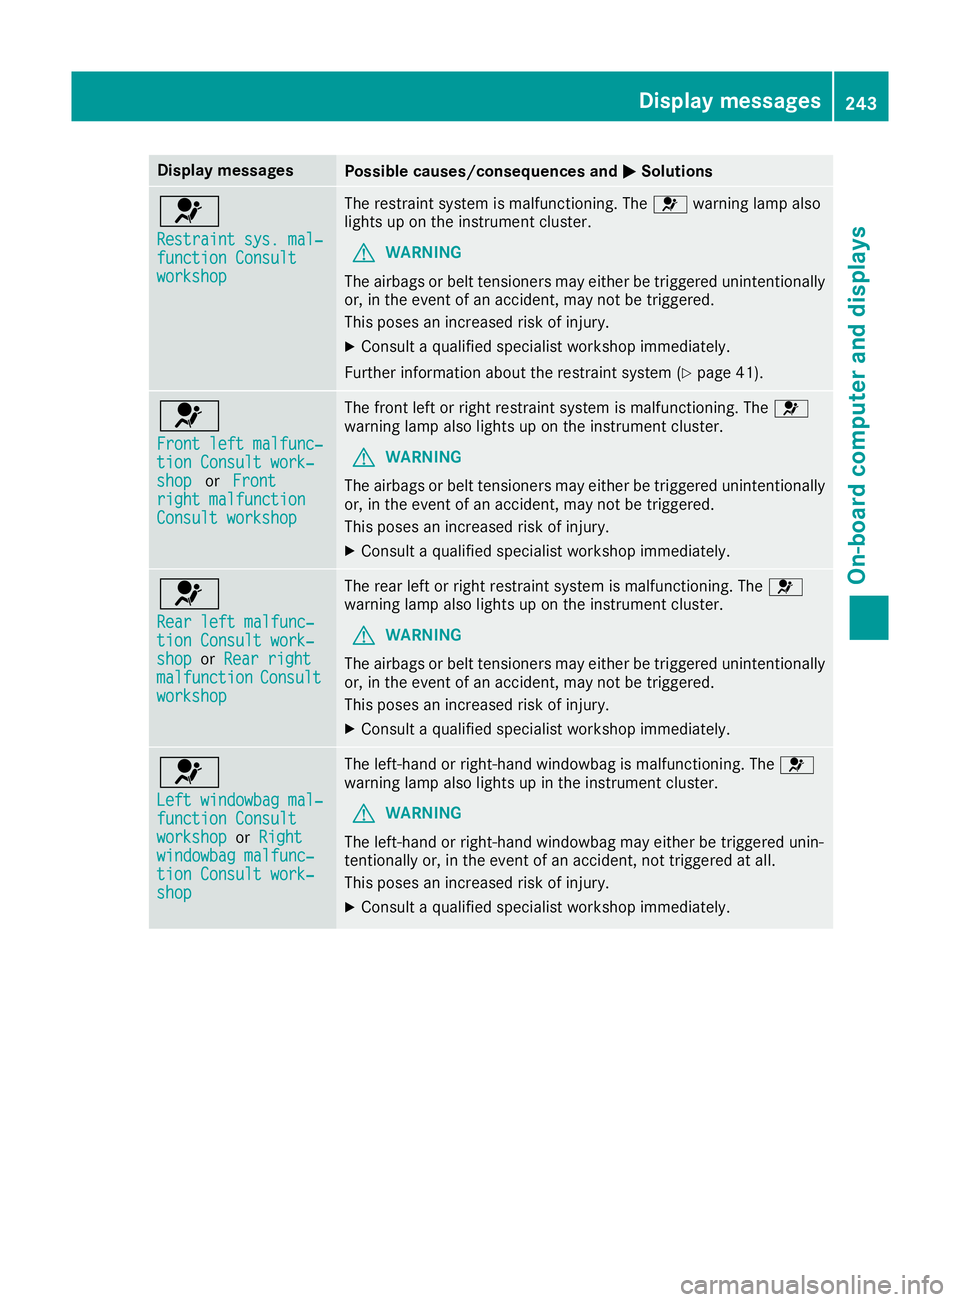
Display messages
Possible causes/consequences and
M
MSolutions 6
Restraint sys. mal‐ Restraint sys. mal‐
function Consult function Consult
workshop workshop The restraint system is malfunctioning. The
6warning lamp also
lights up on the instrument cluster.
G WARNING
The airbags or belt tensioners may either be triggered unintentionally or, in the event of an accident, may not be triggered.
This poses an increased risk of injury.
X Consult a qualified specialist workshop immediately.
Further information about the restraint system (Y page 41).6
Front left malfunc‐ Front left malfunc‐
tion Consult work‐ tion Consult work‐
shop shop
orFront
Front
right malfunction
right malfunction
Consult workshop Consult workshop The front left or right restraint system is malfunctioning. The
6
warning lamp also lights up on the instrument cluster.
G WARNING
The airbags or belt tensioners may either be triggered unintentionally or, in the event of an accident, may not be triggered.
This poses an increased risk of injury.
X Consult a qualified specialist workshop immediately. 6
Rear left malfunc‐ Rear left malfunc‐
tion Consult work‐ tion Consult work‐
shop shop
orRear right
Rear right
malfunction
malfunction Consult
Consult
workshop
workshop The rear left or right restraint system is malfunctioning. The
6
warning lamp also lights up on the instrument cluster.
G WARNING
The airbags or belt tensioners may either be triggered unintentionally or, in the event of an accident, may not be triggered.
This poses an increased risk of injury.
X Consult a qualified specialist workshop immediately. 6
Left windowbag mal‐ Left windowbag mal‐
function Consult function Consult
workshop workshop
orRight
Right
windowbag malfunc‐
windowbag malfunc‐
tion Consult work‐ tion Consult work‐
shop shop The left-hand or right-hand windowbag is malfunctioning. The
6
warning lamp also lights up in the instrument cluster.
G WARNING
The left-hand or right-hand windowbag may either be triggered unin-
tentionally or, in the event of an accident, not triggered at all.
This poses an increased risk of injury.
X Consult a qualified specialist workshop immediately. Display
messages
243On-board computer and displays Z
Page 247 of 369
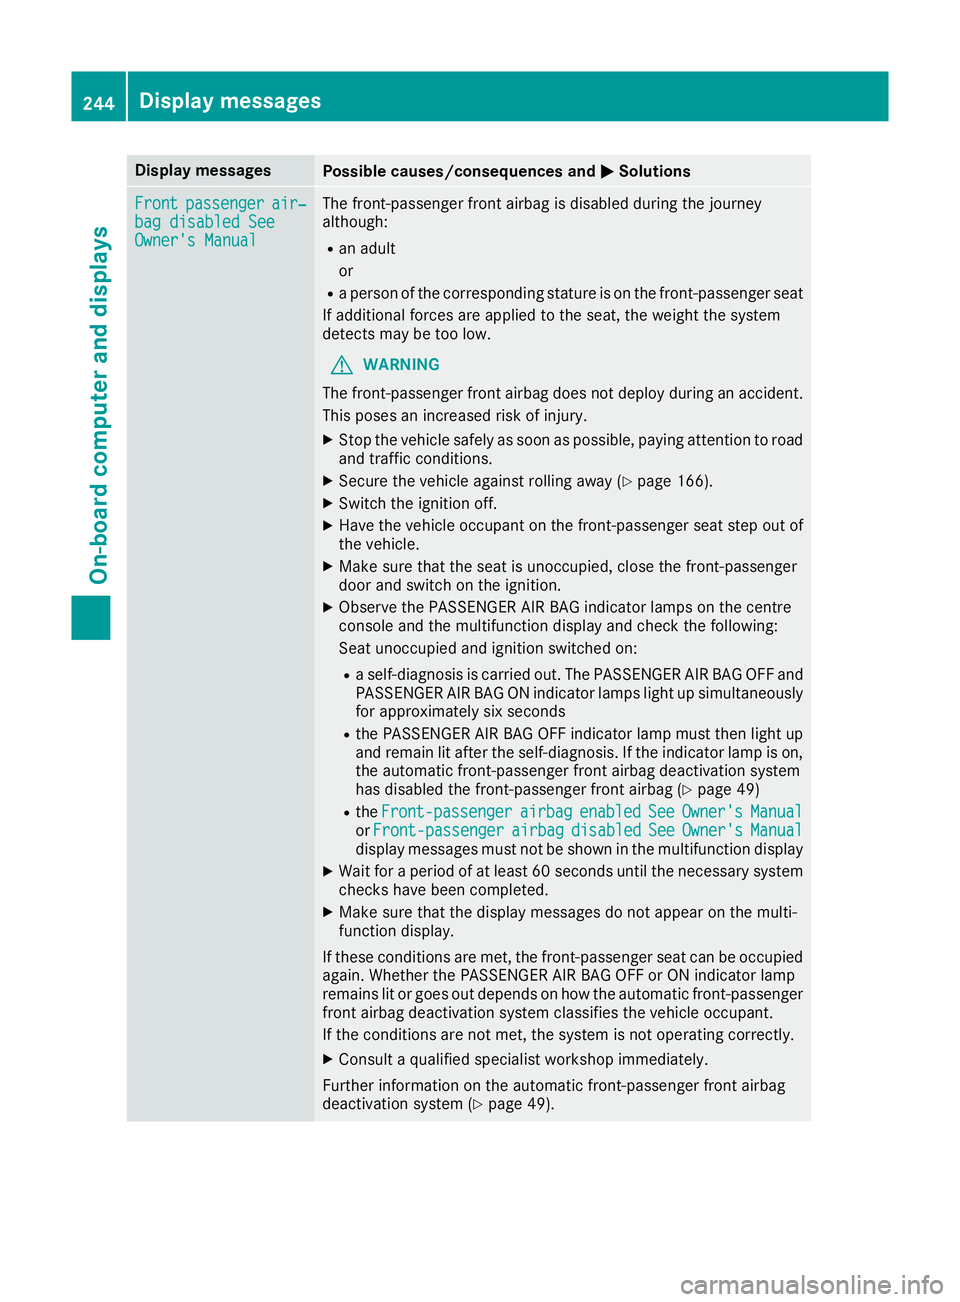
Display messages
Possible causes/consequences and
M
MSolutions Front
Front
passenger
passenger air‐
air‐
bag disabled See
bag disabled See
Owner's Manual Owner's Manual The front-passenger front airbag is disabled during the journey
although:
R an adult
or
R a person of the corresponding stature is on the front-passenger seat
If additional forces are applied to the seat, the weight the system
detects may be too low.
G WARNING
The front-passenger front airbag does not deploy during an accident.
This poses an increased risk of injury.
X Stop the vehicle safely as soon as possible, paying attention to road
and traffic conditions.
X Secure the vehicle against rolling away (Y page 166).
X Switch the ignition off.
X Have the vehicle occupant on the front-passenger seat step out of
the vehicle.
X Make sure that the seat is unoccupied, close the front-passenger
door and switch on the ignition.
X Observe the PASSENGER AIR BAG indicator lamps on the centre
console and the multifunction display and check the following:
Seat unoccupied and ignition switched on:
R a self-diagnosis is carried out. The PASSENGER AIR BAG OFF and
PASSENGER AIR BAG ON indicator lamps light up simultaneously for approximately six seconds
R the PASSENGER AIR BAG OFF indicator lamp must then light up
and remain lit after the self-diagnosis. If the indicator lamp is on, the automatic front-passenger front airbag deactivation system
has disabled the front-passenger front airbag (Y page 49)
R the Front-passenger
Front-passenger airbag airbagenabled
enabled See
SeeOwner's
Owner's Manual
Manual
or Front-passenger
Front-passenger airbag
airbagdisabled
disabled See
SeeOwner's
Owner's Manual
Manual
display messages must not be shown in the multifunction display
X Wait for a period of at least 60 seconds until the necessary system
checks have been completed.
X Make sure that the display messages do not appear on the multi-
function display.
If these conditions are met, the front-passenger seat can be occupied again. Whether the PASSENGER AIR BAG OFF or ON indicator lamp
remains lit or goes out depends on how the automatic front-passenger
front airbag deactivation system classifies the vehicle occupant.
If the conditions are not met, the system is not operating correctly.
X Consult a qualified specialist workshop immediately.
Further information on the automatic front-passenger front airbag
deactivation system (Y page 49).244
Display
messagesOn-board computer and displays
Page 248 of 369
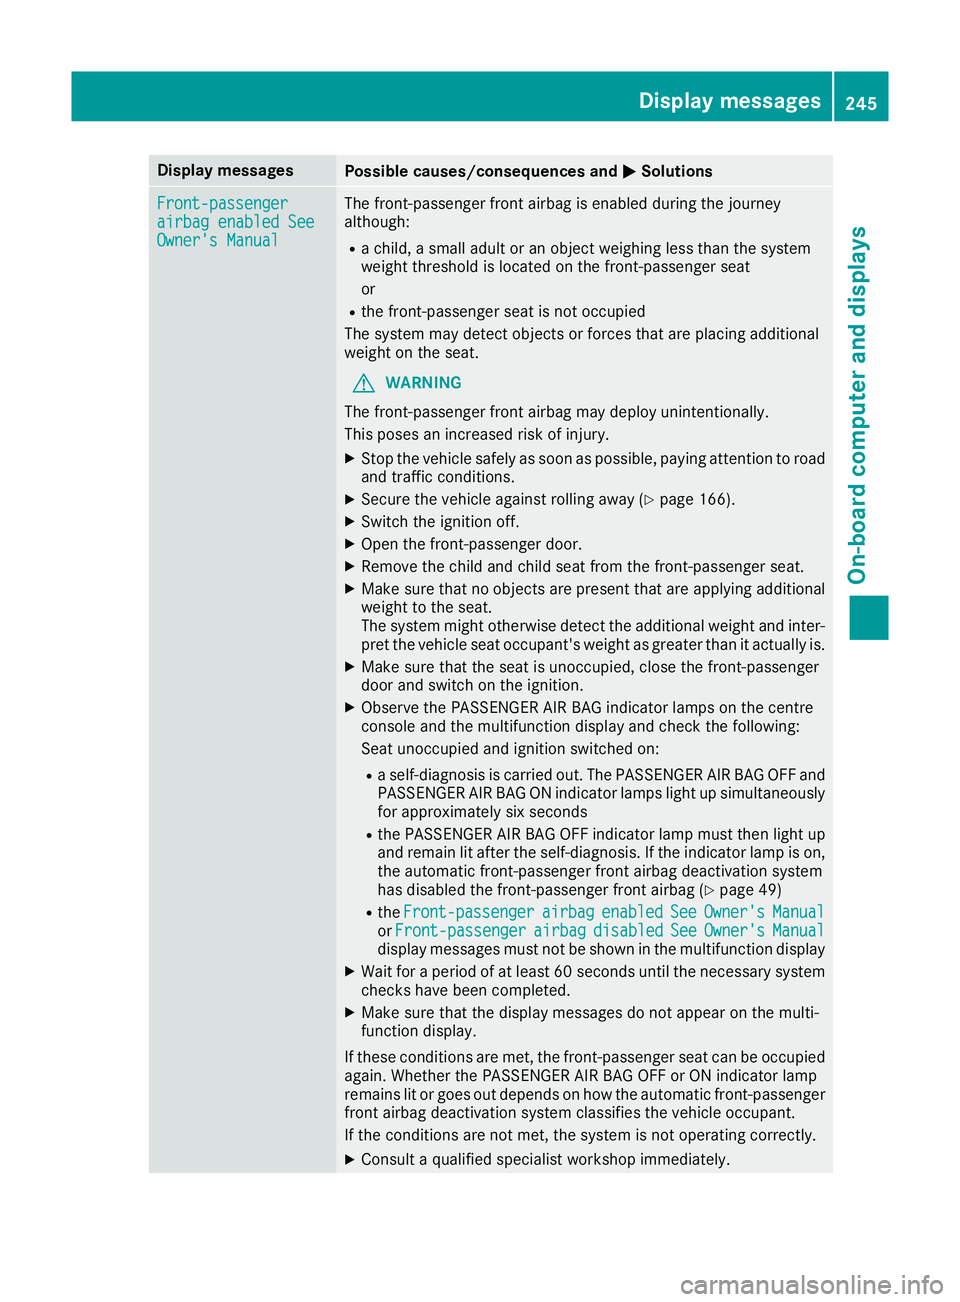
Display messages
Possible causes/consequences and
M
MSolutions Front-passenger
Front-passenger
airbag enabled See airbag enabled See
Owner's Manual Owner's Manual The front-passenger front airbag is enabled during the journey
although:
R a child, a small adult or an object weighing less than the system
weight threshold is located on the front-passenger seat
or
R the front-passenger seat is not occupied
The system may detect objects or forces that are placing additional
weight on the seat.
G WARNING
The front-passenger front airbag may deploy unintentionally.
This poses an increased risk of injury.
X Stop the vehicle safely as soon as possible, paying attention to road
and traffic conditions.
X Secure the vehicle against rolling away (Y page 166).
X Switch the ignition off.
X Open the front-passenger door.
X Remove the child and child seat from the front-passenger seat.
X Make sure that no objects are present that are applying additional
weight to the seat.
The system might otherwise detect the additional weight and inter-pret the vehicle seat occupant's weight as greater than it actually is.
X Make sure that the seat is unoccupied, close the front-passenger
door and switch on the ignition.
X Observe the PASSENGER AIR BAG indicator lamps on the centre
console and the multifunction display and check the following:
Seat unoccupied and ignition switched on:
R a self-diagnosis is carried out. The PASSENGER AIR BAG OFF and
PASSENGER AIR BAG ON indicator lamps light up simultaneously for approximately six seconds
R the PASSENGER AIR BAG OFF indicator lamp must then light up
and remain lit after the self-diagnosis. If the indicator lamp is on, the automatic front-passenger front airbag deactivation system
has disabled the front-passenger front airbag (Y page 49)
R the Front-passenger
Front-passenger airbag airbagenabled
enabled See
SeeOwner's
Owner's Manual
Manual
or Front-passenger
Front-passenger airbag
airbagdisabled
disabled See
SeeOwner's
Owner's Manual
Manual
display messages must not be shown in the multifunction display
X Wait for a period of at least 60 seconds until the necessary system
checks have been completed.
X Make sure that the display messages do not appear on the multi-
function display.
If these conditions are met, the front-passenger seat can be occupied again. Whether the PASSENGER AIR BAG OFF or ON indicator lamp
remains lit or goes out depends on how the automatic front-passenger
front airbag deactivation system classifies the vehicle occupant.
If the conditions are not met, the system is not operating correctly.
X Consult a qualified specialist workshop immediately. Display
messages
245On-board computer and displays Z
Page 249 of 369
Display messages
Possible causes/consequences and
M
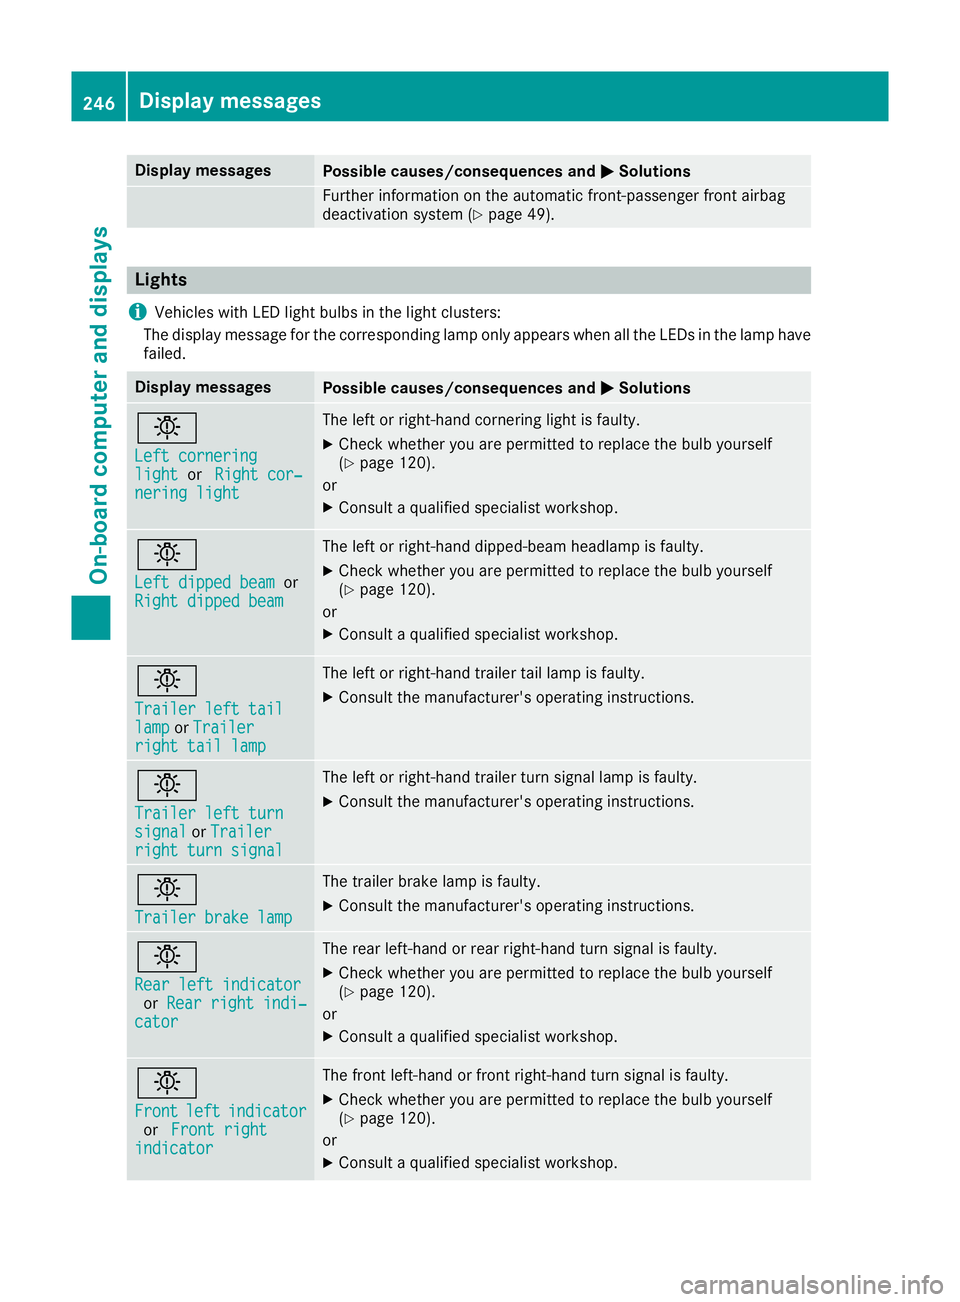
MSolutions Further information on the automatic front-passenger front airbag
deactivation system (Y page 49).Lights
i Vehicles with LED light bulbs in the light clusters:
The display message for the corresponding lamp only appears when all the LEDs in the lamp have
failed. Display messages
Possible causes/consequences and
M
MSolutions b
Left cornering Left cornering
light light
orRight cor‐
Right cor‐
nering light
nering light The left or right-hand cornering light is faulty.
X Check whether you are permitted to replace the bulb yourself
(Y page 120).
or
X Consult a qualified specialist workshop. b
Left dipped beam Left dipped beam
or
Right dipped beam
Right dipped beam The left or right-hand dipped-beam headlamp is faulty.
X Check whether you are permitted to replace the bulb yourself
(Y page 120).
or
X Consult a qualified specialist workshop. b
Trailer left tail Trailer left tail
lamp lamp
orTrailer
Trailer
right tail lamp
right tail lamp The left or right-hand trailer tail lamp is faulty.
X Consult the manufacturer's operating instructions. b
Trailer left turn Trailer left turn
signal signal
orTrailer
Trailer
right turn signal
right turn signal The left or right-hand trailer turn signal lamp is faulty.
X
Consult the manufacturer's operating instructions. b
Trailer brake lamp Trailer brake lamp The trailer brake lamp is faulty.
X Consult the manufacturer's operating instructions. b
Rear left indicator Rear left indicator
or Rear right indi‐
Rear right indi‐
cator
cator The rear left-hand or rear right-hand turn signal is faulty.
X Check whether you are permitted to replace the bulb yourself
(Y page 120).
or
X Consult a qualified specialist workshop. b
Front Front
left
leftindicator
indicator
or Front right
Front right
indicator
indicator The front left-hand or front right-hand turn signal is faulty.
X Check whether you are permitted to replace the bulb yourself
(Y page 120).
or
X Consult a qualified specialist workshop. 246
Display
messagesOn-board computer and displays