2017 MERCEDES-BENZ GLA SUV tow
[x] Cancel search: towPage 57 of 369
therefore cannot protect as intended. There is
an increased risk of injury, possibly even fatal.
Have pyrotechnic belt tensioners which have
been triggered replaced at a qualified special-
ist workshop immediately.
Mercedes-Benz recommends that you have the
vehicle towed to a qualified specialist workshop
after an accident. Take this into account, par-
ticularly if a seat belt tensioner was triggered or
an airbag was deployed.
An electric motor is used by PRE-SAFE ®
to trig-
ger the tightening of the seat belt in hazardous
situations. This procedure is reversible.
If the belt tensioners are triggered or an airbag is
deployed, you will hear a bang, and a small
amount of powder may also be released. The
6 restraint system warning lamp lights up.
Only in rare cases will the bang affect your hear-
ing. In general, the powder released is not haz-
ardous to health but may cause short-term
breathing difficulties to persons suffering from
asthma or other pulmonary conditions. Provided it is safe to do so, you should leave the vehicle
immediately or open the window in order to pre- vent breathing difficulties.
Operation During the first stage of a collision, the restraint
system control unit evaluates important physi-
cal data relating to vehicle deceleration or accel-
eration, such as:
R duration
R direction
R intensity
Based on the evaluation of this data, the
restraint system control unit triggers the seat
belt tensioners in the event of a head-on or rear
collision.
A seat belt tensioner can be triggered only if:
R the ignition is switched on
R the components of the restraint system are
operational. You can find further information
under: "Restraint system warning lamp"
(Y page 42)
R the seat belt buckle tongue has engaged in
the belt buckle of the respective front seat
The seat belt tensioners in the rear compart-
ment are triggered independently of the lock
status of the seat belts. If the restraint system control unit detects a
high-severity accident, in certain head-on colli-
sions, additional components of the restraint
system are deployed independently of each
other:
R front airbags and driver's kneebag
R windowbag, if the system determines that
deployment can offer additional protection to
that provided by the seat belt
On vehicles with the automatic front-passenger
front airbag deactivation system: depending on
the person in the front-passenger seat, the
front-passenger front airbag is either disabled or
enabled. The front-passenger front airbag can
be deployed in an accident only if the
PASSENGER AIR BAG OFF indicator lamp is off. Observe the information on the PASSENGER AIR
BAG indicator lamps (Y page 42).
Your vehicle has two-stage front airbags. In the
first deployment stage, the front airbag is filled
with propellant gas. The front airbag is fully
deployed if the second deployment stage is acti-
vated within a few milliseconds.
The activation threshold for the seat belt ten-
sioners and airbags is determined based on the
evaluation of the vehicle's rate of deceleration
or acceleration at various points in the vehicle.
This process is pre-emptive in nature. The trig-
gering/deployment process should take place
in good time at the start of the collision.
The rate of vehicle deceleration or acceleration
and the direction of the force are essentially
determined by:
R the distribution of forces during the collision
R the collision angle
R the deformation characteristics of the vehicle
R the characteristics of the object with which
the vehicle has collided
Factors that can be seen and measured only
after a collision has occurred do not play a deci-
sive role in the deployment of an airbag. Nor do
they provide an indication of airbag deployment.
The vehicle may be deformed significantly with- out an airbag being deployed. This is the case if only parts that are relatively easily deformed are
affected and the rate of deceleration is not high. Conversely, an airbag may be deployed even
though the vehicle suffers only minor deforma-
tion. This is the case if, for example, very rigid
vehicle parts such as longitudinal body mem-
bers are hit, and sufficient deceleration occurs
as a result. 54
Occupant safetySafety
Page 60 of 369
Child restraint system
If you fit a rearward-facing child restraint system
to the centre rear seat, the rear armrest must be folded back as far as possible.
Observe the instructions for correct use of the
child restraint system (Y page 61).
For safety reasons, Mercedes-Benz recom-
mends that you use only a child restraint system recommended by Mercedes-Benz
(Y page 65). G
WARNING
If the child restraint system is incorrectly fit-
ted on the seat position suitable for this pur-
pose, it cannot perform its intended protec-
tive function. In the event of an accident,
sharp braking or a sudden change in direction, the child may not be held securely. There is an
increased risk of serious or even fatal injuries.
Observe the manufacturer's installation
instructions and the correct use for the child
restraint system. Make sure that the entire
surface of the child restraint system is resting
on the seat surface. Never place objects
under or behind the child restraint system,
e.g. cushions. Only use child restraint sys-
tems with the original cover designed for
them. Only replace damaged covers with gen- uine covers. G
WARNING
If the child restraint system is fitted incor-
rectly or is not secured, it can come loose in
the event of an accident, heavy braking or a
sudden change in direction. The child
restraint system could be thrown about, strik- ing vehicle occupants. There is an increased
risk of injury, possibly even fatal.
Always fit child restraint systems properly,
even if they are not being used. Make sure
that you observe the child restraint system
manufacturer's installation instructions.
You will find further information on stowing
objects, luggage and loads securely under
"Loading guidelines" (Y page 288). G
WARNING
Child restraint systems or their securing sys-
tems that have been damaged or subjected to a load in an accident cannot perform their
intended protective function. In the event of
an accident, sharp braking or a sudden
change in direction, the child may not be held securely. There is an increased risk of serious
or even fatal injuries.
Immediately replace child restraint systems
that have been damaged or subjected to a
load in an accident. Have the child restraint
securing systems checked in a qualified spe-
cialist workshop before fitting a child restraint
system again.
The securing systems of child restraint systems
are:
R the seat belt system
R the ISOFIX or i-Size securing rings
R the Top Tether anchorages
If circumstances require you to fit a child
restraint system to the front-passenger seat, be
sure to observe the information on "Child
restraint systems on the front-passenger seat"
(Y page 60).
Observe the warning labels in the vehicle inte-
rior and on the child restraint system.
i It is advisable to use Mercedes-Benz care
products to clean child restraint systems rec- ommended by Mercedes-Benz. Information
can be obtained at a qualified specialist work-
shop. ISOFIX and i-Size child seat securing
systems G
WARNING
ISOFIX child restraint systems or i-Size child
restraint systems do not offer sufficient pro-
tection for children whose weight is greater
than 22 kg, who are secured using the safety belt integrated in the child restraint system.
The child could, for example, not be restrained
correctly in the event of an accident. This
poses an increased risk of injury or even fatal
injury. Children in the vehicle
57Safety
Z
Page 75 of 369
brakes are applied again, the brake lamps light
up continuously. The hazard warning lamps
switch off automatically if you travel faster than
10 km/ h.You can also switch off the hazard
warning lamps using the hazard warning button (Y page 118). ESP
®
(Electronic Stability Program)
General notes i
Observe the "Important safety notes" sec-
tion (Y page 68).
ESP ®
monitors driving stability and traction, i.e.
power transmission between the tyres and the
road surface.
If ESP ®
detects that the vehicle is deviating from
the direction desired by the driver, one or more
wheels are braked to stabilise the vehicle. The
engine output is also modified to keep the vehi- cle on the desired course within physical limits.
ESP ®
assists the driver when pulling away on
wet or slippery roads. ESP ®
can also stabilise
the vehicle during braking.
ETS/4ETS (Electronic Traction System) i
Observe the "Important safety notes" sec-
tion (Y page 68).
ETS traction control is part of ESP ®
. On vehicles
with 4MATIC, 4ETS is part of ESP ®
.
Traction control brakes the drive wheels indi-
vidually if they spin. This enables you to pull
away and accelerate on slippery surfaces, e.g. if the road surface is slippery on one side. In addi-
tion, more drive torque is transferred to the
wheel or wheels with traction.
Traction control remains active if you deactivate
ESP ®
.
Off-road 4ETS (Electronic Traction Sys-
tem) A 4ETS system specifically suited to off-road
terrain is activated automatically once the off-
road program is activated (Y page 192).
Important safety notes i
Observe the "Important safety notes" sec-
tion (Y page 68). G
WARNING
If ESP ®
is malfunctioning, ESP ®
is unable to
stabilise the vehicle. In addition, other driving
safety systems are switched off. This increa-
ses the risk of skidding and an accident.
Drive on carefully. Have ESP ®
checked at a
qualified specialist workshop.
Vehicles without 4MATIC: when towing your
vehicle with the front axle raised, it is important
that you observe the notes on ESP ®
(Y page 329).
If the å ESP®
OFF warning lamp lights up
continuously, ESP ®
is deactivated.
If the ÷ ESP®
warning lamp and the å
warning lamp are lit continuously, ESP ®
is not
available due to a malfunction.
Read the information on warning lamps
(Y page 269) and display messages that may be
shown in the instrument cluster (Y page 235).
Use only wheels with the recommended tyre
sizes. Only then will ESP ®
function properly.
Characteristics of ESP ® General information
If the ÷ ESP warning lamp goes out before
you begin the journey, ESP ®
is automatically
active.
If ESP ®
intervenes, the ÷ESP®
warning lamp
flashes on the instrument cluster.
If ESP ®
intervenes:
X Do not deactivate ESP ®
under any circum-
stances.
X When pulling away, depress the accelerator
pedal only as far as is necessary.
X Adapt your driving style to suit the prevailing
road and weather conditions.
ECO start/stop function
The ECO start/stop function switches the
engine off automatically if the vehicle stops
moving. When pulling away again, the engine
starts automatically. ESP ®
remains in its previ-
ously selected status. Example:if ESP®
was
deactivated before the engine was switched off,
ESP ®
remains deactivated when the engine is
switched on again. 72
Driving safety systemsSafety
Page 79 of 369
Protection against theft
Immobiliser
The immobiliser prevents your vehicle from
being started without the correct key.
X To activate with the key: remove the key
from the ignition lock.
X To activate with KEYLESS-GO start func-
tion or KEYLESS-GO:
switch the ignition off
and open the driver's door.
X To deactivate: switch on the ignition.
When leaving the vehicle, always take the key
with you and lock the vehicle. Anyone can start
the engine if a valid key has been left inside the
vehicle.
i The immobiliser is always deactivated when
you start the engine. ATA (Anti-Theft Alarm system)
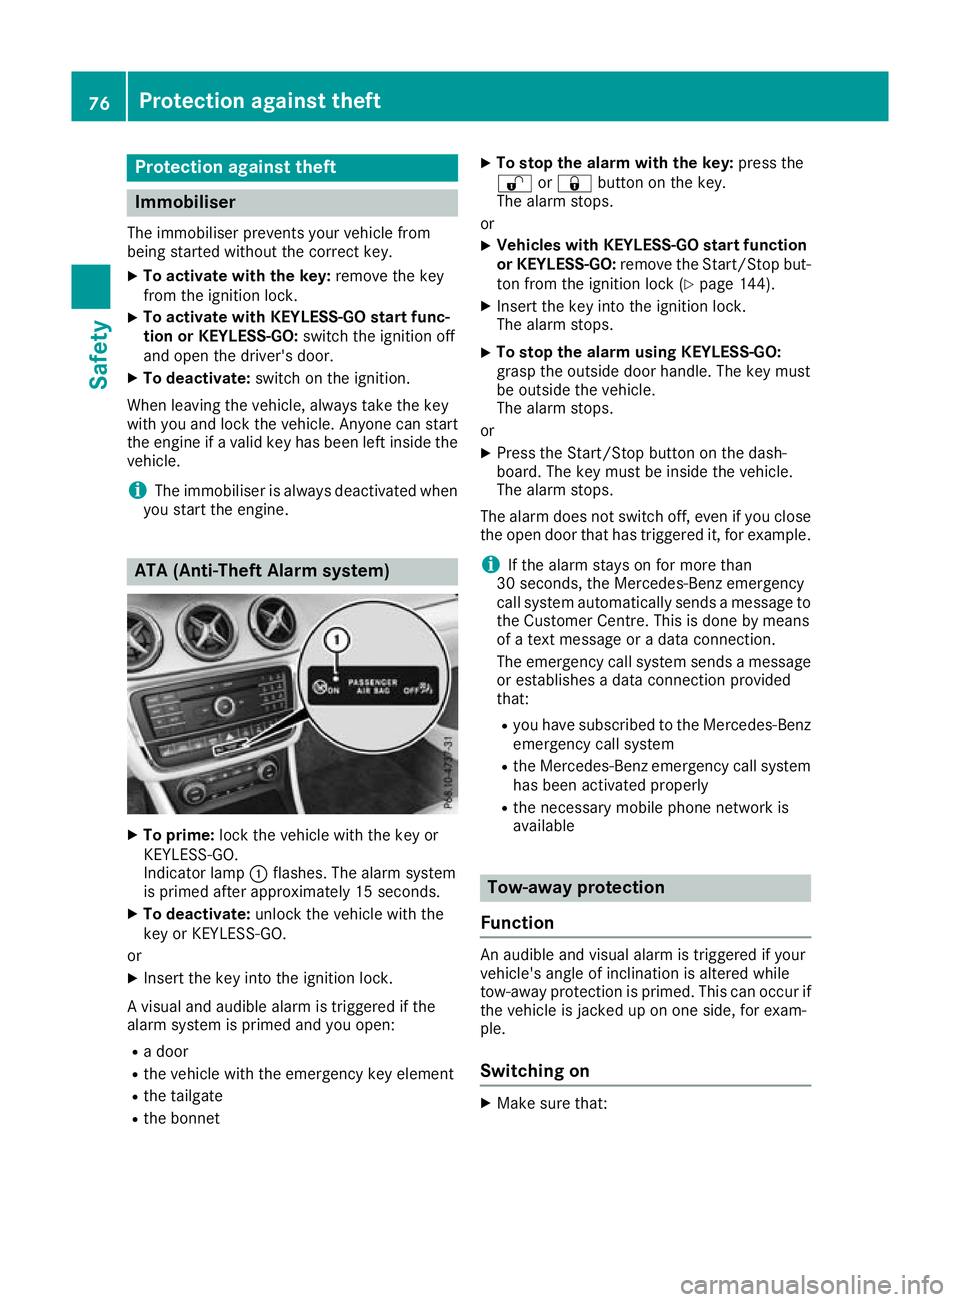
X
To prime: lock the vehicle with the key or
KEYLESS-GO.
Indicator lamp :flashes. The alarm system
is primed after approximately 15 seconds.
X To deactivate: unlock the vehicle with the
key or KEYLESS-GO.
or X Insert the key into the ignition lock.
A visual and audible alarm is triggered if the
alarm system is primed and you open: R a door
R the vehicle with the emergency key element
R the tailgate
R the bonnet X
To stop the alarm with the key: press the
% or& button on the key.
The alarm stops.
or X Vehicles with KEYLESS-GO start function
or KEYLESS-GO: remove the Start/Stop but-
ton from the ignition lock (Y page 144).
X Insert the key into the ignition lock.
The alarm stops.
X To stop the alarm using KEYLESS-GO:
grasp the outside door handle. The key must
be outside the vehicle.
The alarm stops.
or X Press the Start/Stop button on the dash-
board. The key must be inside the vehicle.
The alarm stops.
The alarm does not switch off, even if you close the open door that has triggered it, for example.
i If the alarm stays on for more than
30 seconds, the Mercedes‑Benz emergency
call system automatically sends a message to
the Customer Centre. This is done by means
of a text message or a data connection.
The emergency call system sends a message or establishes a data connection provided
that:
R you have subscribed to the Mercedes ‑Benz
emergency call system
R the Mercedes‑Benz emergency call system
has been activated properly
R the necessary mobile phone network is
available Tow-away protection
Function An audible and visual alarm is triggered if your
vehicle's angle of inclination is altered while
tow-away protection is primed. This can occur if
the vehicle is jacked up on one side, for exam-
ple.
Switching on X
Make sure that: 76
Protection against theftSafety
Page 80 of 369
R
the doors are closed
R the tailgate is closed
Only then is tow-away protection activated.
X Lock the vehicle with the key or KEYLESS-GO.
Tow-away protection is primed after approx-
imately 60 second s.
Switching off X
Unlo ck the vehicle with the key or KEYLESS-
GO.
or X Insert the key into the ignition lock.
Tow-away protection is switched off automat-
ically.
Deactivating X
Remove the key from the ignition lock.
or X Vehicles with KEYLESS-GO start function
or KEYLESS-GO: switch off the engine using
the Start/Stop button and open the driver's
door.
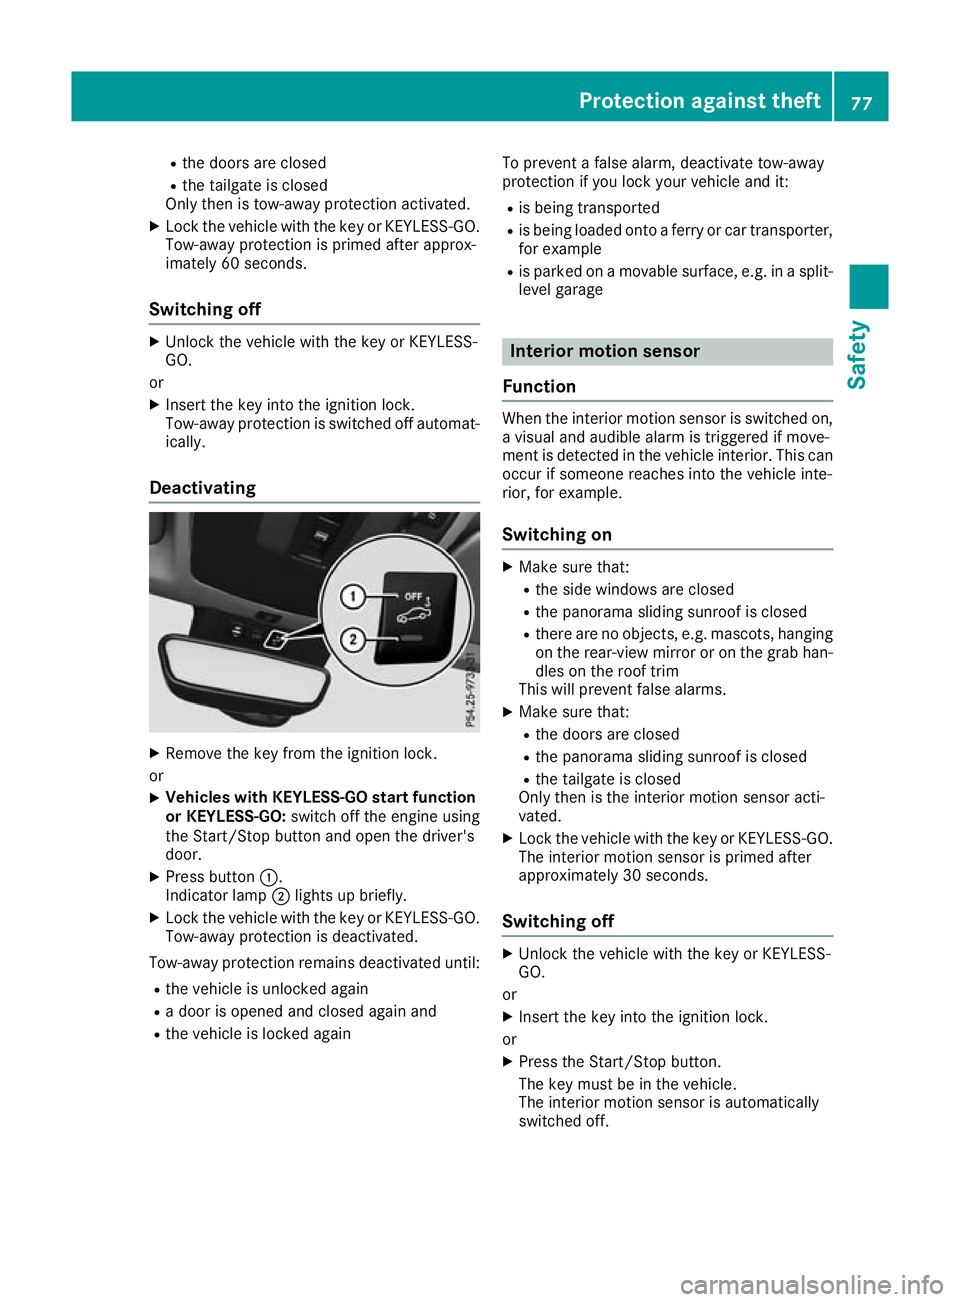
X Press button :.
Indicator lamp ;lights up briefly.
X Lock the vehicle with the key or KEYLESS-GO.
Tow-away protection is deactivated.
Tow-away protection remains deactivated until: R the vehicle is unlocked again
R a door is opened and closed again and
R the vehicle is locked again To prevent a false alarm, deactivate tow-away
protection if you lock your vehicle and it:
R is being transported
R is being loaded onto a ferry or car transporter,
for example
R is parked on a movable surface, e.g. in a split-
level garage Interior motion sensor
Function When the interior motion sensor is switched on,
a visual and audible alarm is triggered if move-
ment is detected in the vehicle interior. This can occur if someone reaches into the vehicle inte-
rior, for example.
Switching on X
Make sure that:
R the side windows are closed
R the panorama sliding sunroof is closed
R there are no objects, e.g. mascots, hanging
on the rear-view mirror or on the grab han-dles on the roof trim
This will prevent false alarms.
X Make sure that:
R the doors are closed
R the panorama sliding sunroof is closed
R the tailgate is closed
Only then is the interior motion sensor acti-
vated.
X Lock the vehicle with the key or KEYLESS-GO.
The interior motion sensor is primed after
approximately 30 seconds.
Switching off X
Unlock the vehicle with the key or KEYLESS-
GO.
or X Insert the key into the ignition lock.
or X Press the Start/Stop button.
The key must be in the vehicle.
The interior motion sensor is automatically
switched off. Protection against theft
77Safety Z
Page 89 of 369
Doors
Important safety notes
G
WARNING
If children are left unsupervised in the vehicle, they could:
R open doors, thereby endangering other per-
sons or road users
R get out and be struck by oncoming traffic
R operate vehicle equipment and become
trapped, for example
In addition, the children could also set the
vehicle in motion, for example, if they:
R release the parking brake
R shift the automatic transmission out of park
position P or shift manual transmission into
neutral
R start the engine
There is a risk of an accident and injury.
When leaving the vehicle, always take the key with you and lock the vehicle. Never leave
children and animals unattended in the vehi-
cle. Keep the keys out of the reach of children.
Stow luggage or loads preferably in the luggage compartment. Observe the loading guidelines
(Y page 288).
United Kingdom only: G
WARNING
When the double locks are activated, the
doors can no longer be opened from the
inside. People in the vehicle can no longer get out, e.g. in hazardous situations. There is a
risk of injury.
Therefore, do not leave any people unsuper-
vised in the vehicle, particularly children, eld-
erly people or people in need of special assis-
tance. Do not activate the double lock when
people are in the vehicle.
If the vehicle has been locked with the key, the
double lock function is activated as standard. It
is then not possible to open the doors from
inside the vehicle. You can deactivate the dou-
ble lock function by deactivating the interior
motion sensor (Y page 78). The doors can then be opened from the inside after the vehicle has
been locked from the outside. You can open the
rear doors from inside the vehicle if they are not secured by the child-proof locks (Y page 67).
The anti-theft alarm system is triggered if the
door is opened from the inside. Switch off the
alarm (Y page 76). Unlocking and opening the doors
from the inside
X
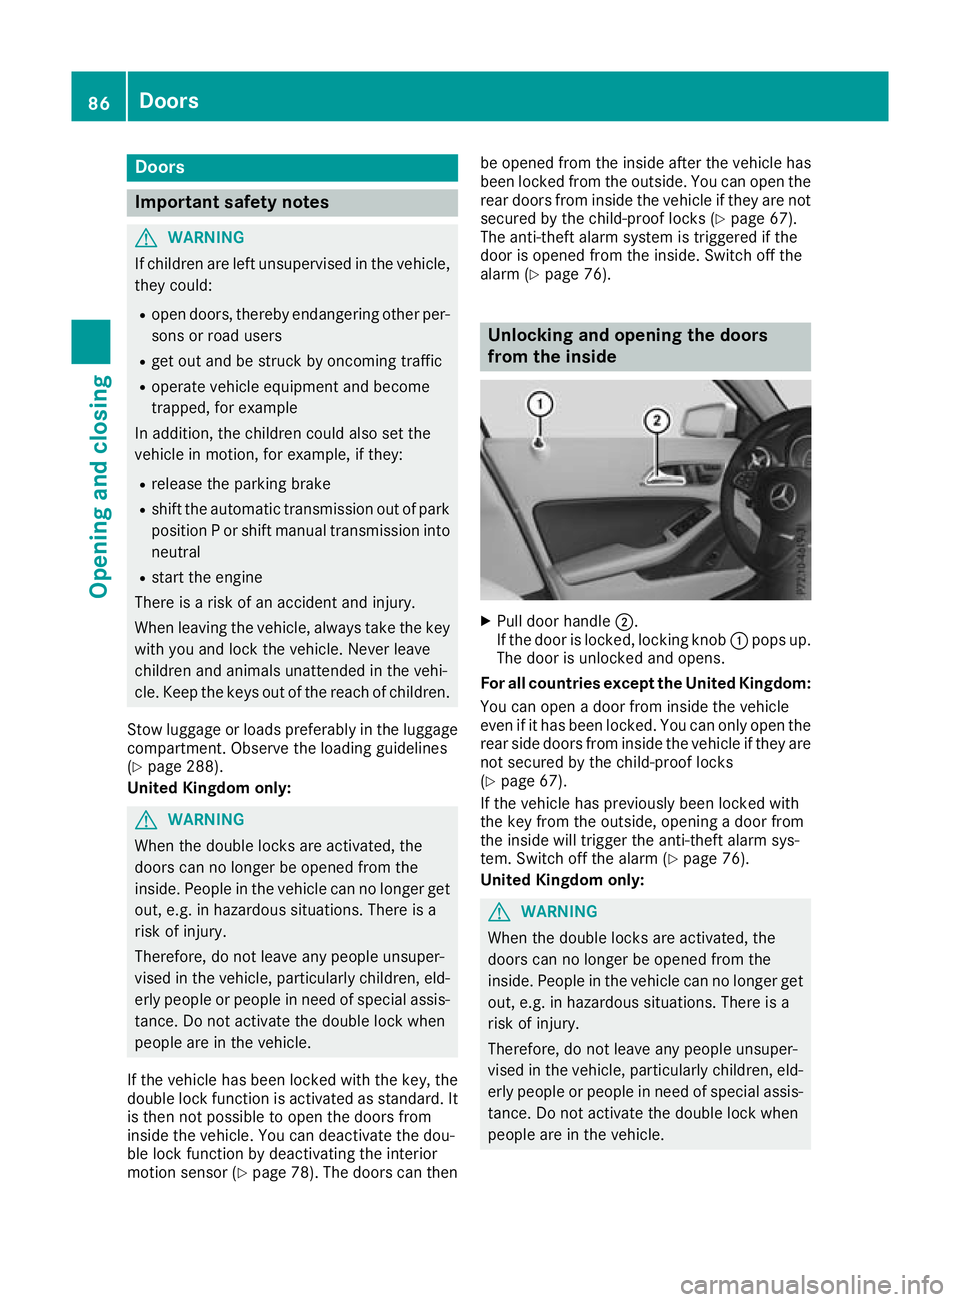
Pull door handle ;.
If the door is locked, locking knob :pops up.
The door is unlocked and opens.
For all countries except the United Kingdom:
You can open a door from inside the vehicle
even if it has been locked. You can only open the rear side doors from inside the vehicle if they are
not secured by the child-proof locks
(Y page 67).
If the vehicle has previously been locked with
the key from the outside, opening a door from
the inside will trigger the anti-theft alarm sys-
tem. Switch off the alarm (Y page 76).
United Kingdom only: G
WARNING
When the double locks are activated, the
doors can no longer be opened from the
inside. People in the vehicle can no longer get out, e.g. in hazardous situations. There is a
risk of injury.
Therefore, do not leave any people unsuper-
vised in the vehicle, particularly children, eld-
erly people or people in need of special assis-
tance. Do not activate the double lock when
people are in the vehicle. 86
DoorsOpening and closing
Page 91 of 369
X
To deactivate: press and hold button :for
approximately five seconds until a tone
sounds.
X To activate: press and hold button ;for
approximately five seconds until a tone
sounds.
If you press one of the two buttons and do not
hear a tone, the relevant setting has already
been selected.
The vehicle is locked automatically when the
ignition is switched on and the wheels are turn-
ing.
You could therefore be locked out if:
R the vehicle is being pushed
R the vehicle is being towed
R the vehicle is being tested on a dynamometer
You can also activate and deactivate the auto-
matic locking function using the on-board com- puter (Y page 229). Unlocking the driver's door (emer-
gency key element)
If the vehicle can no longer be unlocked with the key or KEYLESS-GO, use the emergency key ele-
ment.
If you use the emergency key element to unlock
and open the driver's door, the anti-theft alarm
system will be triggered. Switch off the alarm
(Y page 76).
X Take the emergency key element out of the
key (Y page 81).
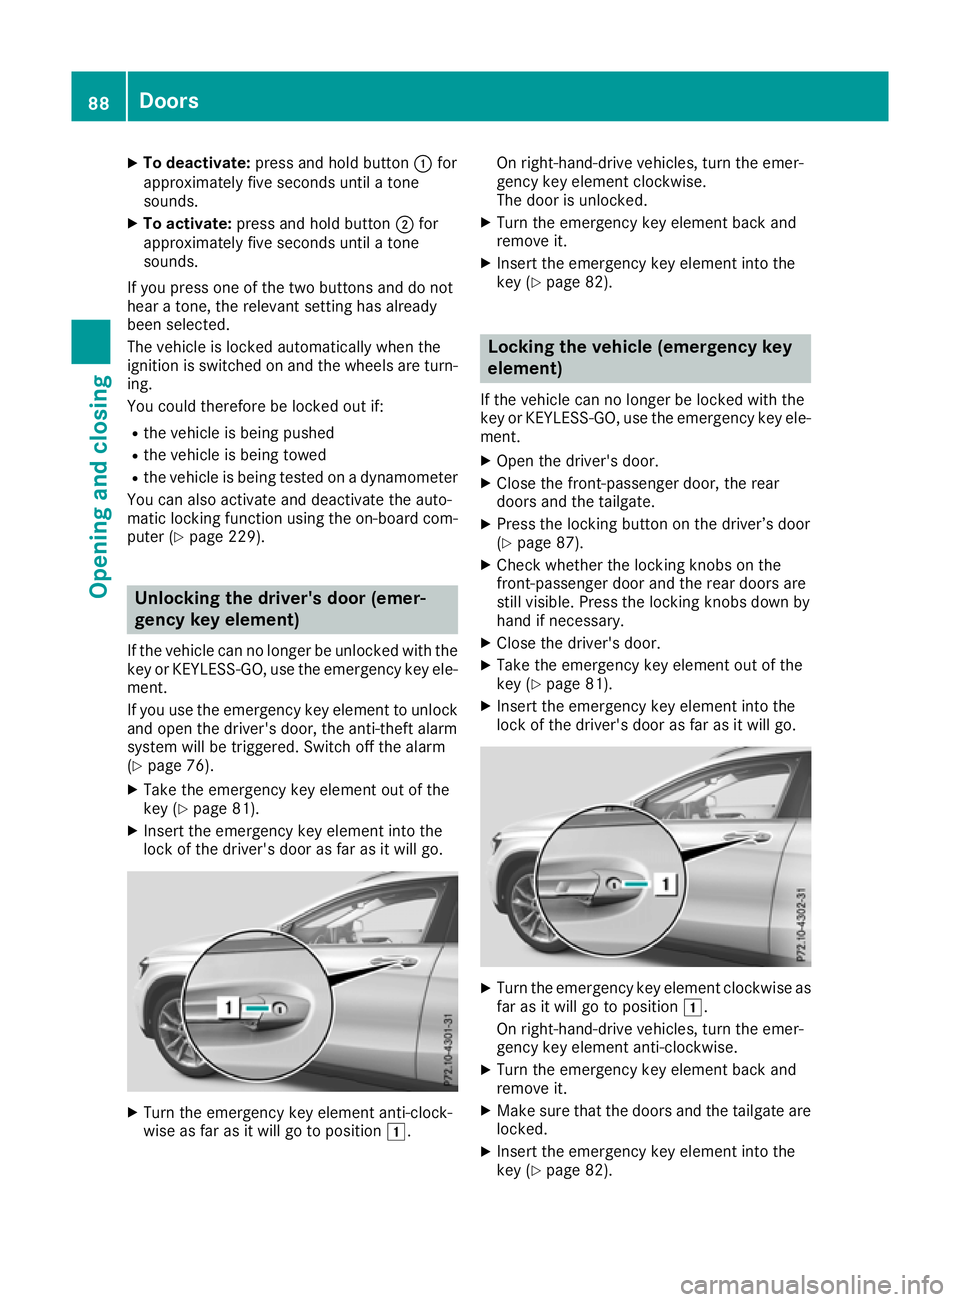
X Insert the emergency key element into the
lock of the driver's door as far as it will go. X
Turn the emergency key element anti-clock-
wise as far as it will go to position 1.On right-hand-drive vehicles, turn the emer-
gency key element clockwise.
The door is unlocked.
X Turn the emergency key element back and
remove it.
X Insert the emergency key element into the
key (Y page 82). Locking the vehicle (emergency key
element)
If the vehicle can no longer be locked with the
key or KEYLESS-GO, use the emergency key ele-
ment.
X Open the driver's door.
X Close the front-passenger door, the rear
doors and the tailgate.
X Press the locking button on the driver’s door
(Y page 87).
X Check whether the locking knobs on the
front-passenger door and the rear doors are
still visible. Press the locking knobs down by
hand if necessary.
X Close the driver's door.
X Take the emergency key element out of the
key (Y page 81).
X Insert the emergency key element into the
lock of the driver's door as far as it will go. X
Turn the emergency key element clockwise as
far as it will go to position 1.
On right-hand-drive vehicles, turn the emer-
gency key element anti-clockwise.
X Turn the emergency key element back and
remove it.
X Make sure that the doors and the tailgate are
locked.
X Insert the emergency key element into the
key (Y page 82). 88
DoorsOpening and closing
Page 92 of 369

i
If you lock the vehicle as described above,
the fuel filler flap is not locked. The anti-theft
alarm system is not primed. Luggage compartment
Important safety notes
G
WARNING
Parts of the body could become trapped dur-
ing automatic closing of the tailgate. More-
over, people, e.g. children, may be standing in the closing area or may enter the closing area
during the closing process. There is a risk of
injury.
Make sure that nobody is in the vicinity of the closing area during the closing process.
Use one of the following options to stop the
closing process:
R press the Fbutton on the key.
R pull or press the remote operating switch
on the driver's door.
R press the close button or STOP button on
the tailgate.
R pull the handle on the tailgate. G
WARNING
Combustion engines emit poisonous exhaust
gases such as carbon monoxide. If the tailgate is open when the engine is running, particu-
larly if the vehicle is moving, exhaust fumes
could enter the passenger compartment.
There is a risk of poisoning.
Turn off the engine before opening the tail-
gate. Never drive with the tailgate open. G
WARNING
If objects, luggage or loads are not secured or not secured sufficiently, they could slip, tip
over or be flung around and thereby hit vehicle
occupants. There is a risk of injury, especially when braking or abruptly changing directions.
Always store objects so that they cannot be
flung around. Secure objects, luggage or loads against slipping or tipping before the
journey.
! The tailgate swings upwards and to the rear
when opened. Therefore, make sure that
there is sufficient clearance above and behind
the tailgate.
You will find details on the tailgate opening
dimensions in the "Vehicle data" section
(Y page 358).
Stow luggage or loads preferably in the luggage compartment. Observe the loading guidelines
(Y page 288).
Do not leave the key in the luggage compart-
ment. If you do so, you could lock yourself out.
The tailgate can be:
R opened and closed manually from outside
R vehicles with EASY-PACK tailgate:
opened/closed automatically from the out-
side
R vehicles with EASY-PACK tailgate:
opened/closed automatically from the inside
R vehicles with EASY-PACK tailgate and
KEYLESS-GO or KEYLESS-GO start func-
tion: closed with the remote operating switch
on the key
R emergency released from the inside. Tailgate obstruction detection with
reversing function
On vehicles with EASY-PACK tailgate, the tail-
gate is equipped with automatic obstacle rec-
ognition with a reversing feature. If a solid object
blocks or restricts the tailgate when automati-
cally opening or closing, the tailgate is stopped.
If the tailgate is stopped during the closing proc- ess, the tailgate automatically opens again
slightly. The automatic obstacle detection with
reversing function is only an aid. It is not a sub- stitute for your attention when opening and
closing the tailgate. G
WARNING
The reversing function does not react:
R to soft, light and thin objects, e.g. fingers
R over the last 8 mm of the closing path Luggage compartment
89Opening and closing
Z