2017 MERCEDES-BENZ G-Class air condition
[x] Cancel search: air conditionPage 235 of 286

Cleaning thepaintwork
!Do no taffix:
Rstickers
Rfilms
Rmagnetic plates or similar items
to painte dsurfaces .You coul dotherwise
damag ethe paintwork.
Scratches, corrosive deposits ,areas affected by
corrosion and damag ecaused by inadequate
car ecanno talways be completely repaired .In
suchc ases, visit aqualified specialist workshop.
XRemove dirt immediately, wherep ossible,
while avoiding rubbing to ohard.
XSoak insect remains withi nsect removerand
rinse off th etreated areas afterwards.
XSoak bird droppings withw aterand rinse off
th et reated areas afterwards.
XRemove coolant ,brak efluid ,tre er esin, oils,
fuels and greases by rubbing gently witha
cloth soaked in petroleum ether or lighter
fluid.
XUse tar remove rtoremove tar stains.
XUse siliconer emovertoremove wax.
If wate rnolonger forms "beads"o nthe paint
surface, use th epaintc arep roduct srecommen-
ded and approved by Mercedes-Benz. This is the
cas eapproximately every three to fiv emonths,
dependingont heclimate conditionsa nd the
car eproduct used.
The cleanin gproduct PaintC leaner, whichh as
been recommended and approved by
Mercedes-Benz, should be used when dirt has
penetrated th epaints urface.
Als ouse PaintC leaner on paintt hath as become
dull.
Do no tuse these car eproduct sinthesun or on
th eh ood while th ehood is hot .
XUse
asuitable touch-up stick ,e.g.MBT ouch-
Up Stick ,torepair slightd amagetothepaint-
work quickly and provisionally.
Matt efinish care
!Never polisht hevehicle or th elight alloy
wheels. Polishingc auses thefinish to shine.
!The followingm ay causethe paintt o
become shinya nd thus reducethe matte
effect:
Rstron grubbing of th epaintwork with
unsuitable materials
Rfrequentu se of automatic car washes
Rwashingthevehicle in direct sunlight
!Never use paintc leaner, buffing or polishing
products, or glossp reserver, e.g.wax. These
product sare only suitable for high-gloss sur-
faces. Theiru se on vehicleswithm atte finish
leads to considerable surface damage( shiny,
spotte dareas).
Always have paintwork repairs carried out at a
qualified specialist workshop.
!Do no tuse wash program swithah ot wax
treatmen tunde rany circumstances.
Observ ethese note sifyour vehicle has aclear
matte finish. This will help you to avoid damage
to th epaintwork due to incorrect treatment.
Thesen otesalso apply to light alloy wheelsw ith
ac lear matte finish.
The vehicle should ideally be washedbyh and
usingas oftsponge, car shampoo and plenty of
water.
Use only insect remove rand car shampoo from
th er ange of approved Mercedes-Ben zcare
products.
Cleaning th evehicle parts
Cleaning th ewheels
GWARNING
The wate rjet from acircular je tnozzle (dirt
blasters)c an causeinvisible exterior damage
to th etires or chassis components .Compo-
nent sdamaged in this way may fail unexpect-
edly. Thereisar iskofana ccident.
Do no tuse power washers withc ircular jet
nozzles to clean th evehicle .Haved amaged
tires or chassis components replaced imme-
diately.
!Do no tuse acidic wheel cleanin gproducts
to remove brak edust.T his coul ddamage
wheel boltsa nd brakecomponents.
Care233
Maintenance and care
Z
Page 242 of 286
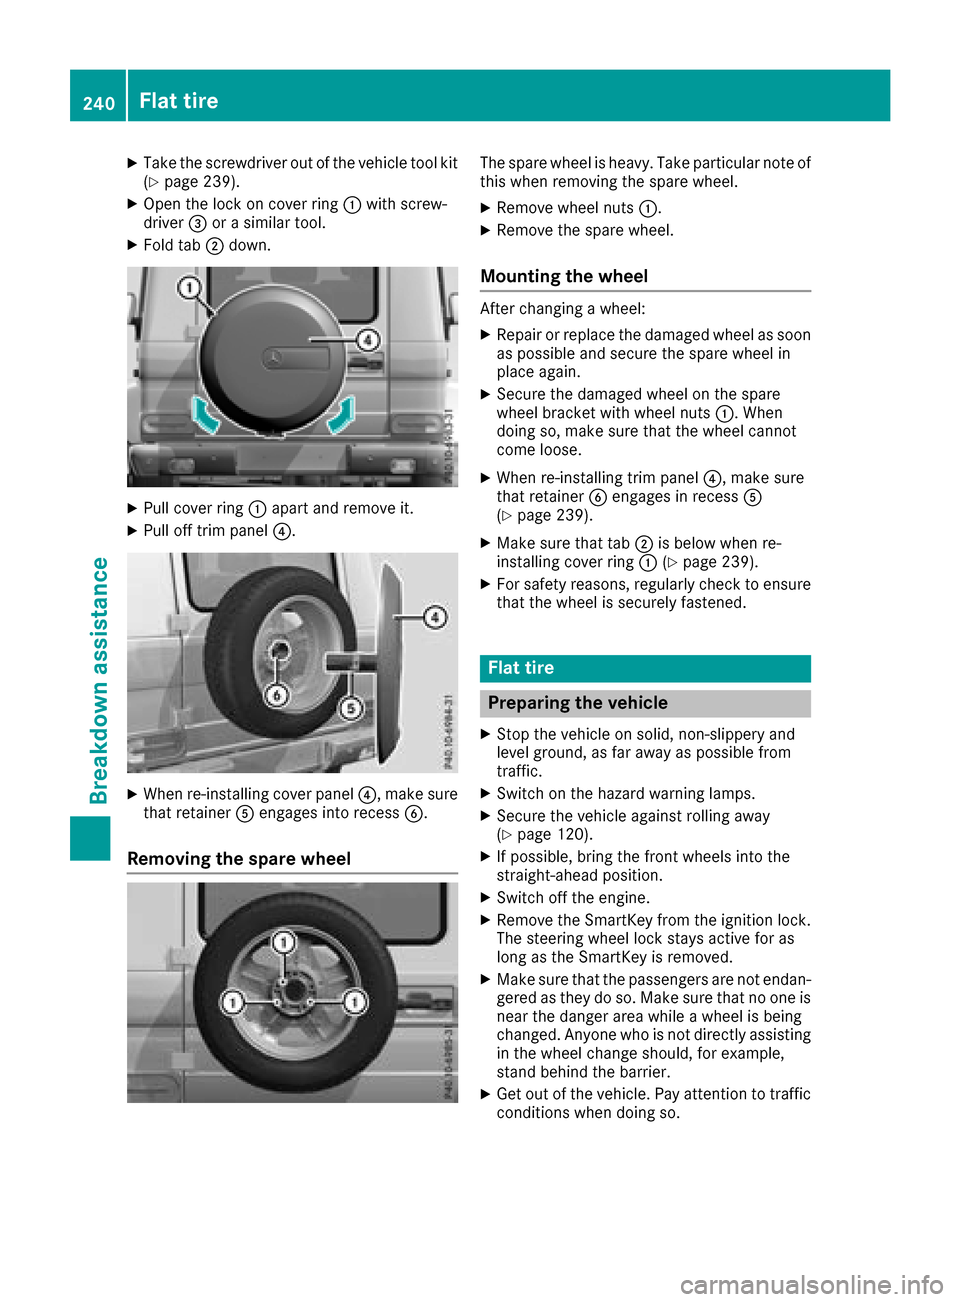
XTake the screwdriver out of the vehicle tool kit(Ypage 239).
XOpen the lock on cover ring :with screw-
driver =oras imilar tool.
XFold tab ;down.
XPull cover ring :apart and remove it.
XPull off trim panel ?.
XWhen re-installing cover panel ?,make sure
that retainer Aengages into recess B.
Removing the sparew heel
The spare wheel is heavy. Take particular noteo f
this when removing the spare wheel.
XRemove wheel nuts :.
XRemove the spare wheel.
Mounting the wheel
After changingawheel:
XRepair or replace the damaged wheel as soon
as possible and secure the spare wheel in
place again.
XSecure the damaged wheel on the spare
wheel bracket with wheel nuts :.When
doing so, make sure that the wheel cannot
come loose.
XWhen re-installing trim panel ?,make sure
that retainer Bengages in recess A
(
Ypage 239).
XMake sure that tab ;is below when re-
installing cover ring :(Ypage 239).
XFor safety reasons, regularly check to ensure
that the wheel is securely fastened.
Flat tire
Preparing the vehicle
XStop the vehicle on solid, non-slippery and
level ground, as far away as possible from
traffic.
XSwitch on the hazard warning lamps.
XSecure the vehicle against rolling away
(Ypage 120).
XIf possible, bring the front wheels into the
straight-ahead position.
XSwitch off the engine.
XRemove the SmartKey from the ignition lock.
The steerin gwheel lock stays active for as
long as the SmartKey is removed.
XMake sure that the passengers are not endan-
gered as they do so. Make sure that no one is
near the danger area while awheel is being
changed. Anyon ewho is not directly assisting
in the wheel change should, for example,
stand behind the barrier.
XGet out of the vehicle. Pay attention to traffic
conditions when doing so.
240Flat tire
Breakdown assistance
Page 256 of 286
!Check the snow chains for damage before
mounting them. Damaged or worn snow
chains may snap and damage the following
components:
Rwheel
Rwheel housing
Rwheel suspension
For this reason, you must use only snow
chains that are free of defects. Observe the
manufacturer's mounting instructions.
For safety reasons, Mercedes-Benz recom-
mends that you only use snow chains that have
been speciallya pproved for your vehicle by
Mercedes-Benz,ora re ofacorresponding
standard of quality. For more information,
please contact aqualified specialist workshop.
If you intend to mount snow chains, please bear
the following points in mind:
RSnow chains may not be mounted on all
wheel/tire combinations. Observe the infor-
mation regarding permitted wheel/tire com-
binations (
Ypage 273).
RInstall the snow chains on all four wheels for
maximum tractive power and driving stability.
If you only have two snow chains, install these
as ap air on the rear wheels. The vehicle then
remains more stable under braking.
ROnly use snow chains when driving on roads
completely covered by snow. Remove the
snow chains as soon as possible when you
come to aroad that is not snow-covered.
RLocal regulations may restrict the use of snow
chains. Observe the appropriate regulations if
you wish to mount snow chains.
RDo not exceed the maximum permissible
speed of 30 mph (50 km/h).
You may wish to deactivate ESP
®when pulling
awayw ith snow chains installed (Ypage 59).
You can thereby allow the wheels to spin in a
controlled manner, achieving an increased driv- ing force (cutting action).
Tire pressure
Tire pressure specifications
Important safety notes
GWARNING
Underinflated or overinflated tires pose the
following risks:
Rthe tires may burst, especially as the load
and vehicle speed increase.
Rthe tires may wear excessively and/or
unevenly, which may greatly impair tire
traction.
Rthe driving characteristics, as well as steer-
ing and braking, may be greatly impaired.
There is arisk of an accident.
Follow recommended tire inflation pressures
and check the pressure of all the tires includ-
ing the spare wheel:
Rmonthly, at least
Rif the load changes
Rbefore beginning along journey
Runder different operating conditions, e.g.
off-road driving
If necessary, correct the tire pressure.
The data on the Tire and Loading Information
placard and tire pressure table shown here are
examples. Tire pressure specifications are vehi-
cle-specific and may deviate from the data
shown here. The tire pressure specifications
that are valid for your vehicle can be found on
the Tire and Loading Information placard and
tire pressure table on the vehicle.
General notes
The recommended tire pressures for the tires
mounted at the factory can be found on the
labelsd escribed here.
Operation with atrailer: the applicable value
for the rear axle is the maximum tire pressure
value stated in the table inside the fuel filler flap.
Further information on tire pressures can be
obtained at aqualified specialist workshop.
254Tire pressure
Wheels and tires
Page 257 of 286
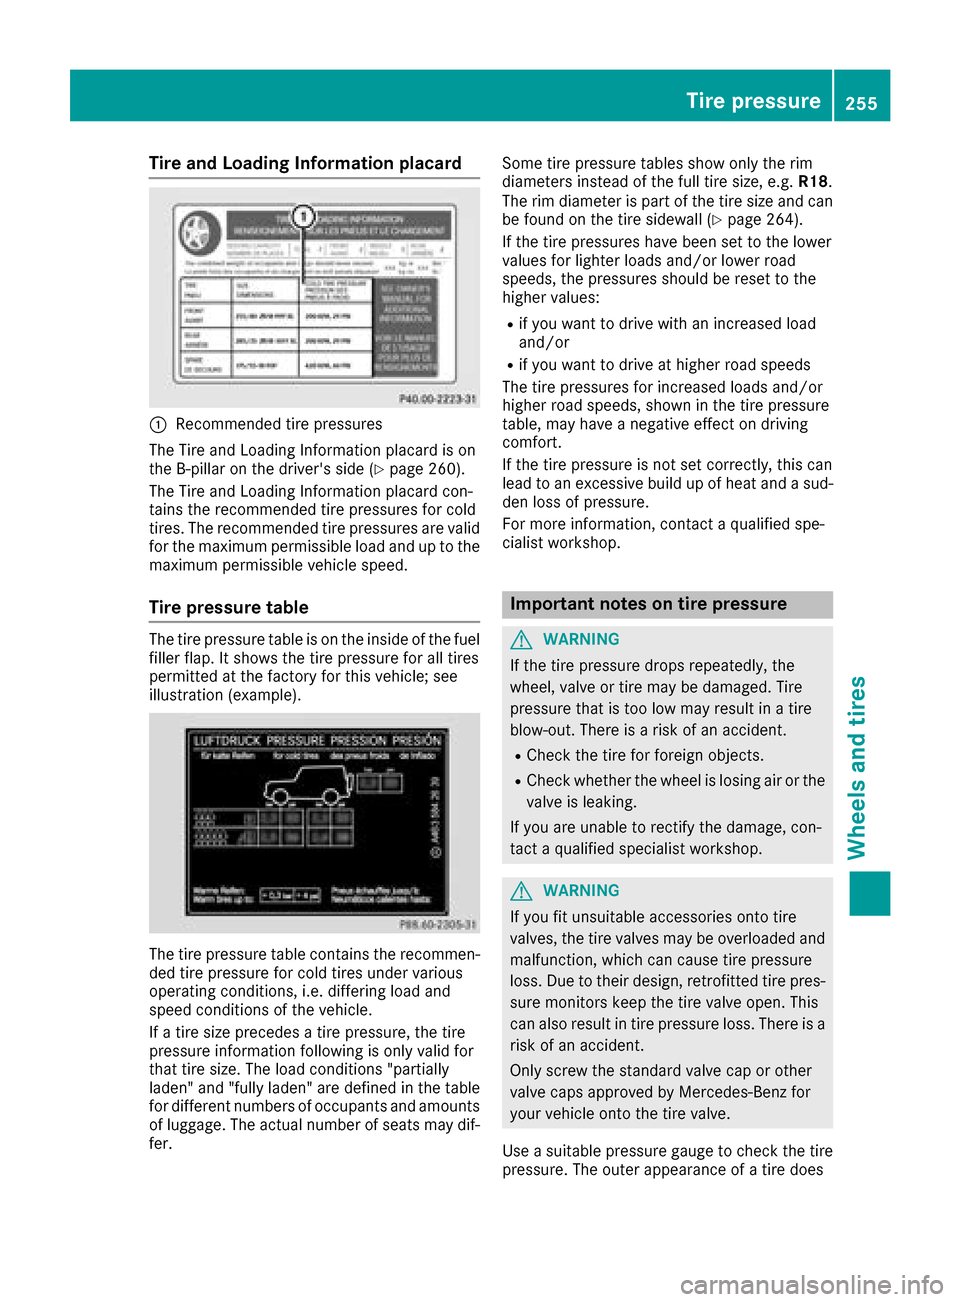
Tire and LoadingInfor matio nplacard
:Recommended tire pressures
The Tire and Loading Informatio nplacard is on
the B-pillar on the driver's side (
Ypage 260).
The Tire and Loading Informatio nplacard con-
tains the recommende dtire pressures for cold
tires. The recommende dtire pressures ar evalid
for the maximum permissibl eloa da nd up to the
maximum permissibl evehicl espeed.
Tire pressure table
The tire pressure table is on the insid eofthe fuel
fille rflap. It shows the tire pressure for al ltires
permitted at the factory for thisv ehicle; see
illustratio n(example).
The tire pressure table contains the recommen-
de dt ire pressure for col dtiresu nder various
operating conditions, i.e .differin gloa da nd
spee dconditions of the vehicle.
If at ire size precedes atire pressure, the tire
pressure informatio nfollowing is onl yvalid for
thatt ire size. The load conditions "partially
laden" and "fully laden" ar edefine dint he table
for different numbers of occupants and amounts of luggage.T he actual numbe rofseats mayd if-
fer. Some tire pressure table
sshowo nlyt he rim
diameters instea dofthe full tire size, e.g. R18.
The rim diamete rispartoft he tire size and can
be found on the tire sidewall (
Ypage 264).
If the tire pressures have been set to the lower
values for lighte rloads and/or lowe rroad
speeds ,the pressures shoul dbereset to the
highe rvalues :
Rif youwanttod rive with an increased load
and/or
Rif yo uwanttod rive at highe rroa ds peeds
The tire pressures for increased load sand/or
highe rroa ds peeds, shown in the tire pressure
table ,mayhave anegative effect on driving
comfort.
If the tire pressure is not set correctly, thisc an
lead to an excessive buil dupofheata nd asud-
de nlossofp ressure.
For mor
einformati
on, contactaquali fied spe-
cialist workshop.
Important notes on tire pressure
GWARNING
If the tire pressure drops repeatedly ,the
wheel, valve or tire maybed amaged.Tire
pressure thati stoo lo wmayresul tina tire
blow-out. There is ariskofana ccident.
RCheck the tire for foreign objects.
RCheck whether the whee lislosin gairor the
valve is leaking.
If yo uareunabl etorectify the damage,c on-
tact aquali fied specialis tworkshop.
GWARNING
If yo ufit unsuitable accessories onto tire
valves, the tire valve smaybe overloaded and
malfunction, which can cause tire pressure
loss. Due to their design, retrofitted tire pres- sure monitors kee pthe tire valve open. This
can also resul tintire pressure loss. There is a
ris kofana ccident.
Onlys crewt he standard valve cap or other
valve cap sapproved by Mercedes-Benz for
your vehicl eonto the tire valve.
Use asuitabl epressure gaug etocheck the tire
pressure. The outer appearance of atire does
Tire pressure255
Wheel sand tires
Z
Page 270 of 286
Recommendedtire pressures
The recommended tire pressure applie stothe
tire sm ounted at the factory.
The Tir eand Loading Information placard con-
tains the recommended tire pressures for cold
tire sonaf ully loaded vehicle and for the maxi-
mum permissible vehicle speed.
The tire pressure table contains the recommen- ded pressures for coldt iresfor variou soperat-
ing conditions ,i.e .d iffering loa dand speed con-
ditions.
Increasedv ehicle weight due to optional
equipment
The combined weigh tofallstandard and
optionale quipment available for the vehicle,
regardless of whether it is actually installed on
the vehicle or not.
Rim
Thisist he part of the wheel on which the tire is
mounted.
GAW R(Gross Axle Weight Rating)
The GAW Risthe maximum grossa xlew eight
rating. The actual loa donanaxlem ustn ever
excee dthe grossa xlew eigh trating. The gross
axl ew eigh trating can be found on the vehicle
identification plate on the B-pillar on the driver's
side.
Speed rating
The speed rating is part of the tire identification. It specifies the speed rang efor which the tire is
approved.
GTW (Gross Trailer Weight)
The GT Wisthe weigh tofatraile rincluding the
weigh tofthe load, luggage, accessorie setc. on
the trailer.
GVW (Gross Vehicl eWeight)
The grossv ehicle weigh tincludes the weigh tof
the vehicle including fuel, tools, the spare wheel,
accessorie sinstalled, occupants, luggage and
the drawbar noseweight, if applicable. The gross
vehicle weigh tmustn ot excee dthe grossv ehi-
cle weigh trating GVW Rasspecified on the vehi-
cle identification plate on the B-pillar on the
driver'ss ide.
GVWR (Gross Vehicl eWeight Rating)
The GVW Risthe maximum permissible gross
weigh tofafully loaded vehicle (the weigh tofthe
vehicle including al laccessories, occupants,
fuel, luggage and the drawbar noseweight, if
applicable). The grossv ehicle weightrating is
specified on the vehicle identification plate on
the B-pillar on the driver'ss ide.
Maximum loaded vehicle weight
The maximum weightist he sumo f:
Rthe curb weigh tofthe vehicle
Rthe weigh tofthe accessories
Rthe loa dlim it
Rthe weigh tofthe factory installed optional
equipment
Kilopascal (kPa)
Metricu nitf or tire pressure. 6.9 kPa corre-
sponds to 1psi.A nother uni tfor tire pressure is
bar. 100 kilopascals (kPa )are the equivalent of
1b ar.
Load index
In addition to the load-bearing index, the load
index may also be imprinte donthe sidewal lof
the tire .Thiss pecifies the load-bearing capacity
of the tire more precisely.
Curb weight
The weigh tofavehicle with standard equipment
incl uding the maximum capacity of fuel, oil and
coolant. It also includes the air-conditioning sys-
tem and optionale quipment if thesea re instal-
le dint he vehicle ,but doe snot includ epassen-
ger sorl uggage.
Maximum load rating
The maximum tire loa disthe maximum permis-
sible weigh tinkilograms or lb sfor which atire is
approved.
Maximum permissiblet ire pressure
Maximumpermissible tire pressure for one tire.
Maximum load on on etire
Maximu mloadono ne tire .Thisisc alculate dby
dividing the maximum axl eloa dofo ne axl eby
two.
268Al la bout wheels and tires
Wheels and tires