2017 MERCEDES-BENZ G-Class tow
[x] Cancel search: towPage 22 of 286
Turn signalsDisplay message ............................ 176
Replacing bulb s(front) ..................... 90
Switching on/off .............................. 87
TV
Operating (on-boar dcomputer) ..... 163
see Separate operating instructions
Two-way radio
Frequencie s................................... 274
Installation ..................................... 274
Transmission output( maximum) .... 274
TWR (Tongue Weight Rating) (defi-
nition) ................................................. 269
Type identificatio nplate
see Vehicl eide ntificatio nplate
U
Unlocking
Emergency unlocking ....................... 68
From insid ethe vehicl e(central
unlocking button) ............................. 67
US Bd evices
Connecting to the Media Inter-
face ...............................................2 03
V
Vanity mirror
Sun visor. ....................................... 211
Vehicle
Correct use ...................................... 27
Data acquisition ............................... 28
Display message ............................ 186
Equipment ....................................... 24
Individua lsettings .......................... 164
Limited Warranty .............................2 8
Loading .......................................... 260
Locking (in an emergency) ............... 68
Locking (SmartKey) .......................... 63
Lowering ........................................ 272
Maintenance .................................... 25
Operation outsidet he USA/
Canada ............................................ 25
Parking .......................................... 120
Parking for along period. ............... 122
Pulling awa y................................... 105
Raising ........................................... 270
Securing from rolling away ............ 270 Tow-starting ................................... 248
Towing ........................................... 246
Transporting .................................. 247
Unlocking (i
nanemergency) ........... 68
Unlocking (SmartKey). ..................... 63
Vehicl edata. .................................. 281
Vehicl edata ....................................... 281
Vehicl edata (off-road driving)
Approach/departure angle ............ 283
Fording depth ................................ 283
Maximu mgradient climbing abil-
ity .................................................. 283
Vehicl edimensions ........................... 281
Vehicl eemergencyl ocking ................ 68
Vehicl eidentificatio nnumber
see VIN
Vehicl eidentificatio nplate .............. 275
Vehicl etoolkit.................................. 239
Ventilation
Setting the airflow ........................... 98
Video
Operating the DVD ......................... 162
see also Digital Operator's Man-
ual.................................................. 198
VIN
Type plate ...................................... 275W
Warning and indicator lampsABS ................................................ 190
Brakes ........................................... 189
Check Engine ................................. 194
Coolant .......................................... 194
Distance warning ........................... 196
DISTRONIC PLUS. .......................... 196
ESP
®.............................................. 191
ESP®OFF ....................................... 192
Fue ltank ........................................ 194
Generaln otes ................................ 187
Overview .......................................... 32
Parking brake ................................ 193
PASSENGER AIR BAG OFF ............... 39
Reserve fue l................................... 194
Restraint system ............................ 193
Seatb elt. ....................................... 188
Tire pressure monitor .................... 197
Warning triangle ................................ 238
20Index
Page 29 of 286

subject to the two following two conditions: 1)
These devices may not cause harmful interfer-
ence, and 2) These devices must accept any
interference received, including interference
that may cause undesired operation. Changes
or modifications not expressly approved by the
party responsible for compliance could void the
user’s authority to operate the equipment."
Canada:"The wireless devices of this vehicle
comply with Industry Canada license-exempt
RSS standard(s). Operation is subject to the fol-
lowing two conditions: (1) These devices may
not cause interference, and (2) These devices
must accept any interference, including inter-
ference that may cause undesired operation of
the device."
Diagnostics connection
The diagnostics connection is only intended for
the connection of diagnostic equipment at a
qualified specialist workshop.
GWARNING
If you connect equipment to adiagnostics
connection in the vehicle, it may affect the
operation of vehicle systems. As aresult, the
operating safety of the vehicle could be affec-
ted. There is arisk of an accident.
Only connect equipment to adiagnostics con-
nection in the vehicle, which is approved for
your vehicle by Mercedes-Benz.
GWARNING
Objects in the driver's footwell can restrict the pedal travel or obstruct adepressed pedal.
The operating and road safety of the vehicle is
jeopardized. There is arisk of an accident.
Make sure that all objects in the vehicle are
stowed correctly, and that they cannot enter
the driver's footwell. Install the floormats
securely and as specified in order to ensure
sufficient clearance for the pedals. Do not use
loose floormats and do not place floormats on
top of one another.
!If the engine is switched off and equipment
on the diagnostics connection is used, the
starter battery may discharge. Connectinge
quipment to the diagnostics con-
nection can lead to emissions monitoring infor-
mation being reset, for example. This may lead
to the vehicle failing to meet the requirements of
the next emissions test during the main inspec-
tion.
Qualified specialist workshop
An authorized Mercedes-Benz Center is aquali-
fied specialist workshop. It has the necessary
specialist knowledge, tools and qualifications to
correctly carry out the work required on your
vehicle. This is especially the case for work rel-
evant to safety.
Observe the notes in the Maintenance Booklet.
Always have the following work carried out at an
authorized Mercedes-Benz Center:
Rwork relevant to safety
Rservice and maintenance work
Rrepair work
Ralterations, installation work and modifica-
tions
Rwork on electronic components
Correct use
If you remove any warning stickers, you or oth-
ers could fail to recognize certain dangers.
Leave warning stickers in position.
Observe the following information when driving
your vehicle:
Rthe safety notes in this manual
Rtechnical data for the vehicle
Rtraffic rules and regulations
Rlaws and safety standards pertaining to motor vehicles
Reporting safety defects
USA only:
The following text is reproduced as required of
all manufacturers under Title 49, Code of U.S.
Federal Regulations, Part 575 pursuant to the
National Traffic and Motor Vehicle Safety Act of
1966.
If you believe that your vehicle has adefect
which could cause acrash or could cause injury
or death, you should immediately inform the
Operating safety27
Introduction
Z
Page 37 of 286
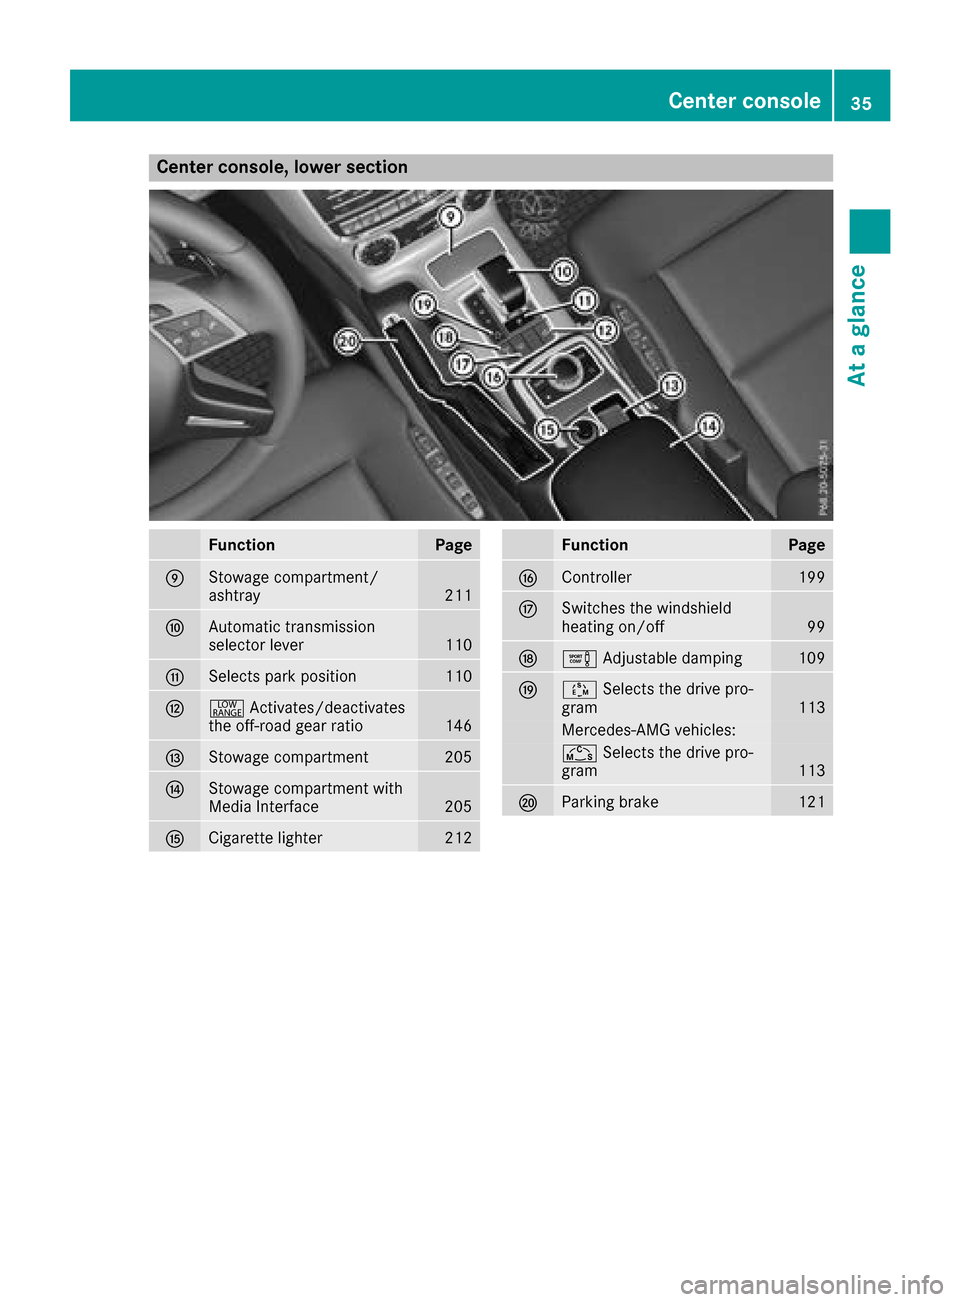
Center console, lower section
FunctionPage
EStowage compartment/
ashtray211
FAutomatic transmission
selectorlever110
GSelect spark position110
H+ Activates/deactivates
th eo ff-road gear ratio146
IStowage compartment205
JStowage compartmen twith
Media Interface205
KCigarett elighter212
FunctionPage
LController199
MSwitches th ewindshield
heating on/off99
Ne Adjustable damping109
OÚSelect sthe driv epro-
gram113
Mercedes-AM Gvehicles:
Ñ Select sthe driv epro-
gram113
PParking brake121
Center console35
At ag lance
Page 48 of 286
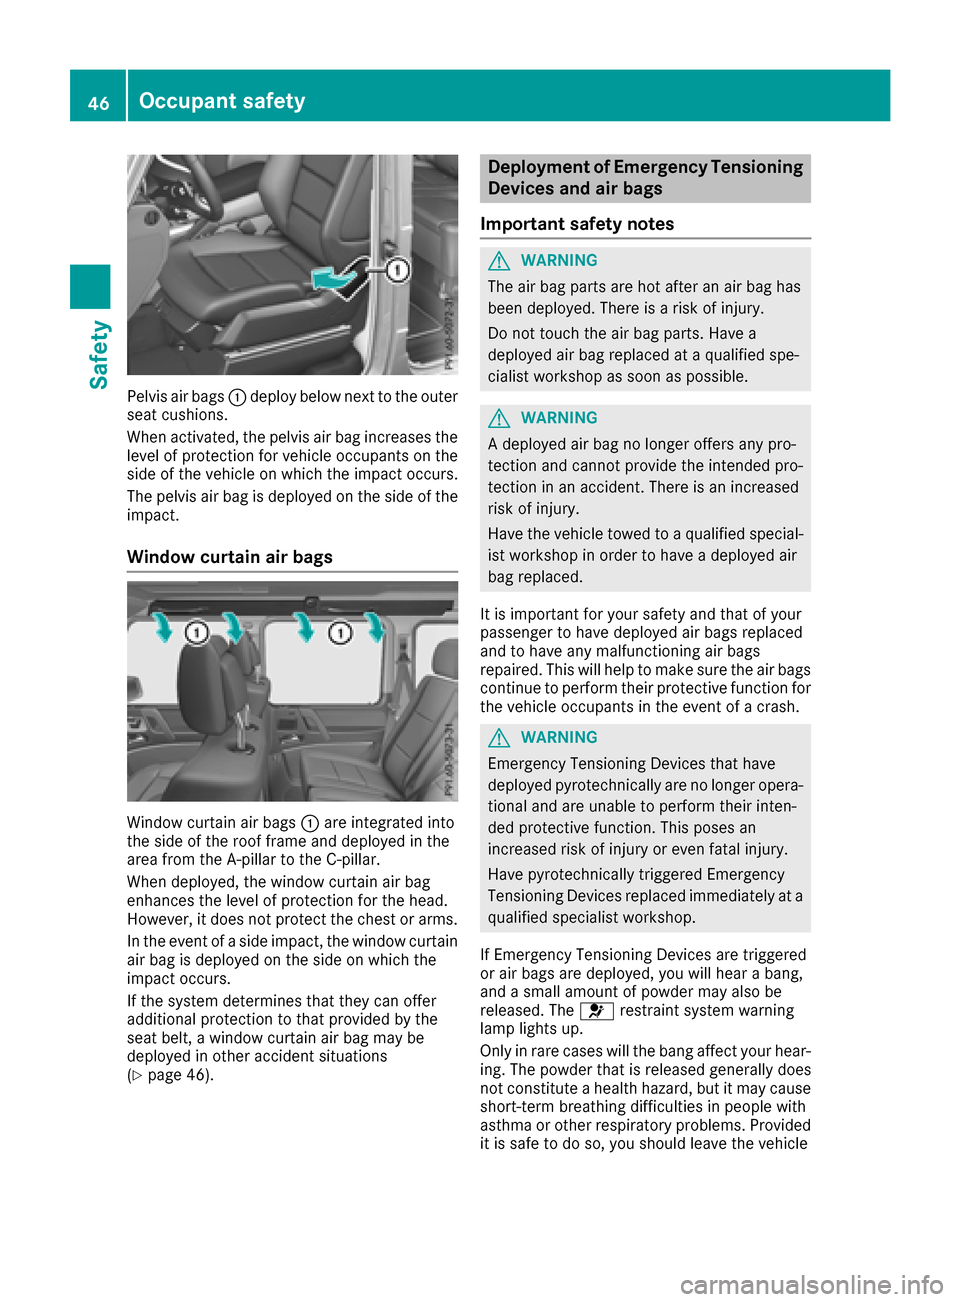
Pelvis air bags:deploy below next to the outer
seat cushions.
When activated, the pelvis air bag increases the
level of protection for vehicle occupantsont he
side of the vehicle on which the impact occurs.
The pelvis air bag is deployed on the side of the
impact.
Window curtain air bags
Window curtain air bags :are integrated into
the side of the roof frame and deployed in the
area from the A-pillar to the C-pillar.
When deployed, the window curtain air bag
enhances the level of protection for the head.
However, it does not protec tthe chest or arms.
In the event of aside impact, the window curtain
air bag is deployed on the side on which the
impact occurs.
If the system determines that they can offer
additional protection to that provided by the
seat belt, awindow curtain air bag may be
deployed in other accident situations
(
Ypage 46).
Deployment of Emergency Tensioning
Devicesa nd air bags
Important safety notes
GWARNING
The air bag parts are hot after an air bag has
been deployed. There is arisk of injury.
Do not touch the air bag parts. Have a
deployed air bag replaced at aqualified spe-
cialist workshop as soon as possible.
GWARNING
Ad eployed air bag no longer offers any pro-
tection and cannot provide the intended pro-
tection in an accident .There is an increased
risk of injury.
Have the vehicle towed to aqualified special-
ist workshop in order to have adeployed air
bag replaced.
It is importan tfor your safety and that of your
passenger to have deployed air bags replaced
and to have any malfunctioning air bags
repaired. This will help to make sure the air bags
continue to perform their protective function for
the vehicle occupantsint he event ofacrash.
GWARNING
Emergency TensioningD evices that have
deployed pyrotechnically are no longer opera-
tional and are unable to perform their inten-
ded protective function. This poses an
increased risk of injury or even fatal injury.
Have pyrotechnically triggered Emergency
TensioningD evices replaced immediately at a
qualified specialist workshop.
If Emergency TensioningD evices are triggered
or air bags are deployed, you will hear abang,
and asmall amount of powder may also be
released. The 6restraint system warning
lamp lights up.
Only in rare cases will the bang affect your hear-
ing. The powder that is released generally does
not constitut eahealth hazard, but it may cause
short-term breathing difficulties in people with
asthma or other respiratory problems. Provided
it is safe to do so, you should leave the vehicle
46Occupant safety
Safety
Page 52 of 286
When leaving the vehicle, alwaystake the
SmartKey with you and lock the vehicle. Never
leave children unsupervised in the vehicle.
GWARNING
If persons, particularly children are subjected to prolonged exposure to extreme heat or
cold, there is arisk of injury, possibly even
fatal. Never leave children unattended in the
vehicle.
GWARNING
If the child restraint system is subjected to
direct sunlight, parts may get very hot. Chil-
dren may burn themselves on these parts,
particularly on the metal parts of the child
restraint system. There is arisk of injury.
If you leave the vehicle, takin gthe child with
you, alwayse nsure that the child restraint
system is not exposed to direct sunlight. Pro- tect it with ablanket ,for example. If the child
restraint system has been exposed to direct
sunlight, let it cool down before securing the
child in it. Never leave children unattended in
the vehicle.
Always ensure that all vehicle occupantsh ave
their seat belts fastened correctly and are sitting
properly. Particular attention must be paid to
children.
Observe the safety notes on the seat belt
(
Ypage 40) and the notes on correct use of seat
belts (Ypage 41).
Ab ooster seat may be necessary to achieve
proper seat belt positionin gfor children over
41 lbs (1 8kg)until they reach aheight where a
three-point seat belt can be properly fastened
without abooster seat.
Special seat belt retractor
GWARNING
If the seat belt is released while driving, the
child restraint system will no longer be
secured properly. The special seat belt retrac- tor is disabled and the inertia real draws in a
portion of the seat belt. The seat belt cannot
be immediately refastened. There is an
increased risk of injury, possibly even fatal.
Stop the vehicle immediately, paying atten-
tion to road and traffic conditions. Reactivate
the special seat belt retractor and secure the
child restraint system properly.
All seat belts except the driver's seat belt are
equipped with aspecial seat belt retractor.
When activated, the special seat belt retractor
ensures that the seat belt will not slacken once
the child restraint system has been secured.
Installing achild restraint system:
XAlways comply with the child restraint system
manufacturer's installation instructions.
XPull the seat belt smoothly out of the belt sash
guide.
XEngage the seat belt tongue in the belt buckle.
Activating the special seat belt retractor:
XPull the seat belt out fully and let the inertia
reel retract it again.
While the seat belt is retracting, you should
hear aratchetin gsound. The special seat belt
retractor is activated.
XPush the child seat restraint system down so
that the seat belt is tight and does not loosen.
Removing achild restraint system and deacti-
vating the special seat belt retractor:
XAlways comply with the child restraint system
manufacturer's installation instructions.
XPress release button of belt buckle, hold the
belt tongue firmly and guide it back towards
the belt sash guide.
The special seat belt retractor is deactivated.
Child restraint system
The use of seat belts and child restraint systems
is required by law in:
Rall 50 states
Rthe U.S .territories
Rthe District of Columbia
Rall Canadian provinces
You can obtain further information about the
correct child restraint system from any author-
ized Mercedes-Benz Center.
50Children in the vehicle
Safety
Page 53 of 286
GWARNING
If the child restraint system is installed incor-
rectly on asuitable seat, it cannot protect as
intended. The child cannot then be restrained
in the event of an accident, heavy braking or
sudden changes of direction. There is an
increased risk of injury ,possibly even fatal.
Make sure that you observe the child restraint
system manufacturer's installation instruc-
tions and the notes on use. Please ensure,
that the base of the child restraint system is
alway sresting completely on the seat cush-
ion. Never place objects, e.g. cushions, under or behind the child restraint system. Only use
child restraint systems with the original cover
designed for them. Only replace damaged
covers with genuine covers.
GWARNING
If the child restraint system is installed incor-
rectly or is not secured, it can come loosei n
the event of an accident, heavy braking or a
sudden change in direction. The child
restraint system coul dbethrown about, strik-
ing vehicleo ccupants. There is an increased
risk of injury ,possibly even fatal.
Always instal lchild restraint systems prop-
erly,e ven if they are not being used .Make
sure that you observe the child restraint sys-
tem manufacturer's installation instructions.
You wil lfind further information on stowing
objects, luggage or loads under "Loading guide-
lines"(
Ypag e204).
GWARNING
Child restraint systems or their securing sys-
tems which have been damaged or subjected
to aloadinana ccident can no longer protect
as intended. The child cannot then be
restrained in the event of an accident, heavy
braking or sudden changes of direction. There is an increased risk of injury ,possibly even
fatal.
Replace child restraint systems which have
been damaged or subjected to aloadina n
accident as soon as possible.H ave the secur-
ing systems on the child restraint system
checked ataqualified specialist workshop,
before you install achild restraint system
again.
The securing systems of child restraint systems
are:
Rthe seat belts ystem
Rthe LATCH-type (ISOFIX) securing rings
Rthe Top Tether anchorages
iIf it is absolutel ynecessary to install achild
restraint system on the front-passenge rseat,
alway sobserve the information on "Child
restraint systems on the front-passenger
seat" (
Ypag e54). There you wil lalsof ind
information on deactivating the front-
passenger front air bag.
All child restraint systems must meet the fol-
lowing standards:
RU.S. FederalM otor Vehicle Safety Standards
213 and 225
RCanadian Motor Vehicle Safety Standards
213 and 210.2
Confirmation that the child restraint system cor-
responds to the standards can be found on an
instruction label on the child restraint system.
This confirmatio ncan als obefound in the instal-
lation instructions that are included with the
child restraint system.
Observe the warning labels in the vehiclei nte-
rior and on the child restraint system.
LATCH-type (ISOFIX) chil dseat secur-
ing system
GWARNING
LATCH-type (ISOFIX) child restraint systems
do not offer sufficient protective effect for
children whosew eight is greater than 48 lbs
(22 kg )who are secure dusing the safety belt
integrated in the child restraint system. In the
event of an accident, achild might not be
restrained correctly. This poses an increased
risk of injury or even fatal injury.
If the child weighs more than 48 lbs (22 kg),
only use LATCH-type (ISOFIX) child restraint
systems with which the child is als osecured
with the vehicles eat belt. Also secure the
Children in the vehicle51
Safety
Z
Page 70 of 286
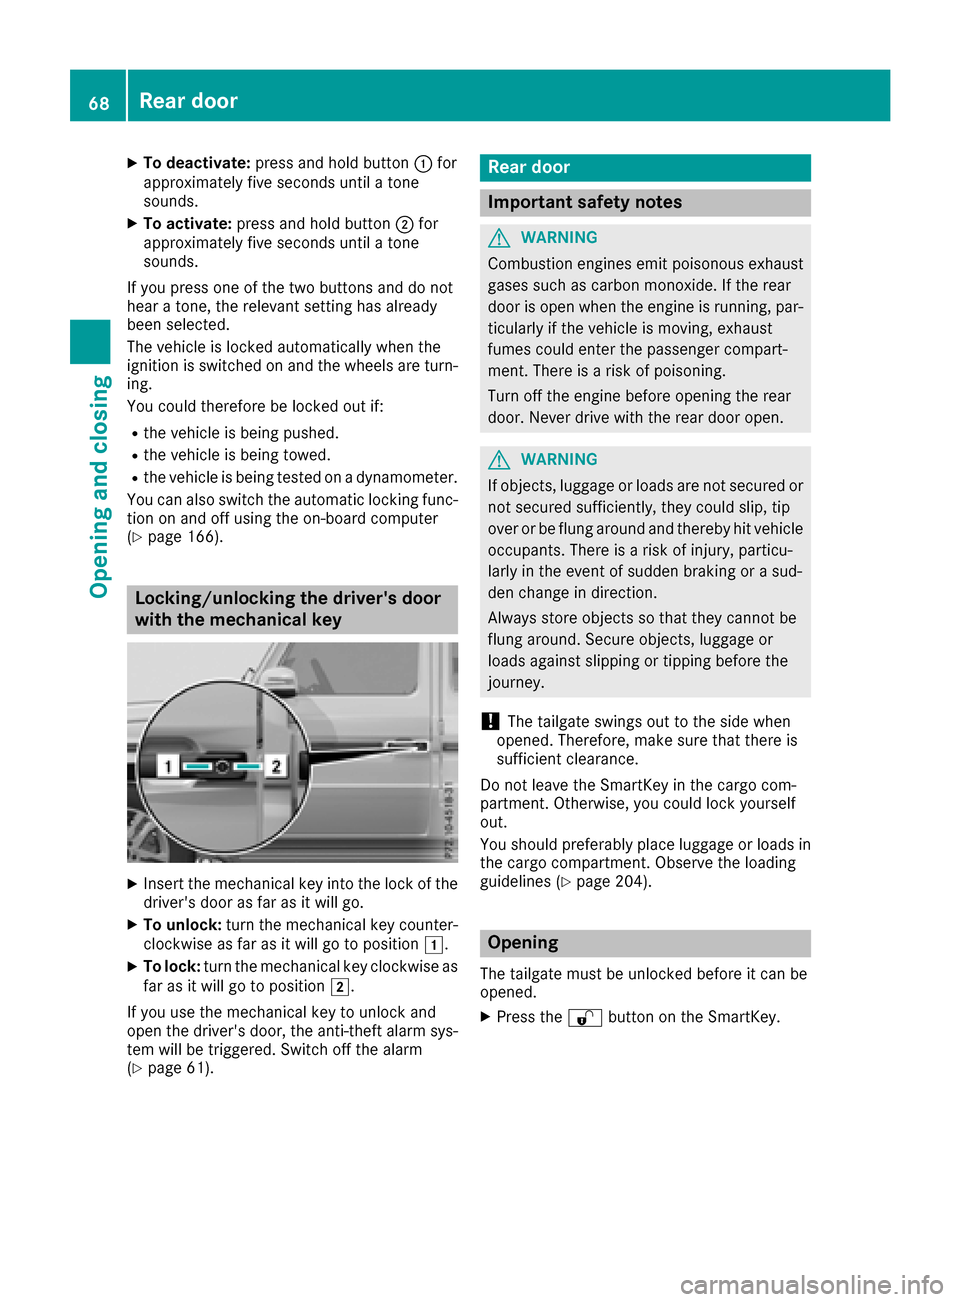
XTo deactivate:press and holdbutton :for
approximatelyf ives econds unti latone
sounds.
XTo activate: press and hol dbutton ;for
approximatelyf ives econds unti latone
sounds.
If yo upress one of the two buttons and do not
hea rat one, the relevant setting hasa lready
been selected.
The vehicl eislocked automaticall ywhent he
ignition is switched on and the wheels are turn-
ing.
Yo uc ould therefore be locked outi f:
Rthe vehicleisbeing pushed.
Rthe vehicl eisbeing towed.
Rthe vehicl eisbeing teste donadynamometer.
Yo uc an also switch the automatic locking func-
tio nona nd off using the on-board computer
(
Ypage 166).
Locking/unlockin gthe driver's door
with the mechanical key
XInsert the mechanical key into the lock of the driver's door as far as it will go.
XTo unlock: turn the mechanical key counter-
clockwise as far as it will go to position 1.
XTo lock:turn the mechanical key clockwise as
far as it will go to position 2.
If yo uusethe mechanical key to unlock and
open the driver's door, the anti-thef talarm sys-
tem will be triggered .Switch off the alarm
(
Ypage 61).
Rear door
Important safety notes
GWARNING
Combustio nengines emi tpoison ouse xhaust
gases such as carbo nmonoxide. If the rear
door is open when the engine is running ,par-
ticularly if the vehicl eismoving, exhaust
fumes could enter the passenger compart-
ment. There is ariskofp oisoning .
Turn off the engine before opening the rear
door. Never drive with the reard ooro pen.
GWARNING
If objects, luggage or load sare not secured or
not secured sufficiently ,they could slip ,tip
overorbef lung around and thereb yhitvehicle
occupants. There is ariskofi njury,p articu-
larly in the event of sudden braking or asud-
de nc hange in direction.
Alway sstoreo bjects so thatt hey cannotbe
flung around .Secure objects, luggage or
load sagain st slipping or tipping before the
journey.
!The tailgate swing soutto the side when
opened. Therefore, make sure thatt hereis
sufficient clearance.
Do not leave the SmartKey in the cargo com-
partment. Otherwise, yo ucould lock yourself
out.
Yo us houl dpreferabl yplace luggage or load sin
the cargo compartment. Observe the loading
guideline s(
Ypage 204).
Opening
The tailgate must be unlockedb efore it can be
opened.
XPress the %button on the SmartKey.
68Rear door
Opening and closing
Page 83 of 286
If somebodybecomes trapped:
Rpress one of the memory function position
buttons, or
Rpress one of the memory function memory
buttons, or
Rmove the switch for steering wheel adjust-
ment in the opposite direction to that in
which the steering wheel is moving
The adjustment process is stopped.
GWARNING
If you drive off whilet he EASY-ENTRY/EXIT
feature is making adjustments, you could lose
control of the vehicle.T here isarisk of an
accident.
Alway swaitu ntil the adjustment process is
complete before driving off.
!Do not activate the EASY-ENTRY/EXIT fea-
ture, if the seat backrest is reclined too far
backwards. This can damage the front or rear
seats. You must first move the backrest to a
vertical position.
The EASY-ENTRY/EXIT feature makes getting in
and out of you rvehicle easier.
You can activate and deactivate the EASY-
ENTRY/EXIT feature in the on-board computer
(
Ypage 166).
Position of the steering whee lwhen the
EASY-ENTRY/EXIT feature is active
The steering wheel moves upwards and towards
the dashboard if:
Ryou remove the SmartKey from the ignition
lock or
Ryou open the driver's door and the SmartKey
is in position 0or 1in the ignition lock
iThe steering wheel only moves upwards and
towards the dashboard if it has not already
reached the uppers teering limiter.
Position of the steering whee lfor driv-
ing
The steering wheel is moved to the last selected positionw hen:
Rthe driver's door is closed
Ryou insert the SmartKey into the ignition lock
The last positionoft he steering column is stored
when you switch off the ignition or when you
store the setting with the memory function
(
Ypage 83).
Mirrors
Rear-view mirror
XAdjust the rear-view mirror in such away that
you have agood view of road and traffic con-
ditions behind you.
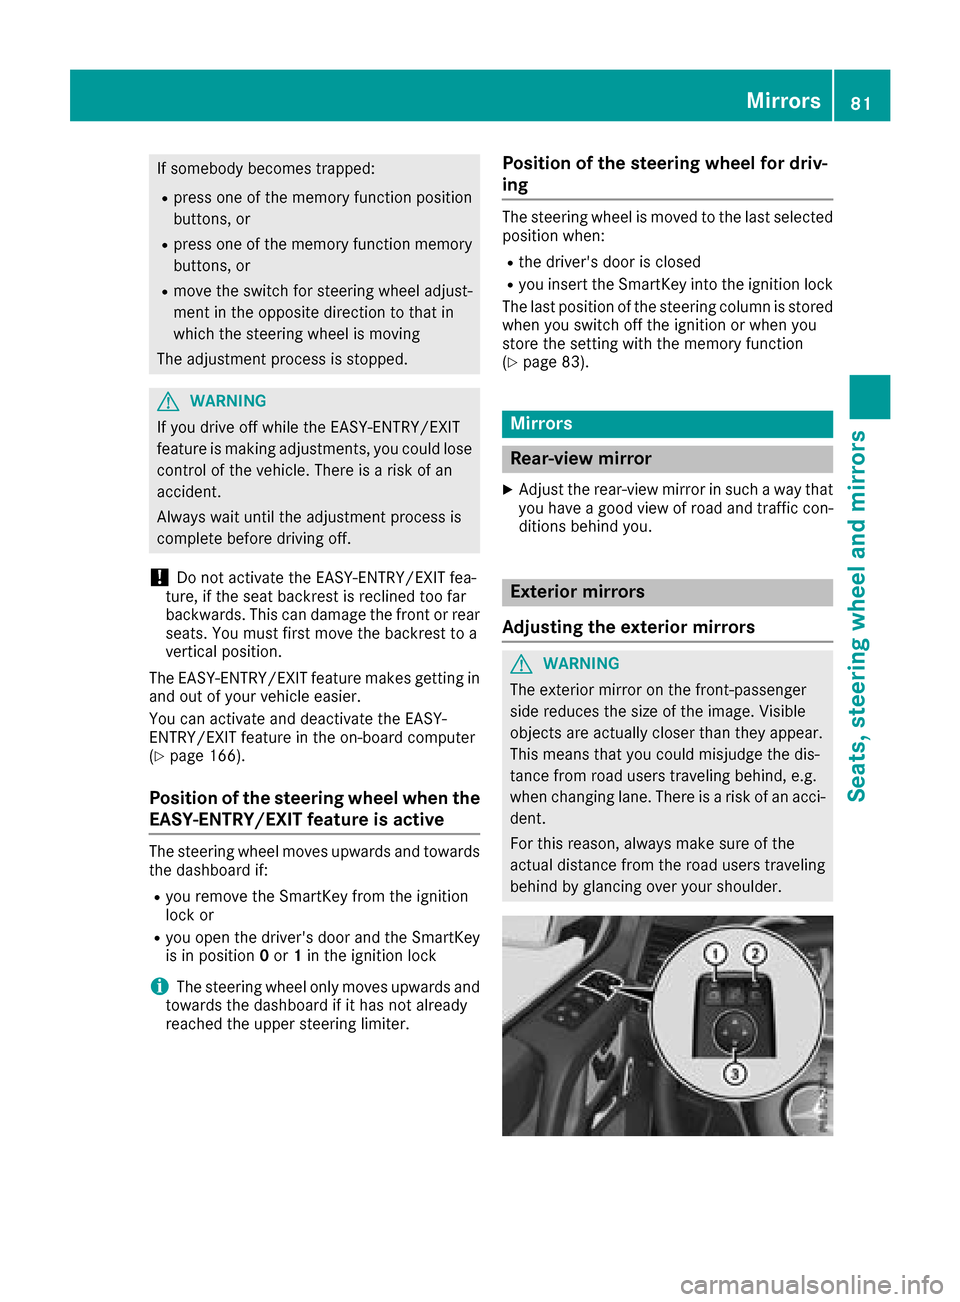
Exteriorm irrors
Adjusting the exterio rmirrors
GWARNING
The exterior mirror on the front-passenger
side reduces the size of the image.V isible
objects are actually closer than they appear.
This means that you could misjudge the dis-
tance from road users traveling behind, e.g.
when changing lane. There is arisk of an acci-
dent.
For this reason, always make sure of the
actual distance from the road users traveling
behind by glancing over you rshoulder.
Mirrors81
Seats, steeringw heel and mirrors
Z