Page 117 of 497
Hooking
the luggage net &
WARNING Risk of inju ryfrom incor rectly
stowe d objects
If objects in the passenger compartment are
stowe d incor rectl y,they can slide or be
th ro wn around and hit vehicle occupants. In
addition, cup holders, open stowage spaces
and mobile phone brac kets cann otalw ays
re tain all objects they contain.
The reis a risk of injur y,particularly in the
ev ent of sudden braking or a sudden change
in direction. #
Alw aysstow objects so that they can‐
not be throw n around in su chsitua‐
tions. #
Alw ays make sure that objects do not
pr otru de from stowage spaces, luggage
nets or stowage nets. #
Close the loc kable stow age spaces
before starting a journe y. #
Alw aysstow and secure heavy, hard,
poin ted, sharp-edged, fragile or bulky
objects in the boot. Obser
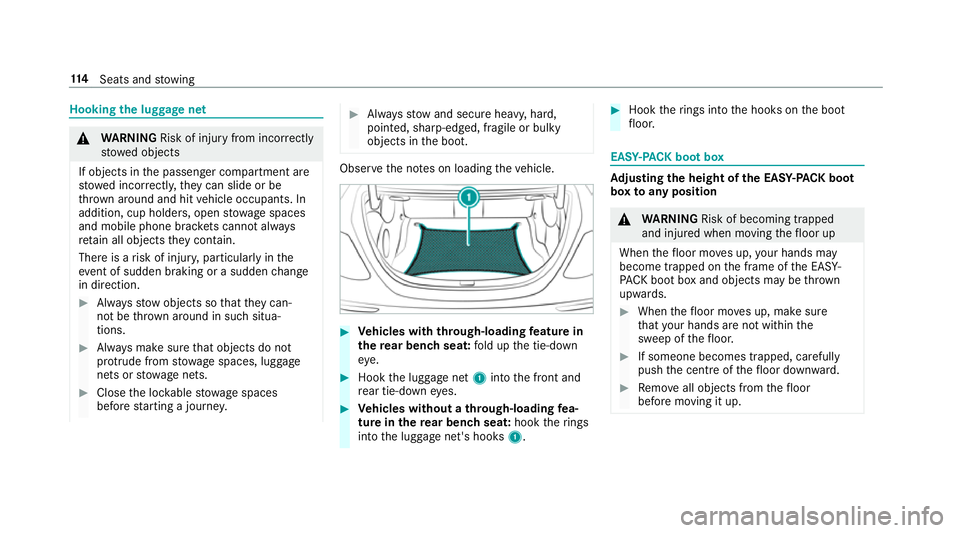
vethe no tes on loading theve hicle. #
Vehicles with through-loading feature in
th ere ar ben chseat: fold up the tie-down
ey e. #
Hook the luggage net 1into the front and
re ar tie-down eyes. #
Vehicles without a through-loading fea‐
ture in there ar ben chseat: hooktherings
into the luggage net's hooks 1. #
Hook therings into the hooks on the boot
fl oor. EAS
Y-PA CK boot box Ad
justing the height of the EA SY-PAC K boot
box toany position &
WARNING Risk of becoming trapped
and inju red when moving thefloor up
When thefloor mo ves up, your hands may
become trapped on the frame of the EASY-
PA CK bo otbox and objects may be thrown
upwards. #
When thefloor mo ves up, make sure
th at your hands are not within the
sweep of thefloor. #
If someone becomes trapped, carefully
push the cent reofthefloor down ward. #
Remo veall objects from thefloor
before moving it up. 11 4
Seats and stowing
Page 118 of 497
&
WARNING Risk of becoming trapped
when pressing the EASY -PAC K boot box
in
When the EASY- PACK boot box is pressed
into there tracted position, your hands may
become trapped. Children, in particular, may
injure themselves when doing so. #
When pressing the EASY -PAC K boot box
in, make sure that your hands are not
within the sweep of the EASY -PACK
boot box. #
When leaving theve hicle, alw aysta ke
th eke y with you and lock theve hicle.
This also applies tomobile phones if the
"digital vehicle key in the smartphone"
function is activated via the Mercedes
connect me web app. #
Never lea vechildren unat tended in the
ve hicle. *
NO
TEDama getotheex tended EAS Y-
PA CK boot box The EASY
-PAC K boot box may be damaged
when it is extended. #
Do not place any objects on or press
down on the EASY -PAC K boot box
frame. #
Do not close the boot lid when the
EAS Y-PA CK boot box is extended. *
NO
TEDama getothe EASY -PAC K boot
box byobjects Objects which are sharp-edged, pointed,
fragile, rounded or heavy and objects that
ro ll can damage the EASY -PAC K boot box and
be thro wn out. #
Do not transport objects which are
sharp-edged, poin ted, rounded or frag‐
ile and objects that roll in the EASY-
PA CK boot box. #
Alw aysstow and secure such objects
outside of the box in the boot. #
Alw ays obser vethe maximum permitted
load of the EASY -PAC K boot box. #
Do not use the EASY -PAC K boot box
when there ar seats are folded for‐
wa rds. The maximum permitted load of
the EASY -PACK
boot box is 10kg.To prev ent the box from being
ove rloaded, the box floor lo wersonto the boot
fl oor when the load reaches appr oximately 5 kg. Seats and
stowing 11 5
Page 119 of 497
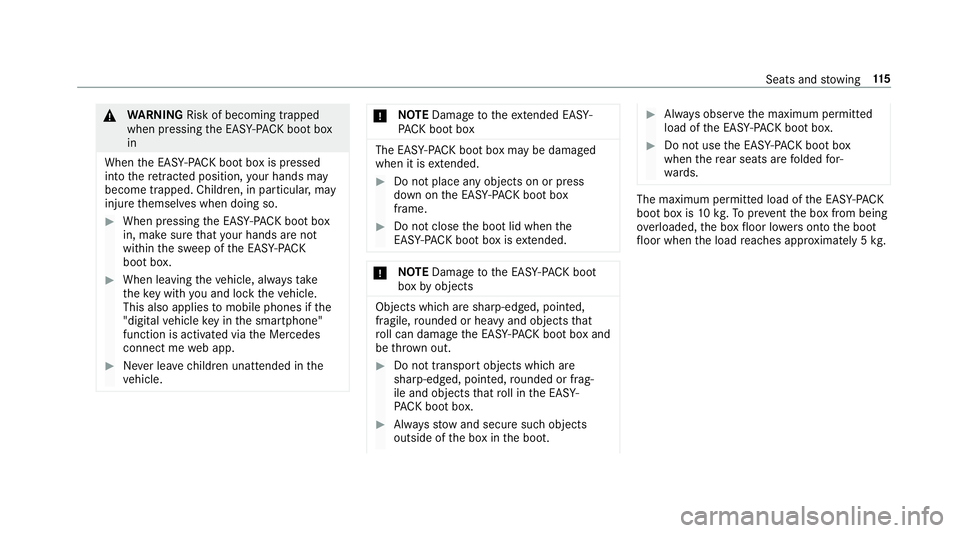
#
Toremo ve: pull handle 2ofthe box. #
Toincrease the load capacit y:press the
centre of floor 1down wardsto the desired
position and box size. #
Toreduce the load capacity: press button
3. #
Tosto w:press the box in comple tely using
handle 2until it loc ksin place. %
Obser vethe no tes on cleaning the EASY-
PA CK boot box (→ page319).
Installing or removing the EA SY-PAC K boot
box
Fi tting #
Turn rotating catches 6outward. #
Inse rtretainers 2of box 1into outer
holes 3. #
Raise box 1and press hooks 5into rear
shelf 4. #
Turn rotating catches 6inwa rd. 11 6
Seats and stowing
Page 120 of 497

Re
moving #
Turn rotating catches 6outward. #
Lowe r box 1and pull it out of anchorages
4. #
Pull box 1back out of openings 3.Opening
thesto wage space under the boot
floor *
NO
TEDama getothe handle in the boot
fl oor If
th e handle in the boot is left pr otru ding,
th e handle may be damaged. #
Unhinge the handle before you close
th e boot lid and press the handle closed
again. #
Pull handle 1up and hook it into drip rail
2. At
taching thero of rack &
WARNING Risk of inju ryby ex ceeding
th e maximum roof load
When you load thero of, theve hicle centre of
gr av ity rises and the driving characteristics
ch ange.
If yo uexc eed the maximum roof load, the
driving characteristics, as well as thesteer‐
ing and braking, will be greatly impaired. #
Neverexc eed the maximum roof load
and adjust your driving style. Yo
u will find information on the maximum roof
load in the "Technical data" section.
* NO
TEVehicle damage from non-
appr ovedro of racks The
vehicle could be damaged byroof racks
which ha venot been tested and appr ovedby
Mercedes-Benz. #
Only use roof rack ste sted and
appr ovedby Mercedes-Benz. Seats and
stowing 117
Page 121 of 497
#
Depending on theve hicle equipment,
ensure that when thero of rack isfitted:
R the sliding sunroof can be fully
ra ised.
R the boot lid can be fully opened. #
Position the load on thero of rack in
such a wayth at theve hicle will not sus‐
ta in damage even when it is in motion. *
NO
TEDama getothe panoramic sliding
sunroof when a roof rack isfitted The panoramic sliding sunroof may be dam‐
aged bythero of rack ifyo u attem pttoopen
it when thero of rack isfitted. #
Do not open the panoramic sliding sun‐
ro of if a roof rack isfitted.
In order toallow ventilation of theve hicle
interior, you can raise the panoramic sliding
sunroof. *
NO
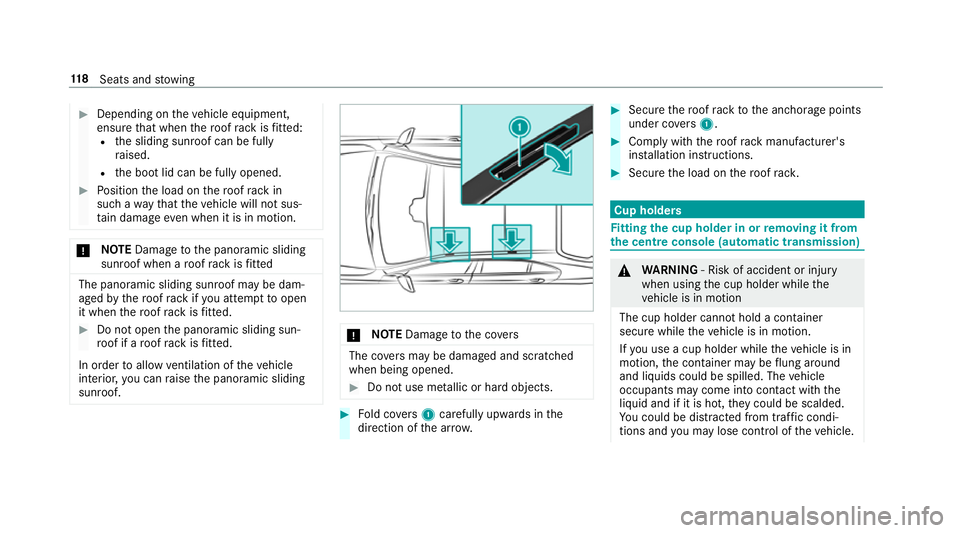
TEDama getothe co vers The co
vers may be dama ged and scratched
when being opened. #
Do not use me tallic or hard objects. #
Fold co vers 1 carefully up wards in the
direction of the ar row. #
Secu rethero of rack tothe anchorage points
under co vers 1 . #
Comply with thero of rack manufacturer's
ins tallation instructions. #
Secure the load on thero of rack. Cup holders
Fi
tting the cup holder in or removing it from
the centre console (au tomatic transmission) &
WARNING ‑ Risk of accident or inju ry
when using the cup holder while the
ve hicle is in motion
The cup holder cannot hold a container
secure while theve hicle is in motion.
If yo u use a cup holder while theve hicle is in
motion, the conta iner may be flung around
and liquids could be spilled. The vehicle
occupants may come into contact with the
liquid and if it is hot, they could be scalded.
Yo u could be distracted from traf fic condi‐
tions and you may lose cont rol of theve hicle. 11 8
Seats and stowing
Page 122 of 497
#
Only use the cup holder when theve hi‐
cle is stationar y. #
Only use the cup holder for containers
of theright size. #
Alw ays close the conta iner, particularly
if th e liquid is hot. #
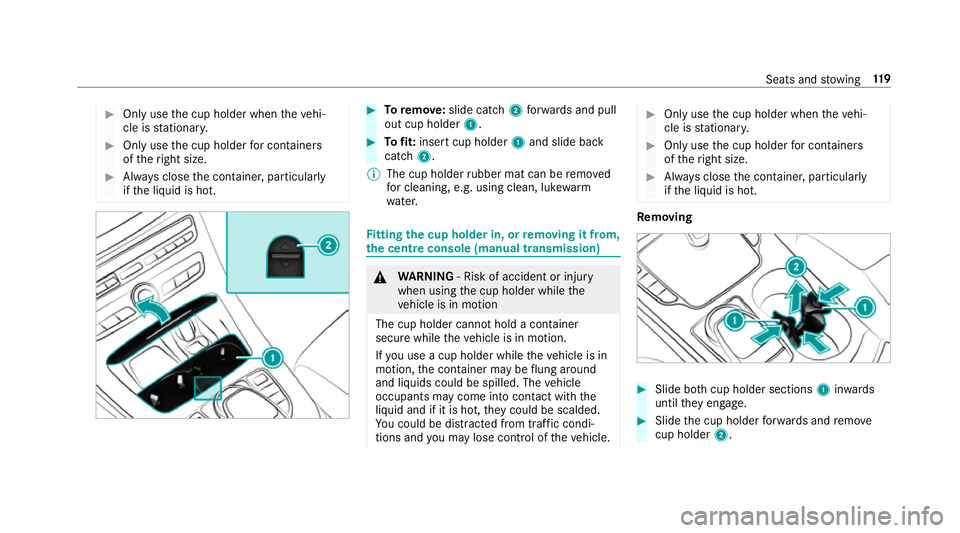
Toremo ve:slide catch 2forw ards and pull
out cup holder 1. #
Tofit: inse rtcup holder 1and slide ba ck
catch 2.
% The cup holder rubber mat can be remo ved
fo r cleaning, e.g. using clean, luk ewarm
wate r. Fi
tting the cup holder in, or removing it from,
the centre console (manual transmission) &
WARNING ‑ Risk of accident or inju ry
when using the cup holder while the
ve hicle is in motion
The cup holder cannot hold a container
secure while theve hicle is in motion.
If yo u use a cup holder while theve hicle is in
motion, the conta iner may be flung around
and liquids could be spilled. The vehicle
occupants may come into contact with the
liquid and if it is hot, they could be scalded.
Yo u could be distracted from traf fic condi‐
tions and you may lose cont rol of theve hicle. #
Only use the cup holder when theve hi‐
cle is stationar y. #
Only use the cup holder for containers
of theright size. #
Alw ays close the conta iner, particularly
if th e liquid is hot. Re
moving #
Slide bo thcup holder sections 1inwa rds
until they engage. #
Slide the cup holder forw ards and remo ve
cup holder 2. Seats and
stowing 11 9
Page 123 of 497
Fi
tting #
Inse rtthe cup holder at the front and slide it
as far as the edge 3.
The wedge of the upper section of the cup
holder must face up wards. #
Slide upper cup holder sections 1outwards
until bo thright and left sides 2engage.
% The cup holder rubber mat can be remo ved
fo r cleaning, e.g. using clean, luk ewarm
wate r. Opening
the cup holder in there ar armrest *
NO
TEDama getothe cup holder When
there ar armrest is folded back the cup
holder could become damaged. #
Only fold there ar armrest back when
th e cup holder is closed. #
Press cup holder 1or2. #
Place a conta iner in orremo vea con tainer
from cup holder 1or2. Asht
ray and cigar ette lighter Using
the ashtr ayinthe front centre console *
NO
TEDama getothestow age compart‐
ment under the ashtr ay The
stow age compartment under the ashtray
is not heat resis tant and could be dama ged if
yo ure st lit cigar ette s on it. #
Ensure that the ashtr ayis fully engaged. 12 0
Seats and stowing
Page 124 of 497
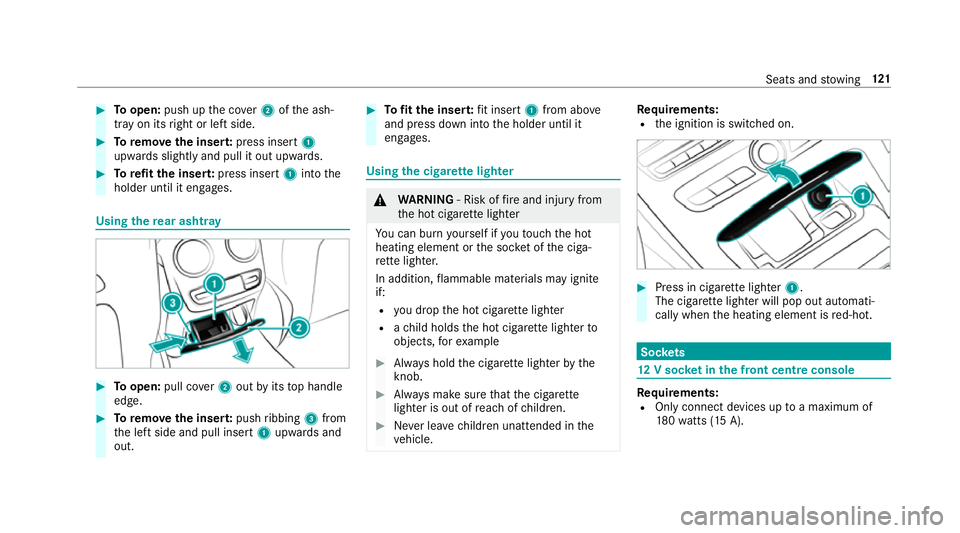
#
Toopen: push up the co ver2 ofthe ash‐
tray on its right or left side. #
Toremo vethe inser t:press insert 1
upwards slightly and pull it out upwards. #
Torefit the inse rt:press insert 1into the
holder until it engages. Using
there ar ashtr ay #
Toopen: pull co ver2 out byits top handle
edge. #
Toremo vethe inser t:push ribbing 3from
th e left side and pull insert 1upwards and
out. #
Tofit the inse rt:fi t insert 1from ab ove
and press down into the holder until it
engages. Using
the cigar ette lighter &
WARNING ‑ Risk of fire and injury from
th e hot cigar ette lighter
Yo u can burn yourself if youto uch the hot
heating element or the soc ket of the ciga‐
re tte lighter.
In addition, flammable materials may ignite
if:
R you drop the hot cigar ette lighter
R ach ild holds the hot cigar ette lighter to
objects, forex ample #
Alw ays hold the cigar ette lighter bythe
knob. #
Alw ays make sure that the cigar ette
lighter is out of reach of children. #
Never lea vechildren unat tended in the
ve hicle. Re
quirements:
R the ignition is switched on. #
Press in cigar ette lighter 1.
The cigar ette lighter will pop out automati‐
cally when the heating element is red-hot. Soc
kets 12
V so cket inthe front centre console Re
quirements:
R Only connect devices up toa maximum of
18 0wa tts (15 A). Seats and
stowing 121