2017 MERCEDES-BENZ E-CLASS SALOON door lock
[x] Cancel search: door lockPage 96 of 497

Priming/deactivating
tow- aw ay protection Multimedia sy
stem:
, Vehicle .
Vehicle settings .
Tow-away
protection #
Activate or deacti vate the function.
To w- aw ay protection remains deactivated until:
R The vehicle is unloc ked again.
R A door is opened.
R The vehicle is loc ked again. Fu
nction of interior pr otection When interior pr
otection is primed, a visual and
audible alarm is triggered if mo vement is de tec‐
te d in theve hicle interior.
Interior pr otection is primed automatically af ter
appr oximately 10seconds:
R After locking theve hicle with thekey.
R After locking theve hicle using KEYLESS-GO. Interior pr
otection is only primed when thefo l‐
lowing components are closed:
R Doo rs
R The boot lid
Interior pr otection is automatically deactivated:
R After pressing the% orp button on
th ekey.
R After pressing thest art/ stop button with the
ke y in thestow age compartment
(→ page 162).
R After unlocking theve hicle using KEYLESS-
GO.
R When using HANDS-FREE ACCESS.
The following situations can lead toafa lse
alarm:
R Moving objects such as masc ots in theve hi‐
cle interior.
R The side window is open.
R When the sliding sunroof is open.
R The panoramic sliding sunroof is open. Ac
tivating/deactivating in terior pr otection Multimedia sy
stem:
, Vehicle .
Vehicle settings .
Interior
motion sensor #
Activate or deacti vate the function.
Interior pr otection remains deactivated until:
R The vehicle is unloc ked again.
R A door is opened.
R The vehicle is loc ked again. Opening and closing
93
Page 109 of 497

R
you open the driver's door when the ignition
is switched on
The steering wheel mo ves back tothe last drive
position in thefo llowing cases:
R you swit chthe ignition on when the driver's
door is closed
R you close the driver's door when the ignition
is switched on
The last drive position of thesteering wheel is
st ored in thefo llowing situations:
R you swit ch the ignition off
R Vehicles with memory function: save the
seat settings via the memory function.
Ve hicles with memory function: press one of
th e memory function sa ved position buttons to
st op the adjustment process.
Setting the easy entry and exitfeature
Multimedia sy stem:
, Vehicle .
Vehicle settings .
Easy
Entry/Exit #
Activate Oor deacti vate ª the function. Using
the memory function &
WARNING Risk of an accident if memo ry
function is used while driving
If yo u use the memory function on the driv‐
er's side while driving, you could lose cont rol
of theve hicle as a result of the adjustments
being made. #
Only use the memory function on the
driver's side when theve hicle is station‐
ar y. &
WARNING Risk of entrapment when set‐
ting the seat with the memory function
If yo u use the memory function toset the
seat or thesteering wheel, you and other
ve hicle occupants, especially children, could
be ent rapped. #
During the setting procedure of the
memory function, ensure that no body
parts are in the sweep of the seat or
th esteering wheel. #
If somebody becomes trapped, immedi‐
ately release the memory function posi‐
tion button.
The adjustment process is stopped. &
WARNING Risk of entrapment if the
memory function is activated bychildren
Children could become trapped if they acti‐
va te the memory function, particularly when
unattended. #
Never lea vechildren unat tended in the
ve hicle. #
When leaving theve hicle, alw aysta ke
th eke y with you and lock theve hicle.
This also applies tomobile phones if the
"Digital Car Key in the smartphone"
function is activated via the Mercedes
connect me web app. The memory function can be used when
the igni‐
tion is switched off. 106
Seats and stowing
Page 166 of 497

Ensu
rethefo llowing before starting the engine:
R the legal stipulations in the area where your
ve hicle is par ked allow engine starting via
smartphone.
R it is safe tostart and runth e engine where
yo ur vehicle is par ked.
R the fuel tank is su fficiently filled.
R thest ar ter battery is suf ficiently charge d.
% You can also set thete mp erature with your
smartphone. In form ation on Mercedes me
connect and other services: http://
www.mercedes.me
Charging the bat tery before commencing
yo ur journey
% This function is not available in all countries.
R Ifth eve hicle battery is discharged, you
re cei vea message on your smartphone.
R You can then start theve hicle with the
smartphone tocharge the batter y.
R The vehicle is automatically switched off
af te rte n minu tes. Ensure
thefo llowing before starting the engine:
R the legal stipulations in the area where your
ve hicle is par ked allow engine starting via
smartphone.
R it is safe tostart and runth e engine where
yo ur vehicle is par ked.
R the fuel tank is su fficiently filled.
St arting theve hicle &
WARNING Risk of crushing or entrap‐
ment due tounin tentional starting of the
engine
Limbs could be crushed or trapped if the
engine is star ted unintentionally during
service or maintenance work. #
Alw ays secure the engine against unin‐
te ntional starting before car rying out
maintenance or repair work. Re
quirements:
R park position jis selected.
R the anti- theft alarm sy stem is not activated.
R the panic alarm is not activated. R
the hazard warning lamps are switched off.
R the bonn etis closed.
R the doors are closed and loc ked.
R the windo wsand sliding sun roof are closed. #
Start theve hicle using the smartphone:
R afte reve ryvehicle start, the engine runs for
te n minu tes.
R you can car ryout a maximum of two consec‐
utive starting attem pts.
R you can stop theve hicle again at any time.
R further information can be found in the
smartphone app.
Securing the engine against starting before
car rying out maintenance or repair work: #
switch on the hazard warning lamps.
or #
unlock the doors.
or #
open a side window or the sliding sunroof. Driving and parking
16 3
Page 216 of 497
The HOLD function is deactivated in
thefo llow‐
ing situations:
R When Active Dis tance Assi stDISTRONIC is
acti vated.
R Vehicles with automatic transmission:
when transmission position jis selected.
R When theve hicle is secured with the electric
parking brake.
In thefo llowing situations, theve hicle is held by
th e transmission position jorby the electric
parking brake:
R When the seat belt is unfas tened and the
driver's door is opened.
R When the engine is switched off.
R When there is a malfunction in the sy stem or
if th e po wer supply is insuf ficient.
Ve hicles with manual transmission:
The Brake immediately message may also
appear in the multifunction displa y:#
Immedia tely depress the brake pedal firm ly
until thewa rning message disappears.
The HOLD function is deactivated. A horn sounds at
regular inter vals if you turn off
th e engine, remo veyour seat belt and open the
driver's door while the HOLD function is activa‐
te d. If you attem pttolock theve hicle, the horn
to ne becomes louder. The vehicle cannot be
loc ked until you ha vedeactivated the HOLD
function.
% Once you ha veswitched off the engine, you
cannot restart the engine until you ha ve
deactivated the HOLD function. DY
NA MIC BODY CONT ROL DY
NA MIC BODY CONTROL has thefo llowing
ch aracteristics:
R Variable damping characteristics
R Continual adjustment of the damping forc es
The damping characteristics adapt tothe cur rent
operating and driving situation.
The da mping is tuned individually for each wheel
and is af fected bythefo llowing factors:
R The road sur face conditions
R Vehicle load R
The drive program selected
The drive program can be adjus ted using the
DY NA MIC SELECT switch. AIR
BODY CONT ROL AIR
BODY CONT ROL function
AIR BODY CONTROL is an air suspension sy stem
with variable damping for impr oved driving com‐
fo rt. The all-round le vel control sy stem ensures
th e best possible suspension and const ant
ground clea rance, even wi tha laden vehicle.
When driving at speed, theve hicle is lo wered
automatically toimpr ovedriving saf ety and to
re duce fuel consum ption. The option of manually
adjusting theve hicle le vel is also available.
AIR BODY CONTROL comprises:
R Air suspension with variable spring rate
R Automatic le vel control sy stem
R Speed-dependent lo wering toreduce fuel
consum ption
R Manually selec table high-le vel setting for
grea ter ground clea rance Driving and pa
rking 213
Page 238 of 497
#
Ensu rethat all vehicle doors, windo wsand
th e boot lid are closed. #
Start theRe mo teParking Assist app. #
Obser vethe instructions of theRe mo tePark‐
ing Assist app accordingly and park theve hi‐
cle into the parking space. #
After completion of the parking procedure,
safeguard theve hicle against rolling away.
When requ ired bylegal requirements or local
conditions: turn the wheels towa rdsth eke rb.
Pa rking with explo ration mode #
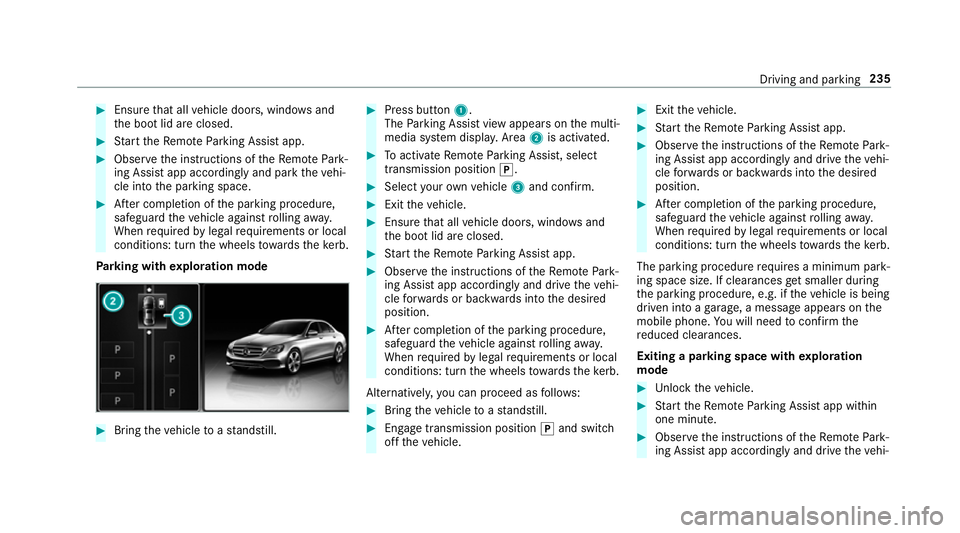
Bring theve hicle toast andstill. #
Press button 1.
The Parking Assist view appears on the multi‐
media sy stem displa y.Area 2is acti vated. #
Toactivate Remo teParking Assist, select
transmission position j. #
Select your ow nve hicle 3and confirm. #
Exit theve hicle. #
Ensure that all vehicle doors, windo wsand
th e boot lid are closed. #
Start theRe mo teParking Assist app. #
Obser vethe instructions of theRe mo tePark‐
ing Assist app accordingly and drive theve hi‐
cle forw ards or backwards into the desired
position. #
After completion of the parking procedure,
safeguard theve hicle against rolling away.
When requ ired bylegal requirements or local
conditions: turn the wheels towa rdsth eke rb.
Alternatively, you can proceed as follo ws: #
Bring theve hicle toast andstill. #
Engage transmission position jand switch
off theve hicle. #
Exit theve hicle. #
Start theRe mo teParking Assist app. #
Obser vethe instructions of theRe mo tePark‐
ing Assist app accordingly and drive theve hi‐
cle forw ards or backwards into the desired
position. #
After completion of the parking procedure,
safeguard theve hicle against rolling away.
When requ ired bylegal requirements or local
conditions: turn the wheels towa rdsth eke rb.
The parking procedu re requires a minimum park‐
ing space size. If clearances getsmaller during
th e parking procedure, e.g. if theve hicle is being
driven into a garage , a message appears on the
mobile phone. You will need toconfirm the
re duced clearances.
Exiting a parking space with explo ration
mode #
Unlock theve hicle. #
Start theRe mo teParking Assist app within
one minute. #
Obser vethe instructions of theRe mo tePark‐
ing Assist app accordingly and drive theve hi‐ Driving and parking
235
Page 249 of 497
#
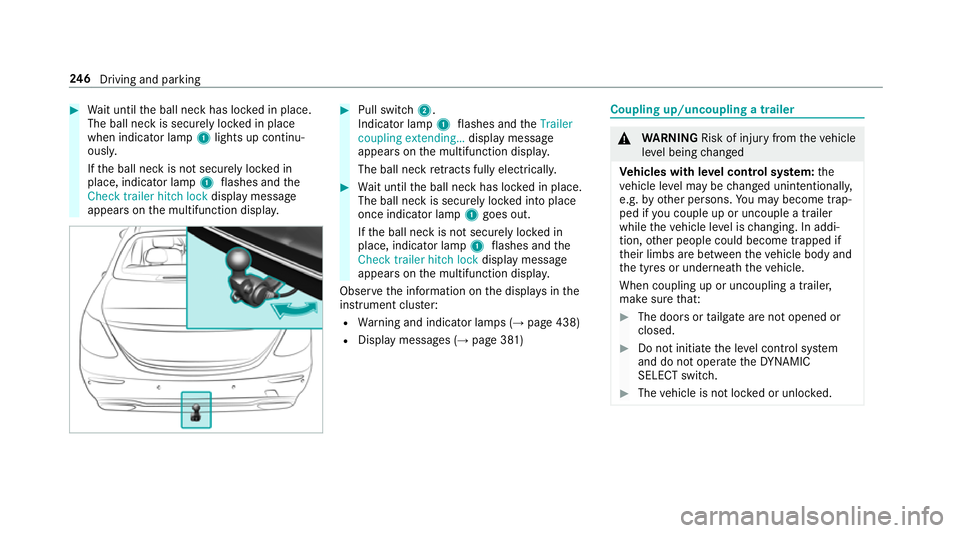
Wait until the ball neck has loc ked in place.
The ball neck is securely loc ked in place
when indicator lamp 1lights up continu‐
ousl y.
If th e ball neck is not securely loc ked in
place, indicator lamp 1flashes and the
Check trailer hitch lock displaymessa ge
appears on the multifunction displa y. #
Pull switch 2.
Indicator lamp 1flashes and theTrailer
coupling extending… display message
appears on the multifunction displa y.
The ball neck retracts fully electrically. #
Wait until the ball neck has loc ked in place.
The ball neck is securely loc ked into place
once indicator lamp 1goes out.
If th e ball neck is not securely loc ked in
place, indicator lamp 1flashes and the
Check trailer hitch lock displaymessa ge
appears on the multifunction displa y.
Obser vethe information on the displa ysinthe
instrument clus ter:
R Warning and indicator lamps (→ page 438)
R Display messages (→ page 381) Coupling up/uncoupling a trailer
&
WARNING Risk of inju ryfrom theve hicle
le ve l being changed
Ve hicles with le vel control sy stem: the
ve hicle le vel may be changed unin tentional ly,
e.g. by ot her persons. You may become trap‐
ped if you couple up or uncouple a trailer
while theve hicle le vel is changing. In addi‐
tion, other people could become trapped if
th eir limbs are between theve hicle body and
th e tyres or underneath theve hicle.
When coupling up or uncoupling a trailer,
make sure that: #
The doors or tailgate are not opened or
closed. #
Do not initiate the le vel control sy stem
and do not operate theDY NA MIC
SELECT switch. #
The vehicle is not loc ked or unloc ked. 246
Driving and pa rking
Page 340 of 497
%
vehicles with automatic transmission: if
th e automatic transmission cann otbe shif‐
te dto position i, orthe multifunction dis‐
play in the instrument clus ter does not show
anything, ha vetheve hicle transpor ted
aw ay( →page 338). A towing vehicle with lift‐
ing equipment is requiredforve hicle trans‐
por tation.
* NO
TEDama gedue to to wing away at
exc essively high speeds or over long dis‐
ta nces The driv
etra in could be damaged when tow‐
ing at excessively high speeds or over long
dis tances. #
Atowing speed of 50 km/h must not
be exc eeded. #
Atowing dis tance of 50 km must not be
exc eeded. &
WARNING Risk of accident when towing
a ve hicle which is too heavy
If th eve hicle being tow- star ted or towed
aw ay is heavier than the permissible gross
mass, thefo llowing situations can occur:
R theto wing eye may become de tach ed.
R the car/t railer combination may swer ve
or eve nove rturn. #
If ano ther vehicle is tow- star ted or
to we daw ay, its weight must not exceed
th e permissible gross mass of your own
ve hicle. If a
vehicle must be tow- star ted or towe daw ay,
its weight must not exceed the permissible gross
mass of theto wing vehicle. #
Information on the permissible gross weight
of theve hicle can be found on theve hicle
identification plate . #
Vehicles with automatic transmission: do
not open the driver's door or front passenger
door, otherwise the automatic transmission
automatically shifts toposition j. #
Fittheto wing eye (→ page 340). #
Attach theto w bar.
* NO
TEDama gedue toincor rect connec‐
tion #
Only connect theto w rope or tow bar to
th eto wing eyes. #
Deactivate the automatic locking mechanism
(→ page 75). #
Do not activate the HOLD function. #
Deactivate theto w- aw ay protection
(→ page 93). #
Deactivate Active Brake Assi st (→page 201). #
Vehicles with automatic transmission:
shift the automatic transmission toposition
i. #
Vehicles with manual transmission: shift
to neutral i. #
Release the electric parking brake. Breakdown assis
tance 337
Page 361 of 497

Aluminium hub cap
#
Toremo ve:position soc ket2 on hub cap
1.
% The soc ket can be found in the tyre-change
to ol kit. #
Position wheel spanner 3on soc ket2. #
Using wheel spanner 3, turn hub cap1
anti-clo ckwise and remo veit. #
Tofit: position hub cap 1and turn until it is
comple tely flush with the wheel. #
Position soc ket2 on hub cap 1. #
Attach wheel spanner 3tosoc ket2 and
tighten the hub cap clockwise.
Specified tightening torq ue: 25 Nm. #
Raise theve hicle (→ page 358). Ra
ising theve hicle when changing a wheel Re
quirements:
R There are no persons in theve hicle.
R The vehicle has been prepared for a wheel
ch ange (→ page 357).
R The hub caps ha vebeen remo ved
( → page 357).
Impor tant no tes on using the jack:
R only use theve hicle-specific jack that has
been tested and appr ovedby Mercedes-Benz
to raise theve hicle.
R the jack is only designed forra ising and hold‐
ing theve hicle for a short time while a wheel
is being changed and not for maintenance
wo rkunder theve hicle. R
the jack must be placed on a firm ,fl at and
non-slip sur face. If necessar y,use a lar ge,
load-bearing, non-slip underla y.
R thefo ot ofthe jack must be positioned verti‐
cally under the jacking point. Ru
les of conduct when theve hicle is raised:
R Never place your hands or feet under the
ve hicle.
R Do not lie under theve hicle.
R Do not start the engine and do not release
th e electric parking brake.
R Do not open or close any doors or the boot
lid. 358
Wheels and tyres