2017 MERCEDES-BENZ E-CLASS SALOON light
[x] Cancel search: lightPage 289 of 497
#
Select Yes.
Deleting all speed dial pres ets#
Highlight a preset. #
Select G. #
Select Delete all speed dial presets .#
Select Yes. Messages (t
ext messages and e-mails) Note
s on messages
If th e connected mobile phone supports the
Blu etoo th®
MAP profile, the message function
can be used on the multimedia sy stem. With
some mobile phones, some settings still ha veto
be made af ter connecting tothe multimedia sys‐
te m (see the manufacturer's operating instruc‐
tions).
New messages are identified bythe1 symbol
in the multimedia sy stem display and an audible
signal.
The ú symbol is displa yed when the mobile
phone's message memory is full. Te
xt messa ges cannot be written while theve hi‐
cle is in motion.
Yo u can obtain fur ther information about set‐
tings and suppor ted functions of Blue tooth®
-
capable mobile phones from a Mercedes-Benz
service centre or at: http://www.mercedes-
benz.com/connect
Calling up the settings for messages
Multimedia sy stem:
, Tel/ ®.
Telephone .
1 .
Set-
tings
Configuring an e-mail account #
Select an e-mail account.
The e-mail account is now confi gured.
Configuring thete xt messages or e-mails dis‐
pla yed #
Highlight Text msg. or an e-mail account. #
Select G.
A menu wi th thefo llowing options is shown:
R All messages
R New messages R
off(The messages are not displa yed auto‐
maticall y.) #
Select an option.
Re ading messages
Multimedia sy stem:
, Tel/ ®.
Telephone .
1
In the message menu
Unr ead messages are displa yed. #
Select a message.
In the message folder
The message menu is displa yed. #
Select 1SMS or1 E-mail. #
Select a message.
Making a call from the messages menu
Multimedia sy stem:
, Tel/ ®.
Telephone .
1
Calling a text message sender #
Highlight a text messa ge. #
Select G. #
Select Call sender. 286
Multimedia sy stem
Page 297 of 497
tings
.
Search for Internet devices .
Start
search #
Select the mobile phone.
If th e mobile phone supports the Blue tooth®
PA N profile, Internet access is set up. Yo u
can use the Internet functions. If the mobile
phone does not support the named Blue‐
tooth ®
profile, predefined or manual access
data must be set.
Selecting the predefined access data of the
mo bile phone network pr ovider #
Select Predefined settings.
A list of countries appears. #
Select the count ryofyour mobile phone net‐
wo rkprov ider.
The list of available pr oviders appears. #
Select your mobile phone network pr ovider.
An ove rview of the pr ovider settings appears. #
Select Confirm settings. Manually setting
the access data of the
mo bile phone network pr ovider #
Select Manual settings.
An ove rview of the pr ovider settings appears. #
Set access data. #
Select Confirm settings.
% Set the access data in accordance with your
data pac kage .Yo u can contact your mobile
phone network pr ovider toobtain the precise
access data.
Editing access data
Multimedia sy stem:
, Tel/ ®.
Tel/ ®.
Inter-
net .
Settings .
Manage Internet settings #
Highlight a mobile phone. #
Select G. #
Select Change configuration . #
Select Predefined settings orManual set-
tings.
The pr ovider settings are displa yed. #
Set the access data. Cancelling Internet access permission
for a
mobile phone
Multimedia sy stem:
, Tel/ ®.
Tel/ ®.
Inter-
net .
Settings .
Manage Internet settings #
Highlight a mobile phone. #
Select G. #
Select Delete configuration. #
Select Yes.
Displaying mobile phone details
Multimedia sy stem:
, Tel/ ®.
Tel/ ®.
Inter-
net .
Settings .
Manage Internet settings #
Highlight a mobile phone. #
Select G. #
Select Details.
Establishing an Internet connection
Re quirements:
R Your connection device is activated and
operational. 294
Multimedia sy stem
Page 304 of 497

Displaying Blu
etoo th®
audio equipment
details
Multimedia sy stem:
, Media .
Media .
Bluetooth
audio .
Options .
Bluetooth audio devices #
Highlight Blue tooth®
audio equipment and
navigate totheright. #
Select Details. Ra
dio Switching on the
radio Multimedia sy
stem:
, Radio #
Alternatively: press the$ button.
The radio display appears. You will hear the
last station pla yed on the last frequency
band selected. Ra
dio overview 1
Memory preset
2 Display of radio station selec ted
3 Main display field with available stations and
re leva nt information
4 Artist and track displ ay Setting
the frequency band Multimedia sy
stem:
, Radio .
Waveband #
Select the frequency band. Selecting a
radio station Multimedia sy
stem:
, Radio
Using the main display field #
Toselect a station: navigate tothe left or
ri ght.
Using the cur rent station list #
Press theto uchpad or cont roller.
The station list appears with thest ations cur‐
re ntly available. #
Select thest ation.
Using direct ent ry #
Select Options . #
Select Direct entry . #
Select the frequency band. #
Ente rth e frequency of the desired station in
th e entry field.
or #
Select Station preset. Multimedia sy
stem 301
Page 306 of 497
Editing
radio station presets Multimedia sy
stem:
, Radio .
Preset .
Edit station preset
Deleting stations #
Highlight a preset entry and navigate tothe
ri ght. #
Select Delete highlighted station/channel .#
Select Yes.
Moving stations #
Highlight a preset entry and navigate tothe
ri ght. #
Select Move highlighted station/channel. #
Select a location forst oring thest ation. Ac
tivating/deactivating the pres ets view Multimedia sy
stem:
, Radio .
Preset #
Select Station presets view: on .
The radio station preset appears. #
Toswitch between stored stations: navi‐
ga te to the left or right.
or #
Select Station presets view: off.
The frequency band of thest ation cur rently
being pl ayed appears. Setting
station tracking Multimedia sy
stem:
, Radio .
Options .
Station tracking
The following options are available:
R Automatic: the multimedia sy stem switches
to alternative frequencies across all fre‐
qu ency bands.
R Digital : switches toalternative frequencies in
th eDA B frequency band.
R Analogue: switches toalternative frequencies
in the FM frequency band.
R Fix frequency: an alternative frequency is not
set. The multimedia sy stem maintains the set
frequency when reception is poo r. #
Select an option.
% The settings are usually stored and taken
into account when calling up a preset again. Switching on
the frequency fix function (FM
ra dio mode) Multimedia sy
stem:
, Radio .
Options #
Select Fix frequency .
The multimedia sy stem maintains the set fre‐
qu ency when reception is poo r. Ta
gging music trac ks Multimedia sy
stem:
, Radio .
Options
If ra dio stations pr ovide there leva nt information,
th is function allo wsyouto trans fer information
on the music track cur rently pl aying toan
Apple ®
device. You can then pur chase the audio
fi le from theiTunes Store ®
. #
Select Tag this track.
The track information is sa ved. Multimedia sy
stem 303
Page 307 of 497
Displaying
the artist and track Multimedia sy
stem:
, Radio .
Options #
Select Display artist and track. #
Switch on Oa function. Switching traf
fic announcements on/off Multimedia sy
stem:
, Radio .
Options .
TA #
Activate Oor deacti vate ª the function.
or #
Press and hold the8 button on the mul‐
tifunction steering wheel until theTA display
in thest atus line lights up or goes out. Displ
aying station information Re
quirements:
R Radio stations pr ovide there leva nt informa‐
tion. Multimedia sy
stem:
, Radio #
Select Information.
Ad ditional information is displa yed.
Re turning tothe main display #
Select Information. Sound
To
ne settings Information about
the sound sy stem
The sound sy stem has a total output of 100
wa tts and is equipped wi th7 spea kers. It is av
ailable for all functions in thera dio and media
modes.
Calling up the sound menu
Multimedia sy stem:
, Media .
à
The following functions are available:
R Equaliser
R Balance/Fader #
Select the sound menu.
Ad justing treble, mid and bass settings
Multimedia sy stem:
, Media .
à .
Equaliser #
Select thero tary menu. #
Change the settings. #
Toexitth e menu: pressthe% button.
Ad justing the balance/ fader
Multimedia sy stem:
, Media .
à .
Balance/Fader #
Adjust the balance and fader. #
Toexitth e menu: pressthe% button. 304
Multimedia sy stem
Page 310 of 497
Battery disconnection periods
The AS
SYST PLUS service inter val display
can only calculate the service due da tewhen
th e bat tery is connected. #
Notedown the service due date displa yed on
th e instrument display before disconnecting
th e battery (→ page 306). Engine compartment
Ac
tive bonn et(pedestrian pr otection) Operation of
the active bonnet (pedestrian
pr otection)
In cer tain accident situations, therisk of injury
to pedestrians can be reduced bythe actuation
of the active bonn et. The rear area of the engine
bonn etisraised byappr oximately 85 mm.
Fo rth e drive tothewo rkshop, reset the trig‐
ge red active bonn etyourself. If the active bonn et
has been triggered, pedestrian pr otection may
be limited.
A qu alified specialist workshop must re-ins tate
th e full functionality of the active bonn et. The active bonnet is not
available in all coun‐
tries.
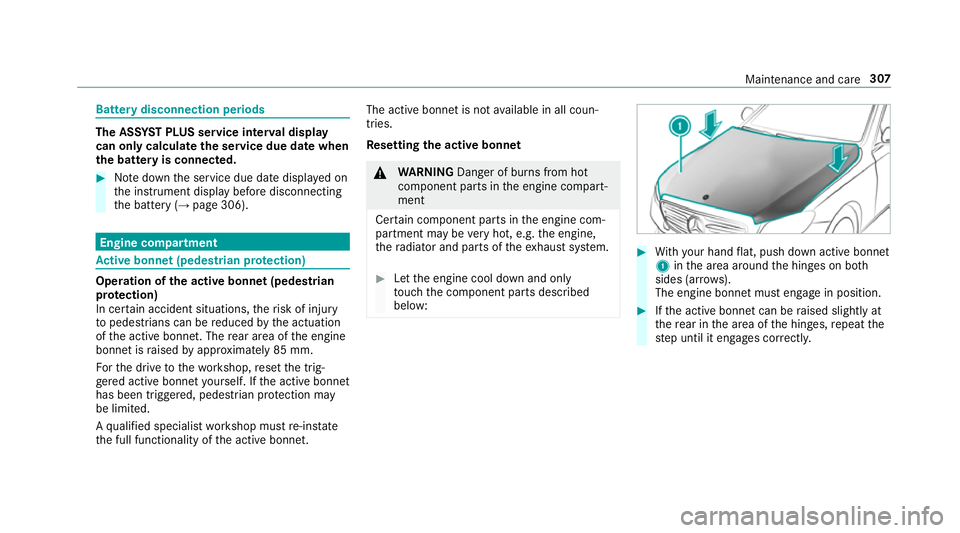
Re setting the active bonnet &
WARNING Danger of bu rns from hot
component parts in the engine compart‐
ment
Cer tain component parts in the engine com‐
partment may be very hot, e.g. the engine,
th era diator and parts of theex haust sy stem. #
Let the engine cool down and only
to uch the component parts described
below: #
With your hand flat, push down active bonnet
1 inthe area around the hinges on bo th
sides (ar rows).
The engine bonnet must engage in position. #
Ifth e active bonn etcan be raised slight lyat
th ere ar in the area of the hinges, repeat the
st ep until it engages cor rectl y. Maintenance and care
307
Page 312 of 497
th
era diator and parts of theex haust sy stem. #
Let the engine cool down and only
to uch the component parts described
below: &
WARNING Risk of inju ryfrom using the
windscreen wipers while the engine bon‐
net is open
When the engine bonn etis open, and the
windscreen wipers are set in motion, you can
be trapped bythe wiper linkage. #
Alw ays switch off the windscreen wip‐
ers and ignition before opening the
engine bonn et. #
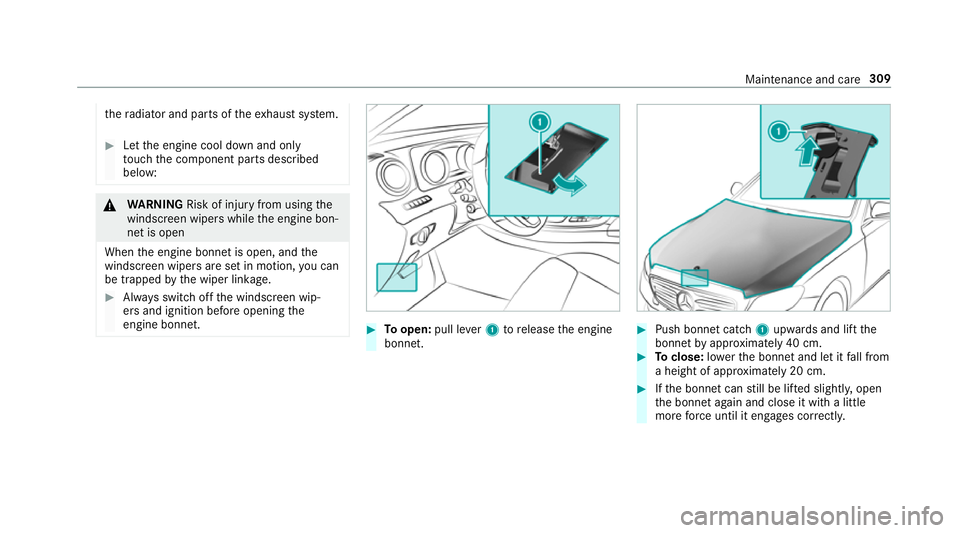
Toopen: pull lever1 torelease the engine
bonn et. #
Push bonnet catch 1upwards and lift the
bonn etby appr oximately 40 cm. #
Toclose: lowe rth e bonn etand let it fall from
a height of appr oximately 20 cm. #
Ifth e bonn etcan still be lif ted slightl y,open
th e bonn etagain and close it with a little
more forc e until it engages cor rectly. Maintenance and care
309
Page 318 of 497
Components damaged in
this wa y may unex‐
pec tedly fail. #
Do not use high-pressure cleaners with
circular jet nozzles toclean theve hicle. #
Have damaged tyres or chassis parts
re placed immediatel y. To
avo id damage to yourvehicle, obser vethefo l‐
lowing when using a high-pressure cleaner:
R Keep theke y at least 3 m away from the
ve hicle. Otherwise the boot lid could open
unintentionall y.
R Maintain a dis tance of at least 30 cm tothe
ve hicle. R
Vehicles with deco rative foil: parts of your
ve hicle are co vered with a decorative foil.
Maintain a dis tance of at least 70 cm
between thefo il-c ove red parts of theve hicle
and the nozzle of the high pressure cleaner.
Mo vethe high-pressure cleaner nozzle
around whilst cleaning.
R Obser vethe information on the cor rect dis‐
ta nce in the equipment manufacturer's oper‐
ating instructions.
R Do not point the nozzle of the high-pressure
cleaner directly at sensitive parts such as
tyres, slits, electrical component parts, bat‐
te ries, light sources and ventilation sl ots. Wa
shing theve hicle byhand Obser
vethe legal requ irements, e.g. in a number
of countries, washing byhand is only permitted
in specially designated wash ba ys. #
Use a mild cleaning agent, e.g. car shampoo. #
Washtheve hicle with luk ewarmwate r using
a soft car sponge. When doing so, do not
ex pose theve hicle todirect sunlight. #
Carefully hose theve hicle off with water and
dry using a chamois. Take care not topoint
th ewate r jet directly towa rdsth e air inlet. Maintenance and care
315