Page 115 of 585
#
Alw aysbep articular lycareful around
th et ailpipe and thet ailpipe trim. #
Allo wthe vehicle parts tocool down
befor eyou touc ht hem. The handling
characteristic sofyourvehicle are
dependent on thed istribution of thel oad within
th ev ehicle. Yous hould bear thef ollowing in
mind when loadingt hevehicle:
R nevere xceed them aximum permissible
gross mass or thep ermissible axle loads for
th ev ehicle (including occupants).
R thel oad mus tnotprotru de abo vetheu pper
edg eoft he seat backrests.
R when transporting objects in thel oad com‐
partment, thec ombined luggag ecove rand
ne tm usta lway sbei nstalled (load compart‐
men tcover and saf etyn et).
R alwaysp lace thel oad behind unoccupied
seats if possible.
R secur ethe load using thet ie-down eyes and
distribut ethe load evenly. St
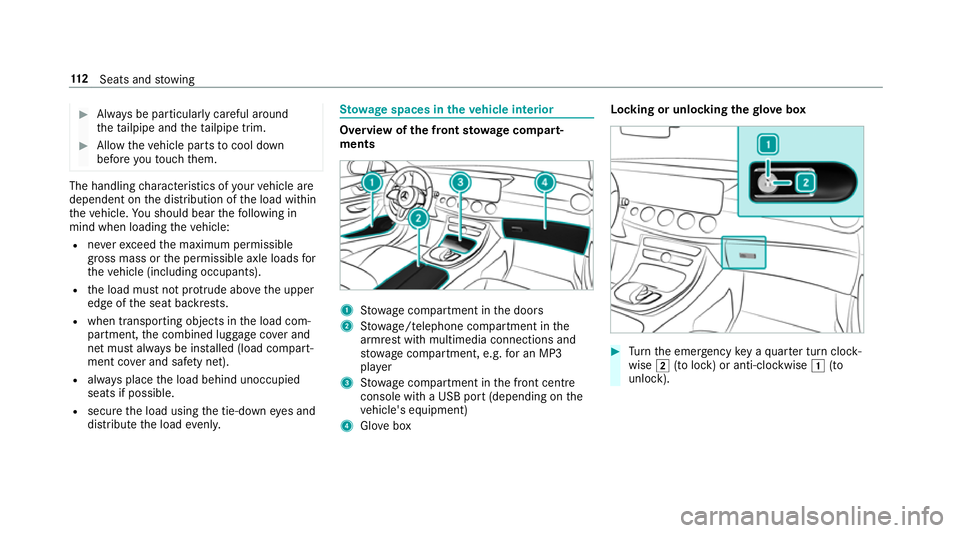
ow ages pace sint hevehicl einterior Overvie
wofthe front stowage compa rt‐
ments 1
Stow agec ompartment in thed oors
2 Stow age/telephon ecompartment in the
armres twithm ultimedia connections and
stow agec ompartment ,e.g. foranM P3
pla yer
3 Stow agec ompartment in thef ront cent re
consol ewithaU SBpor t(depending on the
ve hicle's equipment)
4 Glovebox Locking or unlocking
theg love box #
Turn thee mer gency keyaq uartert urnc lock‐
wise 2(tol ock) or anti-clockwise 1(to
unlock). 11 2
Seats and stowing
Page 148 of 585
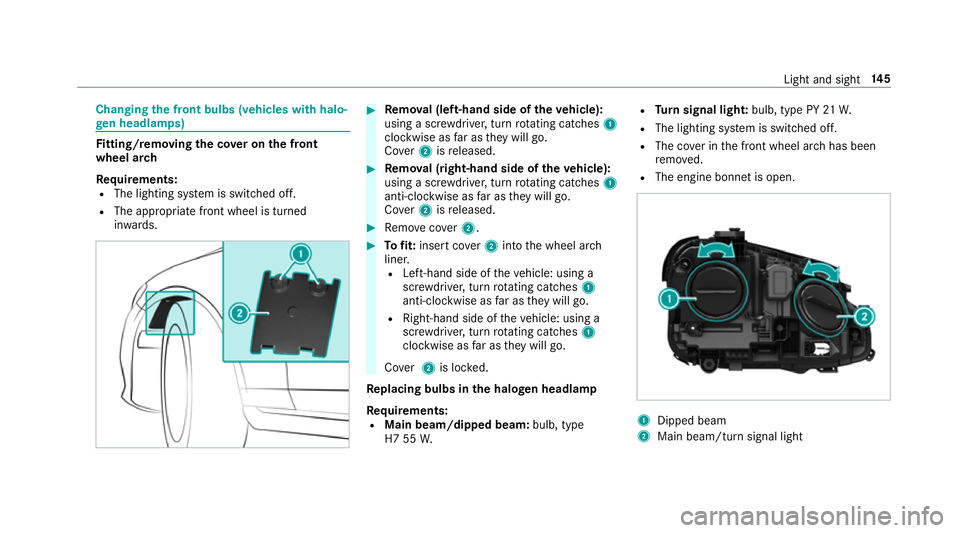
Changing
thef ront bulbs (vehicles wit hhalo‐
ge nh eadla mps) Fi
tting/ removing the co vero nthe front
whee larch
Re quirements:
R The lightin gsystemiss witched off.
R The appropriat efront wheel is turned
in wa rds. #
Remo val(left-hand side of thev ehicle):
using ascrew driver ,tur nr otating catches 1
clockwise as farast heyw ill go.
Co ver 2isreleased. #
Remo val(right-hand side of thev ehicle):
using ascrew driver ,tur nr otating catches 1
anti-clockwise as farast heyw ill go.
Co ver 2isreleased. #
Remo vecover 2. #
Tofit: inse rtco ver 2intot he wheel ar ch
liner.
R Left-hand side of thev ehicle: using a
scr ewdriver ,tur nr otating catches 1
anti-clockwise as farast heyw ill go.
R Right-han dside of thev ehicle: using a
scr ewdriver ,tur nr otating catches 1
clockwise as farast heyw ill go.
Co ver 2is loc ked.
Re placing bulbs in the halo genh eadla mp
Requ irements:
R Main beam/dipped beam: bulb, type
H7 55 W. R
Turn signal light: bulb, type PY 21W.
R The lighting sy stem is switched off.
R The co verint he front wheel ar chhas been
re mo ved.
R The engin ebonn etis open. 1
Dipped beam
2 Main beam/tur nsignal light Light and sight
14 5
Page 149 of 585
#
Turn ther ele vant housing co vera nti-clock‐
wise and remo veit. #
Main beam/dipped beam: turnthe soc ket
anti-clockwis eand remo veit. #
Turn signal light: turnthe soc keta nti-clo ck‐
wise, unloc kand remo veit. #
Pull theb ulb out of thes ocket. #
Inse rtthen ew bulb int othe soc ketsot hat
th ee ntir ebase of theb ulb is resting on the
bottom of thes ocket. #
Inse rtsoc keta nd tur nitclock wise. #
Press on theh ousing co vera nd tur nitclock‐
wise. #
Replace thec over in thef ront wheel ar ch. Wi
ndscreen wiper sand windscreen washer
sy stem Switching
thew indscreen wiper son/off 1
gWindsc reen wiper soff
2 Ä Intermittent wiping, normal
3 Å Intermittent wiping, frequent 4
° Continuous wiping, slow
5 ¯ Continuous wiping, fast #
Turn thec ombination switc htothe cor rect
position 1-5. #
Singlew ipe /washing: pushtheb utton on
th ec ombination switc hinthe direction of
ar row 1.
R í Single wipe
R î Wiping wit hwashe rfluid 14 6
Light and sight
Page 186 of 585
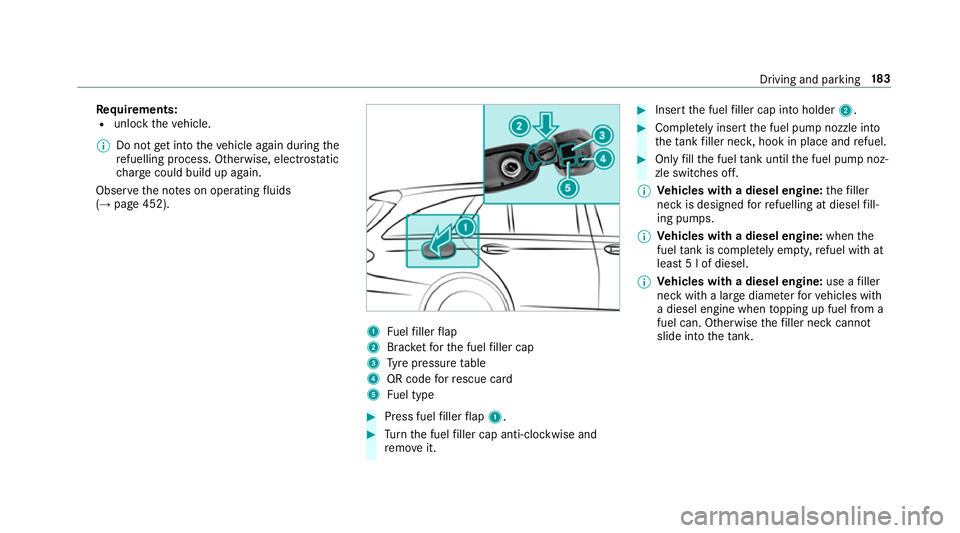
Re
quirements:
R unloc kthe vehicle.
% Do no tget intot he vehicle again during the
re fuelling process. Otherwise, electros tatic
ch arge could buil dupagain.
Obser vethen otes on operating fluids
(→ pag e452). 1
Fuelfiller flap
2 Brac ketfor thef uel filler cap
3 Tyre pressur etable
4 QR code forr escue card
5 Fuel type #
Press fuel filler flap 1. #
Turn thef uel filler cap anti-clockwise and
re mo veit. #
Inser tthe fuel filler cap int oholder 2. #
Comple tely inse rtthef uel pum pnozzle into
th et ank filler nec k,hook in place and refuel. #
Onlyfillthef uel tank unti lthe fuel pum pnoz‐
zle switches off.
% Vehicles with adiesel engine: thef iller
nec kisd esigned forr efuelling at diesel fill‐
ing pumps.
% Vehicles with adiesel engine: whenthe
fuel tank is compl etelye mp ty,r efuel wit hat
lea st5lofd iesel.
% Vehicles with adiesel engine: useafiller
nec kwithal arge diame terf or vehicles with
ad iesel engine when topping up fuel from a
fuel can. Otherwise thef iller nec kcannot
slide int othe tank. Driving and pa
rking 18 3
Page 188 of 585
The
following announcements appear in order in
th em ultifunction displa ywhen theA dBlue ®
tank
requ iresrefilling:
R Refill AdBlue See Owner's Manual .The
Ad Blue ®
re ser voir is down tother eser ve
le ve l.
R Refill AdBlue No star tinXXX km .You can
onl ydrive thev ehicle overthe dis tance
shown. TopupA dBlue®
as soon as possible.
R Refill AdBlue Start not possible.T hevehicle
can no longer be star ted. Opening
theA dBlue ®
filler cap #
Press fuel filler flap 1. #
Turn AdBlue ®
filler cap 2anti-clockwise and
re mo veit. Preparing
theA dBlue ®
re fill canis ter #
Screw onthef astener of AdBlue ®
re fill canis‐
ter 2. #
Screw disposable hose 1ontothe opening
of Ad Blue ®
re fill canis ter2 until finger-tight. Driving and pa
rking 18 5
Page 260 of 585
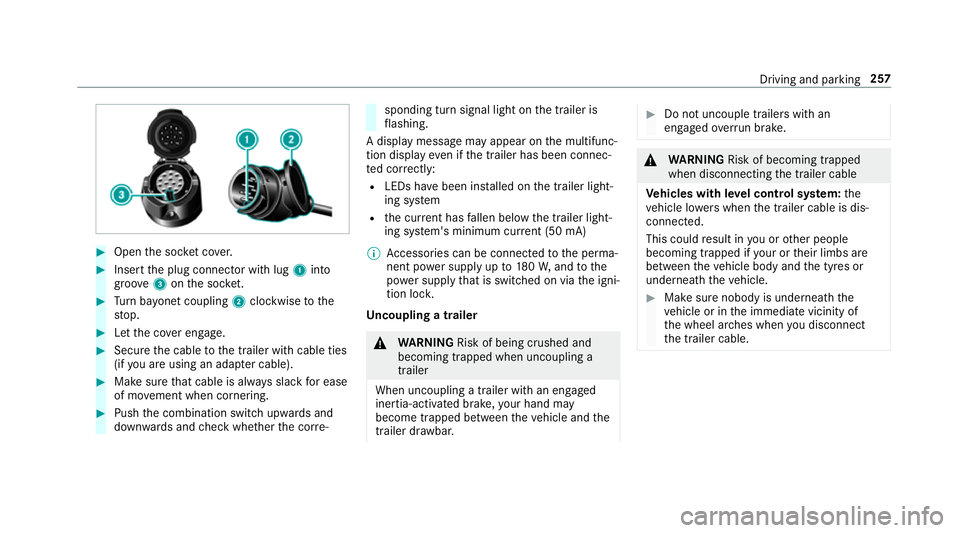
#
Open thes ocketc ove r. #
Inser tthe plug connector wit hlug 1 into
groo ve3 onthes ocket. #
Turn bayone tc oupling 2clockwise tothe
st op. #
Letthe co vere ngage. #
Secur ethe cable tothet railer wit hcable ties
(if youa reusin gana dapterc able). #
Mak esuret hat cabl eisalway ss lac kfor ease
of mo vement when cornering. #
Push thec ombination switc hupwards and
down wardsa nd checkw hether thec orre‐ sponding tur
nsignal light on thet railer is
fl ashing.
Ad ispla ymessag emayappear on them ultifunc‐
tion displa yevenift he trailer has been connec‐
te dc orrectly:
R LEDs ha vebeen ins talled on thet railer light‐
ing sy stem
R thec urrent ha sfallen belo wthe trailer light‐
ing sy stem's minimum cur rent (50 mA)
% Accessorie scan be connected tothep erma‐
nentp owersupp lyup to180W,a ndtothe
po we rsupp lythat is swit ched on via thei gni‐
tion loc k.
Un coupling atrailer &
WARNING Risk of being crushed and
becoming trapped whe nuncoupling a
trailer
Whe nuncoupling atrailer with an engaged
ine rtia-activated brake, your han dmay
become trapped between thev ehicle and the
traile rdrawbar. #
Do no tuncouple trailer swithan
engaged overrunb rake. &
WARNING Risk of becoming trapped
whe ndisconnecting thet railer cable
Ve hicles with le velc ontrol sy stem: the
ve hicle lo werswhen thet railer cable is dis‐
connected.
This could result in youoro ther people
becoming trapped if your or their limbs are
between thev ehicle body and thet yres or
underneat hthe vehicle. #
Mak esuren obody is underneat hthe
ve hicle or in thei mmediat evicinity of
th ew heel ar ches when youd isconnect
th et railer cable. Driving and parking
257
Page 333 of 585
Multimedia sy
stem:
, Navigation #
Tozoo min:swipe down on theT ouc hCon‐
trol.
or #
Turn thec ontroller anti-clockwise.
or #
Movetwof inger saparton thet ouchpad. #
Tozoo mo ut:swipe up on theT ouc hControl.
or #
Turn thec ontroller clockwise.
or #
Movetwof inger stogether on thet ouchpad.
% Youc an se tthe unit of measurement of the
map scale (→ page301). Moving
them ap
Multimedia sy stem:
, Navigation .
Z Options .
Map
menu #
Alternatively: if them ap is displa yedinf ull
screen mode, press theT ouc hControl, the
controller or thet ouchpad.
The map menu appears. #
Select "mo vemap" in map menu 2
(→ pag e329). #
Swipe in an ydirection on theT ouc hControl
or touchpad.
or #
Slid ethe controller in an ydirection.
The map mo vesint he cor responding direc‐
tion under thec rosshair .The fur ther you
mo veyour finger away from thes tarti ngposi‐
tio nont hetouchpad, thef astert he map
mo ves. Selecting
them aporientation
Multimedia sy stem:
, Navigation .
Z Options .
Map
menu #
Alternatively: if them ap is displa yedinf ull
screen mode, press theT ouc hControl or the
to uchpad.
The map men uappears. #
In map menu 3,select N,2D or
3D( →pag e329).
R N:t he 2D map vie wisdisplayedsot hat
nor this alw aysatt hetop.
R 2D:t he 2D map vie wisaligned tothe
direction of tra vel.
R 3D:t he 3D map vie wisaligned tothe
direction of tra vel.
Selecting POI symbols
Multimedia sy stem:
, Navigation .
Z Options .
Map con-
tent
POIs include filling stations and ho tels whic hcan
be displa yedass ymbols on them ap,fore xam‐
ple. Notall POI sareavailable everywhere. 330
Multimedia sy stem
Page 400 of 585
#
Do no talter thee ngine oil or oil filter in
order toachie velonger chang einter vals
th an presc ribed. #
Do no tuse additives. #
Followt he instructions in thes ervice
inter vald ispla yregarding theo il
ch ange. *
NO
TEDama gecaused bytopping up too
muc hengine oil To
pping up toom uche ngine oil can cause
damag etothe engine or thec atalytic con‐
ve rter. #
Have excess engine oil remo vedata
qu alified specialis tworks hop. #
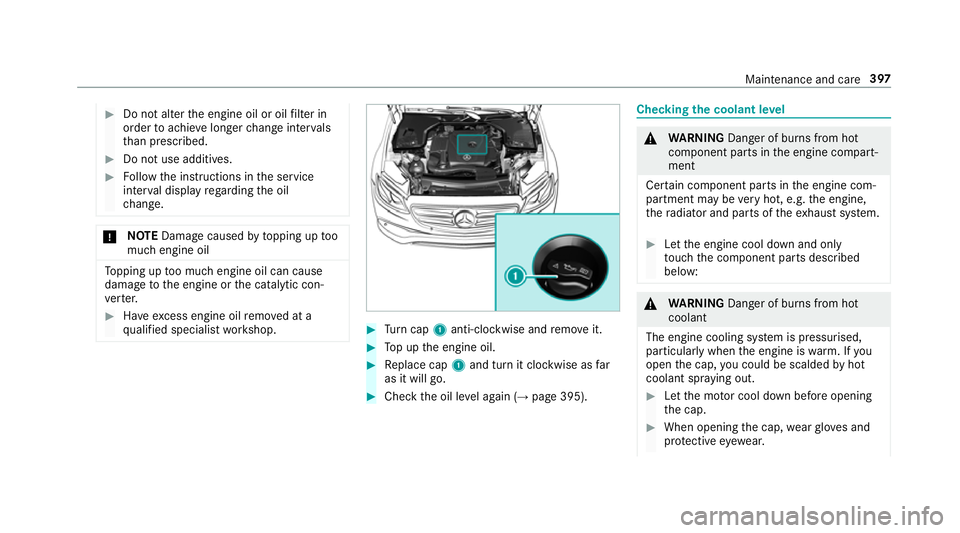
Turn cap 1anti-clockwise and remo veit. #
Topupt he engine oil. #
Replace cap 1and tur nitclockwise as far
as it will go. #
Chec kthe oil le vela ga in (→ page395). Checking
thec oolant le vel &
WARNING Danger of bu rnsf romh ot
component parts in thee ngine compart‐
ment
Cer tain component parts in thee ngine com‐
partmen tmaybe very hot, e.g. thee ngine,
th er adiator and parts of thee xhau stsystem. #
Letthe engine cool down and only
to uc ht he component parts described
below: &
WARNING Danger of bu rnsf romh ot
coolant
The engine cooling sy stem is pressurised,
particularly when thee ngine is warm.Ify ou
open thec ap, youc ould be scalded byhot
coolant spr aying out. #
Letthe mo torc ool down befor eopening
th ec ap. #
When opening thec ap, wearglove sand
pr otectiv eeyewe ar. Maintenanc
eand care 397