Page 401 of 585
#
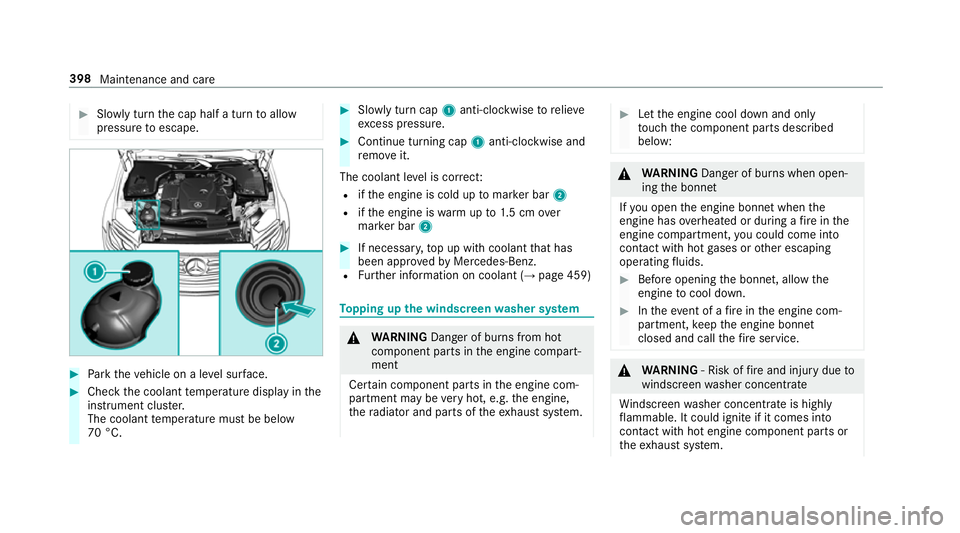
Slowly tur nthe cap half aturntoa llow
pressur etoescape. #
Park thev ehicle on alevel sur face. #
Chec kthe coolant temp eratur edispla yint he
instrument clus ter.
The coolant temp eratur emustbeb elow
70 °C. #
Slowl yturnc ap 1 anti-clockwise torelie ve
exc ess pressure. #
Continue turning cap 1anti-clockwise and
re mo veit.
The coolan tleve lisc orrect:
R ifth ee ngine is cold up tomar kerb ar2
R ifth ee ngine is warm upto1.5c mo ver
mar kerb ar2 #
If necessar y,topupw ithc oolant that has
been appr ovedbyM ercedes-Benz.
R Further information on coolant (→ page459) To
pping up the windsc reen washer sy stem &
WARNING Danger of bu rnsf romh ot
component parts in thee ngine compart‐
ment
Cer tain component parts in thee ngine com‐
partmen tmaybe very hot, e.g. thee ngine,
th er adiator and parts of thee xhau stsystem. #
Letthe engine cool down and only
to uc ht he component parts described
below: &
WARNING Danger of bu rnsw hen open‐
ing theb onnet
If yo uo pen thee ngine bonn etwhen the
engine has overheated or during afireint he
engine compartment, youc ould come into
contact wit hhotgases or other escaping
operating fluids. #
Befor eopening theb onnet ,allowt he
engine tocool down. #
Inthee vent of afireint he engine com‐
partment, keep thee ngine bonn et
closed and cal lthe fire service. &
WARNING ‑Riskoff irea nd injur ydue to
windscreen washer concentrate
Wi ndsc reen washer concentrat eishighly
fl ammable. It coul dignit eifitc omes into
con tact wi thhote ngine component parts or
th ee xhau stsystem. 398
Maintenanc eand care
Page 427 of 585
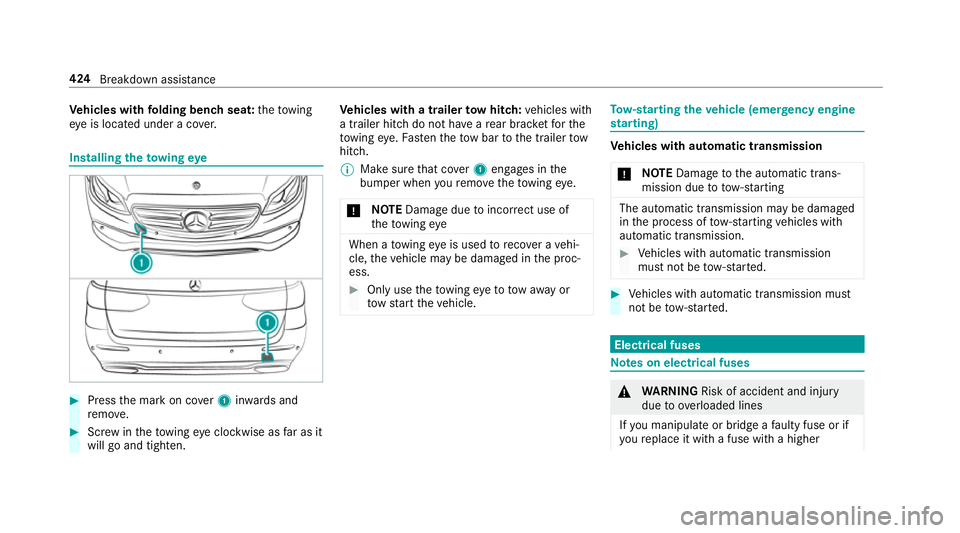
Ve
hicles with folding benc hseat: thet ow ing
ey eisl ocated under acove r. Installin
gthe towing eye #
Press them arkonc over 1 inwa rdsa nd
re mo ve. #
Screw inthet ow ing eye clockwise as farasit
willgoa nd tighten. Ve
hicles with atrailert owhitch: vehicles with
at railer hitc hdonothave arear brac ketfor the
to wing eye. Fasten thet ow bar tothet railer tow
hitch.
% Mak esuret hat co ver1engages in the
bumper when your emo vethet ow ing eye.
* NO
TEDama gedue toincor rect us eof
th et ow ing eye When
atow ing eyeisu sedtoreco verav ehi‐
cle, thev ehicle ma ybedamaged in thep roc‐
ess. #
Onlyusethet ow ing eyetot owaway or
to ws tartthe vehicle. To
w- starting thev ehicle (emer gency engine
st arting) Ve
hicles with automatic transmission
* NO
TEDama getothea utomatic trans‐
mission due to tow-starting The automatic transmissio
nmaybe damaged
in thep rocess of tow- startin gvehicles with
automatic transmission. #
Vehicles wit hautomatic transmission
mus tnotbe tow- star ted. #
Vehicles wit hautomatic transmission must
no tbet ow-sta rted. Electrical fuses
Note
sone lectrical fuses &
WARNING Risk of accident and inju ry
due to ov erloaded lines
If yo um anipulat eorbridg eaf aulty fuse or if
yo ur eplace it wit hafuse wit hahigher 424
Breakdown assis tance
Page 444 of 585
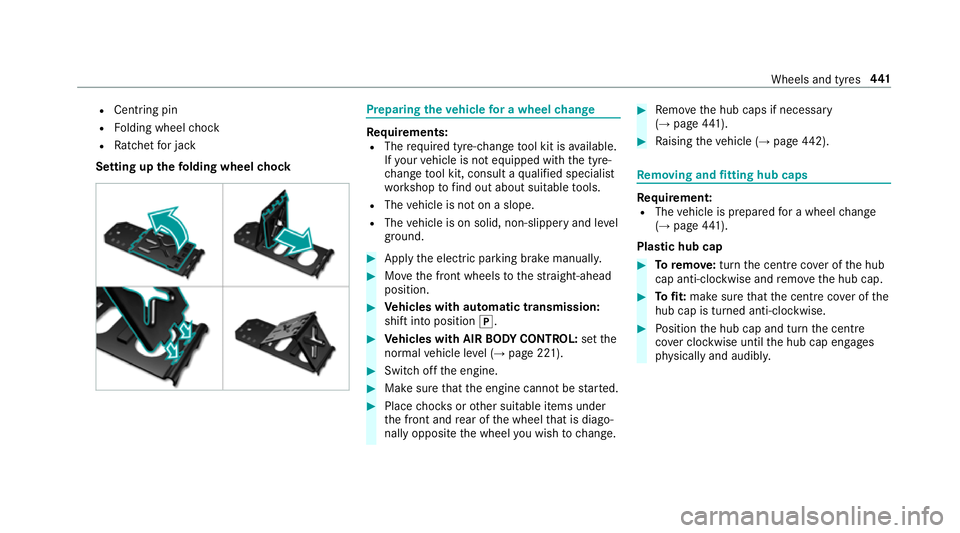
R
Centring pin
R Folding wheel chock
R Ratche tfor jack
Setting up thef olding wheel chock Prepa
ring thev ehicle foraw heelchange Re
quirements:
R The requ ired tyre-chang etool kit is available.
If yo ur vehicle is no tequipped wit hthe tyre-
ch ang etool kit, consult aqualified specialist
wo rkshop tofind ou tabout suitable tools.
R The vehicle is no tonaslope.
R The vehicle is on solid, non-slipper yand le vel
ground. #
Apply thee lectric parking brak emanually. #
Movethef ront wheels tothes traight-ahead
position. #
Vehicles with automatic transmission:
shif tint op osition j. #
Vehicles with AIRB ODYC ONT ROL:setthe
normal vehicle le vel(→pag e221). #
Swit chofft he engine. #
Mak esuret hat thee ngine cann otbe star ted. #
Place choc ks orother suitable items under
th ef ront and rear of thew heel that is diago‐
nall yopposit ethe wheel youw ish tochange. #
Remo vetheh ub caps if necessary
(→ pag e441). #
Raising thev ehicle (→ page442). Re
moving and fittin ghub caps Re
quirement:
R The vehicle is prepared foraw heelchange
(→ pag e441).
Plastic hub cap #
Toremo ve: turnthe centre coveroft he hub
cap anti-clockwise and remo vetheh ub cap. #
Tofit: mak esuret hat thec ent recoveroft he
hub cap is turned anti-clockwise. #
Position theh ub cap and tur nthe centre
co verc lockwise until theh ub cap engages
ph ysicall yand audibly. Wheels and tyres
441
Page 445 of 585
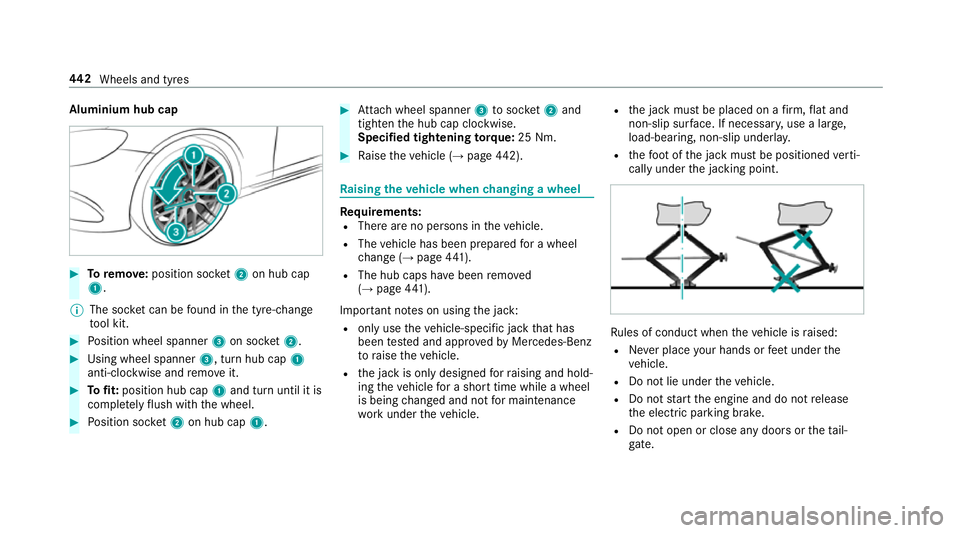
Aluminiu
mhubcap #
Toremo ve: positio nsocket 2on hu bcap
1.
% The soc ketc an be found in thet yre-change
to ol kit. #
Position wheel spanner 3on soc ket2. #
Using whee lspa nner 3,turnh ub cap 1
anti-clo ckwise and remo veit. #
Tofit: position hub cap 1and tur nuntil it is
comple tely flush wit hthe wheel. #
Position soc ket2on hu bcap 1. #
Attach wheel spanner 3tosoc ket 2and
tighten theh ub cap clockwise.
Specified tightening torq ue: 25 Nm. #
Raise thev ehicle (→ page442). Ra
ising thev ehicle when changing awheel Re
quirements:
R Ther eareno persons in thev ehicle.
R The vehicle has been prepared foraw heel
ch ang e(→pag e441).
R Theh ub cap shave been remo ved
( → pag e441).
Impor tant no tesonu singthej ack:
R onlyusethev ehicle-specific jac kthat has
been tested and appr ovedbyM ercedes-Benz
to raise thev ehicle.
R thej ackiso nlyd esigned forr aising and hold‐
ing thev ehicle foras horttime while awheel
is being changed and no tfor maintenance
wo rkunder thev ehicle. R
thej ackm ustbep laced on afirm, flat and
non-slip sur face. If necessar y,use alarge,
load-bearing, non-slip underla y.
R thef ootoft he jac kmustbep ositioned verti‐
call yunder thej acking point. Ru
les of conduct when thev ehicle is raised:
R Neverp lace your hands or feet under the
ve hicle.
R Do no tlie under thev ehicle.
R Do no tstar tthe engine and do no trelease
th ee lectric parking brake.
R Do no topen or close an ydoor sort hetail‐
ga te. 442
Wheels and tyres
Page 447 of 585
#
Position jack 2at jac ksuppor tpoint 1. #
Turn ratche tring sp anner 3clockwise until
jack 2sitsc omple tely on ja cksuppor tpoint
1 and theb ase of thej ackl ies evenlyon
th eg round. #
Continue totur nratche tring sp anner 3
unti lthe tyr eisraised amaximum of 3cm
of ft he ground. #
Loosen and remo vethew heel (→ page444). Re
moving awheel Re
quirement:
R The vehicle is raised (→ page442).
When changing awheel, avoid applying an yforce
to theb rake discs, since this could impair the
le ve lofc omfort when braking.
* NO
TEDama getothre adin gfromd irton
wheel bolts #
Do no tplace wheel bolt sinsandoron
ad irty sur face. #
Unscr ew theu ppermos twheel bolt com‐
ple tely. #
Screw centring pin 1instead of thew heel
bolt int othe thre ading. #
Unscr ew ther emaining wheel bolt sfully. #
Remo vethew heel. #
Fitthen ew wheel (→ page444). Fi
ttin gan ewwheel Re
quirement:
R The wheel is remo ved( →pag e444). 444
Wheels and tyres
Page 448 of 585
&
WARNING Risk of accident from losing a
wheel
Oiled, greased or damaged wheel bolt/wheel
nut thre ads or wheel hub/wheel mounting
bolt thre ads can caus ethe wheel bolts/
wheel nuts tocome loose.
As aresult, youc ould lose awheel while driv‐
ing. #
Nevero il or grease thet hreads. #
Inthee vent of damag etothethre ads,
con tact aq ualified specialis tworks hop
immediatel y. #
Have thed amaged wheel bolts or dam‐
aged hub thre ads replaced. #
Do no tcontinue driving. #
Obser vethei nformation on thec hoice of
tyres (→ page436).
Fo rtyres wit haspecified direction of rotation,
an ar rowonthes ide wall of thet yrei ndicates
th ec orrect di rection of rotation. Obse rvet he
direction of rotatio nw henf itting. #
Slide thew heel tobe mounted ont othe cen‐
tring pin and push it on. &
WARNING Risk of inju ryfrom tightening
whee lbolts and nuts
If yo ut ighten thew heel bolts or wheel nuts
when thev ehicle is raised, thej ackc ould tip. #
Onlytighten wheel bolts or wheel nuts
when thev ehicle is on theg round. #
Fors afet yr easons, onl yuse wheel bolts
whic hhaveb een appr ovedbyM ercedes-
Benz and fort he wheel in question. #
Tighten thew heel bolts until they aref inger-
tight. #
Unscr ew thec ent ring pin. #
Tighten thel astw heel bolt until it is finger-
tight. #
Lowe rthe vehicle (→ page445). Lo
weri ngthev ehicle af teraw heelchange Re
quirements:
R The ne wwheel has been fitted (→ page 444 ). #
Place ther atche tring sp anner ont othe he xa‐
gon nut of thej acksot hatthel ette ring "AB"
is visible. #
Tolowe rthe vehicle: turnthe ratche tring
sp an ner of thej acka nti-clockwise. #
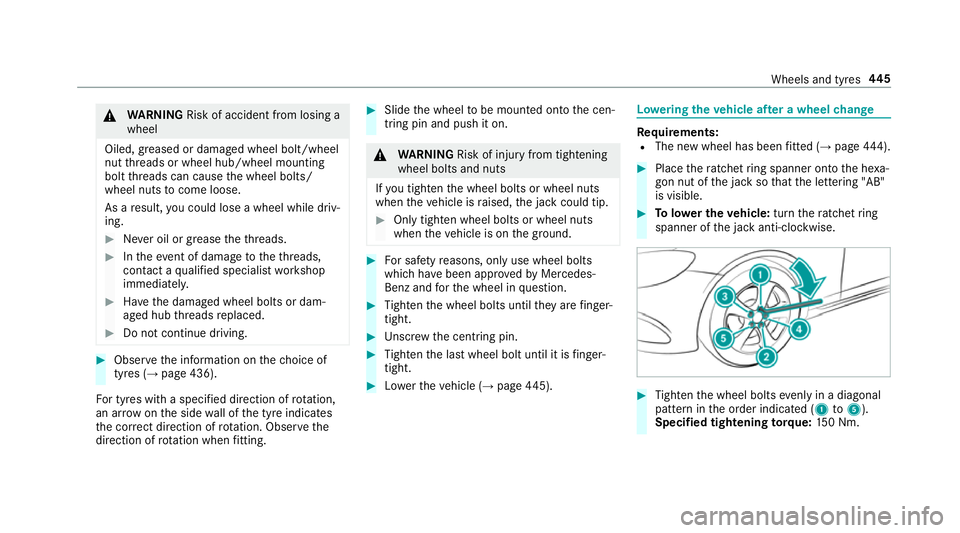
Tighten thew heel bolts evenlyinad iagonal
patter ninthe order indicated (1 to5 ).
Specified tightening torq ue: 150N m. Wheels and tyres
445