Page 452 of 692

4525-12. Other function
IS300h_EE(OM53D89E)
Go to “MirrorLink”: “MENU” button “Info” “MirrorLink”
Select the desired application on the application list screen.
■MirrorLink™ screen
Follow the specific operation procedur es for the smartphone application.
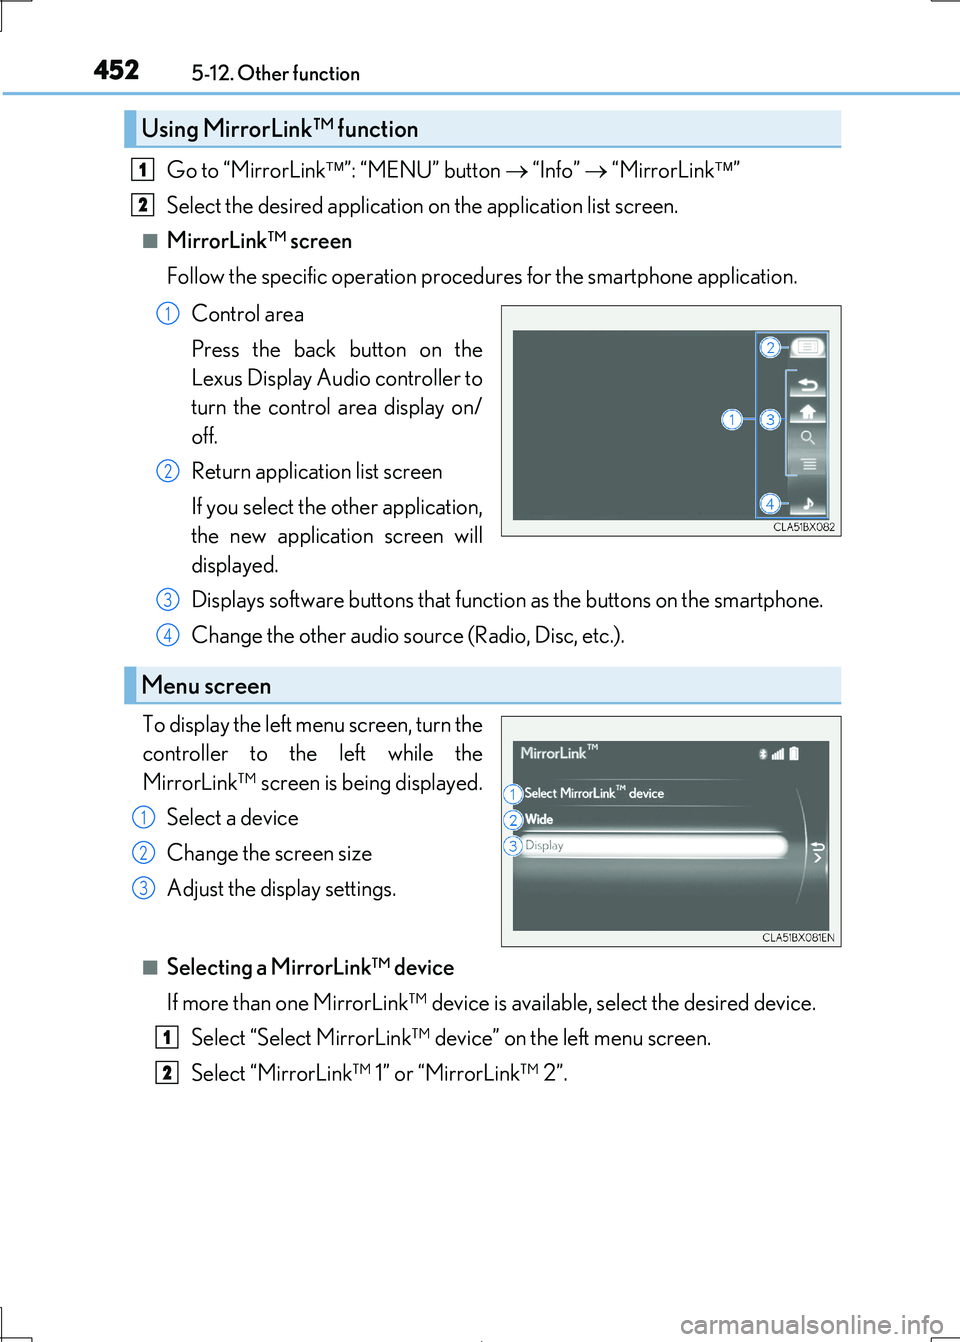
Control area
Press the back button on the
Lexus Display Audio controller to
turn the control area display on/
off.
Return application list screen
If you select the other application,
the new application screen will
displayed.
Displays software buttons that functi on as the buttons on the smartphone.
Change the other audio source (Radio, Disc, etc.).
To display the left menu screen, turn the
controller to the left while the
MirrorLink™ screen is being displayed.
Select a device
Change the screen size
Adjust the display settings.
■Selecting a MirrorLink™ device
If more than one MirrorLink™ device is available, select the desired device.
Select “Select MirrorLink™ device” on the left menu screen.
Select “MirrorLink™ 1” or “MirrorLink™ 2”.
Using MirrorLink™ function
1
2
1
2
Menu screen
3
4
1
2
3
1
2
Page 453 of 692

4535-12. Other function
5
Lexus Display Audio system
IS300h_EE(OM53D89E)
■Operational conditions
●When MirrorLink™ is activated, previous applications, run with a USB, are closed, and
vice versa.
●Compatible devices
Smartphones, which passed the Car Connect ivity Consortium certification program
ver1.1 or later. Confirm with the smartphone manufacture or the distributor for the MirrorLink™ compatibility.
●Compatible applications
Applications, which are cert ified by Car Connectivity Consortium as MirrorLink™Base-Certified or Drive-Certified applications.
■About MirrorLink™
MirrorLink is a registered trademar k of Car Connectivity Consortium, Inc.
■When using MirrorLink™
●Check that the smartphone screen is unlocked. Unlock the smartphone screen before
connecting it to the Lexus Display Audio system. (Some smartphones may not be able to be connected via MirrorLink™ if the screen is locked.)
●Make sure that the smartphone has been connected via Bluetooth®. (Some smart-
phones may not be able to perform hands-free calls using the MirrorLink™ function if it has not been connected to the vehicle via Bluetooth®.)
●If a MirrorLink™ application cannot be starte d, check that the MirrorLink™ applica-
tion certificate has not expired. The certificates of MirrorLink™ applications have an expiration date. (An internet connection is required to automatically update the certifi-
cate.) If a MirrorLink™ application becomes un available, it may be due to the certifi-
cate expiring. In this case, the certificate must be updated manually. Check with the smartphone manufacturer or application de veloper for how to update the certificate.
●Make sure the volume of the smartphone is set to an appropriate level. If the Mirror-
Link™ application volume is ex cessively low even when the volume of the Lexus Dis- play Audio system is increased, check the vo lume of the smartphone and increase it as
necessary.
WARNING
■While driving
Do not connect smartphone or operate the controls.
Page 455 of 692
4555-12. Other function
5
Lexus Display Audio system
IS300h_EE(OM53D89E)
Go to “USB photo”: “MENU” button “Info” “USB 1 photo” or “USB 2
photo”
P. 375
Move the controller to the left to display the menu screen.
Change the full screen mode.
Select to set the slide show display
on/off.
Start the slide show at a selected folder.
Change the play speed.
Change the play mode.
Move the controller to the right and select “Browse”.
Select the desired folder, and then sele ct a desired file to begin using the
selected folder.
USB photo
Connecting a USB memory device enable s you to enjoy photo on the Lexus
Display Audio display.
USB photo screen
Connecting a USB memory device
Menu screen
1
2
3
4
Selecting a folder and a file
1
2
Page 456 of 692
4565-12. Other function
IS300h_EE(OM53D89E)
■USB memory functions
P. 407
■USB memory
●Compatible devices
USB memory device that can be used for JPEG display.
●Compatible device formats
The following device format can be used:
• USB communication format: USB2.0 FS (480 Mbps)
• File system format: FAT16/32 (Windows) • Correspondence class: Mass storage class
●JPEG file compatibility
• Compatible image size: Maximum 10MB
• Compatible pixel size: Maximum 10,000,000 pixels
NOTICE
■To prevent damage to the USB me mory device or its terminals
P. 410
Page 457 of 692

4575-12. Other function
5
Lexus Display Audio system
IS300h_EE(OM53D89E)
You can register desired contacts to enable the speech command system. Up to
50 contacts per phone can be registered.
Go to “Voice tags”: “MENU” button “Setup” “Telephone” “Contact/
call history settings” “Voice tag” “New” or “Edit”
Select the desired contact.
Move the controller to the left and then select “REC”.
Say the registered voice tag.
To play the registered voice, select “Play”.
■Deleting a voice tag
Display the “Voice tags” screen.
Select “Delete” and then the desired contact.
Move the controller to the left and then select “Delete”.
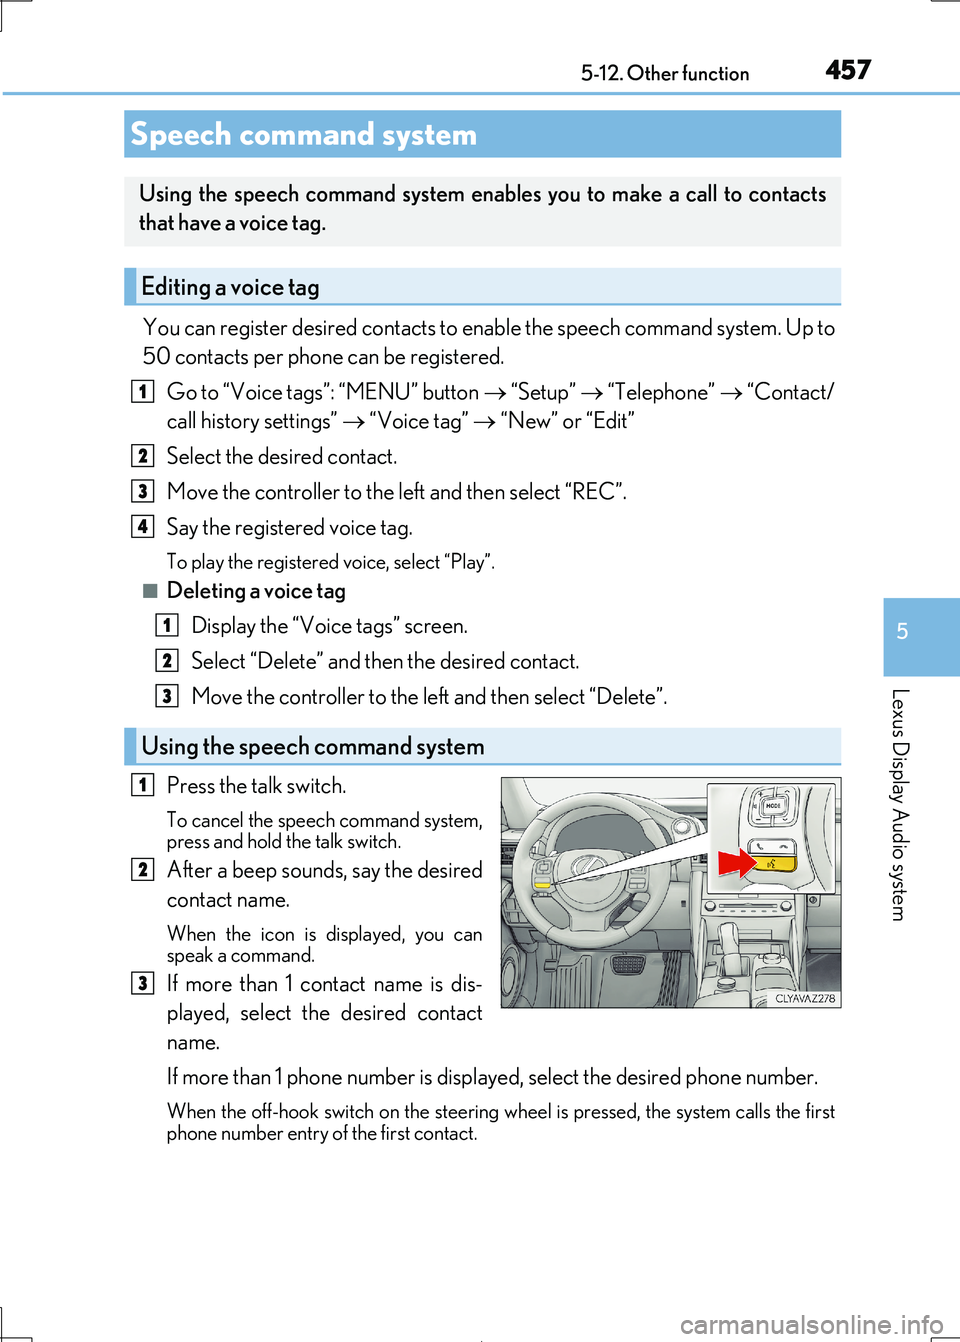
Press the talk switch.
To cancel the speech command system, press and hold the talk switch.
After a beep sounds, say the desired
contact name.
When the icon is displayed, you can
speak a command.
If more than 1 contact name is dis-
played, select the desired contact
name.
If more than 1 phone number is displayed, select the desired phone number.
When the off-hook switch on the steering wheel is pressed, the system calls the first
phone number entry of the first contact.
Speech command system
Using the speech command system enables you to make a call to contacts
that have a voice tag.
Editing a voice tag
Using the speech command system
1
2
3
4
1
2
3
1
2
3
Page 459 of 692

459
6Interior features
IS300h_EE(OM53D89E)
6-1. Basic operation of
the Remote Touch
screen
Remote Touch .............................460
10.3-inch display ........................ 464
6-2. Using the air conditioning
system
Automatic air conditioning
system .......................................... 466
Heated steering wheel/
seat heaters/
seat ventilator s ......................... 479
6-3. Using the interior lights
Interior lights list........................... 481
• Interior lights ..........................482
• Personal lights .......................482
6-4. Using the storage features
List of storage features ............484
• Glove box .............................. 485
• Console box.......................... 485
•Cup holders/
Bottle holders ........................486
Trunk features............................. 488
6-5. Using the other interior
features
Other interior features ............. 491
• Sun visors ................................. 491
• Vanity mirrors ........................ 491
• Clock ......................................... 491
• Power outlet........................... 492
• Armrest.................................... 493
• Rear sunshade ...................... 493
• Assist grips ............................. 495
• Coat hooks ............................. 495
ERA-GLONASS ...................... 496
Page 460 of 692
460
IS300h_EE(OM53D89E)
6-1. Basic operation of the Remote Touch screen
“MAP” button
Press this button to display the vehicle’s current position.
“•” button
Vehicles with a navigation system
Press this button to scroll the list screen and to change the scale of the map.
Vehicles without a navigation system
Press this button to scroll the list screen.
Back button
Press to display the previous screen.
“MENU” button
Press this button to display the “Menu” screen. (P. 463)
Remote Touch
: If equipped
The Remote Touch can be used to operate the Remote Touch screens.
Owners of models equipped with a 10 .3-inch display should refer to the
“NAVIGATION AND MULTIMEDIA SYSTEM OWNER’S MANUAL”.
The illustration below is for left-hand drive vehicles.
1
2
3
4
Page 461 of 692
4616-1. Basic operation of the Remote Touch screen
6
Interior features
IS300h_EE(OM53D89E)
Remote Touch knob
Move in the desired direction to select a function, letter and screen button.
Press the knob to enter the selected function, letter or screen button.
“ENTER” button
Press to enter the selected func tion, letter or screen button.
“HOME” button
Press this button to display the home screen.
Select: Move the Remote Touch
knob in the desired direction.
Enter: Push the Remote Touch knob
or an “ENTER” button.
Remote Touch operation
5
6
7
1
2