Page 17 of 54

15*IF EQUIPPED
ALWAYS CHECK THE OWNER’S MANUAL FOR COMPLETE OPER ATING INFORMATION AND SAFET Y WARNINGS .
POWER
CHARGE
FAULT
IPOWER
CHARGE
FAULT
F
PLUG-IN HYBRID SYSTEM
POWER
CHARGE
FAULT
E
For more detail and/or subsequent steps in charging your vehicle, please see the Owner’s Manual.
REMINDER: The charging door will open and close only when the driver’s door is unlocked .
Charging Your Plug-In Hybrid Vehicle (Continued)
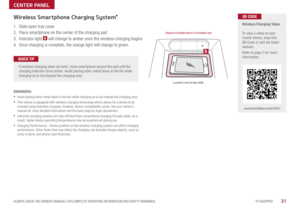
To charge the Plug-In Hybrid vehicle using a normal/trickle charger:
1 . Connect the ICCB
A plug to an electrical outlet
2 . Check if the power light (green)
B on the ICCB turns on
3 . Press the brake pedal and engage the parking brake
4 . Turn off all switches, put the shift lever in P (Park), and turn off the vehicle
5 . Open the charging door
E at the front of the vehicle by pressing the door in
to release .
6 . Hold the charging connector handle and connect it to the vehicle’s
charging inlet
F by pushing the connector until you hear a “clicking” sound
7 . Charging begins automatically (Ensure the charge indicator light
is
illuminated on your instrument cluster, indicating the vehicle is charging)
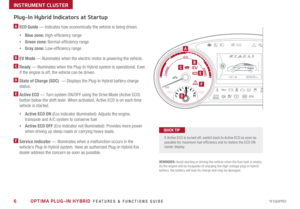
Checking the Charging Status
The charging status can be checked by viewing the charging status indicator
I on the dash panel . Below are the different charging status indicators:
• Green - Charging in progress
• Off - Fully charged
• Blinks green then off - Scheduled charging
• Blinks red - Malfunction
Page 18 of 54
 System*
The BSD system uses radar sensors to help alert the driver before changing
lanes . The light on t")
16*IF EQUIPPED OPTIMA PLUG-IN HYBRID FEATURES & FUNCTIONS GUIDE
Blind Spot Detection (BSD) System*
The BSD system uses radar sensors to help alert the driver before changing
lanes . The light on the BSD button
A will illuminate when turned ON . The outside
rearview mirror warning lights will also illuminate for 3 seconds .
The system will become active when the vehicle is traveling more than 18 mph
and will alert the driver if another vehicle is detected by the radar sensor .
Blind Spot Detection / Lane Change Assist
1st-stage alert: When another vehicle is detected within the BSD System
boundary
B, a yellow indicator will illuminate on the outside rearview mirrors .
2nd-stage alert: When 1st-stage alert is on and the driver activates a turn signal,
a flashing yellow indicator will illuminate on the outside rearview mirrors and the
system will sound an alert .
RCTA (Rear Cross Traffic Alert)
If the RCTA system sensors detect approaching vehicles from the left or right
side
C, the system will sound an audible alert, the warning indicators on the
outside rearview mirror will illuminate and a message will appear on the LCD
screen, with these conditions:
• When the vehicle is in Reverse
• When the vehicle moves in reverse from a parking position
• Wh en the vehicle is moving less than 6 mph
REMINDERS:
• The BSD system will not show a warning if the vehicle speed is only 6 mph
above the surrounding vehicles
•If the BSD is turned ON and the ignition is cycled, the BSD system returns to ON
•The RCTA feature can be turned OFF/ON in User Settings
For more information on the Blind Spot Detection System, please refer to the Owner’s Manual.
Blind Spot Detection
System Video
To view a video on your
mobile device, snap this
QR Code or visit the listed
website .
Refer to page 2 for more
information .QR CODE
www.KuTechVideos.com/jf23/2017
B
C
(Buttons are located left
of the Steering Wheel)
REMINDER: The above images are for
illustration purposes only and may not reflect
actual operation .
DA
DRIVER'S PANEL
Page 19 of 54
*
With the ENGINE START/STOP button")
17*IF EQUIPPED
ALWAYS CHECK THE OWNER’S MANUAL FOR COMPLETE OPER ATING INFORMATION AND SAFET Y WARNINGS .
DRIVER'S PANEL
Lane Departure Warning System (LDWS)*
With the ENGINE START/STOP button in the ON position, press the
LDWS button
D to turn system ON . The instrument cluster
indicator
will illuminate .
If the LDWS detects that you are veering outside of your lane, the
system may issue a warning on the LCD screen and an alert may
sound, while applying a slight adjustment to the steering, trying to
prevent the vehicle from moving outside its lane .
Standard LDWS is the operating mode by default when the button
is depressed to ON . To switch to Active LDWS mode or standard mode,
go to User Settings in the Instrument Cluster .
If the LDWS detects that you are veering outside of your lane, the
system may issue a warning on the LCD screen and an alert may sound .
All systems will operate under the following conditions:
• The vehicle exceeds approximately 55 mph
• The LDWS system recognizes the lane the vehicle is traveling in
• LDWS will stay on when the ignition is cycled
REMINDER: LDWS will not issue a warning if the turn signal is activated .
Autonomous (Assist) Emergency Braking (AEB) / Forward Collision Warning (FCW)*
The AEB helps to alert the driver when rapidly approaching a vehicle that is slowing down, braking
or stopped
E . A warning message will appear on the LCD screen and a chime will sound . The AEB
will become active when the vehicle is traveling more than 6 mph .
To turn the AEB off, go to User Settings in the LCD Instrument Cluster modes .
REMINDER: The AEB will be activated by default when vehicle power is cycled on, even when previously set to off
Autonomous (Assist) Emergency Braking is not a substitute for safe driving, and may not detect all objects in front of vehicle. Always drive safely and use caution.
When the LK AS sensor detects
the lane traveling in, both lanes
are illuminatedWhen the LK AS sensor does
not detect the lane traveling in
the lanes are not illuminated
When the LK AS sensor detects the vehicle veering outside of the lane traveling
in, a yellow indicator will illuminate either on the left or right lane (shown in both
images above)
Lane Keep Assist
Lane Keep Assist Lane Keep Assist
Lane Keep Assist
Lane Keep Assist
Lane Keep Assist
Lane Keep Assist
Lane Keep Assist
Lane Keep Assist
Lane Keep AssistLane Keep Assist
Lane Keep Assist
Lane Keep Assist
Lane Keep AssistLane Keep Assist
Lane Keep Assist
E
Lane Departure Warning
System Video
To view a video on your
mobile device, snap this
QR Code or visit the listed
website
.
Refer to page 2 for more
information .
www.KuTechVideos.com/jf23/2017
QR CODE
Page 20 of 54

The ESC system is designed to help stabilize the vehicle during cornering
maneuvers . It is a good")
18*IF EQUIPPED OPTIMA PLUG-IN HYBRID FEATURES & FUNCTIONS GUIDE
Electronic Stability Control (ESC)
The ESC system is designed to help stabilize the vehicle during cornering
maneuvers . It is a good idea to keep the ESC turned ON for daily driving
whenever possible .
Press ESC OFF button
B to disable Traction Control in ESC (ESC OFF
indicator will illuminate) .
To turn both Traction Control and Stability Control off, press and hold ESC
OFF button
B (ESC OFF indicator will illuminate, and an alert sounds) .
REMINDERS:
•ESC is active by default at vehicle start-up
• The ESC Indicator Light in the instrument cluster will illuminate whenever the ESC is in
operation
For more information on Electronic Stability Control (ESC) and its specific features and
operations, please refer to your Owner’s Manual.
(Located left of Steering Wheel)
Instrument Panel Dimmer
Toggle switch A up or down to
adjust display brightness of the
instrument panel illumination .
REMINDER: The Instrument Panel
Dimmer does not adjust brightness
on the UVO eServices System or
the UVO eServices with Premium
Navigation System screens; use the
system’s setup menu to adjust
brightness on the screens .
Hill-Start Assist Control (HAC)
HAC helps prevent the vehicle from rolling backward when accelerating
from a stop while on a steep incline .
The HAC automatically activates whether the ESC is OFF or ON but does
NOT activate when the ESC has malfunctioned .
REMINDERS:
•The HAC does not operate when the gear shift is in the P (Park) or the N (Neutral) position .
•In the event of HAC system malfunction, see Authorized Kia Dealer for service .
•
•When HAC is active (e .g ., accelerating from a stop on an incline), you may
notice that the brakes will momentarily remain engaged after you depress the
accelerator
•HAC provides a 2-second delay before the vehicle may start rolling backward
QUICK TIPS
A
B
DRIVER'S PANEL
Page 21 of 54

19*IF EQUIPPED
ALWAYS CHECK THE OWNER’S MANUAL FOR COMPLETE OPER ATING INFORMATION AND SAFET Y WARNINGS .
To use electrical accessories:
ACC position
•When in the OFF position and without depressing the brake pedal, press the ENGINE START/STOP button once (amber light A )
ON position
•When already in the ACC position (amber light A ) and without depressing the brake pedal, press the ENGINE START/STOP button
again (red light B )
• When in the OFF position and without depressing the brake pedal, press the ENGINE START/STOP button twice (red light B )
Keeping the vehicle in ACC or ON position without turning engine on may discharge the vehicle’s battery .
QUICK TIPS
Engine Start/Stop Button
& Smart Key Video
To view a video on your
mobile device, snap this
QR Code or visit the listed
website .
Refer to page 2 for more
information .QR CODE
www.KuTechVideos.com/jf23/2017
AB
REMINDERS:
• In an emergency situation while the vehicle is in motion, you are able to turn the engine off and to
the ACC position by pressing the ENGINE START/STOP button for more than 2 seconds or 3 times
successively within 3 seconds
• If the Smart Key battery is weak or not working properly, hold the Smart Key fob up to the ENGINE START/
STOP button (Lock button side closest) and press to start engine
Engine Start/Stop Button
To start the engine:
1 . Depress the brake pedal
2 . Press the ENGINE START/STOP button while gear shift is in P (Park)
To turn the vehicle OFF, press the ENGINE START/STOP button .
To use the ENGINE START/STOP button, you must have the Smart Key fob
on your person .
DRIVER'S PANEL
Page 22 of 54
 position . Ref")
20*IF EQUIPPED OPTIMA PLUG-IN HYBRID FEATURES & FUNCTIONS GUIDE
Automatic Door Lock/Unlock
Auto Door Lock /Unlock will engage when the gear shift is moved in to
or out of the P (Park) position . Refer to the User Settings in the LCD
Instrument Cluster modes on how to turn Auto Door Lock /Unlock ON/OFF .
Power/Heated Outside Mirrors*
Mirror heaters controlled with Rear Defroster .
Power Folding Outside Mirrors*
Press L or R buttons D (left or right) to select mirrors . Then press arrows
E to adjust mirror position .
To both fold and unfold the outside rearview mirrors, press the folding
mirror button
F as pictured:
• Left − The mirrors will unfold .
• Right − The mirrors will fold .
• Center − The mirrors will fold/unfold automatically when doors are
locked/unlocked with the Smart Key or a door handle button is pressed .
Also, the mirrors will unfold when approaching the vehicle with the
Smart Key fob in proximity .
A Pull/Press to operate Driver’s and Front Passenger’s Windows
Auto-Up/Down*
B Press to Unlock /Lock All Doors
C Press to disable Rear Passenger Windows
REMINDER: When pressed C, window controls for the Rear Passenger Windows are disabled .
A
B
C
E
D
F
REMINDER: To lock position of mirrors, toggle switch to the neutral (center) position .
Power Windows, Window Lock
& Central Door Lock
To automatically fold mirrors when exiting vehicle, press the LOCK button once on
the Smart Key* .QUICK TIP
Press button again to stop Auto Up/Down function .QUICK TIP
DRIVER'S PANEL
Page 23 of 54
* /Hi")
21*IF EQUIPPED
ALWAYS CHECK THE OWNER’S MANUAL FOR COMPLETE OPER ATING INFORMATION AND SAFET Y WARNINGS .
Headlight position
Parking light position
AUTO *AFLS (Adaptive Front Lighting System)* /High Beam
Assist position / Daytime Running Lights (DRL)
OFF OFF position
Headlights & High Beams
To o p e rate:
• Rotate lever to change the Headlight function
• Push lever to turn High Beams ON
• Pull leve r to flash Headlights/High Beams
AFLS (Adaptive Front Lighting System)* — When switch is in the AUTO
position and the vehicle’s ignition or the Engine Start /Stop button* is on, the
AFLS system will operate . To turn the system off, change the switch setting .
After turning the system off, headlamp swiveling no longer occurs, but leveling
operates continuously .
High Beam Assist* — The High Beam Assist will automatically adjust the
brightness depending on brightness of oncoming vehicles and road conditions .
When switch is in the AUTO position and the vehicle’s ignition or the Engine
Start /Stop button* is on, the High Beam Assist will operate . To turn the system
off, change the switch setting .
Daytime Running Lights (DRL)* — DRL may help others to see the front of
your vehicle during the day . The lights will be on automatically when the ignition
or ENGINE START/STOP button* is ON and the headlight switch is in the AUTO
position, unless one of the following occurs:
• Headlights are on
• Parking brake is applied
• Fog lights are on
• Engine is turned off
Turn Signals & Fog Lights
To o p e r a t e :
• Tu r n Signals - Move lever Up/Down for Right /Left Turn Signal
• Fog Lights - Rotate lever ring to turn Fog Lights ON/OFF
REMINDER: Headlights must be ON for Fog Light operation .
One-Touch Lane Change Signal is activated by moving the
Turn Signal Lever slightly for less than 1 second and then
releasing . The lane change signal will blink 3 times .
To change how many times (3/5/7) the Lane Change Signal
blinks, go to User Settings Mode in the LCD Instrument Cluster
modes .
REMINDERS:
•DRL only operates during the daytime
• The DRL system turns off when the headlights are ON, parking brake is applied
or the front fog lights are tuned on
STEERING WHEEL CONTROLS
Page 24 of 54

22*IF EQUIPPED OPTIMA PLUG-IN HYBRID FEATURES & FUNCTIONS GUIDE
•
•Pressing lever up increases Intermittent wipe frequency and wipe speed .
Pressing lever down decreases frequency of wipes
•Set the wiper to OFF position when the wiper is not in use
If ignition is turned OFF, then ON again, within 30 minutes of steering wheel heater
being turned on, system will automatically be set ON again .
M I S T: Single wipe
OFF: Wiper off
I N T: Intermittent wipe
LO: Slow wipe
HI: Fast wipeHEV
B
A
(Located below gear shift)
Windshield Wipers & Washers
To o p e r a t e :
• Move lever Up/Down to change Wiper modes
• Press switch
A Up/Down to adjust Intermittent Wipe Speed
• Pull lever to spray and wipe
QUICK TIPSQUICK TIP
Heated Steering Wheel Button*
Press button B to turn ON/OFF steering wheel heater, while the ignition or
ENGINE START/STOP button is in the ON position .
Steering wheel heater will turn off automatically in 30 minutes, or when
button is pressed again to deactivate .
STEERING WHEEL CONTROLS