Page 577 of 723
727
What to do in an emergency
It is possible that some tyres, espe- cially with larger punctures or dam-
age to the sidewall, cannot be sealed
completely.
Air pressure loss in the tyre may
adversely affect tyre performance.
For this reason, you should avoid
abrupt steering or other driving
manoeuvres, especially if the vehicle
is heavily loaded or if a trailer is in use.
The TMK is not designed or intended
as a permanent tyre repair method
and is to be used for one tyre only.
This instruction shows you step by
step how to temporarily seal the
puncture simply and reliably.
Read the section "Notes on the safe
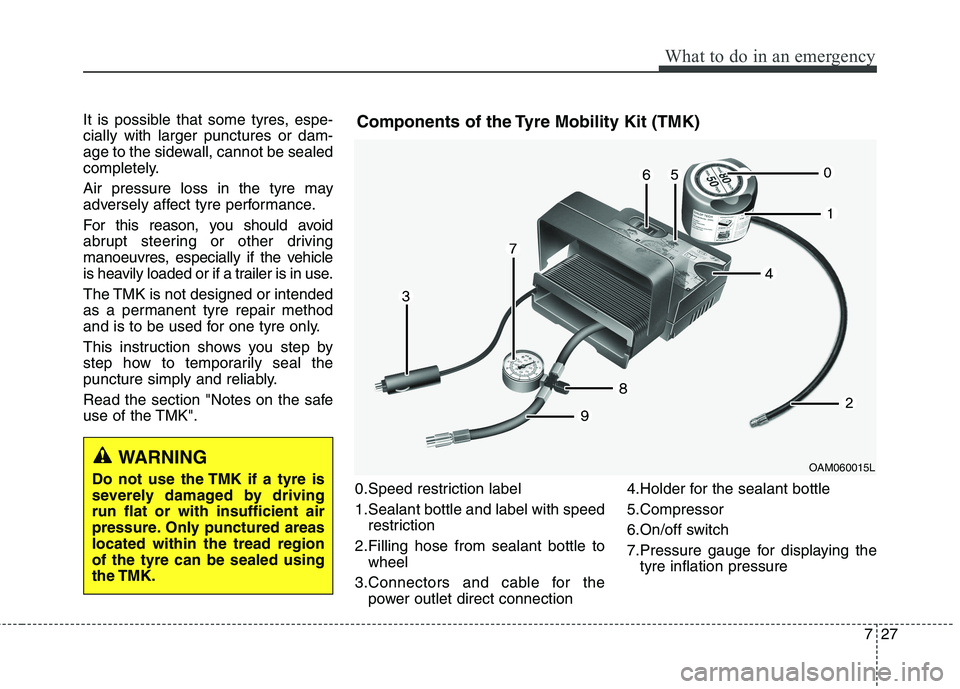
use of the TMK".0.Speed restriction label
1.Sealant bottle and label with speedrestriction
2.Filling hose from sealant bottle to wheel
3.Connectors and cable for the power outlet direct connection 4.Holder for the sealant bottle
5.Compressor
6.On/off switch
7.Pressure gauge for displaying the
tyre inflation pressure
OAM060015LWARNING
Do not use the TMK if a tyre is
severely damaged by drivingrun flat or with insufficient air
pressure. Only punctured areaslocated within the tread regionof the tyre can be sealed usingthe TMK.
Components of the Tyre Mobility Kit (TMK)
Page 578 of 723
What to do in an emergency
28
7
8.Screw cap for reducing tyre infla-
tion pressure
9.Hose to connect compressor and sealant bottle or compressor and wheel
Connectors, cable and connectionhose are stored in the compressorhousing.
Strictly follow the specified
sequence, otherwise the sealant
may escape under high pressure. Using the Tyre Mobility Kit (TMK)
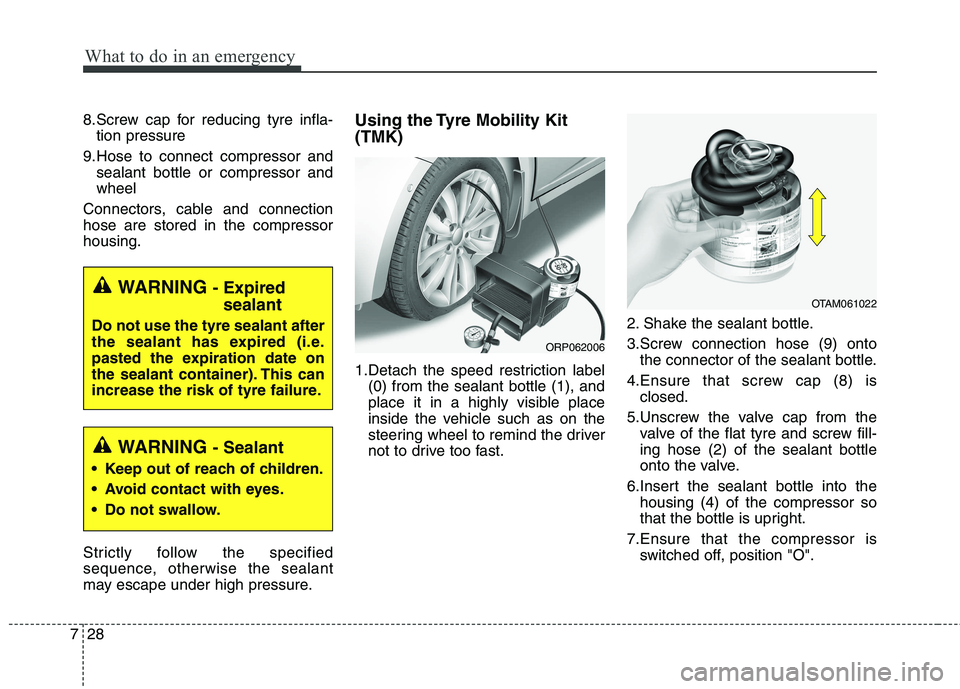
1.Detach the speed restriction label
(0) from the sealant bottle (1), and
place it in a highly visible place
inside the vehicle such as on the
steering wheel to remind the driver
not to drive too fast. 2. Shake the sealant bottle.
3.Screw connection hose (9) onto
the connector of the sealant bottle.
4.Ensure that screw cap (8) is closed.
5.Unscrew the valve cap from the valve of the flat tyre and screw fill- ing hose (2) of the sealant bottle
onto the valve.
6.Insert the sealant bottle into the housing (4) of the compressor so
that the bottle is upright.
7.Ensure that the compressor is switched off, position "O".
WARNING - Expired
sealant
Do not use the tyre sealant after
the sealant has expired (i.e.
pasted the expiration date on
the sealant container). This can
increase the risk of tyre failure.
WARNING - Sealant
Keep out of reach of children.
Avoid contact with eyes.
Do not swallow.
ORP062006
OTAM061022
Page 584 of 723
What to do in an emergency
34
7
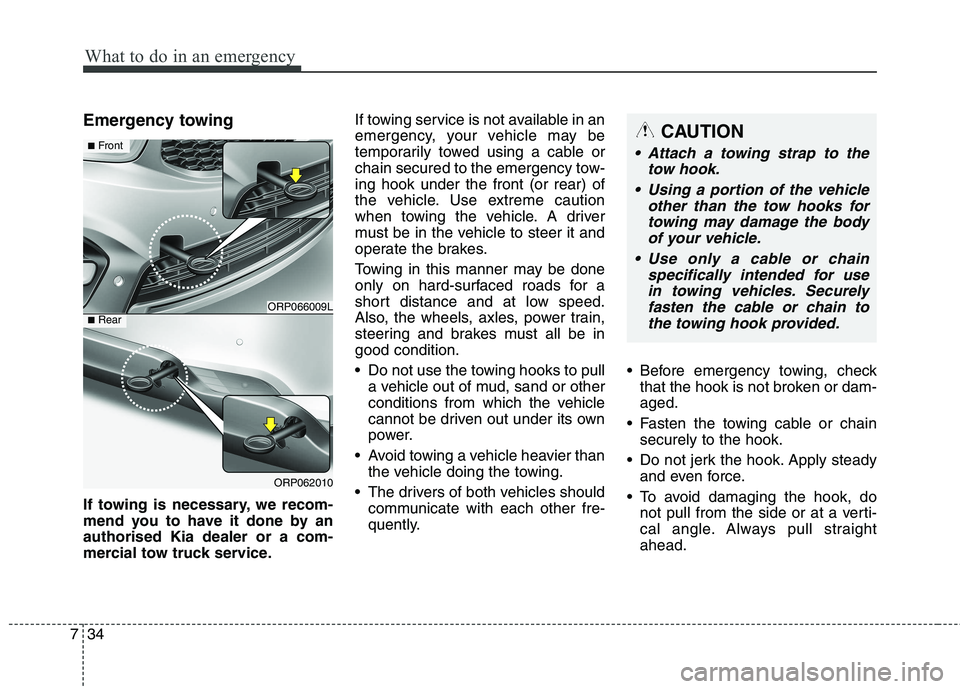
Emergency towing
If towing is necessary, we recom-
mend you to have it done by anauthorised Kia dealer or a com-
mercial tow truck service. If towing service is not available in an
emergency, your vehicle may be
temporarily towed using a cable or
chain secured to the emergency tow-ing hook under the front (or rear) of
the vehicle. Use extreme caution
when towing the vehicle. A driver
must be in the vehicle to steer it and
operate the brakes.
Towing in this manner may be done
only on hard-surfaced roads for a
short distance and at low speed.
Also, the wheels, axles, power train,
steering and brakes must all be ingood condition.
Do not use the towing hooks to pull
a vehicle out of mud, sand or other
conditions from which the vehicle
cannot be driven out under its own
power.
Avoid towing a vehicle heavier than the vehicle doing the towing.
The drivers of both vehicles should communicate with each other fre-
quently. Before emergency towing, check
that the hook is not broken or dam-aged.
Fasten the towing cable or chain securely to the hook.
Do not jerk the hook. Apply steady and even force.
To avoid damaging the hook, do not pull from the side or at a verti-
cal angle. Always pull straightahead.CAUTION
Attach a towing strap to the
tow hook.
Using a portion of the vehicle other than the tow hooks fortowing may damage the bodyof your vehicle.
Use only a cable or chain specifically intended for usein towing vehicles. Securely fasten the cable or chain tothe towing hook provided.
ORP066009L
ORP062010
■ Front
■Rear
Page 585 of 723
735
What to do in an emergency
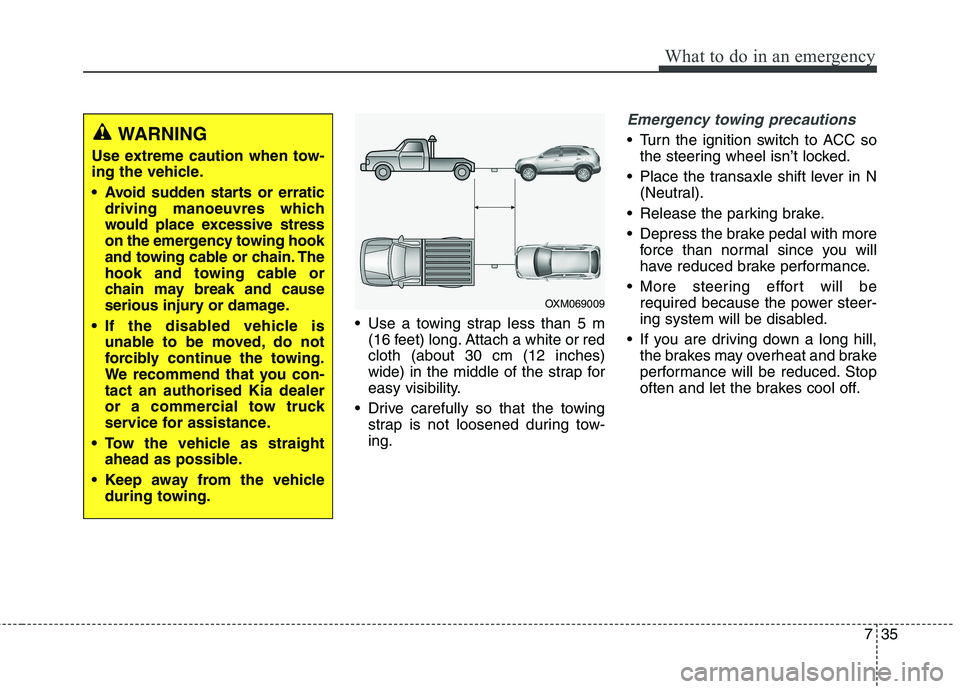
Use a towing strap less than 5 m(16 feet) long. Attach a white or red cloth (about 30 cm (12 inches)
wide) in the middle of the strap for
easy visibility.
Drive carefully so that the towing strap is not loosened during tow-ing.
Emergency towing precautions
Turn the ignition switch to ACC sothe steering wheel isn’t locked.
Place the transaxle shift lever in N (Neutral).
Release the parking brake.
Depress the brake pedal with more force than normal since you will
have reduced brake performance.
More steering effort will be required because the power steer-
ing system will be disabled.
If you are driving down a long hill, the brakes may overheat and brake
performance will be reduced. Stop
often and let the brakes cool off.
OXM069009
WARNING
Use extreme caution when tow-
ing the vehicle.
Avoid sudden starts or erratic driving manoeuvres which
would place excessive stress
on the emergency towing hook
and towing cable or chain. The
hook and towing cable or
chain may break and cause
serious injury or damage.
If the disabled vehicle is unable to be moved, do not
forcibly continue the towing.
We recommend that you con-tact an authorised Kia dealer
or a commercial tow truck
service for assistance.
Tow the vehicle as straight ahead as possible.
Keep away from the vehicle during towing.
Page 586 of 723
What to do in an emergency
36
7
CAUTION
- Automatic transaxle /
dual clutch transmission
If the car is being towed with all four wheels on the ground, itcan be towed only from thefront. Be sure that the transaxleis in neutral. Be sure the steer- ing is unlocked by placing theignition switch in the ACC posi-tion. A driver must be in the towed vehicle to operate thesteering and brakes.
To avoid serious damage to the automatic transaxle / dualclutch transmission, limit the vehicle speed to 15 km/h (10mph) and drive less than 1.5km (1 mile) when towing.
(Continued)
(Continued)
Before towing, check the auto- matic transaxle / dual clutchtransmission fluid leak under your vehicle. If the automatictransaxle / dual clutch trans-mission fluid is leaking, a flatbed equipment or towingdolly must be used.
Page 596 of 723
89
Maintenance
OWNER MAINTENANCE
We recommend that the following
lists are vehicle checks and inspec-
tions that should be performed by the
owner or an authorised Kia dealer atthe frequencies indicated to help
ensure safe, dependable operation
of your vehicle.
If you have any question, we recom-
mend that you consult an authorised
Kia dealer.
These Owner Maintenance Checks
are generally not covered by war-
ranties and you may be charged for
labour, parts and lubricants used. Owner maintenance schedule
When you stop for fuel:
Check the engine oil level.
Check coolant level in coolant
reservoir.
Check the windscreen washer fluid level.
Look for low or under-inflated tyres.
Check the radiator and condenser. Check if the front of the radiator and condenser are clean and not
blocked with leaves, dirt or insectsetc.
If any of the above parts are
extremely dirty or you are not sure
of their condition, we recommend
that you contact an authorised Kia
dealer.
Whilst operating your vehicle:
Note any changes in the sound ofthe exhaust or any smell of
exhaust fumes in the vehicle.
Check for vibrations in the steering wheel. Notice any increased steer-
ing effort or looseness in the steer-
ing wheel, or change in its straight-ahead position.
Notice if your vehicle constantly turns slightly or “pulls” to one side
when travelling on smooth, levelroad.
When stopping, listen and check for unusual sounds, pulling to one
side, increased brake pedal travel
or “hard-to-push” brake pedal.
If any slipping or changes in the operation of your transaxle occurs,
check the transaxle fluid level.
Check manual transaxle operation, including clutch operation.
WARNING
Be careful when checking your
engine coolant level when the
engine is hot. Scalding hot
coolant and steam may blow out
under pressure. This could cause
burns or other serious injury.
Page 603 of 723
Maintenance
16
8
Normal Maintenance Schedule - For Europe (Except Russia) (Continue)
I : Inspect and if necessary, adjust, correct, clean or replace.
R : Replace or change.
MAINTENANCE
INTERVALS
MAINTENANCE ITEMNumber of months or driving distance, whichever comes first
Months24487296120144168192
Miles×1,00020406080100120140160
Km×1,000306090120150180210240
Parking brake (Hand type)IIIIIIII
Steering gear rack, linkage and bootsIIIIIIII
Suspension ball jointsIIIIIIII
Tire (pressure & tread wear)IIIIIIII
Battery conditionIIIIIIII
All electrical systemIIIIIIII
Page 604 of 723
817
Maintenance
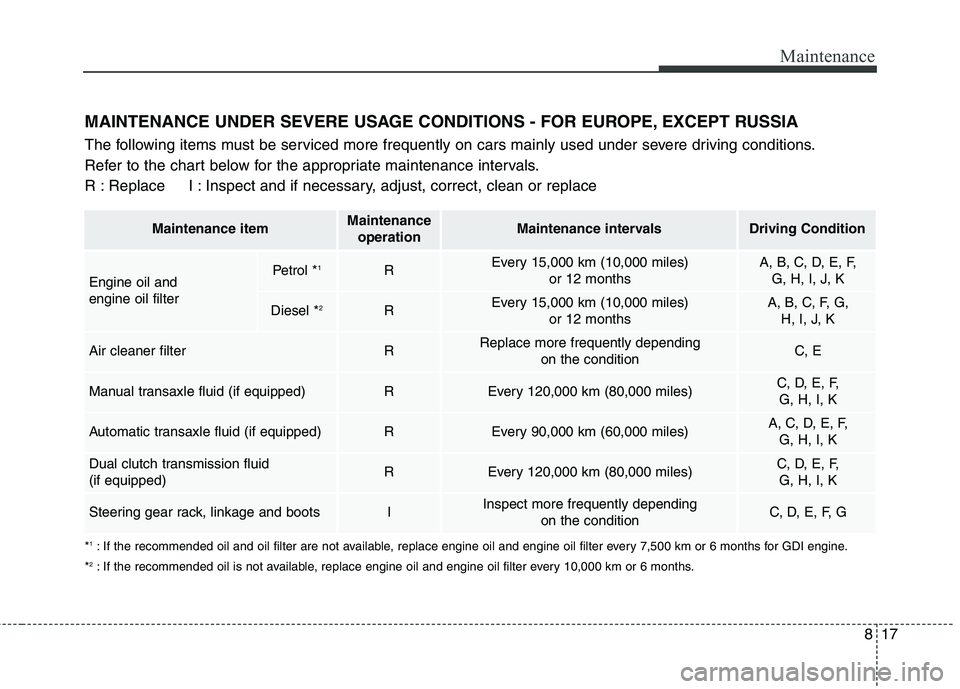
MAINTENANCE UNDER SEVERE USAGE CONDITIONS - FOR EUROPE, EXCEPT RUSSIA
The following items must be serviced more frequently on cars mainly used under severe driving conditions.
Refer to the chart below for the appropriate maintenance intervals.
R : Replace I : Inspect and if necessary, adjust, correct, clean or replace
Maintenance itemMaintenanceoperationMaintenance intervalsDriving Condition
Engine oil and engine oil filterREvery 15,000 km (10,000 miles) or 12 monthsA, B, C, D, E, F, G, H, I, J, K
REvery 15,000 km (10,000 miles) or 12 monthsA, B, C, F, G, H, I, J, K
Air cleaner filterRReplace more frequently depending on the conditionC, E
Manual transaxle fluid (if equipped)REvery 120,000 km (80,000 miles)C, D, E, F, G, H, I, K
Automatic transaxle fluid (if equipped)REvery 90,000 km (60,000 miles)A, C, D, E, F, G, H, I, K
Dual clutch transmission fluid (if equipped)REvery 120,000 km (80,000 miles)C, D, E, F, G, H, I, K
Steering gear rack, linkage and bootsIInspect more frequently depending on the conditionC, D, E, F, G
Petrol *1
Diesel * 2
* 1
: If the recommended oil and oil filter are not available, replace engine oil and engine oil filter every 7,500 km or 6 months for GDI engine.
* 2
: If the recommended oil is not available, replace engine oil and engine oil filter every 10,000 km or 6 months.