2017 KIA CARENS RHD ABS
[x] Cancel search: ABSPage 527 of 723

Driving your vehicle
92
6
Hazardous driving conditions
When hazardous driving conditions
are encountered such as water,
snow, ice, mud, sand, or similar haz-
ards, follow these suggestions:
Drive cautiously and allow extra
distance for braking.
Avoid sudden braking or steering.
When braking with non-ABS brakes pump the brake pedal with
a light up-and-down motion until
the vehicle is stopped.
If stalled in snow, mud, or sand, use second gear. Accelerate slowly to
avoid spinning the drive wheels.
Use sand, rock salt, tyre chains, or other non-slip material under the
drive wheels to provide traction
when stalled in ice, snow, or mud. Rocking the vehicle
If it is necessary to rock the vehicle to
free it from snow, sand, or mud, first
turn the steering wheel right and left
to clear the area around your front
wheels. Then, shift back and forth
between 1 (First) and R (Reverse) in
vehicles equipped with a manual
transaxle or R (Reverse) and any for-
ward gear in vehicles equipped with
an automatic transaxle / dual clutch
transmission. Do not race the engine,and spin the wheels as little as possi-
ble. If you are still stuck after a few
tries, have the vehicle pulled out by a
tow vehicle to avoid engine overheat-
ing and possible damage to the
transaxle.
SPECIAL DRIVING CONDITIONS WARNING
- Downshifting
Downshifting with an automatic
transaxle / dual clutch transmis-
sion, whilst driving on slipperysurfaces can cause an accident.
The sudden change in tyrespeed could cause the tyres to
skid. Be careful when down-
shifting on slippery surfaces.
WARNING - ABS
Do not pump the brake pedal on
a vehicle equipped with ABS.
CAUTION
Prolonged rocking may cause engine over-heating, transaxledamage or failure, and tyre dam- age.
Page 537 of 723

Driving your vehicle
102
6
Hitches
It's important to have the correct hitch
equipment. Crosswinds, large trucks
going by, and rough roads are a few
reasons why you’ll need the right
hitch. Here are some rules to follow:
Do you have to make any holes in
the body of your vehicle when you
install a trailer hitch? If you do, thenbe sure to seal the holes later
when you remove the hitch.
The bumpers on your vehicle are not intended for hitches. Do notattach rental hitches or other
bumper-type hitches to them. Use
only a frame-mounted hitch that
does not attach to the bumper.
A Kia accessory trailer hitch is avail- able at an authorised Kia dealer. Safety chains
You should always attach chains
between your vehicle and your trail-
er. Cross the safety chains under the
tongue of the trailer so that thetongue will not drop to the road if it
becomes separated from the hitch.
Instructions about safety chains may
be provided by the hitch manufactur-
er or by the trailer manufacturer.
Follow the manufacturer’s recom-
mendation for attaching safety
chains. Always leave just enough
slack so you can turn with your trail-
er. And, never allow safety chains to
drag on the ground.
Trailer brakes
If your trailer is equipped with a brak-
ing system, make sure it conforms to
your country’s regulations and that it
is properly installed and operating
correctly.
If your trailer weight exceeds the
maximum allowed weight without
trailer brakes, then the trailer will also
require its own brakes as well. Be
sure to read and follow the instruc-
tions for the trailer brakes so you’ll be
able to install, adjust and maintain
them properly.
Do not tap into or modify your vehi-
cle's brake system.
WARNING - Trailer
brakes
Do not use a trailer with its own
brakes unless you are absolute-
ly certain that you have proper-
ly set up the brake system. This
is not a task for amateurs. Use
an experienced, competent
trailer shop for this work.
Page 541 of 723

Driving your vehicle
106
6
Parking on hills
Generally, if you have a trailer
attached to your vehicle, you should
not park your vehicle on a hill. People
can be seriously or fatally injured,
and both your vehicle and the trailer
can be damaged if unexpectedly roll
down hill. However, if you ever have to park your
trailer on a hill, here is how to do it:
1. Pull the vehicle into the parking
space. Turn the steering wheel in
the direction of the kerb (left if head-
ed down hill, right if headed up hill).
2. If the vehicle has a manual transaxle, place the car in neutral.
If the vehicle has an automatic
transaxle / dual clutch transmis-
sion, place the car in P (Park).
3. Set the parking brake and shut off the vehicle.
4. Place chocks under the trailer wheels on the down hill side of the
wheels.
5. Start the vehicle, hold the brakes, shift to neutral, release the parking
brake and slowly release the
brakes until the trailer chocksabsorb the load.
6. Reapply the brakes, reapply the parking brake and shift the vehicle
to R (Reverse) for manual transaxle
or P (Park) for automatic transaxle /
dual clutch transmission.
7. Shut off the vehicle and release the vehicle brakes but leave the
parking brake set.
WARNING - Parking on
a hill
Parking your vehicle on a hill
with a trailer attached could
cause serious injury or death,
should the trailer break loose.
WARNING - Parking
brake
It can be dangerous to get out
of your vehicle if the parking
brake is not firmly set.
If you have left the engine run-
ning, the vehicle can move sud-
denly. You or others could be
seriously or fatally injured.
Page 556 of 723

What to do in an emergency
6
7
Jump starting procedure
✽✽
NOTICE
If the battery is discharged, the
engine can be started using a battery
of another vehicle and two jumper
cables. Only use jumper cables with
fully insulated clamp handles.
To prevent personal injury or dam-
age to both vehicles, adhere strictly
to the following procedure.
(Continued)
Do not allow the (+) and (-) jumper cables to touch. It may cause sparks.
The battery may rupture or explode when you jump start
with a low or frozen battery.
CAUTION - AGM battery
(if equipped)
Absorbent Glass Matt (AGM) batteries are maintenance-freeand we recommend that theAGM batteries be serviced byan authorised Kia dealer. For charging your AGM battery,use only fully automatic bat-tery chargers that are speciallydeveloped for AGM batteries.
When replacing the AGM bat- tery, we recommend that youuse parts for replacementfrom an authorised Kia dealer.
Do not open or remove the cap on top of the battery. Thismay cause leaks of internalelectrolyte that could result insevere injury.
(Continued)
(Continued)
If the AGM battery is recon- nected or replaced, ISG func-tion will not operate immedi- ately.
If you want to use the ISGfunction, the battery sensorneeds to be calibrated forapproximately 4 hours with the ignition off.
Page 569 of 723

719
What to do in an emergency
7.Place the jack at the front (1) orrear (2) jacking position closest to
the tyre you are changing. Place
the jack at the designated locations
under the frame. The jacking posi-
tions are plates welded to the
frame with two tabs and a raised
dot to index with the jack. 8.Insert the jack handle into the jack
and turn it clockwise, raising the
vehicle until the tyre just clears the
ground. This measurement is
approximately 30 mm (1.2 in).
Before removing the wheel lug
nuts, make sure the vehicle is sta-
ble and that there is no chance for
movement or slippage.
9.Loosen the wheel nuts and remove them with your fingers. Slide the
wheel off the studs and lay it flat so
it cannot roll away. To put the wheel
on the hub, pick up the spare tyre,line up the holes with the studs andslide the wheel onto them.
ORP064015K
ORP064015
WARNING - Jack
location
To reduce the possibility of
injury, be sure to use only the
jack provided with the vehicle
and in the correct jack position;
never use any other part of the
vehicle for jack support.
ORP062011
Page 637 of 723

Maintenance
50
8
Battery capacity label
(see the example) ❈ The actual battery label in the vehicle may
differ from the illustration.
1. CMF60L-BCI : The Kia model name of battery
2. 12V : The nominal voltage
3. 60Ah(20HR) : The nominal capac- ity (in Amperehours)
4. 92RC : The nominal reserve
capacity (in min.)
5. 550CCA : The cold-test current in amperes by SAE
6. 440A : The cold-test current in
amperes by EN Battery recharging
Your vehicle has a maintenance-free,
calcium-based battery.
If the battery becomes discharged
in a short time (because, for exam-
ple, the headlights or interior lights
were left on whilst the vehicle was
not in use), recharge it by slow
charging (trickle) for 10 hours.
If the battery gradually discharges because of high electric load whilst
the vehicle is being used, recharge
it at 20-30A for two hours.
OJD072039
Example
CAUTION -
AGM battery (if equipped)
Absorbent Glass Matt (AGM)
batteries are maintenance-freeand we recommend that the AGM battery be serviced by anauthorised Kia dealer. Forcharging your AGM battery, use only fully automatic bat-tery chargers that are speciallydeveloped for AGM batteries.
When replacing the AGM bat- tery, we recommend that youuse parts for replacementfrom an authorised Kia dealer.
Do not open or remove the cap on top of the battery. Thismay cause leaks of internal electrolyte that could result insevere injury.
Page 643 of 723

Maintenance
56
8
Tyre replacement
If the tyre is worn evenly, a tread
wear indicator will appear as a solid
band across the tread. This showsthere is less than 1.6 mm (1/16 in.) of
tread left on the tyre. Replace the
tyre when this happens.
Do not wait for the band to appear
across the entire tread before replac-
ing the tyre.
✽✽
NOTICE
We recommend that when replacing
tyres, use the same originally sup-
plied with the vehicles.
If not, that affects driving perform-
ance.
OEN076053
Tread wear indicator
WARNING - Replacing
tyres
Driving on worn-out tyres is very hazardous and will reduce
braking effectiveness, steering
accuracy, and traction.
Your vehicle is equipped with tyres designed to provide for
safe ride and handling capa-
bility. Do not use a size andtype of tyre and wheel that is
different from the one that is
originally installed on your
vehicle. It can affect the safety
and performance of your vehi-
cle, which could lead to han-
dling failure or rollover and
serious injury. When replacing
the tyres, be sure to equip all
four tyres with the tyre and
wheel of the same size, type,
tread, brand and load-carrying
capacity.
(Continued)(Continued)
The use of any other tyre sizeor type may seriously affect
ride, handling, ground clear-
ance, stopping distance, body
to tyre clearance, snow tyre
clearance, and speedometer
reliability.
It is best to replace all four tyres at the same time. If that
is not possible, or necessary,
then replace the two front or
two rear tyres as a pair.Replacing just one tyre can
seriously affect your vehicle’shandling.
The ABS works by comparing the speed of the wheels. Tyre
size can affect wheel speed.
When replacing tyres, all 4
tyres must use the same size
originally supplied with the
vehicle. Using tyres of a dif-
ferent size can cause the ABS
(Anti-lock Brake System) and
ESC (Electronic Stability
Control) to work irregularly.
Page 660 of 723

873
Maintenance
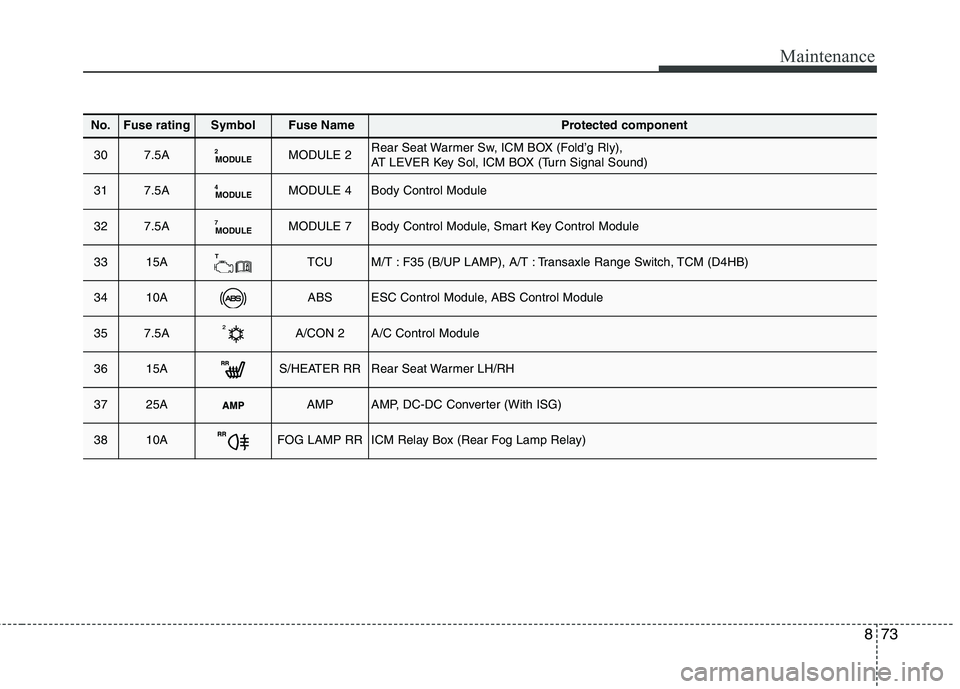
No.Fuse ratingSymbolFuse NameProtected component
307.5AMODULE2MODULE 2Rear Seat Warmer Sw, ICM BOX (Fold’g Rly),
AT LEVER Key Sol, ICM BOX (Turn Signal Sound)
317.5AMODULE4MODULE 4Body Control Module
327.5AMODULE7MODULE 7Body Control Module, Smart Key Control Module
3315ATTCUM/T : F35 (B/UP LAMP), A/T : Transaxle Range Switch, TCM (D4HB)
3410AABSESC Control Module, ABS Control Module
357.5AA/CON 2A/C Control Module
3615AS/HEATER RRRear Seat Warmer LH/RH
3725AAMPAMP, DC-DC Converter (With ISG)
3810AFOG LAMP RRICM Relay Box (Rear Fog Lamp Relay)