2017 KIA CARENS RHD interior lights
[x] Cancel search: interior lightsPage 149 of 723

453
Features of your vehicle
Electric chromic mirror (ECM)(if equipped)
The electric rearview mirror automat- ically controls the glare from the
headlights of the vehicle behind you
in nighttime or low light driving condi-
tions. The sensor mounted in the mir-
ror senses the light level around the
vehicle, and automatically controls
the headlight glare from vehicles
behind you.
When the engine is running, the glare
is automatically controlled by the sen-
sor mounted in the rearview mirror.
Whenever the shift lever is shifted
into R (Reverse), the mirror will auto-
matically go to the brightest setting in
order to improve the drivers view
behind the vehicle. To operate the electric rearview mirror:
The mirror defaults to the ON posi-
tion whenever the ignition switch is
turned on.
Press the ON/OFF button (1) to turn the automatic dimming func-
tion off. The mirror indicator light
(2) will turn off.
Press the ON/OFF button (1) to
turn the automatic dimming func-
tion on. The mirror indicator light
(2) will illuminate.
❈ (2) : Indicator, (3) : Sensor Outside rearview mirror Be sure to adjust mirror angles
before driving.
Your vehicle is equipped with both
left-hand and right-hand outside
rearview mirrors. The mirrors can beadjusted remotely with the remote
switch. The mirror heads can be fold-
ed back to prevent damage during an
automatic car wash or when passing
in a narrow street.
CAUTION
When cleaning the mirror, use a
paper towel or similar materialdampened with glass cleaner. Do not spray glass cleanerdirectly on the mirror as thatmay cause the liquid cleaner to enter the mirror housing.
WARNING - Rearview
mirrors
The outside rearview mirror is convex. Objects seen in the
mirror are closer than they
appear.
Use your interior rearview mirror or direct observation todetermine the actual distance
of following vehicles when
changing lanes.
ORP046321L
Page 230 of 723
Features of your vehicle
134
4
Interior lamp AUTO cut
When all entrances are closed, if
you lock the vehicle by using the
transmitter or the smart key, all
interior lamp will be off after a few
seconds.
If you do not operate anything in the vehicle after turning off the
engine, the lights will turn off after
20 minutes. Map lamp
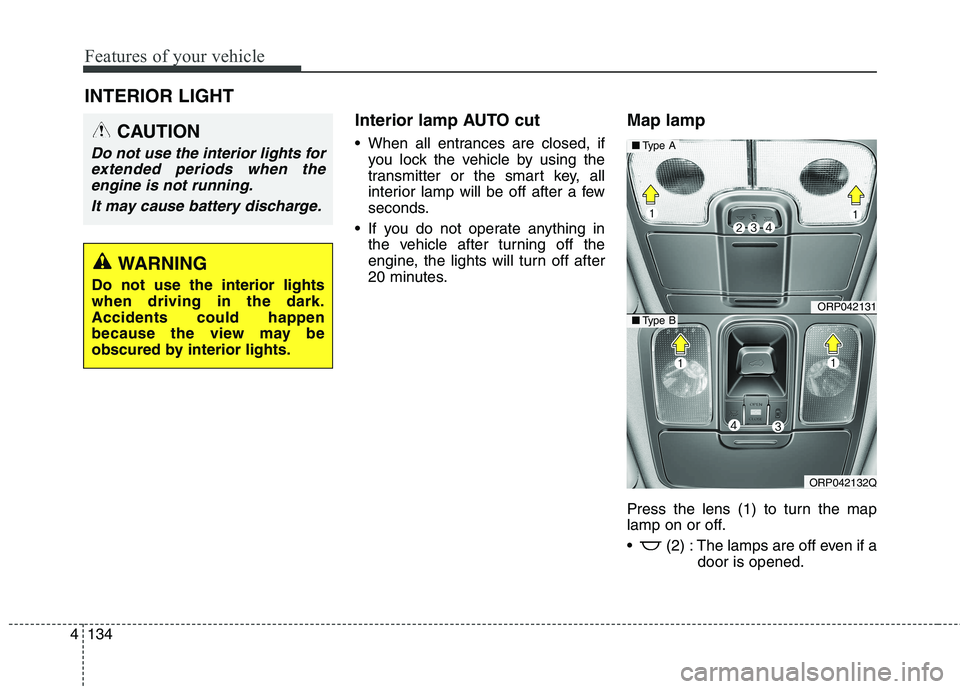
Press the lens (1) to turn the map
lamp on or off.
(2) : The lamps are off even if a
door is opened.
INTERIOR LIGHT
CAUTION
Do not use the interior lights for
extended periods when theengine is not running.
It may cause battery discharge.
WARNING
Do not use the interior lights when driving in the dark.Accidents could happen
because the view may be
obscured by interior lights.
ORP042131
ORP042132Q
■ Type A
■Type B
Page 233 of 723
4137
Features of your vehicle
Headlamp welcome
When the headlight(light switch in
the headlight or AUTO position) is onand all doors (and tailgate) are
locked and closed, the headlight,position light and tail light will come
on for 15 seconds if any of the below
is performed.
- When the door unlock button is pressed on the transmitter.
- When the door unlock button is pressed on the smart key.
At this time, if you press the door lock
button (on the transmitter or smart
key), the lights will turn off immedi-
ately. Interior light
When the interior light switch is in the DOOR position and all doors (and
tailgate) are locked and closed, the
room lamp will come on for 30 sec-
onds if any of the below is performed.
- When the door unlock button is pressed on the transmitter.
- When the door unlock button is pressed on the smart key.
- When the button of the outside door handle is pressed.
At this time, if you press the door lock
button, the lamps will turn off imme-
diately. Puddle lamp (if equipped)
When all doors are locked and closed, the puddle lamp will come on
for 15 seconds if any of the below is
performed.
- When the door unlock button is pressed on the transmitter.
- When the door unlock button is pressed on the smart key.
- When the button of the outside door handle is pressed.
- When the vehicle is approached with the smart key in possession.
At this time, if you press the door lock
button, the lamps will turn off imme-
diately.
WELCOME SYSTEM (IF EQUIPPED)
Page 637 of 723

Maintenance
50
8
Battery capacity label
(see the example) ❈ The actual battery label in the vehicle may
differ from the illustration.
1. CMF60L-BCI : The Kia model name of battery
2. 12V : The nominal voltage
3. 60Ah(20HR) : The nominal capac- ity (in Amperehours)
4. 92RC : The nominal reserve
capacity (in min.)
5. 550CCA : The cold-test current in amperes by SAE
6. 440A : The cold-test current in
amperes by EN Battery recharging
Your vehicle has a maintenance-free,
calcium-based battery.
If the battery becomes discharged
in a short time (because, for exam-
ple, the headlights or interior lights
were left on whilst the vehicle was
not in use), recharge it by slow
charging (trickle) for 10 hours.
If the battery gradually discharges because of high electric load whilst
the vehicle is being used, recharge
it at 20-30A for two hours.
OJD072039
Example
CAUTION -
AGM battery (if equipped)
Absorbent Glass Matt (AGM)
batteries are maintenance-freeand we recommend that the AGM battery be serviced by anauthorised Kia dealer. Forcharging your AGM battery, use only fully automatic bat-tery chargers that are speciallydeveloped for AGM batteries.
When replacing the AGM bat- tery, we recommend that youuse parts for replacementfrom an authorised Kia dealer.
Do not open or remove the cap on top of the battery. Thismay cause leaks of internal electrolyte that could result insevere injury.
Page 652 of 723
865
Maintenance
Inner panel fuse replacement
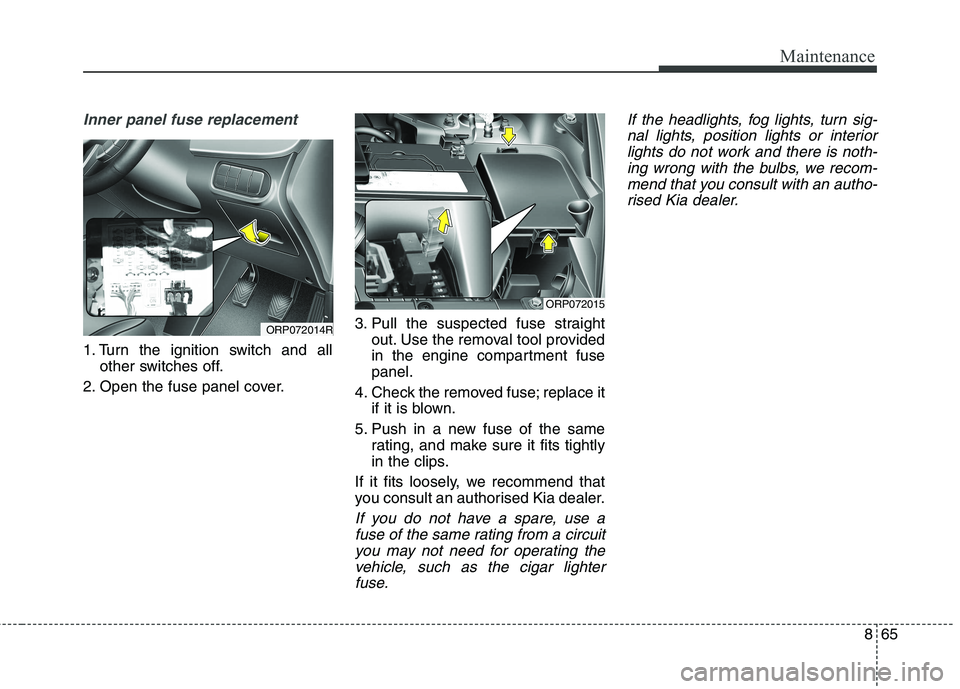
1. Turn the ignition switch and allother switches off.
2. Open the fuse panel cover. 3. Pull the suspected fuse straight
out. Use the removal tool provided
in the engine compartment fusepanel.
4. Check the removed fuse; replace it if it is blown.
5. Push in a new fuse of the same rating, and make sure it fits tightly
in the clips.
If it fits loosely, we recommend that
you consult an authorised Kia dealer.
If you do not have a spare, use a fuse of the same rating from a circuityou may not need for operating the vehicle, such as the cigar lighterfuse. If the headlights, fog lights, turn sig-
nal lights, position lights or interior lights do not work and there is noth-ing wrong with the bulbs, we recom-mend that you consult with an autho- rised Kia dealer.
ORP072014R
ORP072015
Page 687 of 723
Maintenance
100
8
Interior light bulb replacement
Map lamp, Vanity mirror lamp,
Room lamp, Luggage room lamp, Foot lamp
1. Using a flat-blade screwdriver, gently pry the lens from the interi- or light housing.
2. Remove the bulb by pulling it straight out. 3. Install a new bulb in the socket.
4. Align the lens tabs with the interior
light housing notches and snap
the lens into place.
WARNING
Prior to working on the interior
lights, ensure that the light is off
to avoid burning your fingers or
receiving an electric shock.
CAUTION
Be careful not to dirt or damage lens, lens tab, and plastic hous-ings.
Page 722 of 723
Index
10
I
TPMS (Tyre Pressure Monitoring System)
malfunction indicator ................................................7-12
Tyre specification and pressure label ............................9-12
Tyres and wheels..............................................................9-6
Tyres and wheels............................................................8-52 Checking tyre inflation pressure ................................8-53
Low aspect ratio tyre ..................................................8-62
Recommended cold tyre inflation pressures ..............8-52
Tyre care......................................................................8-52
Tyre maintenance ......................................................8-57
Tyre replacement ........................................................8-56
Tyre rotation ..............................................................8-54
Tyre sidewall labeling ................................................8-58
Tyre traction ................................................................8-57
Wheel alignment and tyre balance ..........................8-55
Wheel replacement ....................................................8-57
Vehicle break-in process ..................................................1-7
Vehicle certification label ..............................................9-11
Vehicle identification number (VIN) ............................9-11
Vehicle weight ............................................................6-113
Warning and indicator lights..........................................4-81 Indicator Lights ..........................................................4-91 Warning lights ............................................................4-81
Washer fluid ..................................................................8-39 Checking the washer fluid level ..............................8-39
Welcome system ..........................................................4-137 Headlamp welcome ..................................................4-137
Interior light ............................................................4-137
Puddle lamp ..............................................................4-137
Windows ........................................................................4-33 Power windows ..........................................................4-34
Windscreen defrosting and defogging ......................4-163 Automatic climate control system ............................4-164
Manual climate control system ................................4-163
Winter driving ................................................................6-96 Carry emergency equipment ......................................6-99
Change to "winter weight" oil if necessary ................6-98
Check battery and cables ............................................6-98
Check spark plugs and ignition system ......................6-98
Don't let ice and snow accumulate underneath ..........6-99
Don't let your parking brake freeze ............................6-99
Snowy or Icy conditions ............................................6-96
To keep locks from freezing ......................................6-99
Use approved window washer anti-freeze in system..6-99
Use high quality ethylene glycol coolant ..................6-98
Wiper blades ..................................................................8-44 Blade inspection ..........................................................8-44
Blade replacement ....................................................8-44
Wipers and washers ....................................................4-126 Rear window wiper and washer switch ..................4-133
V
W