2017 Hyundai Ioniq Electric service
[x] Cancel search: servicePage 333 of 582
4-37
Multimedia System
4
Information
When the incoming call screen is displayed, audio mode and the set-
tings screen cannot be shown. Only
call volume control is supported.
Some Bluetooth ®
devices may not
support the call reject function.
Some Bluetooth ®
devices may not
support the phone number display
function.Operation during calls
Incoming call with Bluetooth®
con-
nected ➟Select [Accept].
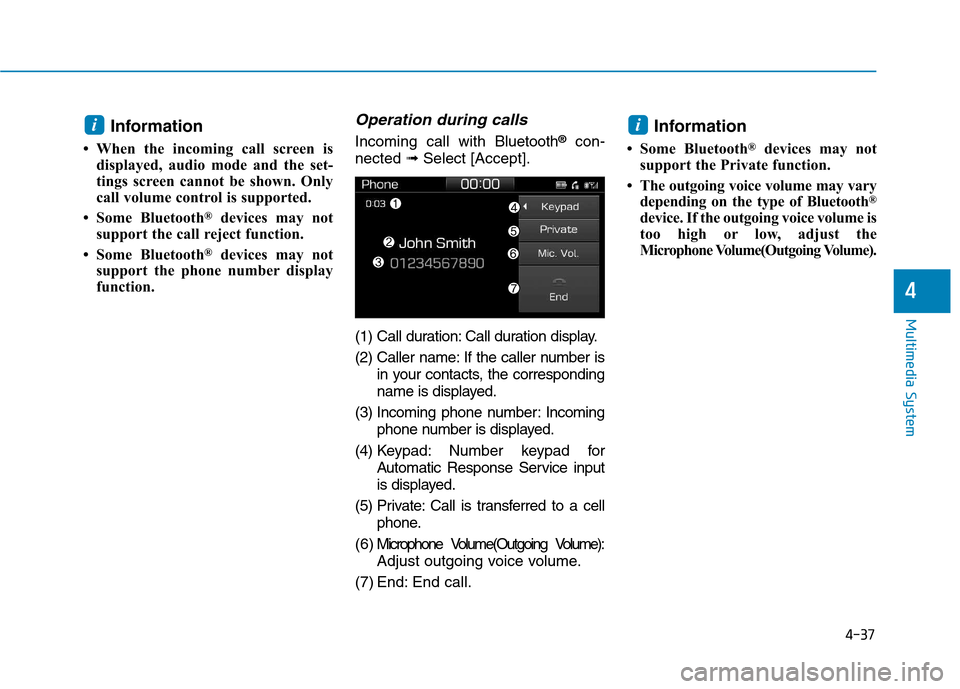
(1) Call duration: Call duration display.
(2) Caller name: If the caller number is in your contacts, the corresponding
name is displayed.
(3) Incoming phone number: Incoming phone number is displayed.
(4) Keypad: Number keypad for Automatic Response Service input
is displayed.
(5) Private: Call is transferred to a cell phone.
( 6 ) Microphone Volume(Outgoing Volume): Adjust outgoing voice volume.
(7) End: End call. Information
Some Bluetooth ®
devices may not
support the Private function.
The outgoing voice volume may vary depending on the type of Bluetooth ®
device. If the outgoing voice volume is
too high or low, adjust the
Microphone Volume(Outgoing Volume).
ii
Page 438 of 582
5-99
Driving your vehicle
5
Check battery and cables
The winter temperature increases
the battery consumption.Inspect
the battery and cables, as speci-
fied in the chapter 7. The battery
charging level can be checked by an
authorized HYUNDAI dealer or in a
service station.
Change to "winter weight" oil if
necessary
In some regions during winter, it is recommended to use the "winter
weight" oil with lower viscosity. For
further information, refer to the chap-
ter 8. When you are not sure about a
type of winter weight oil, consult an
authorized HYUNDAI dealer. To prevent locks from freezing
To prevent the locks from being
frozen, spray approved de-icing fluid
or glycerin into key holes. When a
lock opening is already covered with
ice, spray approved de-icing fluid
over the ice to remove it. When an
internal part of a lock freezes, try to
thaw it with a heated key. Carefully
use the heated key to avoid an injury.
Use approved window washer
anti-freeze solution in system
To prevent the window washer from
being frozen, add authorized window
washer anti-freeze solution, as spec-
ified on the window washer contain-
er. Window washer anti-freeze solu-
tion is available from an authorized
HYUNDAI dealer, and so are the
most vehicle accessory outlets. Donot use coolant or other types of anti-
freeze solution to prevent any dam-
age to the vehicle paint.Do not let your parking brake
freeze
Under some conditions your parking
brake can freeze in the engaged
position. This is most likely to happen
when there is an accumulation of
snow or ice around or near the rear
brakes or if the brakes are wet. When
there is the risk that your parking
brake may freeze, temporarily shift to
P (Park). Also, block the rear wheels
in advance, so the vehicle may not
roll. Then, release the parking brake.
Do not let ice and snow accumu- late underneath
Under some conditions, snow and
ice can build up under the fenders
and interfere with the steering. When
driving in such conditions during the
severe winter, you should check
underneath the vehicle on a regular
basis, so that moving the front
wheels and the steering components
is unblocked.
Page 442 of 582
What to do in an emergency
Hazard warning flasher ........................................6-2
In case of an emergency while driving ..............6-2If the vehicle stalls while driving...................................6-2
If the vehicle stalls at a crossroad or crossing .........6-2
If you have a flat tire while driving..............................6-3
If the vehicle will not start ...................................6-4 If the vehicle doesn't turn over or
turns over slowly ...............................................................6-4
Jump starting ..........................................................6-4
If the vehicle overheats ........................................6-8
Tire Pressure Monitoring System (TPMS).........6-9 Check tire pressure...........................................................6-9
Tire pressure monitoring system ................................6-10
Low tire pressure telltale ..............................................6-11
Low tire pressure position and
tire pressure telltale .......................................................6-11
TPMS (Tire Pressure Monitoring System)
malfunction indicator .....................................................6-12 Changing a tire with TPMS...........................................6-13
If you have a flat tire..........................................6-15 With Tire Mobility Kit (TMK) ........................................6-15 Towing ...................................................................6-22
Towing service .................................................................6-22
Removable towing hook ................................................6-23
Emergency towing ..........................................................6-24
6
Page 445 of 582
6-4
What to do in an emergency
If the vehicle doesn't turn over
or turns over slowly
Be sure the gear is in P (Park). Thevehicle starts only when the gear is
in P (Park).
Check the 12-volt battery connec- tions to be sure they are clean andtight.
Turn on the interior light. If the light dims or goes out when you operate
the starter, the battery is drained.
Do not push or pull the vehicle to
start it. This could cause damage to
your vehicle. See instructions for
"Jump Starting" provided in this
chapter. Jump starting can be dangerous if
done incorrectly. Follow the jump
starting procedure in this section to
avoid serious injury or damage to
your vehicle. If in doubt about how to
properly jump start your vehicle, we
strongly recommend that you have a
service technician or towing service
do it for you.
JJ
UU MM PP SS TT AA RRTTIINN GG
II FF TT HH EE VV EEHH IICC LLEE WW IILL LL NN OO TT
S
S TT AA RRTT
To prevent SERIOUS INJURY or
DEATH to you or bystanders,
always follow these precautions
when working near or handling
the battery:
Always read and follow
instructions carefully
when handling a battery.Wear eye protection
designed to protect the
eyes from acid splashes.
Keep all flames, sparks, or smoking materials
away from the battery.
Hydrogen is always pres- ent in battery cells, is
highly combustible, and
may explode if ignited.
Keep batteries out of
reach of children.
(Continued)
WARNING
Page 452 of 582
6-11
What to do in an emergency
6
If any of the below happens, have
the system checked by an author-
ized HYUNDAI dealer.
1. The Low Tire Pressure Telltale/TPMS Malfunction Indicator
does not illuminate for 3 sec-
onds when the vehicle is ON.
2. The TPMS Malfunction Indicator remains illuminated after blink-
ing for approximately 1 minute.
3. The Low Tire Pressure Position Telltale remains illuminated.
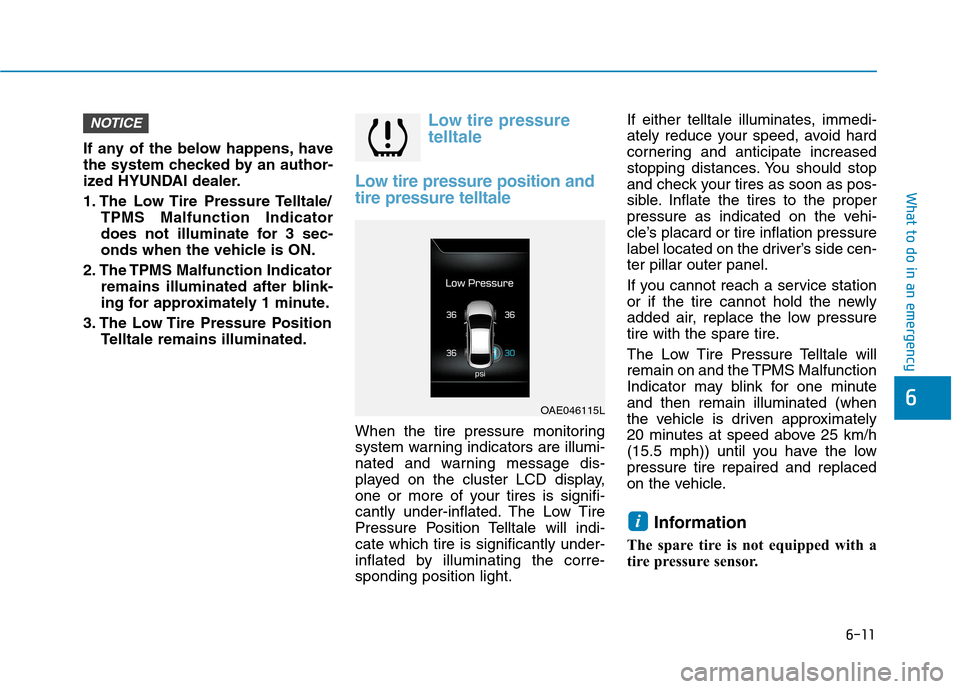
Low tire pressure telltale
Low tire pressure position andtire pressure telltale
When the tire pressure monitoring
system warning indicators are illumi-
nated and warning message dis-
played on the cluster LCD display,
one or more of your tires is signifi-
cantly under-inflated. The Low Tire
Pressure Position Telltale will indi-cate which tire is significantly under-
inflated by illuminating the corre-sponding position light. If either telltale illuminates, immedi-
ately reduce your speed, avoid hard
cornering and anticipate increased
stopping distances. You should stop
and check your tires as soon as pos-
sible. Inflate the tires to the proper
pressure as indicated on the vehi-
cle’s placard or tire inflation pressure
label located on the driver’s side cen-ter pillar outer panel.
If you cannot reach a service station
or if the tire cannot hold the newly
added air, replace the low pressure
tire with the spare tire.
The Low Tire Pressure Telltale will
remain on and the TPMS Malfunction
Indicator may blink for one minuteand then remain illuminated (when
the vehicle is driven approximately
20 minutes at speed above 25 km/h
(15.5 mph)) until you have the lowpressure tire repaired and replaced
on the vehicle.
Information
The spare tire is not equipped with a
tire pressure sensor.
i
NOTICE
OAE046115L
Page 454 of 582
6-13
What to do in an emergency
6
The TPMS Malfunction Indicator
may illuminate after blinking for
one minute if the vehicle is near
electric power supply cables or
radio transmitters such as police
stations, government and public
offices, broadcasting stations,
military installations, airports,
transmitting towers, etc.
Additionally, the TPMS Malfunction
Indicator may illuminate if snow
chains are used or electronic
devices such as computers, charg-
ers, remote starters, navigation,
etc. This may interfere with normal
operation of the TPMS.
Changing a tire with TPMS
If you have a flat tire, the Low Tire
Pressure and Position telltales will
come on. Have the flat tire repaired
by an authorized HYUNDAI dealer
as soon as possible or replace the
flat tire with the spare tire.
Once the original tire equipped with
a tire pressure monitoring sensor isreinflated to the recommended pres-
sure and reinstalled on the vehicle,
the Low Tire Pressure Telltale andTPMS Malfunction Indicator will go
off within a few minutes of driving.
If the indicators do not extinguish
after a few minutes, please visit an
authorized HYUNDAI dealer.Each wheel is equipped with a tirepressure sensor mounted inside the
tire behind the valve stem. You must
use TPMS specific wheels. It is rec-
ommended that you always have
your tires serviced by an authorized
HYUNDAI dealer.
You may not be able to identify a tire
with low pressure by simply looking
at it. Always use a good quality tire
pressure gauge to measure. Pleasenote that a tire that is hot (from being
driven) will have a higher pressuremeasurement than a tire that is cold.
A cold tire means the vehicle has
been sitting for 3 hours and driven forless than 1.6 km (1 mile) in that 3
hour period.
Allow the tire to cool before measur-
ing the inflation pressure. Always be
sure the tire is cold before inflating to
the recommended pressure.
NOTICE
Never use a puncture-repairing
agent not approved by HYUNDAIdealer to repair and/or inflate a
low pressure tire. Tire sealant
not approved by HYUNDAI deal-
er may damage the tire pressure
sensor.
CAUTION
Page 456 of 582
6-15
What to do in an emergency
6
With Tire Mobility Kit (TMK)
For safe operation, carefully read
and follow the instructions in this
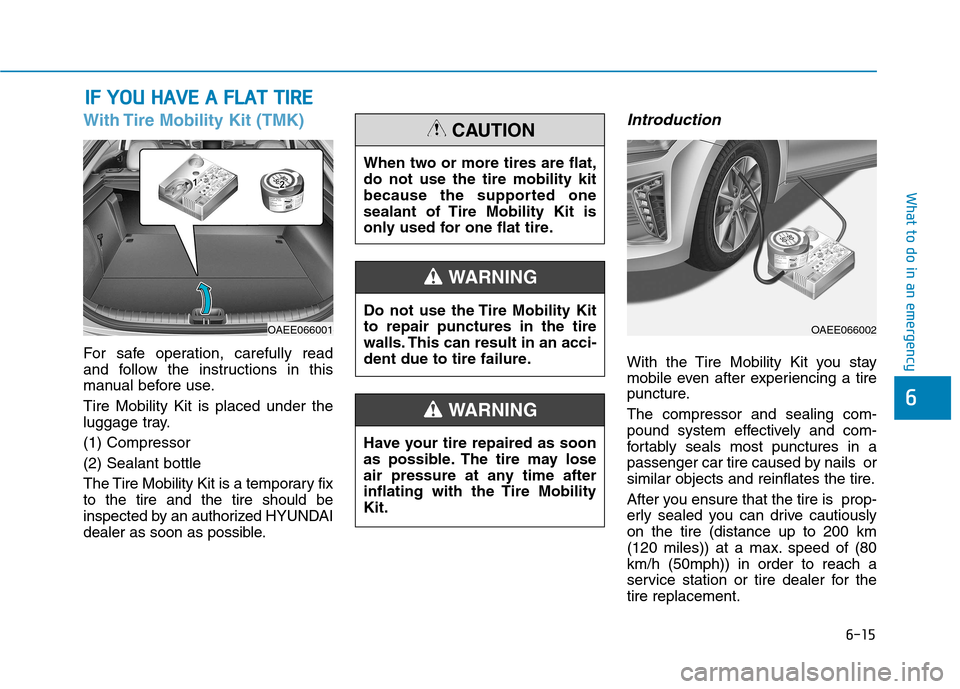
manual before use. Tire Mobility Kit is placed under the
luggage tray. (1) Compressor(2) Sealant bottle
The Tire Mobility Kit is a temporary fix to the tire and the tire should be
inspected by an authorized HYUNDAI
dealer as soon as possible.
Introduction
With the Tire Mobility Kit you stay
mobile even after experiencing a tire
puncture. The compressor and sealing com-
pound system effectively and com-
fortably seals most punctures in a
passenger car tire caused by nails or
similar objects and reinflates the tire.
After you ensure that the tire is prop-
erly sealed you can drive cautiouslyon the tire (distance up to 200 km
(120 miles)) at a max. speed of (80km/h (50mph)) in order to reach a
service station or tire dealer for thetire replacement.
IIFF YY OO UU HH AAVVEE AA FF LLAA TT TT IIRR EE
OAEE066001OAEE066002
When two or more tires are flat, do not use the tire mobility kit
because the supported one
sealant of Tire Mobility Kit is
only used for one flat tire.
CAUTION
Do not use the Tire Mobility Kit to repair punctures in the tire
walls. This can result in an acci-
dent due to tire failure.
WARNING
Have your tire repaired as soon
as possible. The tire may lose
air pressure at any time after
inflating with the Tire MobilityKit.
WARNING
Page 461 of 582
6-20
What to do in an emergency
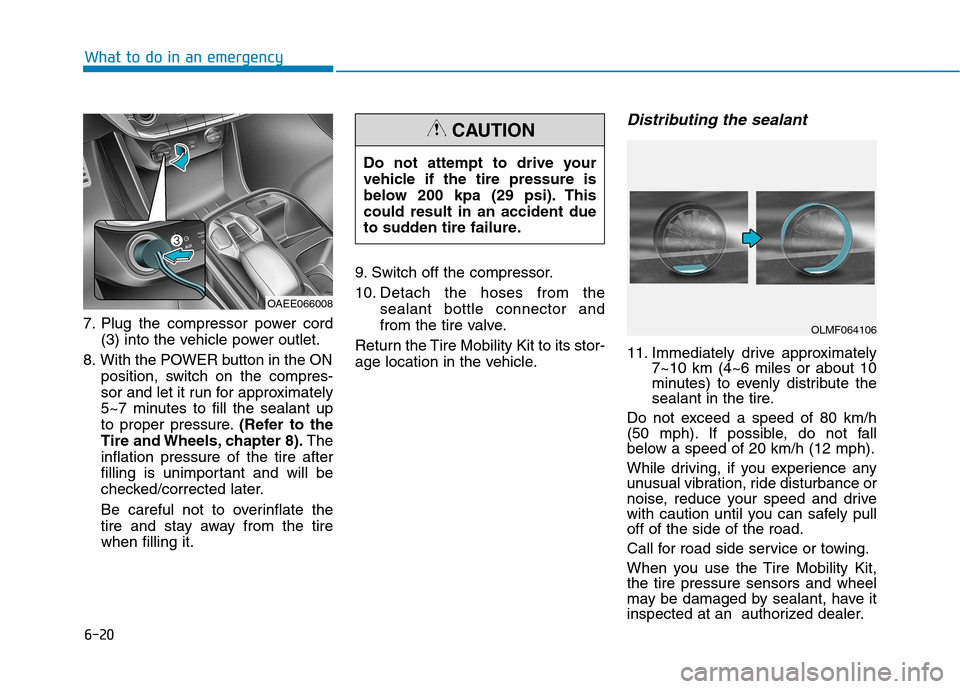
7. Plug the compressor power cord(3) into the vehicle power outlet.
8. With the POWER button in the ON position, switch on the compres-
sor and let it run for approximately
5~7 minutes to fill the sealant up
to proper pressure. (Refer to the
Tire and Wheels, chapter 8). The
inflation pressure of the tire after
filling is unimportant and will be
checked/corrected later.
Be careful not to overinflate the
tire and stay away from the tirewhen filling it. 9. Switch off the compressor.
10. Detach the hoses from the
sealant bottle connector and
from the tire valve.
Return the Tire Mobility Kit to its stor-
age location in the vehicle.
Distributing the sealant
11. Immediately drive approximately 7~10 km (4~6 miles or about 10
minutes) to evenly distribute the
sealant in the tire.
Do not exceed a speed of 80 km/h
(50 mph). If possible, do not fall
below a speed of 20 km/h (12 mph).
While driving, if you experience any
unusual vibration, ride disturbance or
noise, reduce your speed and drive
with caution until you can safely pulloff of the side of the road.
Call for road side service or towing.
When you use the Tire Mobility Kit, the tire pressure sensors and wheel
may be damaged by sealant, have it
inspected at an authorized dealer.
Do not attempt to drive your
vehicle if the tire pressure is
below 200 kpa (29 psi). Thiscould result in an accident due
to sudden tire failure.
CAUTION
OAEE066008
OLMF064106