2017 HYUNDAI ELANTRA SE ESP
[x] Cancel search: ESPPage 133 of 586
3-39
Convenient features of your vehicle
3
Reprogramming a singleHomeLink®button
To program a new device to a previ-
ously trained HomeLink®button, fol-
low these steps:
1. Press and hold the desired HomeLink
®button. Do NOT
release until step 4 has been com-
pleted.
2. When the indicator light begins to flash slowly (after 20 seconds),
position the handheld transmitter 1
to 3 inches away from the
HomeLink
®surface.
3. Press and hold the handheld transmitter button. The HomeLink
®
indicator light will flash, first slowly
and then rapidly.
4. When the indicator light begins to flash rapidly, release both buttons.
5. Press and hold the just-trained HomeLink
®button and observe
the red Status Indicator LED. If the
indicator light stays on constantly,
programming is complete and
your new device should activate.
Erasing HomeLink®buttons
Individual buttons cannot be erased.
However, to erase all three pro-
grammed buttons:
1. Press and hold the two outer HomeLink
®buttons until the indi-
cator light begins to flash-after 20
seconds.
2. Release both buttons. Do not hold for longer than 30 seconds.
The Integrated HomeLink
®Wireless
Control System is now in the training
(learn) mode and can be pro-
grammed at any time following the
appropriate steps in the Programming
chapters above.
NVS
®is a registered trademark and
Z-Nav™ is a trademark of the Gentex
Corporation, Zeeland, Michigan.
HomeLink
®is a registered trademark
owned by Johnson Controls,
Incorporated, Milwaukee, Wisconsin.
FCC ID: NZLZTVHL3
IC: 4112A-ZTVHL3
Information
This device complies with Part 15 of
the FCC Rules.
Operation is subject to the following
three conditions:
1. This device may not cause harmful interference, and
2. This device must accept any interfer- ence received, including interference
that may cause undesired operation.
3. The transceiver has been tested and complies with FCC and Industry
Canada rules. Changes or modifica-
tions not expressly approved by the
party responsible for compliance
could void the user’s authority to
operate the device.
i
Page 154 of 586
3-60
Convenient features of your vehicle
Information
Make sure to refuel your vehicle
according to the "Fuel Requirements"
suggested in the Introduction chapter.
Do not spill fuel on the exteriorsurfaces of the vehicle. Any type
of fuel spilled on painted sur-
faces may damage the paint.
If the fuel filler cap requires replacement, use only a genuine
HYUNDAI cap or the equivalent
specified for your vehicle. An
incorrect fuel filler cap can
result in a serious malfunction
of the fuel system or emission
control system.
NOTICE
i(Continued)
Once refueling has begun,
contact between your bare
hand and the vehicle should
be maintained until the filling
is complete.
Use only approved portable
plastic fuel containers designed
to carry and store gasoline.
When refueling, always move
the shift lever to the P (Park)
position, set the parking
brake, and place the ignition
switch to the LOCK/OFF posi-
tion. Sparks produced by
electrical components related
to the engine can ignite fuel
vapors causing a fire.
Do not use matches or a
lighter and do not smoke or
leave a lit cigarette in your
vehicle while at a gas station,
especially during refueling.
Do not over-fill or top-off your
vehicle tank, which can cause
gasoline spillage. (Continued)
(Continued)
If a fire breaks out during refu-
eling, leave the vicinity of the
vehicle, and immediately con-
tact the manager of the gas
station and then contact the
local fire department. Follow
any safety instructions they
provide.
If pressurized fuel sprays out,
it can cover your clothes or
skin and thus subject you to
the risk of fire and burns.
Always remove the fuel cap
carefully and slowly. If the cap
is venting fuel or if you hear a
hissing sound, wait until the
condition stops before com-
pletely removing the cap.
Always check that the fuel cap
is installed securely to pre-
vent fuel spillage in the event
of an accident.
Page 202 of 586
3-108
Convenient features of your vehicle
Daytime running light (DRL)
(if equipped)
The Daytime Running Lights (DRL)
can make it easier for others to see
the front of your vehicle during the
day, especially after dawn and before
sunset.
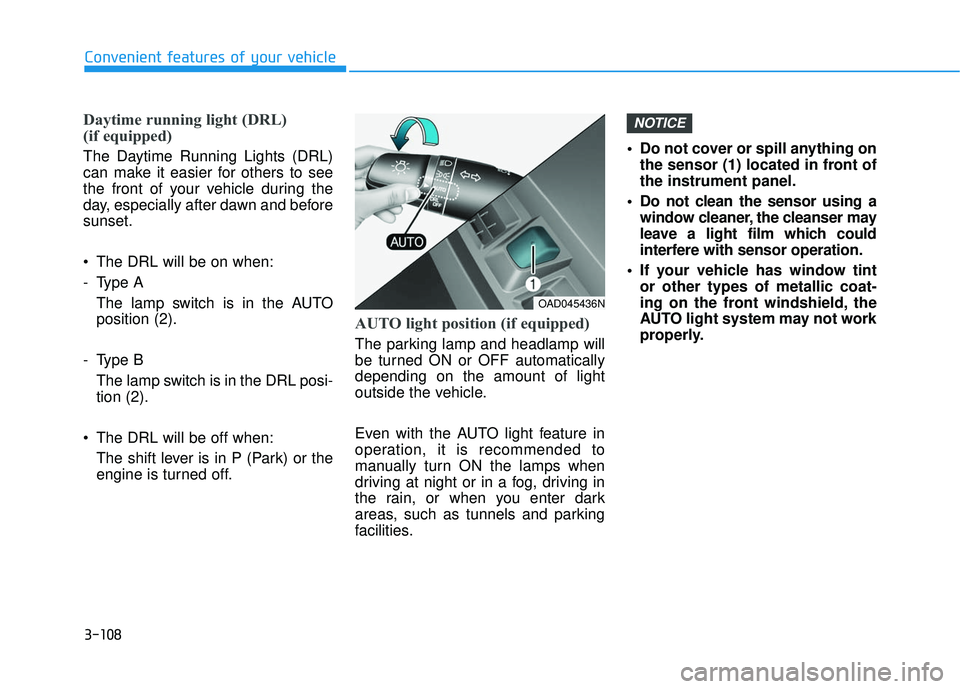
• The DRL will be on when:
- Type AThe lamp switch is in the AUTO
position (2).
- Type B The lamp switch is in the DRL posi-
tion (2).
The DRL will be off when: The shift lever is in P (Park) or the
engine is turned off.
AUTO light position (if equipped)
The parking lamp and headlamp will
be turned ON or OFF automatically
depending on the amount of light
outside the vehicle.
Even with the AUTO light feature in
operation, it is recommended to
manually turn ON the lamps when
driving at night or in a fog, driving in
the rain, or when you enter dark
areas, such as tunnels and parking
facilities. • Do not cover or spill anything on
the sensor (1) located in front of
the instrument panel.
Do not clean the sensor using a window cleaner, the cleanser may
leave a light film which could
interfere with sensor operation.
If your vehicle has window tint or other types of metallic coat-
ing on the front windshield, the
AUTO light system may not work
properly.
NOTICE
OAD045436N
Page 215 of 586
3-121
Convenient features of your vehicle
3
D
DR
RI
IV
V E
ER
R
A
A S
SS
SI
IS
S T
T
S
S Y
Y S
ST
T E
EM
M
Rear View Camera
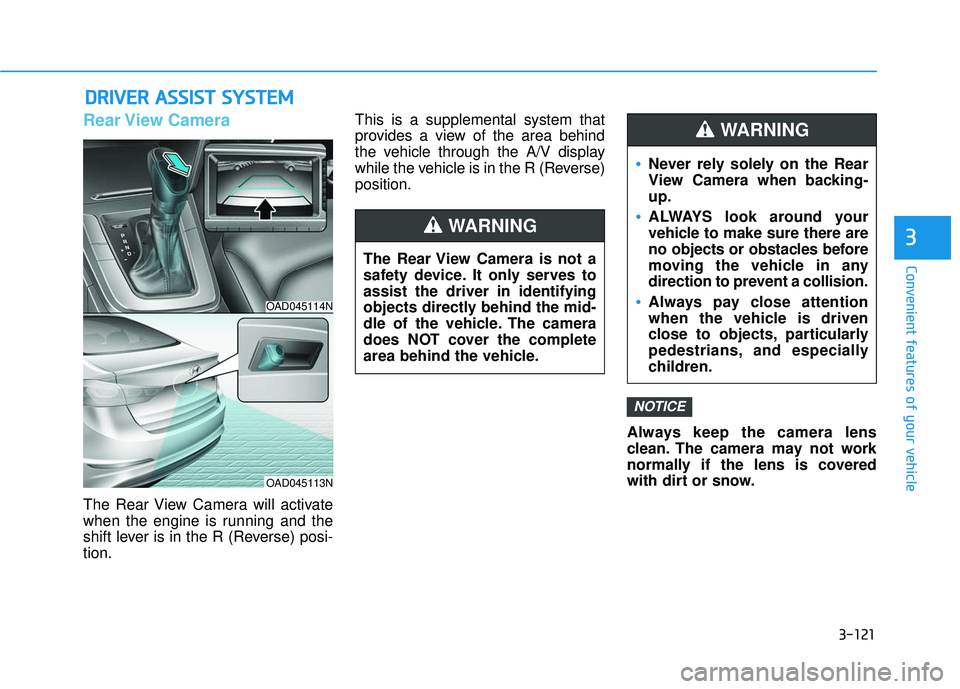
The Rear View Camera will activate
when the engine is running and the
shift lever is in the R (Reverse) posi-
tion. This is a supplemental system that
provides a view of the area behind
the vehicle through the A/V display
while the vehicle is in the R (Reverse)
position.
Always keep the camera lens
clean. The camera may not work
normally if the lens is covered
with dirt or snow.
NOTICE
The Rear View Camera is not a
safety device. It only serves to
assist the driver in identifying
objects directly behind the mid-
dle of the vehicle. The camera
does NOT cover the complete
area behind the vehicle.
WARNING
Never rely solely on the Rear
View Camera when backing-
up.
ALWAYS look around your
vehicle to make sure there are
no objects or obstacles before
moving the vehicle in any
direction to prevent a collision.
Always pay close attention
when the vehicle is driven
close to objects, particularly
pedestrians, and especially
children.
WARNING
OAD045114N
OAD045113N
Page 239 of 586
3-145
Convenient features of your vehicle
3
W
WI
IN
N D
DS
SH
H I
IE
E L
LD
D
D
D E
EF
FR
R O
O S
ST
T I
IN
N G
G
A
A N
N D
D
D
D E
EF
FO
O G
GG
GI
IN
N G
G
For maximum defrosting, set the
temperature control to the extreme
right/hot position and the fan speed
control to the highest speed.
If warm air to the floor is desired while defrosting or defogging, set the
mode to the floor-defrost position.
Before driving, clear all snow and ice from the windshield, rear win-
dow, side view mirrors, and all side
windows.
Clear all snow and ice from the hood and air inlet in the cowl grill to
improve heater and defroster effi-
ciency and to reduce the probability
of fogging up the inside of the wind-
shield.
If the engine temperature is still
cold after starting, then a brief
engine warm up period may be
required for the vented air flow to
become warm or hot.Manual Climate Control System
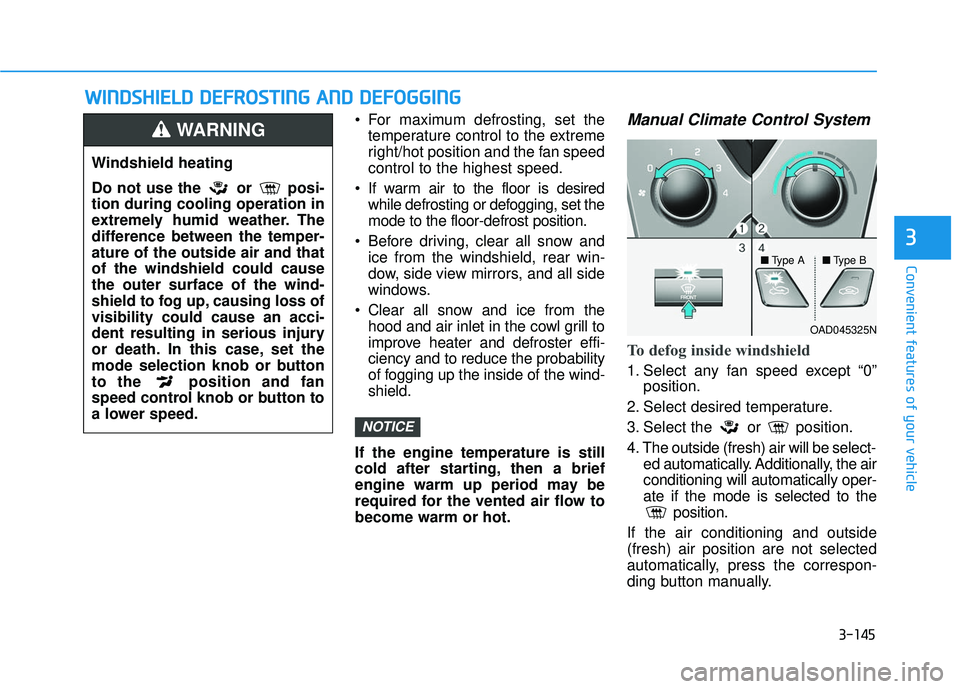
To defog inside windshield
1. Select any fan speed except “0” position.
2. Select desired temperature.
3. Select the or position.
4. The outside (fresh) air will be select- ed automatically. Additionally, the air
conditioning will automatically oper-
ate if the mode is selected to the position.
If the air conditioning and outside
(fresh) air position are not selected
automatically, press the correspon-
ding button manually.
NOTICE
Windshield heating
Do not use the or posi-
tion during cooling operation in
extremely humid weather. The
difference between the temper-
ature of the outside air and that
of the windshield could cause
the outer surface of the wind-
shield to fog up, causing loss of
visibility could cause an acci-
dent resulting in serious injury
or death. In this case, set the
mode selection knob or button
to the position and fan
speed control knob or button to
a lower speed.
WARNING
OAD045325N
■
Type A ■Type B
Page 240 of 586
3-146
Convenient features of your vehicle
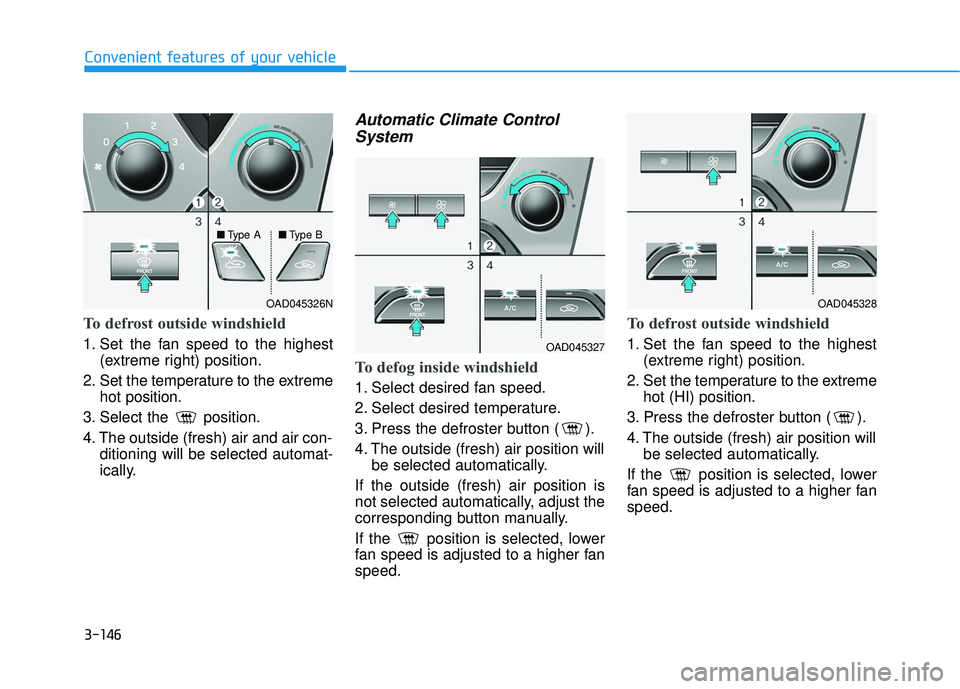
To defrost outside windshield
1. Set the fan speed to the highest(extreme right) position.
2. Set the temperature to the extreme hot position.
3. Select the position.
4. The outside (fresh) air and air con- ditioning will be selected automat-
ically.
Automatic Climate Control System
To defog inside windshield
1. Select desired fan speed.
2. Select desired temperature.
3. Press the defroster button ( ).
4. The outside (fresh) air position will
be selected automatically.
If the outside (fresh) air position is
not selected automatically, adjust the
corresponding button manually.
If the position is selected, lower
fan speed is adjusted to a higher fan
speed.
To defrost outside windshield
1. Set the fan speed to the highest (extreme right) position.
2. Set the temperature to the extreme hot (HI) position.
3. Press the defroster button ( ).
4. The outside (fresh) air position will be selected automatically.
If the position is selected, lower
fan speed is adjusted to a higher fan
speed.
OAD045326NOAD045328
OAD045327
■
Type A ■Type B
Page 268 of 586
(Continued)
• Park the vehicle when connectingthe head unit with the mobile phone.
• Bluetooth
®connection may become
intermittently disconnected in some
mobile phones. Follow these steps to
try again.
1. Within the mobile phone, turn the Bluetooth
®function off/on and try
again.
2. Turn the mobile phone power Off/On and try again.
3. Completely remove the mobile phone battery, reboot, and then
again.
4. Reboot the Audio System and try again.
5. Delete all paired devices, pair and try again.
• Handsfree call quality and volume may differ depending on the model
of your mobile phone.
Information - Using the voicerecognition
• When using the voice recognition feature, only commands listed with-
in the user's manual are supported.
• Be aware that during the operation of the voice recognition system,
pressing any key other than the
key terminate the voice recognition
mode.
• For superior voice recognition per- formance, position the microphone
used for voice recognition above the
head of the driver’s seat and main-
tain a proper position when saying
commands.
• Within the following situations, voice recognition may not function
properly due to external sound.
- When the windows and sunroofare open
- When the wind of the cooling / heating device is strong
- When entering and passing through tunnels
(Continued)(Continued)
- When driving on rugged anduneven roads
- During severe rain (heavy rains, windstorms)
• Phone related voice commands can be used only when a Bluetooth
®
Wireless Technology device is con-
nected.
• When making calls by stating a name, the corresponding contact
must be downloaded and stored
within the audio system.
• After downloading the Bluetooth
®
Wireless Technology phone book, it
takes some times to convert the
phone book data into voice informa-
tion. During this time, voice recogni-
tion may not properly operate.
• Pronounce the voice commands nat- urally and clearly as if in a normal
conversation.
i
4-16
Multimedia System
Page 278 of 586
4-26
Multimedia SystemAudio System Safety Warnings
Do not stare at the screen
while driving. Staring at the
screen for prolonged periods
of time could lead to traffic
accidents.
Do not disassemble, assem-
ble, or modify the audio sys-
tem. Such acts could result in
accidents, fire, or electric
shock.
Using the phone while driving
may lead to a lack of attention
of traffic conditions and
increase the likelihood of
accidents. Use the phone fea-
ture after parking the vehicle.
Exercise caution not to spill
water or introduce foreign
objects into the device. Such
acts could lead to smoke, fire,
or product malfunction. (Continued)
(Continued)
Please refrain from use if the
screen is blank or no sound
can be heard as these signs
may indicate product mal func-
tion. Continued use in such
conditions could lead to acci-
dents (fires, electric shock) or
product malfunctions.
Do not touch the antenna dur-
ing thunder or lightening as
such acts may lead to light-
ning induced electric shock.
Do not stop or park in park-
ing-restricted areas to operate
the product. Such acts could
lead to traffic accidents.
WARNING
Distracted Driving
Driving while distracted can
result in a loss of vehicle con-
trol that may lead to an acci-
dent, severe personal injury,
and death. The driver’s primary
responsibility is in the safe and
legal operation of a vehicle, and
use of any handheld devices,
other equipment, or vehicle sys-
tems which take the driver’s
eyes, attention and focus away
from the safe operation of a
vehicle or which are not permis-
sible by law should never be
used during operation of the
vehicle.
WARNING