2017 HYUNDAI ELANTRA SE check engine
[x] Cancel search: check enginePage 7 of 586

F7
Introduction
F
FU
U E
EL
L
R
R E
EQ
Q U
UI
IR
R E
EM
M E
EN
N T
TS
S
NOTICE indicates a situation
which, if not avoided, could result
in vehicle damage. Your new vehicle is designed to
obtain maximum performance with
UNLEADED FUEL, as well as mini-
mize exhaust emissions and spark
plug fouling.
Your new vehicle is designed to use
only unleaded fuel having an octane
number ((R+M)/2) of 87 (Research
Octane Number 91) or higher. (Do not
use methanol blended fuels)
To prevent damage to the engine
and engine components, never
add any fuel system cleaning
agents to the fuel tank other than
what has been specified.
Consult an authorized HYUNDAI
dealer for additional information.
Gasoline containing alcohol or
methanol
Gasohol, a mixture of gasoline and
ethanol (also known as grain alco-
hol) are being marketed along with or
instead of leaded or unleaded gaso-
line. For example, "E15" is a gasohol
comprised of 15% ethanol and 85%
gasoline.
Do not use gasohol containing more
than 15% ethanol, and do not use
gasoline or gasohol containing any
methanol. Either of these fuels may
cause drivability problems and dam-
age to the fuel system, engine con-
trol system and emission control sys-
tem.
Discontinue using gasohol of any
kind if drivability problems occur.
NOTICE
NOTICE
CAUTION indicates a hazardous
situation which, if not avoided,
could result in minor or moder-
ate injury.
CAUTION
•Do not "top off" after the noz-
zle automatically shuts off
when refueling.
Always check that the fuel cap
is installed securely to pre-
vent fuel spillage in the event
of an accident.
WARNING
Page 17 of 586
F17F17
Hazard warning flasher ........................................6-2
In case of an emergency while driving ..............6-2
If the engine stalls while driving ...................................6-2
If the engine stalls at a crossroad or crossing .........6-2
If you have a flat tire while driving..............................6-3
If the engine will not start ...................................6-3
If the engine doesn't turn over or turns over
slowly........................................................................\
............6-3
If the engine turns over normally but doesn't
start.....................................................................\
..................6-3
Jump starting ..........................................................6-4
If the engine overheats ........................................6-7
Tire Pressure Monitoring System (TPMS).........6-9
Check tire pressure...........................................................6-9
Tire Pressure Monitoring System ...............................6-10
Low Tire Pressure Telltale ............................................6-11
Low Tire Pressure LCD Display with Position
Indicator........................................................................\
.....6-11
TPMS malfunction indicator.........................................6-12
Changing a tire with TPMS...........................................6-13
If you have a flat tire..........................................6-15
With spare tire .................................................................6-15
With Tire Mobility Kit (TMK) ........................................6-22
Towing ...................................................................6-32
Towing service .................................................................6-32
Removable towing hook ................................................6-33
Emergency towing ..........................................................6-34
Tie-down hook ................................................................6-35
6What to do in an emergency
Page 18 of 586
F18
Engine compartment .............................................7-3
Maintenance services ...........................................7-4
Owner's Responsibility .....................................................7-4
Owner Maintenance Precautions..................................7-4
Owner maintenance ...............................................7-5
Owner Maintenance Schedule .......................................7-6
Scheduled maintenance services.........................7-7
Explanation of scheduled maintenance items..7-24
Engine oil ..............................................................7-28
Checking the Engine Oil Level .....................................7-28
Checking the Engine Oil and Filter .............................7-29
Engine coolant......................................................7-30
Checking the Engine Coolant Level ............................7-30
Changing Engine Coolant ..............................................7-32
Brake/clutch fluid ................................................7-33
Checking the Brake/clutch Fluid Level......................7-33
Washer fluid .........................................................7-34
Checking the Washer Fluid Level................................7-34
Parking brake .......................................................7-33
Checking the Parking Brake .........................................7-33
Air cleaner ............................................................7-35
Filter Replacement ..........................................................7-35
Climate control air filter .....................................7-37
Filter Inspection ...............................................................7-37
Wiper blades .........................................................7-39
Blade Inspection ..............................................................7-39
Blade Replacement .........................................................7-39
Battery...................................................................7-41
For Best Battery Service ..............................................7-42
Battery Recharging ........................................................7-42
Reset features .................................................................7-43
Tires and wheels ..................................................7-44
Tire Care ........................................................................\
....7-44
Recommended Cold Tire Inflation Pressures ...........7-45
Check Tire Inflation Pressure ......................................7-46
Tire Rotation...................................................................\
..7-47
Wheel Alignment and Tire Balance ............................7-48
Tire Replacement ............................................................7-48
Wheel Replacement ........................................................7-49
Tire Traction .....................................................................7-4\
9
Tire Maintenance ............................................................7-50
Tire Sidewall Labeling ....................................................7-50
Tire Terminology and Definitions................................7-54
All Season Tires ...............................................................7-57
Summer Tires ...................................................................7-57
Snow Tires ........................................................................\
7-57
F18
7Maintenance
Page 77 of 586

2-52
Safety system of your vehicle
10. Side pressure sensors
11. Driver's knee air bag module
12. Emergency Fastening Device System
13. Occupant classification system
The SRSCM (Supplemental
Restraint System Control Module)
continually monitors all SRS compo-
nents while the Engine Start/Stop
button is in the ON position to deter-
mine if a crash impact is severe
enough to require air bag deploy-
ment or pre-tensioner seat belt
deployment.
SRS warning light
The SRS (Supplement Restraint
System) air bag warning light on the
instrument panel displays the air bag
symbol depicted in the illustration.
The system checks the air bag elec-
trical system for malfunctions. The
light indicates that there is a potential
malfunction with your air bag system,
which could include your side and
curtain air bags used for rollover pro-
tection.
If your SRS malfunctions, the air
bag may not inflate properly dur-
ing an accident increasing the
risk of serious injury or death.
If any of the following condi-
tions occur, your SRS is mal-
functioning:
The light does not turn on for
approximately six seconds
when the ignition switch is in
the ON position.
The light stays on after illumi-
nating for approximately six
seconds.
The light comes on while the
vehicle is in motion.
The light blinks when the
engine is running.
Have an authorized HYUNDAI
dealer inspect the SRS as soon
as possible if any of these con-
ditions occur.
WARNING
Page 98 of 586
3-4
Convenient features of your vehicle
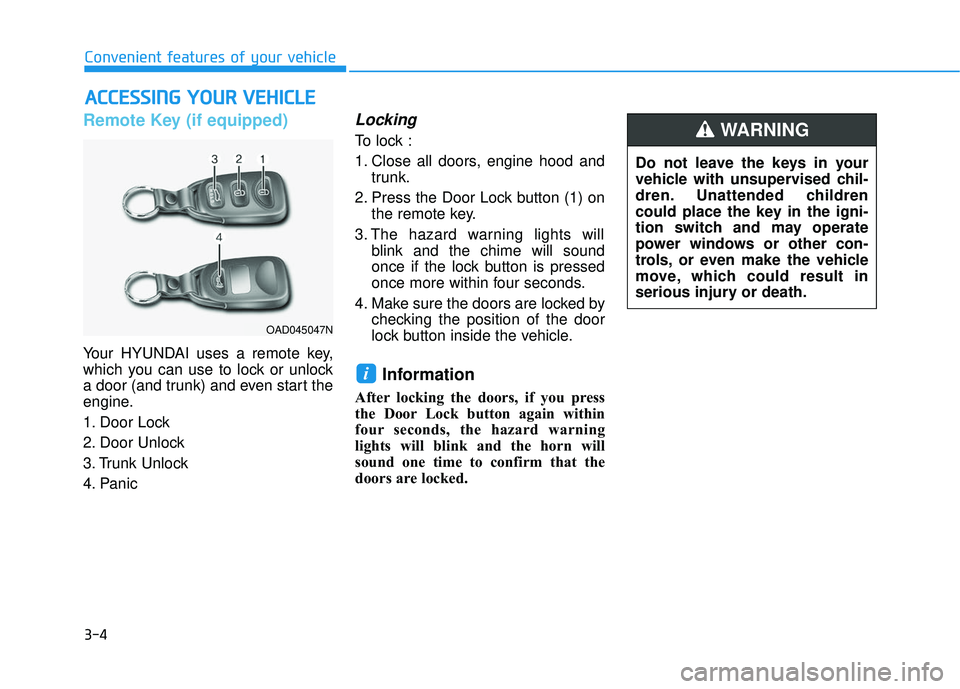
Remote Key (if equipped)
Your HYUNDAI uses a remote key,
which you can use to lock or unlock
a door (and trunk) and even start the
engine.
1. Door Lock
2. Door Unlock
3. Trunk Unlock
4. Panic
Locking
To lock :
1. Close all doors, engine hood andtrunk.
2. Press the Door Lock button (1) on the remote key.
3. The hazard warning lights will blink and the chime will sound
once if the lock button is pressed
once more within four seconds.
4. Make sure the doors are locked by checking the position of the door
lock button inside the vehicle.
Information
After locking the doors, if you press
the Door Lock button again within
four seconds, the hazard warning
lights will blink and the horn will
sound one time to confirm that the
doors are locked.
i
A AC
CC
CE
E S
SS
SI
IN
N G
G
Y
Y O
O U
UR
R
V
V E
EH
H I
IC
C L
LE
E
OAD045047N
Do not leave the keys in your
vehicle with unsupervised chil-
dren. Unattended children
could place the key in the igni-
tion switch and may operate
power windows or other con-
trols, or even make the vehicle
move, which could result in
serious injury or death.
WARNING
Page 102 of 586
3-8
Convenient features of your vehicle
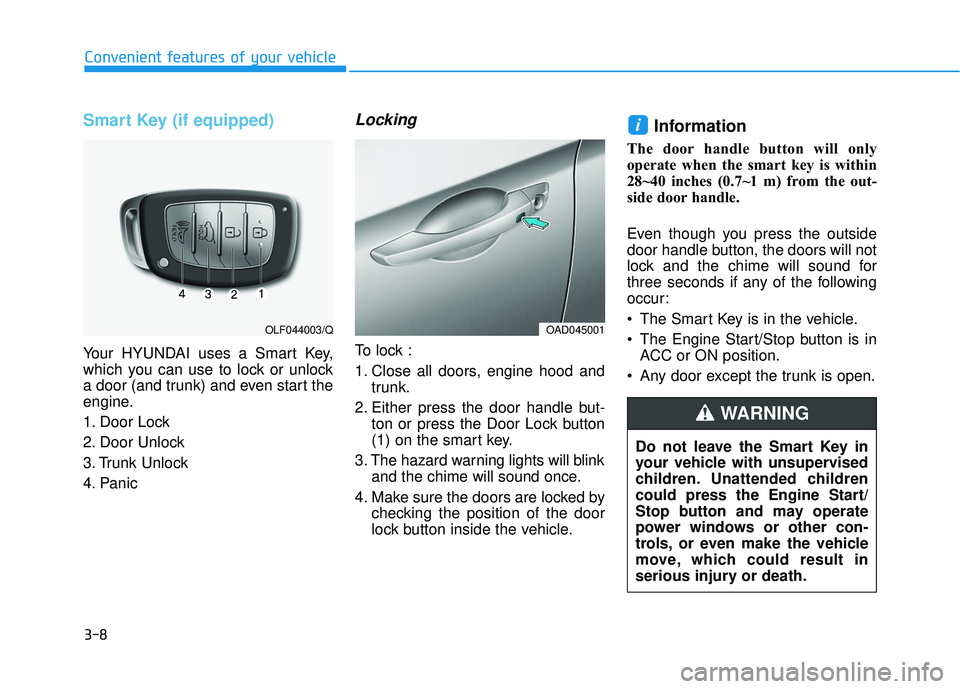
Smart Key (if equipped)
Your HYUNDAI uses a Smart Key,
which you can use to lock or unlock
a door (and trunk) and even start the
engine.
1. Door Lock
2. Door Unlock
3. Trunk Unlock
4. Panic
Locking
To lock :
1. Close all doors, engine hood andtrunk.
2. Either press the door handle but- ton or press the Door Lock button
(1) on the smart key.
3. The hazard warning lights will blink and the chime will sound once.
4. Make sure the doors are locked by checking the position of the door
lock button inside the vehicle.
Information
The door handle button will only
operate when the smart key is within
28~40 inches (0.7~1 m) from the out-
side door handle.
Even though you press the outside
door handle button, the doors will not
lock and the chime will sound for
three seconds if any of the following
occur:
The Smart Key is in the vehicle.
The Engine Start/Stop button is inACC or ON position.
Any door except the trunk is open.
i
OAD045001OLF044003/Q
Do not leave the Smart Key in
your vehicle with unsupervised
children. Unattended children
could press the Engine Start/
Stop button and may operate
power windows or other con-
trols, or even make the vehicle
move, which could result in
serious injury or death.
WARNING
Page 113 of 586
3-19
Convenient features of your vehicle
This system helps to protect your
vehicle and valuables. The horn will
sound and the hazard warning lights
will blink continuously if any of the
following occurs:
- A door is opened without using theremote key or smart key.
- The trunk is opened without using the remote key or smart key.
- The engine hood is opened.
The alarm continues for 30 seconds, then the system resets. To turn off
the alarm, unlock the doors with
the remote key or smart key.
The Theft Alarm System automati-
cally sets 30 seconds after you lock
the doors and the trunk. For the sys-
tem to activate, you must lock the
doors and the trunk from outside the
vehicle with the remote key or smart
key or by pressing the button on the
outside of the door handles with the
smart key in your possession.
The hazard warning lights will blink
and the chime will sound once to
indicate the system is armed. Once the security system is set,
opening any door, the trunk, or the
hood without using the remote key or
smart key will cause the alarm to
activate.
The Theft Alarm System will not set if
the hood, the trunk, or any door is
not fully closed. If the system will not
set, check the hood, the trunk, or the
doors are fully closed.
Do not attempt to alter this system or
add other devices to it.Information
• Do not lock the doors until all pas-
sengers have left the vehicle. If the
remaining passenger leaves the
vehicle when the system is armed,
the alarm will be activated.
• If the vehicle is not disarmed with the remote key or smart key, open the
doors by using the mechanical key
and place the ignition switch in the
ON position (for remote key) or start
the engine (for smart key) by direct-
ly pressing the ignition switch with
the smart key.
• When the system is disarmed but a door or trunk is not opened within 30
seconds, the system will be rearmed.
i
T TH
H E
EF
FT
T -
-A
A L
LA
A R
RM
M
S
S Y
Y S
ST
T E
EM
M
3
Page 115 of 586

3-21
Convenient features of your vehicle
3
Recalling positions from memory
1. Check that the shift lever is in P(Park) while the ignition switch is
in the ON position.
2. Press the desired memory button (1 or 2). The system will beep once,
and then the driver’s seat position,
side view mirror position and instru-
ment panel illumination intensity
will automatically adjust to the
stored positions.
3.
"Driver 1(or 2) settings is applied" will
appear on the LCD display. While recalling the "1" memory
position, pressing the SET or 1
button temporarily stops the
adjustment of the recalled memo-
ry position. Pressing the 2 button
recalls the "2" memory position.
While recalling the "2" memory position, pressing the SET or 2
button temporarily stops the
adjustment of the recalled memo-
ry position. Pressing the 1 button
recalls the "1" memory position.
While recalling the stored posi- tions, pressing one of the con-
trol buttons for the driver’s seat,
side view mirror or instrument
panel illumination will cause the
movement of that component to
stop and move in the direction
that the control button is
pressed.
Easy Access Function
When exiting the vehicle the driver’s
seat will move rearward when the
engine is turned off and the shift lever
in P (Park).
When entering the vehicle the dri-
ver’s seat will move forward when the
ignition switch is placed to the ACC
position.
You can activate or deactivate the
Easy Access Function from the User
Settings Mode on the LCD display.
For more information, refer to the
"LCD Display" section in this
chapter.
NOTICE
OADA045189/OADA045190