Page 521 of 586
7-61
7
Maintenance
Instrument Panel Fuse
Replacement
1. Turn the engine off.
2. Turn all other switches OFF.
3. Open the fuse panel cover.
4. Refer to the label on the inside ofthe fuse panel cover to locate the
suspected fuse location. 5. Pull the suspected fuse straight
out. Use the removal tool provided
in the engine compartment fuses
panel.
6. Check the removed fuse; replace it if it is blown. Spare fuses are pro-
vided in the instrument panel fuse
panels (or in the engine compart-
ment fuse panel).
7. Push in a new fuse of the same rating, and make sure it fits tightly
in the clips. If it fits loosely, consult
an authorized HYUNDAI dealer.
OAD075022
OAD075021
Do not use a screwdriver or any
other metal object to remove
fuses because it may cause a
short circuit and damage the
system.
CAUTION
Page 522 of 586
7-62
Maintenance
In an emergency, if you do not have
a spare fuse, use a fuse of the same
rating from a circuit you may not
need for operating the vehicle, such
as the cigarette lighter fuse.
If the headlamps or other electrical
components do not work and the
fuses are OK, check the fuse panel
in the engine compartment. If a fuse
is blown, it must be replaced with the
same rating.
Fuse switch
Always, place the fuse switch to the
ON position.
If you move the switch to the OFF
position, some items such as the
audio system and digital clock must
be reset and the smart key may not
work properly.
Information
If the fuse switch is OFF, the above
message will appear.
i
OAD075023OAD045144/OTL045155L
■ Conventional cluster ■Supervision cluster
Page 523 of 586
7-63
7
Maintenance
Always place the fuse switch inthe ON position while driving the
vehicle.
Do not move the fuse switch repeatedly. The fuse switch may
be damaged.
Engine Compartment Panel
Fuse Replacement
1. Turn the engine off.
2. Turn all other switches OFF.
3. Remove the fuse panel cover by pressing the tap and pulling up.
4. Check the removed fuse; replace it if it is blown. To remove or insert
the fuse, use the fuse puller in the
engine compartment fuse panel.
5. Push in a new fuse of the same rating, and make sure it fits tightly
in the clips. If it fits loosely, consult
an authorized HYUNDAI dealer.
NOTICE
After checking the fuse box in
the engine compartment
securely close the fuse box
cover inside the engine com-
partment, until it clicks.
If the fuse box is not closed
properly, water may leak in side,
possibly causing a malfunction
with the electrical system.
CAUTION
OAD075024
Page 557 of 586

7-97
7
Maintenance
Canister
Fuel vapors generated inside the fuel
tank are absorbed and stored in the
onboard canister. When the engine is
running, the fuel vapors absorbed in
the canister are drawn into the surge
tank through the purge control sole-
noid valve.
Purge Control Solenoid Valve(PCSV)
The purge control solenoid valve is
controlled by the Engine Control
Module (ECM); when the engine
coolant temperature is low during
idling, the PCSV closes so that evap-
orated fuel is not taken into the
engine. After the engine warms-up
during ordinary driving, the PCSV
opens to introduce evaporated fuel to
the engine.
3. Exhaust Emission Control System
The Exhaust Emission Control
System is a highly effective system
which controls exhaust emissions
while maintaining good vehicle per-
formance.
When the engine starts or fails to
start, excessive attempts to restart
the engine may cause damage to the
emission system.
Engine exhaust (carbon monox-
ide) precautions
Carbon monoxide can be present
with other exhaust fumes. If you
smell exhaust fumes of any kind in
your vehicle, drive with all the win-
dows fully open. Have your vehicle
checked and repaired immediately.
Engine exhaust gases contain
carbon monoxide (CO). Though
colorless and odorless, it is
dangerous and could be lethal if
inhaled. Follow the instructions
on this page to avoid CO poi-
soning.
WARNING
Page 569 of 586

8-9
88
Specifications, Consumer information and Reporting safety defects
Recommended SAE viscosity
number Engine oil viscosity (thickness) has
an effect on fuel economy and cold
weather operating (engine start and
engine oil flowability). Lower viscosi-
ty engine oils can provide better fuel
economy and cold weather perform-
ance, however, higher viscosity
engine oils are required for satisfac-
tory lubrication in hot weather.Using oils of any viscosity other than
those recommended could result in
engine damage.
When choosing an oil, consider the
range of temperature your vehicle
will be operated in before the next oil
change. Proceed to select the rec-
ommended oil viscosity from the
chart.
Always be sure to clean the area
around any filler plug, drain
plug, or dipstick before check-
ing or draining any lubricant.
This is especially important in
dusty or sandy areas and when
the vehicle is used on unpaved
roads. Cleaning the plug and
dipstick areas will prevent dirt
and grit from entering the
engine and other mechanisms
that could be damaged.
CAUTION
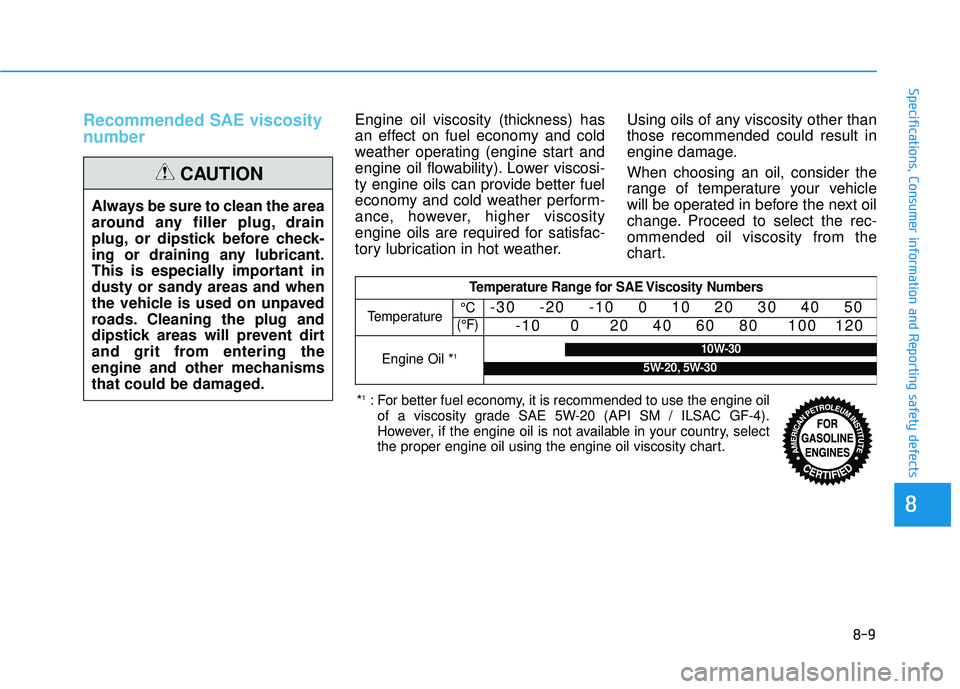
Temperature Range for SAE Viscosity Numbers
Temperature -30 -20 -10 0 10 20 30 40 50
-10 0 20 40 60 80 100 120
Engine Oil *110W-30
5W-20, 5W-30
°C
(°F)
*1: For better fuel economy, it is recommended to use the engine oil of a viscosity grade SAE 5W-20 (API SM / ILSAC GF-4).
However, if the engine oil is not available in your country, select
the proper engine oil using the engine oil viscosity chart.
Page 577 of 586

I-4
Bulb replacementFront parking lamp .....................................................7-73
Front turn signal lamp ................................................7-73
Headlamp....................................................................7-73\
High mounted stop lamp ............................................7-86
Interior light bulb .......................................................7-88
License plate light bulb ..............................................7-87
Rear combination light bulb .......................................7-82
Side marker lamp .......................................................7-73
Side repeater lamp ......................................................7-82
Bulb wattage .....................................................................8-3\
Button start/stop, see engine start/stop button ..................5-9
Capacities (Lubricants) .....................................................3-6
Care Exterior care ...............................................................7-89
Interior care ................................................................7-95
Tire care ......................................................................7-\
44
Cartridge type fuse..........................................................7-65
Center console storage ..................................................3-150
Central door lock switch .................................................3-16
Certification label ...........................................................8-10
Chains Tire chains ..................................................................5-96
Changing a Tire with TPMS ...........................................6-14
Checking tire inflation pressure ......................................7-46 Child restraint system (CRS) ..........................................2-35
Booster seats...............................................................2-38
Children always in the rear ........................................2-35
Forward-facing child restraint system........................2-38
Installing a child restraint system (CRS) ...................2-38
Lower anchors and tether for children (LATCH system) .....................................................2-38
Rearward-facing child restraint system......................2-37
Securing a child restraint seat with "Tether Anchor" system......................................................................2-\
42
Securing a child restraint system with the LATCH anchors system ........................................................2-41
Securing a child restraint with a lap/shoulder belt.....2-43
Selecting a child restraint system (CRS) ...................2-36
Child-protector rear door locks.......................................3-19
Climate control air filter .................................................7-37
Clock ........................................................................\
.....3-156
Clothes hanger ..............................................................3-157
Combined instrument, see instrument cluster ................3-61
Compact spare tire replacement .....................................7-49
Coolant ........................................................................\
....7-30
Cooling fluid, see engine coolant ...................................7-30
Crankcase emission control system ................................7-96
Cruise control system .....................................................5-70
Cup holder.....................................................................3-1\
53
Curtain air bags ...............................................................2-50
Index
C