2017 Hyundai Elantra battery
[x] Cancel search: batteryPage 20 of 571
F20F20
Parking brake .......................................................7-27
Checking the parking brake .........................................7-27
Air cleaner ............................................................7-28
Filter replacement ...........................................................7-28
Climate control air filter .....................................7-30
Filter inspection ...............................................................7-30
Filter replacement ...........................................................7-30
Wiper blades .........................................................7-31
Blade inspection ..............................................................7-31
Blade replacement ..........................................................7-31
Battery...................................................................7-34
For best battery service................................................7-34
Battery capacity label ...................................................7-36
Battery recharging .........................................................7-36
Reset items .......................................................................7-37
Ty r e s a n d w h e e l s . . . . . . . . . . . . . . . . . . . . . . . . . . . . . . . . . . . . . . . . . . . . . . . . . 7 - 3 8
Ty r e c a r e . . . . . . . . . . . . . . . . . . . . . . . . . . . . . . . . . . . . . . . . . . . . . . . . . . . . . . . . . . . . . . . . . . . . . . . . . . . 7 - 3 8
Recommended cold tyre inflation pressures ...........7-38
Checking tyre inflation pressure.................................7-40
Ty r e r o t a t i o n . . . . . . . . . . . . . . . . . . . . . . . . . . . . . . . . . . . . . . . . . . . . . . . . . . . . . . . . . . . . . . . . . . . 7 - 4 1
Wheel alignment and tyre balance .............................7-42
Ty r e r e p l a c e m e n t . . . . . . . . . . . . . . . . . . . . . . . . . . . . . . . . . . . . . . . . . . . . . . . . . . . . . . . . . . . . 7 - 4 2
Wheel replacement ........................................................7-44
Ty r e t r a c t i o n . . . . . . . . . . . . . . . . . . . . . . . . . . . . . . . . . . . . . . . . . . . . . . . . . . . . . . . . . . . . . . . . . . . . . 7 - 4 4
Ty r e m a i n t e n a n c e . . . . . . . . . . . . . . . . . . . . . . . . . . . . . . . . . . . . . . . . . . . . . . . . . . . . . . . . . . 7 - 4 4
Ty r e s i d e w a l l l a b e l l i n g . . . . . . . . . . . . . . . . . . . . . . . . . . . . . . . . . . . . . . . . . . . . . . . . . . . . 7 - 4 4
Low aspect ratio tyre ...................................................7-49
Fuses ......................................................................7-50
Fuse/relay panel description .......................................7-56
Light bulbs.............................................................7-67
Headlamp, position lamp, turn signal lamp and
fog lamp light bulb replacement .................................7-68
Side repeater lamp replacement .................................7-74
Rear combination lamp bulb replacement ................7-75
High mounted stop lamp replacement .......................7-79
Licence plate light bulb replacement ........................7-79
Interior light bulb replacement ....................................7-80
Appearance care ..................................................7-81
Exterior care ....................................................................7-81
Interior care......................................................................7-87
Emission control system .....................................7-88
Crankcase emission control system ...........................7-88
Evaporative emission control system.........................7-89
Exhaust emission control system ...............................7-89
Page 27 of 571
EENNGGIINNEE CCOOMMPPAARRTTMMEENNTT
1-6
Yo u r v e h i c l e a t a g l a n c e
OAD075100R
■■Petrol Engine (Nu 2.0 MPI)
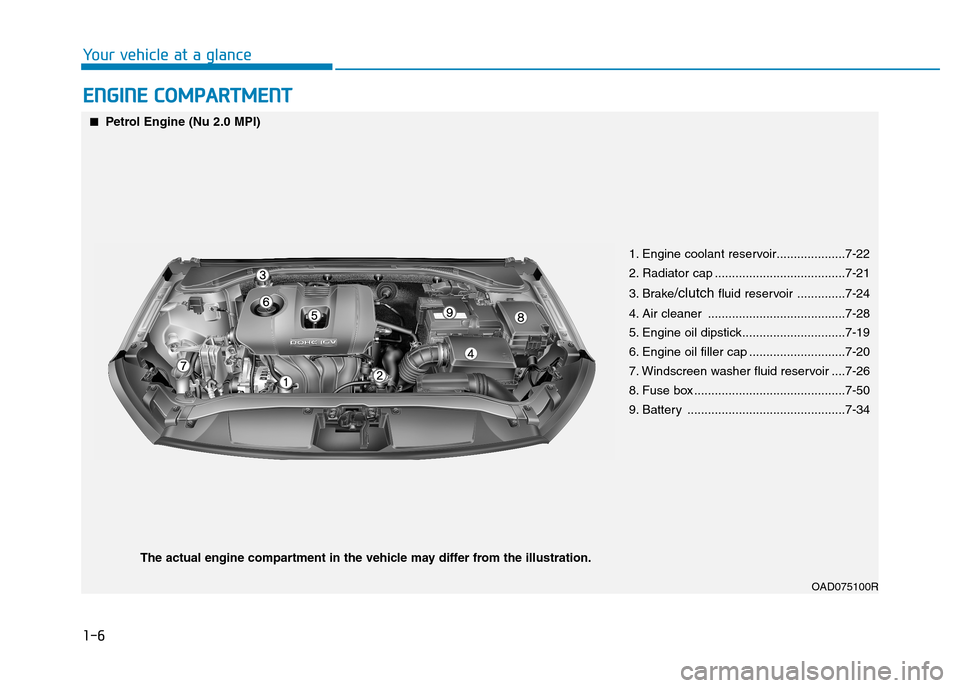
1. Engine coolant reservoir....................7-22
2. Radiator cap ......................................7-21
3. Brake/clutchfluid reservoir ..............7-24
4. Air cleaner ........................................7-28
5. Engine oil dipstick..............................7-19
6. Engine oil filler cap ............................7-20
7. Windscreen washer fluid reservoir ....7-26
8. Fuse box ............................................7-50
9. Battery ..............................................7-34
The actual engine compartment in the vehicle may differ from the illustration.
Page 36 of 571
2-9
Safety system of your vehicle
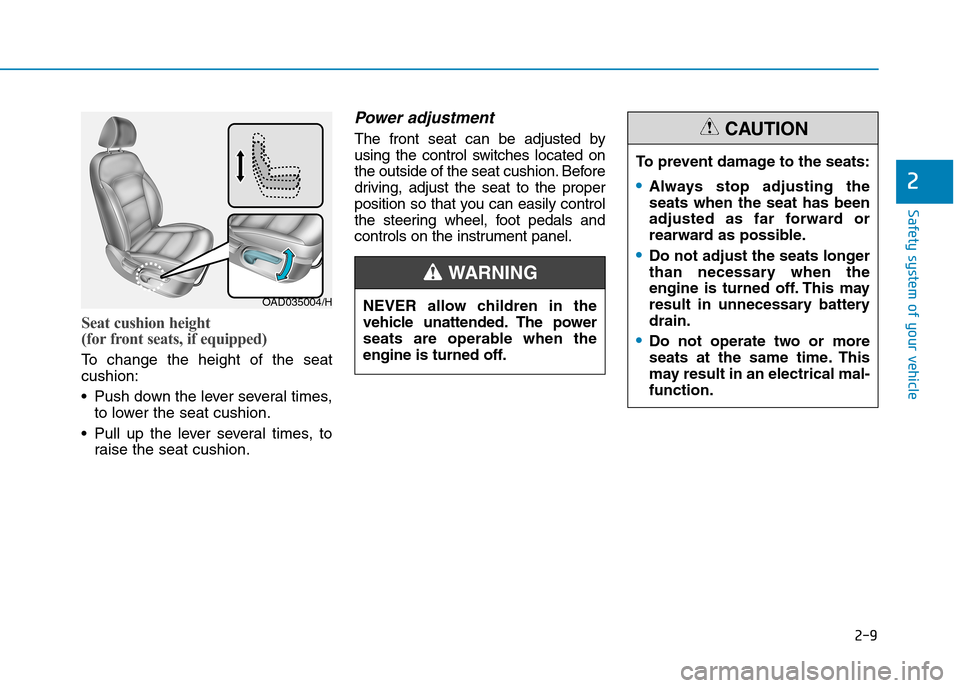
Seat cushion height
(for front seats, if equipped)
To c h a n g e t h e h e i g h t o f t h e s e a t
cushion:
•Push down the lever several times,
to lower the seat cushion.
•Pull up the lever several times, to
raise the seat cushion.
Power adjustment
The front seat can be adjusted by
using the control switches located on
the outside of the seat cushion. Before
driving, adjust the seat to the proper
position so that you can easily control
the steering wheel, foot pedals and
controls on the instrument panel.
2
OAD035004/H
To p r e v e n t d a m a g e t o t h e s e a t s :
•Always stop adjusting the
seats when the seat has been
adjusted as far forward or
rearward as possible.
•Do not adjust the seats longer
than necessary when the
engine is turned off. This may
result in unnecessary battery
drain.
•Do not operate two or more
seats at the same time. This
may result in an electrical mal-
function.
CAUTION
NEVER allow children in the
vehicle unattended. The power
seats are operable when the
engine is turned off.
WA R N I N G
Page 51 of 571
2-24
Safety system of your vehicle
Damaged seat belts and seat
belt assemblies will not operate
properly. Always replace:
•Frayed, contaminated, or dam-
aged webbing.
•Damaged hardware.
•The entire seat belt assembly
after it has been worn in an
accident, even if damage to
webbing or assembly is not
apparent.
WA R N I N G
(Continued)
•No modifications or additions
should be made by the user
which will either prevent the
seat belt adjusting devices
from operating to remove
slack, or prevent the seat belt
assembly from being adjusted
to remove slack.
Seat belts are designed to bear
upon the bony structure of the
body, and should be worn low
across the front of the pelvis or
the pelvis, chest and shoulders,
as applicable; wearing the lap
section of the belt across the
abdominal area must be avoid-
ed.
Seat belts should be adjusted
as firmly as possible, consis-
tent with comfort, to provide the
protection for which they have
been designed.
A slack belt will greatly reduce
the protection afforded to the
wearer.
(Continued)
WA R N I N G (Continued)
Care should be taken to avoid
contamination of the webbing
with polishes, oils and chemi-
cals, and particularly battery
acid. Cleaning may safely be
carried out using mild soap and
water.
The belt should be replaced if
webbing becomes frayed, con-
taminated or damaged. It is
essential to replace the entire
assembly after it has been worn
in a severe impact even if dam-
age to the assembly is not obvi-
ous. Belts should not be worn
with straps twisted. Each seat
belt assembly must only be
used by one occupant; it is dan-
gerous to put a belt around a
child being carried on the occu-
pant's lap.
Page 98 of 571
![Hyundai Elantra 2017 Owners Manual - RHD (UK. Australia) 3-6
Remote key precautions
The remote key will not work if any of
the following occur:
•The key is in the ignition switch.
•You exceed the operating distance
limit (about 30 m [90 feet]).
•The r Hyundai Elantra 2017 Owners Manual - RHD (UK. Australia) 3-6
Remote key precautions
The remote key will not work if any of
the following occur:
•The key is in the ignition switch.
•You exceed the operating distance
limit (about 30 m [90 feet]).
•The r](/manual-img/35/14544/w960_14544-97.png)
3-6
Remote key precautions
The remote key will not work if any of
the following occur:
•The key is in the ignition switch.
•You exceed the operating distance
limit (about 30 m [90 feet]).
•The remote key battery is weak.
•Other vehicles or objects may be
blocking the signal.
•The weather is extremely cold.
•The remote key is close to a radio
transmitter such as a radio station
or an airport which can interfere
with normal operation of the
remote key.
When the remote key does not work
correctly, open and close the door
with the mechanical key. If you have
a problem with the remote key, it is
recommended that you contact an
authorised HYUNDAI dealer.
(Continued)
(Continued)
If the remote key is in close proximi-
ty to your mobile phone, the signal
could be blocked by your mobile
phone’s normal operational signals.
This is especially important when the
phone is active such as making and
receiving calls, text messaging,
and/or sending/receiving emails.
Avoid placing the remote key and
your mobile phone in the same loca-
tion and always try to maintain an
adequate distance between the two
devices.
Information
Changes or modifications not express-
ly approved by the party responsible
for compliance could void the user’s
authority to operate the equipment. If
the keyless entry system is inoperative
due to changes or modifications not
expressly approved by the party
responsible for compliance, it will not
be covered by your manufacturer’s
vehicle warranty.
Keep the remote key away from
electromagnetic materials that
block electromagnetic waves to
the key surface.
NOTICE
i
Convenient features of your vehicle
Page 99 of 571
3-7
Convenient features of your vehicle
Battery replacement
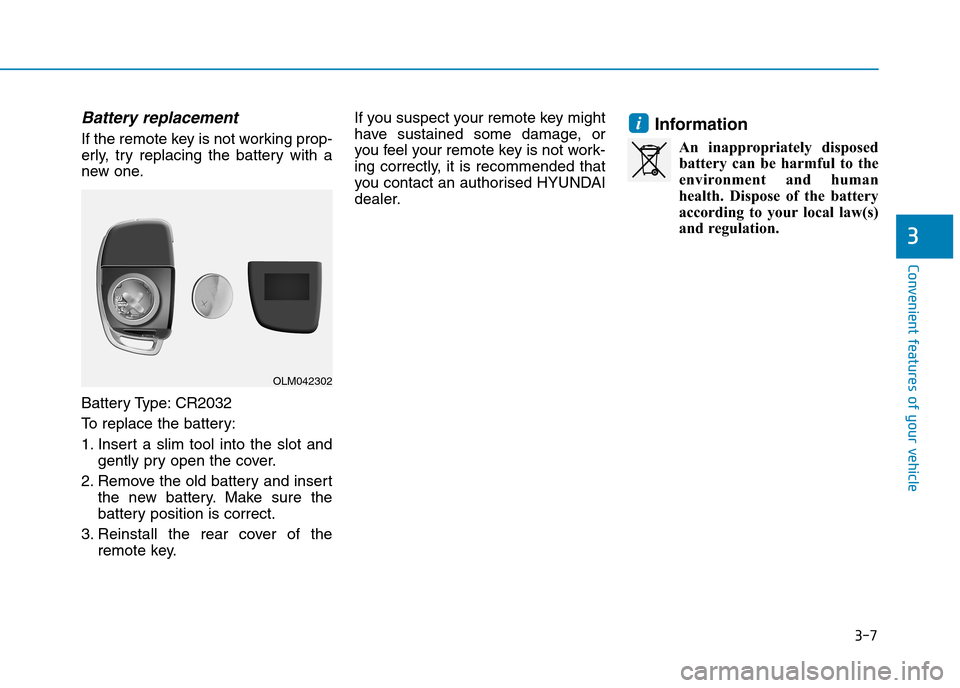
If the remote key is not working prop-
erly, try replacing the battery with a
new one.
Battery Type: CR2032
To r e p l a c e t h e b a t t e r y :
1. Insert a slim tool into the slot and
gently pry open the cover.
2. Remove the old battery and insert
the new battery. Make sure the
battery position is correct.
3. Reinstall the rear cover of the
remote key.
If you suspect your remote key might
have sustained some damage, or
you feel your remote key is not work-
ing correctly, it is recommended that
you contact an authorised HYUNDAI
dealer.
Information
An inappropriately disposed
battery can be harmful to the
environment and human
health. Dispose of the battery
according to your local law(s)
and regulation.
i
3
OLM042302
Page 104 of 571
3-12
Convenient features of your vehicle
Information
Changes or modifications not express-
ly approved by the party responsible
for compliance could void the user’s
authority to operate the equipment. If
the keyless entry system is inoperative
due to changes or modifications not
expressly approved by the party
responsible for compliance, it will not
be covered by your manufacturer’s
vehicle warranty.
Keep the smart key away from
electromagnetic materials that
blocks electromagnetic waves to
the key surface.
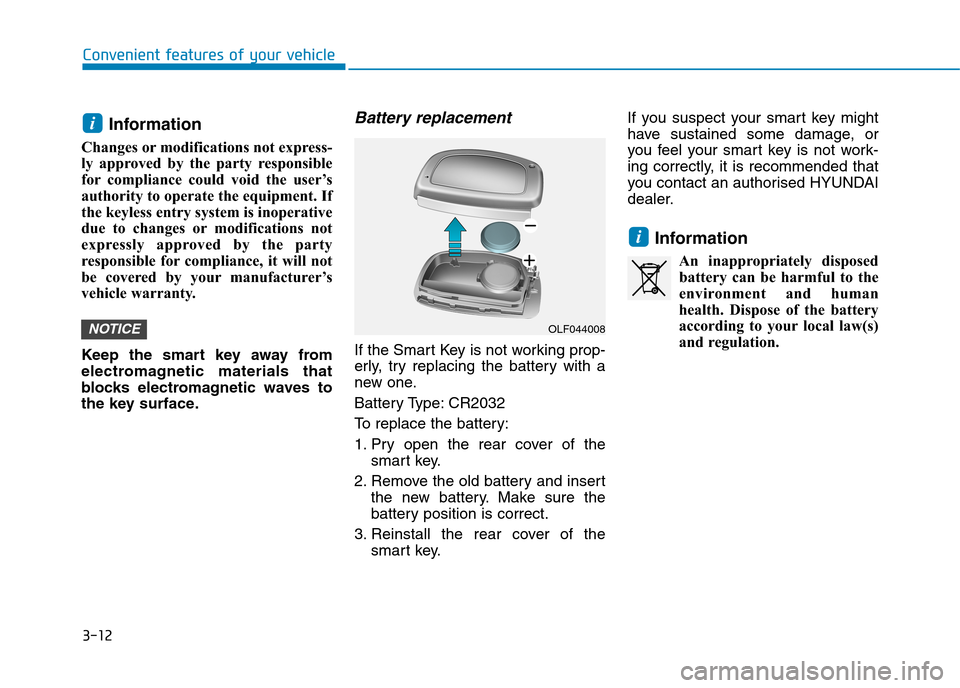
Battery replacement
If the Smart Key is not working prop-
erly, try replacing the battery with a
new one.
Battery Type: CR2032
To r e p l a c e t h e b a t t e r y :
1. Pry open the rear cover of the
smart key.
2. Remove the old battery and insert
the new battery. Make sure the
battery position is correct.
3. Reinstall the rear cover of the
smart key.
If you suspect your smart key might
have sustained some damage, or
you feel your smart key is not work-
ing correctly, it is recommended that
you contact an authorised HYUNDAI
dealer.
Information
An inappropriately disposed
battery can be harmful to the
environment and human
health. Dispose of the battery
according to your local law(s)
and regulation.
i
NOTICE
i
OLF044008
Page 113 of 571
3-21
Convenient features of your vehicle
3
The Driver Position Memory System
is provided to store and recall the fol-
lowing memory settings with a sim-
ple button operation.
- Driver's seat position
- Outside rearview mirror position
- Instrument panel illumination intensity
Information
• If the battery is disconnected, the
memory settings will be erased.
•If the Driver Position Memory
System does not operate normally,
we recommend that you have the
system checked by an authorised
HYUNDAI dealer.
Storing memory positions
1. Move the shift lever into P (for
Automatic transmission) or Neutral
(for manual transmission) whilst the
ignition switch or the Engine
Start/Stop button is in the ON posi-
tion.
2. Adjust the driver's seat position,
outside rearview mirror position
and instrument panel illumination
intensity to the desired position.
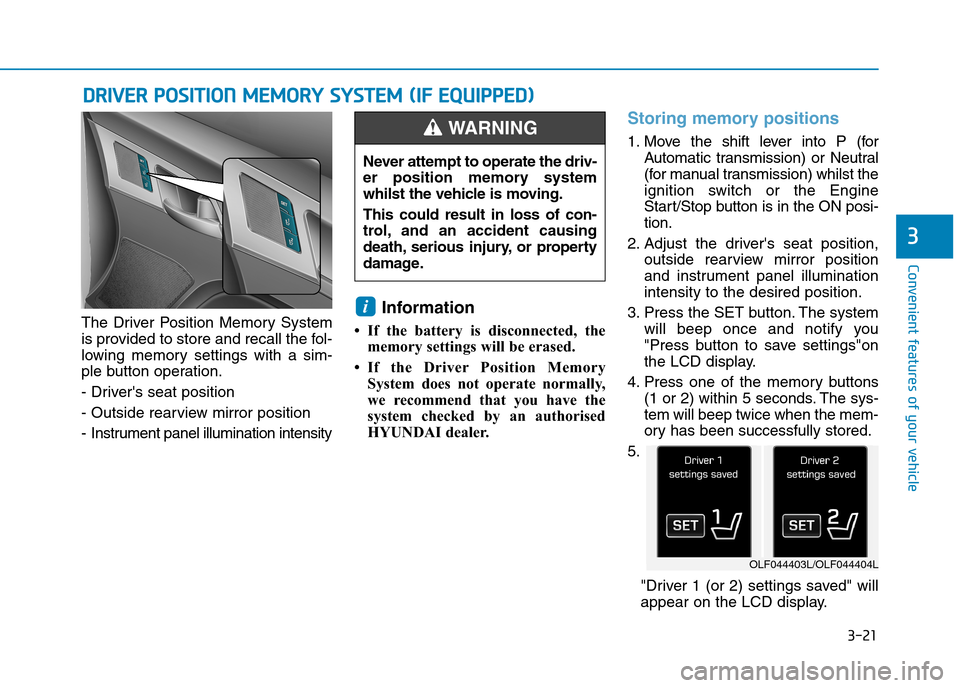
3. Press the SET button. The system
will beep once and notify you
"Press button to save settings"on
the LCD display.
4. Press one of the memory buttons
(1 or 2) within 5 seconds. The sys-
tem will beep twice when the mem-
ory has been successfully stored.
5.
"Driver 1 (or 2) settings saved" will
appear on the LCD display.
i
DDRRIIVVEERR PPOOSSIITTIIOONN MMEEMMOORRYY SSYYSSTTEEMM ((IIFF EEQQUUIIPPPPEEDD))
Never attempt to operate the driv-
er position memory system
whilst the vehicle is moving.
This could result in loss of con-
trol, and an accident causing
death, serious injury, or property
damage.
WA R N I N G
OLF044403L/OLF044404L