Page 188 of 571

3-96
Convenient features of your vehicle
Average Vehicle Speed (2)
•The average vehicle speed is cal-
culated by the total driving dis-
tance and driving time since the
last average vehicle speed reset.
- Speed range: 0~240 km/h
•To reset the average vehicle speed,
press the [OK] button on the steer-
ing wheel for more than 1 second
when the average vehicle speed is
displayed.
Information
•The average vehicle speed is not dis-
played if the driving distance is less
than 300 metres or the driving time is
less than 10 seconds since the ignition
switch or the Engine Start/Stop but-
ton is turned to ON.
• The average vehicle speed will con-
tinue to be calculated and will start
to decrease if the vehicle is stopped
whilst the engine is still running (for
example, when the vehicle is in traf-
fic or stopped at a stop light.)
Elapsed Time (3)
•The elapsed time is the total driv-
ing time since the last elapsed time
reset.
- Time range (hh:mm):
00:00 ~ 99:59
•To reset the elapsed time, press the
[OK] button on the steering wheel
for more than 1 second when the
elapsed time is displayed.
Information
The elapsed time will continue to be
counted whilst the engine is still run-
ning (for example, when the vehicle is
in traffic or stopped at a stop light.)
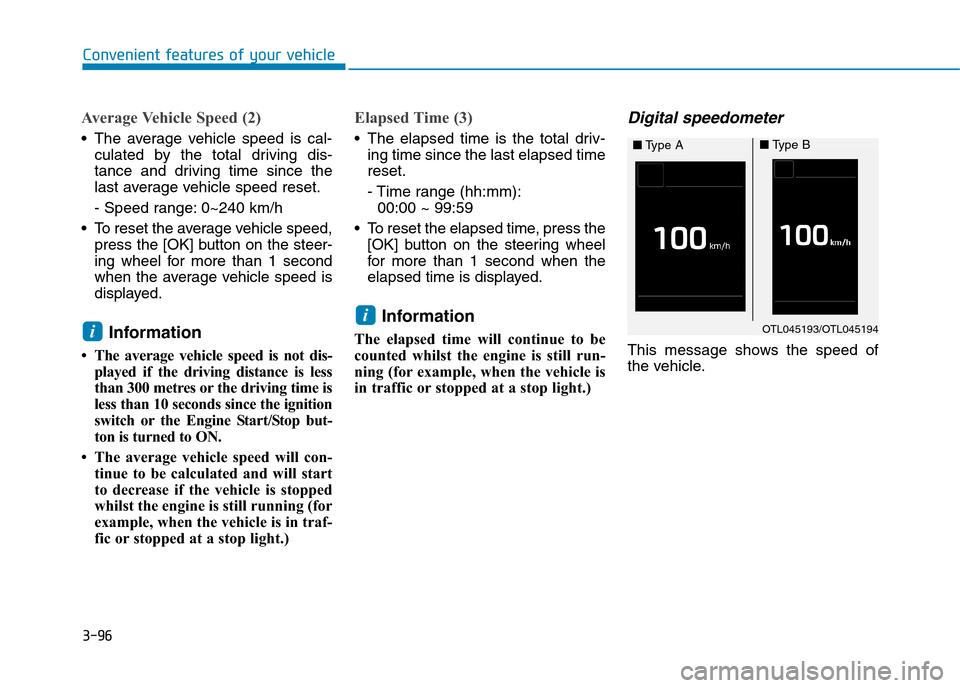
Digital speedometer
This message shows the speed of
the vehicle.
i
iOTL045193/OTL045194
■Ty p e A■Ty p e B
Page 215 of 571
3-123
Convenient features of your vehicle
3
MAX A/C-Level (B, D, F)
To o p e r a t e t h e M A X A / C , t u r n t h e
temperature selection knob to the
extreme left. Air flow is directed
toward the upper body and face.
In this mode, the air conditioning and
the recirculated air position will be
selected automatically.
Instrument panel vents
The outlet vents can be opened or
closed separately using the thumb-
wheel.
Also, you can adjust the direction of
air delivery from these vents using
the vent control lever as shown.
Te m p e r a t u r e c o n t ro l
The temperature control knob allows
you to control the temperature of the
air flowing from the ventilation sys-
tem. To change the air temperature in
the passenger compartment, turn
the knob to the right position for
warm and hot air or left position for
cooler air.
OAD045303
OAD045304R
OAD045332
■Front
■Rear
OAD045305
Page 227 of 571
3-135
Convenient features of your vehicle
3
Instrument panel vents
The outlet vents can be opened or
closed separately using the thumb-
wheel.
Also, you can adjust the direction of
air delivery from these vents using
the vent control lever as shown.
Te m p e r a t u r e c o n t ro l
Tu r n t h e t e m p e r a t u r e c o n t r o l k n o b t o
set the desired temperature.
Adjusting the driver and passenger
side temperature equally
•Press the “SYNC”button to adjust
the driver and passenger side tem-
perature equally.
The passenger side temperature
will be set to the same temperature
as the driver side temperature.
•Turn the driver side temperature
control knob. The driver and pas-
senger side temperature will be
adjusted equally.
OAD045304R
OAD045332
■Front
■Rear
OAD045317
OAD045318R
Page 250 of 571

Multimedia System
Multimedia system .................................................4-2
Aux, USB and iPod®port ................................................4-2
Antenna ...............................................................................4-3
Steering wheel audio controls .......................................4-4
Audio / Video / Navigation system (AVN) ..................4-5
Bluetooth®Wireless Technology hands-free ............4-5
How vehicle audio works ................................................4-6
AUDIO (Without Touch Screen) ...........................4-9
Features of Your Audio .................................................4-10
Radio Mode
(Type A-1, Type A-2, Type A-3, Type A-4
with RDS)...........................................................................4-30
Radio Mode (Type A-5, Type A-6) .............................4-32
Media Mode......................................................................4-33
Phone Mode .....................................................................4-40
Setup Mode
(Type A-1, Type A-2, Type A-3, Type A-4).............4-42
Setup Mode (Type A-5, Type A-6).............................4-50
AUDIO (With Touch Screen) ...............................4-58
Features of Your Audio .................................................4-59
Radio Mode
(Type B-1, Type B-2, Type B-3, Type B-4) .............4-77
Radio Mode (Type B-5, Type B-6) .............................4-80
Media Mode......................................................................4-82
Phone Mode .....................................................................4-97
Bluetooth®Wireless Technology
(Type B-1, Type B-2, Type B-3, Type B-4) .............4-98
Bluetooth®Wireless Technology
(Type B-5, Type B-6)...................................................4-105
Setup Mode
(Type B-1, Type B-2, Type B-3, Type B-4)...........4-112
Setup Mode (Type B-5, Type B-6)) .........................4-120
4
Page 253 of 571

Steering wheel audio control
(if equipped)
The steering wheel audio control but-
ton is installed for your convenience.
Do not operate audio remote con-
trol buttons simultaneously.
VOLUME (VOL + / - ) (1)
•Move the VOLUME lever up to
increase volume.
•Move the VOLUME lever down to
decrease volume.
SEEK/PRESET ( / ) (2)
If the SEEK/PRESET lever is moved
up or down and held for 0.8 seconds
or more, it will function in the follow-
ing modes.
RADIO mode
It will function as the AUTO SEEK
select button. It will SEEK until you
release the button.
MEDIA mode
It will function as the FF/REW button.
If the SEEK/PRESET lever is moved
up or down, it will function in the fol-
lowing modes.
RADIO mode
It will function as the PRESET STA-
TION UP/DOWN button.
MEDIA mode
It will function as the TRACK UP/
DOWN button.
MODE ( ) (3)
Press the MODE button to select
Radio, Disc, or AUX.
MUTE ( ) (4)
•Press the button to mute the
sound.
•Press the button again to activate
the sound.
Information
Detailed information for audio control
buttons are described in the following
pages in this chapter.
i
NOTICE
OAD045425
OAD045444L
4-4
Multimedia System
■Ty p e A
■Ty p e B
Page 289 of 571

4-40
Multimedia System
Phone Mode (if equipped)
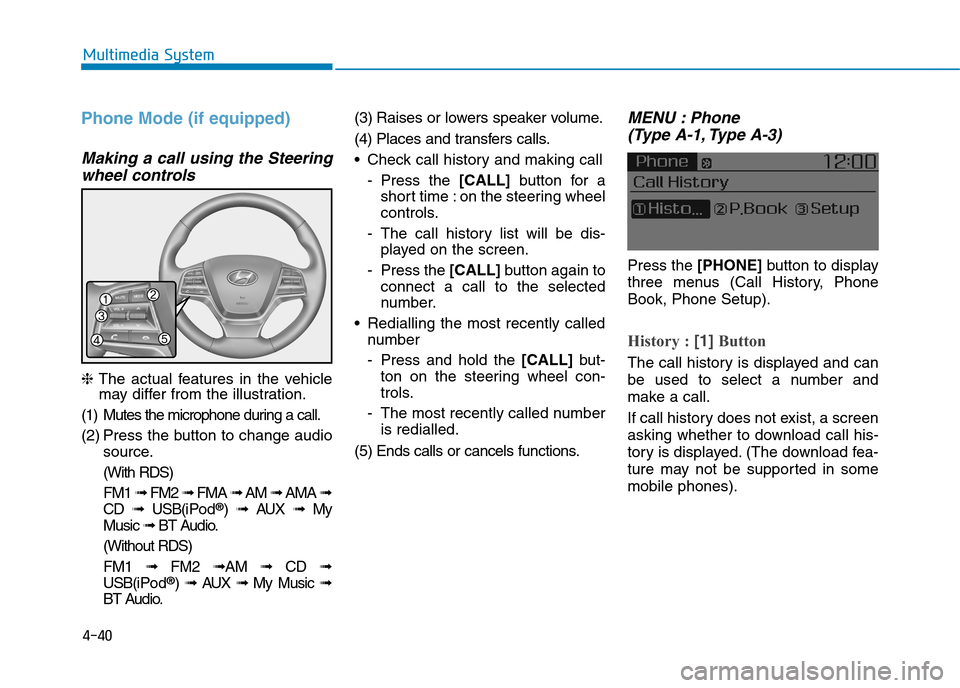
Making a call using the Steering
wheel controls
❈The actual features in the vehiclemay differ from the illustration.
(1) Mutes the microphone during a call.
(2) Press the button to change audio
source.
(With RDS)
FM1 ➟FM2 ➟FMA ➟AM ➟AMA ➟
CD ➟USB(i Po d®) ➟AUX ➟My
Music ➟BT Audio.
(Without RDS)
FM1 ➟FM2➟AM ➟CD ➟
USB(i Po d®) ➟AUX ➟My Music ➟
BT Audio.
(3) Raises or lowers speaker volume.
(4) Places and transfers calls.
•Check call history and making call
-Press the [CALL]button for a
short time : on the steering wheel
controls.
-The call history list will be dis-
played on the screen.
-Press the [CALL] button again to
connect a call to the selected
number.
•Redialling the most recently called
number
-Press and hold the [CALL] but-
ton on the steering wheel con-
trols.
-The most recently called number
is redialled.
(5) Ends calls or cancels functions.
MENU : Phone
(Type A-1, Type A-3)
Press the [PHONE]button to display
three menus (Call History, Phone
Book, Phone Setup).
History : [1]Button
The call history is displayed and can
be used to select a number and
make a call.
If call history does not exist, a screen
asking whether to download call his-
tory is displayed. (The download fea-
ture may not be supported in some
mobile phones).
Page 346 of 571

4-97
Multimedia System
4
Phone Mode
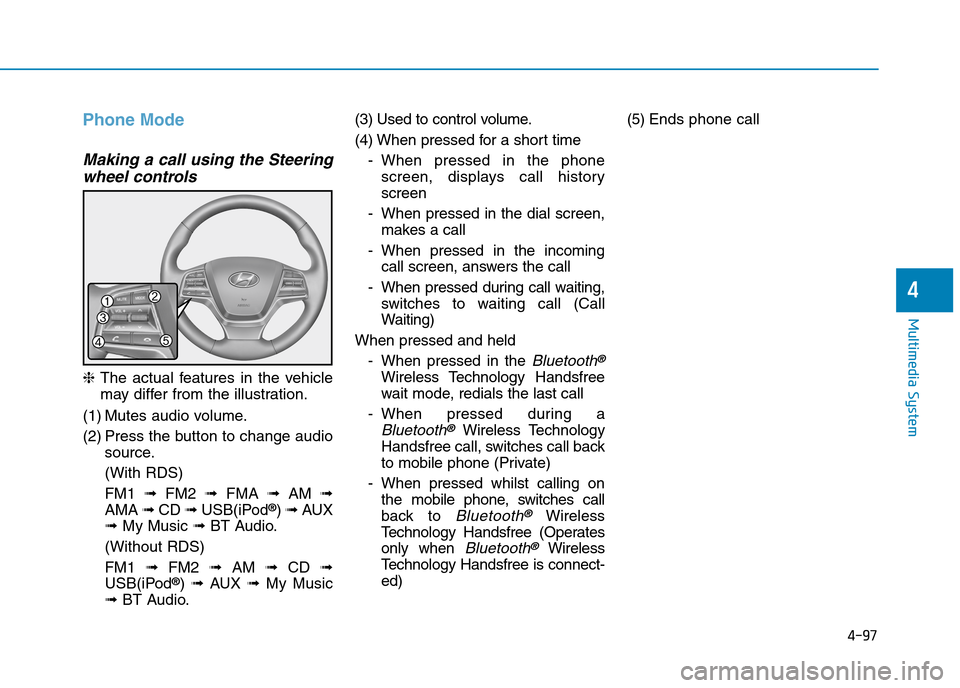
Making a call using the Steering
wheel controls
❈The actual features in the vehicle
may differ from the illustration.
(1) Mutes audio volume.
(2) Press the button to change audio
source.
(With RDS)
FM1 ➟FM2 ➟FMA ➟AM ➟
AMA ➟CD ➟USB(iPod®) ➟AUX
➟My Music ➟BT Audio.
(Without RDS)
FM1 ➟FM2➟AM ➟CD ➟
USB(iPod®) ➟AUX ➟My Music
➟BT Audio.
(3) Used to control volume.
(4) When pressed for a shor t time
-When pressed in the phone
screen, displays call history
screen
-When pressed in the dial screen,
makes a call
-When pressed in the incoming
call screen, answers the call
-When pressed during call waiting,
switches to waiting call (Call
Waiting)
When pressed and held
-When pressed in the Bluetooth®
Wireless Technology Handsfree
wait mode, redials the last call
-When pressed during a
Bluetooth®Wireless Technology
Handsfree call, switches call back
to mobile phone (Private)
-When pressed whilst calling on
the mobile phone, switches call
back to Bluetooth®Wireless
Te c h n o l o g y H a n d s f r e e ( O p e r a t e s
only when Bluetooth®Wireless
Te c h n o l o g y H a n d s f r e e i s c o n n e c t -
ed)
(5) Ends phone call
Page 347 of 571
![Hyundai Elantra 2017 Owners Manual - RHD (UK. Australia) 4-98
Multimedia System
Bluetooth®Wireless Technology
(Type B-1, Type B-2,Type B-3,
Ty p e B - 4 )
When No Devices have been
Paired
➀Press the [PHONE]button or the
[CALL]button on the steerin Hyundai Elantra 2017 Owners Manual - RHD (UK. Australia) 4-98
Multimedia System
Bluetooth®Wireless Technology
(Type B-1, Type B-2,Type B-3,
Ty p e B - 4 )
When No Devices have been
Paired
➀Press the [PHONE]button or the
[CALL]button on the steerin](/manual-img/35/14544/w960_14544-346.png)
4-98
Multimedia System
Bluetooth®Wireless Technology
(Type B-1, Type B-2,Type B-3,
Ty p e B - 4 )
When No Devices have been
Paired
➀Press the [PHONE]button or the
[CALL]button on the steering
wheel controls. The following
screen is displayed.
➁Press the [OK]button to enter the
Pair Phone screen.
•Device :Name of device as shown
when searching from your
Bluetooth®Wireless Technology
device
•Passkey :Passkey used to pair the
device
➂From your Bluetooth®Wireless
Te c h n o l o g y d e v i c e ( i . e . M o b i l e
Phone), search and select your
audio system.
❈SSP : Secure Simple Pairing
Non SSP supported device :
➃After a few moments, a screen is
displayed where the passkey is
entered.
Enter the passkey “0000” to pair
your Bluetooth®Wireless Technology
device with the audio system.
SSP supported device :
➃After a few moments, a screen
displays a 6 digit passkey.
Check the passkey on your
Bluetooth®Wireless Technology
device and confirm.
➄Once pairing is complete, the fol-
lowing screen is displayed.
Some phones (i.e., iPhone®, Android
and Blackberry phones) may offer an
option to allow acceptance of all
future Bluetooth®connection requests
by default. Visit http://www.
Hyundai.com/#/bluetooth for addition-
al information on pairing your
Bluetooth®-enabled mobile phone,
and to view a phone compatibility list.