Page 54 of 571

2-27
Safety system of your vehicle
2
Seat belt restraint system
Lap/shoulder belt
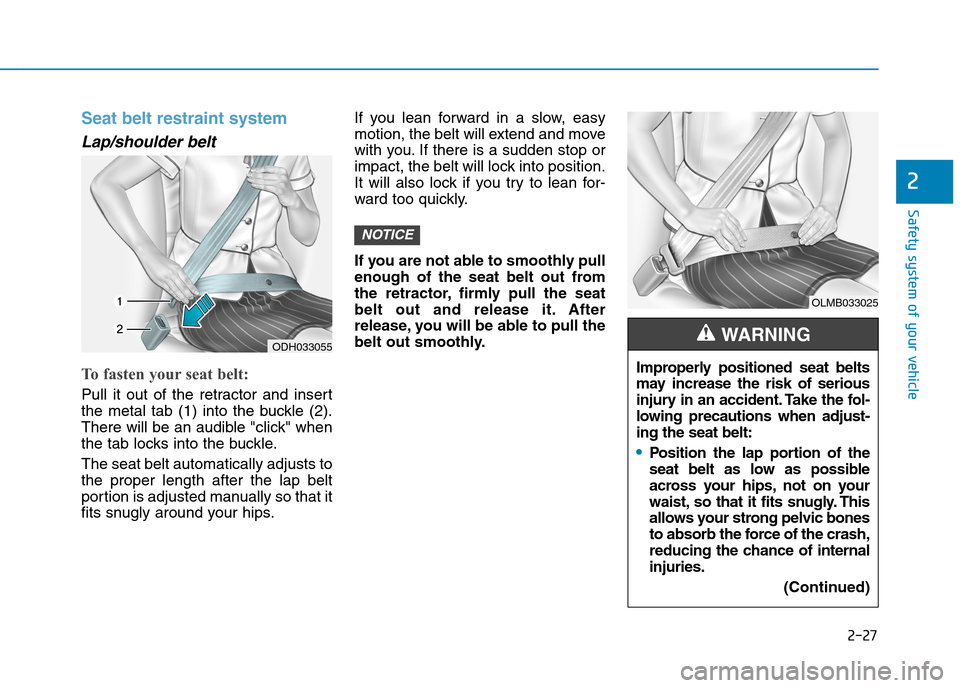
To fasten your seat belt:
Pull it out of the retractor and insert
the metal tab (1) into the buckle (2).
There will be an audible "click" when
the tab locks into the buckle.
The seat belt automatically adjusts to
the proper length after the lap belt
portion is adjusted manually so that it
fits snugly around your hips.
If you lean forward in a slow, easy
motion, the belt will extend and move
with you. If there is a sudden stop or
impact, the belt will lock into position.
It will also lock if you try to lean for-
ward too quickly.
If you are not able to smoothly pull
enough of the seat belt out from
the retractor, firmly pull the seat
belt out and release it. After
release, you will be able to pull the
belt out smoothly.
NOTICE
ODH033055
OLMB033025
Improperly positioned seat belts
may increase the risk of serious
injury in an accident. Take the fol-
lowing precautions when adjust-
ing the seat belt:
•Position the lap por tion of the
seat belt as low as possible
across your hips, not on your
waist, so that it fits snugly. This
allows your strong pelvic bones
to absorb the force of the crash,
reducing the chance of internal
injuries.
(Continued)
WA R N I N G
Page 71 of 571

2-44
Safety system of your vehicle
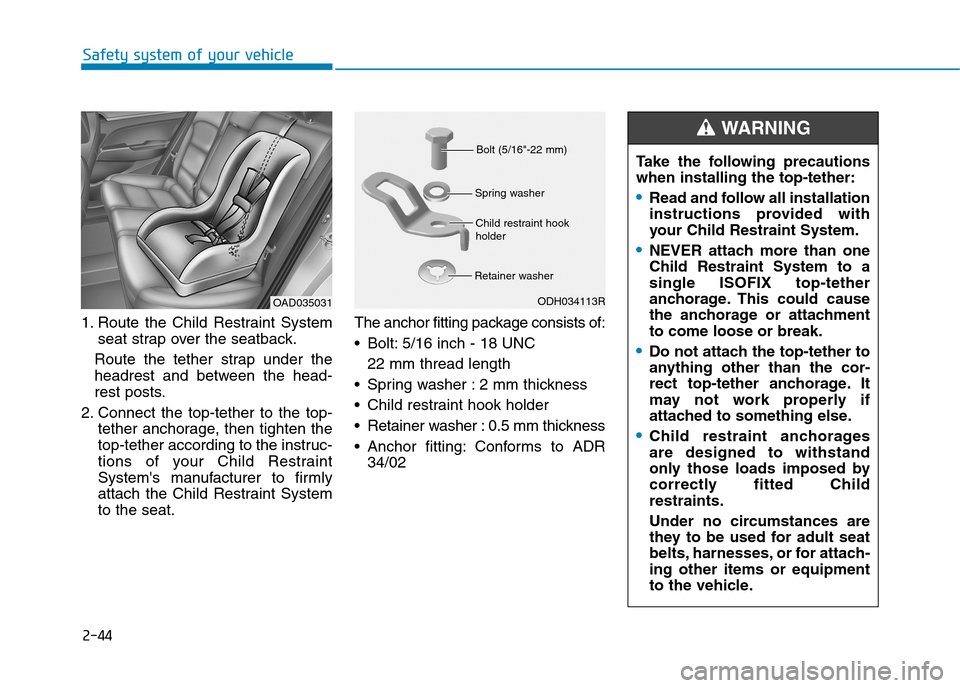
1. Route the Child Restraint System
seat strap over the seatback.
Route the tether strap under the
headrest and between the head-
rest posts.
2. Connect the top-tether to the top-
tether anchorage, then tighten the
top-tether according to the instruc-
tions of your Child Restraint
System's manufacturer to firmly
attach the Child Restraint System
to the seat.
The anchor fitting package consists of:
•Bolt:5/16 inch - 18 UNC
22 mm thread length
•Spring washer :2 mm thickness
•Child restraint hook holder
•Retainer washer :0.5 mm thickness
•Anchor fitting:Conforms to ADR
34/02
OAD035031
Ta k e t h e f o l l o w i n g p r e c a u t i o n s
when installing the top-tether:
•Read and follow all installation
instructions provided with
your Child Restraint System.
•NEVER attach more than one
Child Restraint System to a
single ISOFIX top-tether
anchorage. This could cause
the anchorage or attachment
to come loose or break.
•Do not attach the top-tether to
anything other than the cor-
rect top-tether anchorage. It
may not work properly if
attached to something else.
•Child restraint anchorages
are designed to withstand
only those loads imposed by
correctly fitted Child
restraints.
Under no circumstances are
they to be used for adult seat
belts, harnesses, or for attach-
ing other items or equipment
to the vehicle.
WA R N I N G
Bolt (5/16"-22 mm)
Spring washer
Child restraint hookholder
Retainer washer
ODH034113R
Page 73 of 571

2-46
Safety system of your vehicle
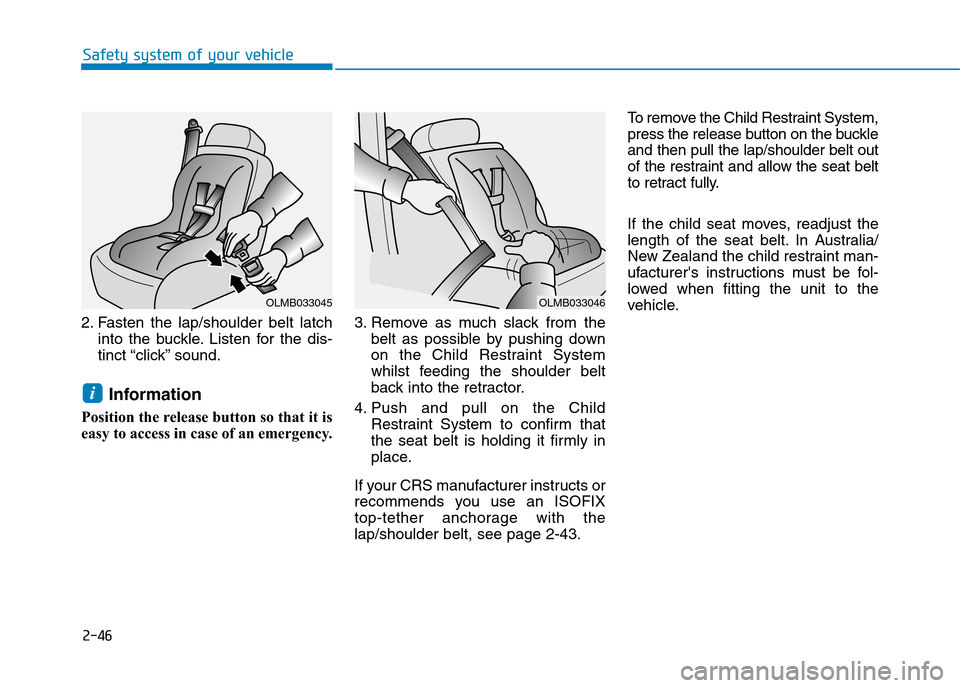
2. Fasten the lap/shoulder belt latch
into the buckle. Listen for the dis-
tinct “click” sound.
Information
Position the release button so that it is
easy to access in case of an emergency.
3. Remove as much slack from the
belt as possible by pushing down
on the Child Restraint System
whilst feeding the shoulder belt
back into the retractor.
4. Push and pull on the Child
Restraint System to confirm that
the seat belt is holding it firmly in
place.
If your CRS manufacturer instructs or
recommends you use an ISOFIX
top-tether anchorage with the
lap/shoulder belt, see page 2-43.
To r e m o v e t h e C h i l d R e s t r a i n t S y s t e m ,
press the release button on the buckle
and then pull the lap/shoulder belt out
of the restraint and allow the seat belt
to retract fully.
If the child seat moves, readjust the
length of the seat belt. In Australia/
New Zealand the child restraint man-
ufacturer's instructions must be fol-
lowed when fitting the unit to the
vehicle.
i
OLMB033045OLMB033046
Page 419 of 571

5-43
Driving your vehicle
5
When the ECO mode is activated:
•The acceleration response may be
slightly reduced as the accelerator
pedal is depressed moderately.
•The air conditioner performance
may be limited.
•The shift pattern of the automatic
transmission may change.
•The engine noise may get louder.
The above situations are normal
conditions when the ECO mode is
activated, to improve fuel efficiency.
Limitation of the ECO mode oper-
ation:
If the following conditions occur
whilst the ECO mode is operating,
the system operation is limited even
though there is no change in the
ECO indicator.
•When the coolant temperature is
low:
The system will be limited until
engine performance becomes nor-
mal.
•When driving up a hill:
The system will be limited in gain-
ing power when driving uphill
because engine torque is restrict-
ed.
•When driving the vehicle with the
automatic transmission gear shift
lever in manual shift mode:
The system will be limited due to
the shift location.
•When the accelerator pedal is fully
depressed for a few seconds:
The system will be limited, judging
that the driver wants to speed up.
SPORT mode
SPORT mode manages
the driving dynamics by
automatically adjusting the
steering effort, and the
engine and transmission control
logic for enhanced driver perform-
ance.
•When SPORT mode is selected by
pressing the DRIVE MODE button,
the SPORT indicator (orange
colour) will illuminate.
•Whenever the engine is restarted,
the Drive Mode will revert back to
NORMAL mode. If SPORT mode is
desired, re-select SPORT mode
from the DRIVE MODE button.
•When SPORT mode is activated:
- The engine r pm will tend to
remain raised over a certain
length of time even after releas-
ing the accelerator
- Upshifts are delayed when accel-
erating
Information
In SPORT mode, the fuel efficiency
may decrease.
i
Page 563 of 571
8-2
Specifications & Consumer information
DDIIMMEENNSSIIOONNSS
EENNGGIINNEE
ItemNu 2.0 MPI
Displacementcc (cu. in) 1,999 (121.98)
Bore x Stroke mm (in.)81x97 (3.18x3.82)
Firing order1-3-4-2
No. of cylinders4, in-line
Itemsmm (in)
Overall length4,570 (179.9)
Overall width1,800 (70.9)
Overall height1,440 (56.7)
Front tread
195/65 R151,563 (61.5)
205/55 R161,555 (61.2)
225/45 R171,549 (61.0)
Rear tread
195/65 R151,572 (61.9)
205/55 R161,564 (61.6)
225/45 R171,558 (61.3)
Wheelbase2,700 (106.3)