Page 275 of 571

4-26
Multimedia System
Information
-Using the iPod®Device
• Some iPod®models may not sup-
port communication protocol and
files may not properly play.
Supported iPod®models :
- iPhone®3GS/4
- iPod®touch 1st~4th generation
- iPod®nano 1st~6th generation
- iPod®classic
• The order of search or playback of
songs in the iPod®can be different
from the order searched in the audio
system.
• If the iPod®is disabled due to its
own malfunction, reset the iPod®
(Reset: Refer to iPod®manual).
• An iPod®may not operate normally
on low battery.
(Continued)
(Continued)
• Some iPod®devices, such as the
iPhone®, can be connected through
the Bluetooth®Wireless Technology
interface. The device must have audio
Bluetooth®Wireless Technology capa-
bility (such as for stereo headphone
Bluetooth®Wireless Technology ). The
device can play, but it will not be con-
trolled by the audio system.
• To use iPod®features within the
audio, use the cable provided upon
purchasing an iPod®device.
•Skipping or improper operation
may occur depending on the charac-
teristics of your iPod®/iPhone®
device.
• If your iPhone®is connected to both
the Bluetooth®Wireless Technology
and USB, the sound may not be
properly played. In your iPhone®,
select the Dock connector or
Bluetooth®Wireless Technology to
change the sound output (source).
(Continued)
(Continued)
• When connecting an iPod®with the
iPod®Power Cable, insert the con-
nector to the multimedia socket
completely. If not inserted complete-
ly, communications between iPod®
and audio may be interrupted.
• When adjusting the sound effects of
the iPod®and the audio system, the
sound effects of both devices will
overlap and might reduce or distort
the quality of the sound.
• Deactivate (turn off) the equaliser
function of an iPod®when adjusting
the audio system’s volume, and turn
off the equaliser of the audio system
when using the equaliser of an
iPod®.
• When not using an iPod®with the
audio system, detach the iPod®cable
from the iPod®, otherwise the iPod®
may remain in accessory mode, and
may not work properly.
• Use only the original iPod®cable.
Other cables may not be recognised.
i
Page 279 of 571
![Hyundai Elantra 2017 Owners Manual - RHD (UK. Australia) 4-30
Multimedia System
Radio Mode
(Type A-1, Type A-2, Type A-3,
Ty p e A - 4 w i t h R D S )
With the Radio Mode Button
SEEK
Press the [SEEK TRACK]button.
•Press the button for a short time : Hyundai Elantra 2017 Owners Manual - RHD (UK. Australia) 4-30
Multimedia System
Radio Mode
(Type A-1, Type A-2, Type A-3,
Ty p e A - 4 w i t h R D S )
With the Radio Mode Button
SEEK
Press the [SEEK TRACK]button.
•Press the button for a short time :](/manual-img/35/14544/w960_14544-278.png)
4-30
Multimedia System
Radio Mode
(Type A-1, Type A-2, Type A-3,
Ty p e A - 4 w i t h R D S )
With the Radio Mode Button
SEEK
Press the [SEEK TRACK]button.
•Press the button for a short time :
Changes the frequency.
•Press the button for a short time :
Automatically searches for the next
frequency.
Preset SEEK
Press the [1]~ [6]button.
•Press the button for a short time :
Plays the frequency saved in the
corresponding button.
•Pressing and holding the button:
Pressing and holding the desired
button from [1]~ [6]will save the
currently playing broadcast to the
selected button and sound a BEEP.
SCAN
Press the [TA/SCAN]button.
•Pressing and holding the button:
The broadcast frequency increas-
es and previews each broadcast
for 5 seconds each. After scanning
all frequencies, returns and plays
the current broadcast frequency.
Selecting through manual search
Tu r n t h e TUNE knob left/right to
adjust the frequency.
Traffic Announcement (TA)
Press the [TA/SCAN]button for a shor t
time : Set [On/Off] TA (Traffic
Announcement) mode.
Page 281 of 571
![Hyundai Elantra 2017 Owners Manual - RHD (UK. Australia) 4-32
Multimedia System
Radio Mode
(Type A-5, Type A-6)
With the Radio Mode Button
SEEK
Press the [SEEK TRACK]button
•Press the button for a short time :
Changes the frequency.
•Pressing and holdin Hyundai Elantra 2017 Owners Manual - RHD (UK. Australia) 4-32
Multimedia System
Radio Mode
(Type A-5, Type A-6)
With the Radio Mode Button
SEEK
Press the [SEEK TRACK]button
•Press the button for a short time :
Changes the frequency.
•Pressing and holdin](/manual-img/35/14544/w960_14544-280.png)
4-32
Multimedia System
Radio Mode
(Type A-5, Type A-6)
With the Radio Mode Button
SEEK
Press the [SEEK TRACK]button
•Press the button for a short time :
Changes the frequency.
•Pressing and holding the button :
Automatically searches for the next
frequency.
Preset SEEK
Press the [1] ~[6]button
•Press the button for a short time :
Plays the frequency saved in the
corresponding button.
•Pressing and holding the button:
Pressing and holding the desired
button from [1] ~[6]will save the
currently playing broadcast to the
selected button and sound a BEEP.
SCAN
Press the [SCAN] button
•Press the button for a short time :
The broadcast frequency increas-
es and previews each broadcast
for 5 seconds each. After scanning
all frequencies, returns and plays
the current broadcast frequency.
•Pressing and holding the button:
Previews the broadcasts saved in
Preset [1] ~[6]for 5 seconds
each.
Selecting through manual search
Tu r n t h e TUNE knob left/right to
adjust the frequency.
MENU : Radio
Within [MENU]button is the A.Store
(Auto Store).
A.Store (Auto Store) : [1] Button
Select A.Store(Auto Store) to save
frequencies with superior reception
to presets [1] ~[6].If no frequencies
are received, then the most recently
received frequency will be broad-
cast.
Page 282 of 571
4-33
Multimedia System
4
Media Mode
With the Media Mode Button
Press the [MEDIA]button to change
the mode in order of CD ➟
USB(iPod®) ➟ AUX ➟ My Music*➟
BT Audio*.
*if equipped
The folder/file name is displayed on
the screen.
The CD is automatically played when
a CD is inserted.
The USB music is automatically
played when a USB is connected.
Repeat
Whilst song (file) is playing, press
[RPT]button
Audio CD, MP3 CD, USB, iPod®, My
Music* mode : RPT on screen
•To repeat one song (Press the but-
ton for a short time) : Repeats the
current song.
MP3 CD, USB mode : FLD.RPT on
screen
•To repeat folder (pressing twice) :
repeats all files within the current
folder.
Press the [RPT]button again to turn
off repeat.
*if equipped
■ My Music Mode
■ USB Mode
■ MP3 CD Mode
■ Audio CD Mode
Page 286 of 571
4-37
Multimedia System
4
Information : [3]Button
Displays information of the current
song.
Press the [MENU] button to turn off
info display.
Search : [4]Button
Displays iPod®category list.
Searching iPod®category if [MENU]
button is pressed, moves to parent
category.
MENU : AUX
AUX is used to play exter nal MEDIA
currently connected with the AUX
terminal.
AUX mode will automatically star t
when an external device is connect-
ed with the AUX terminal.
If an external device is connected,
you can also press the [MEDIA]but-
ton to change to AUX mode.
AUX mode cannot be star ted unless
there is an external device connect-
ed to the AUX terminal.
Information
-Using the AUX
Fully insert the AUX cable into the
AUX terminal for use.
i
■ Ty p e A - 5 , Ty p e A - 6
■ Ty p e A - 1 , Ty p e A - 2 , Ty p e A - 3 , Ty p e A - 4
Page 289 of 571

4-40
Multimedia System
Phone Mode (if equipped)
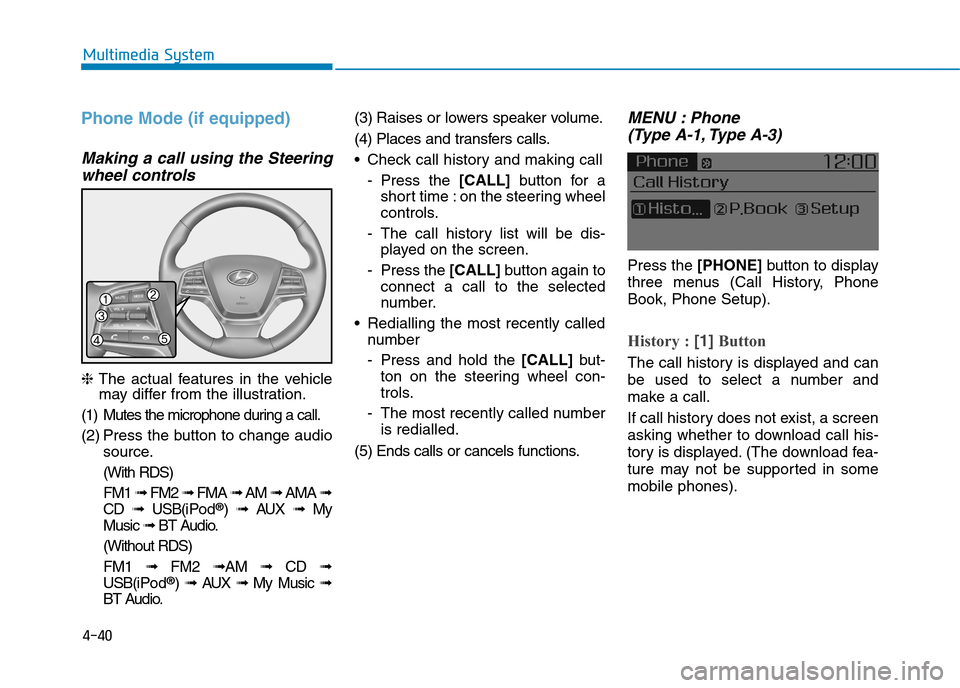
Making a call using the Steering
wheel controls
❈The actual features in the vehiclemay differ from the illustration.
(1) Mutes the microphone during a call.
(2) Press the button to change audio
source.
(With RDS)
FM1 ➟FM2 ➟FMA ➟AM ➟AMA ➟
CD ➟USB(i Po d®) ➟AUX ➟My
Music ➟BT Audio.
(Without RDS)
FM1 ➟FM2➟AM ➟CD ➟
USB(i Po d®) ➟AUX ➟My Music ➟
BT Audio.
(3) Raises or lowers speaker volume.
(4) Places and transfers calls.
•Check call history and making call
-Press the [CALL]button for a
short time : on the steering wheel
controls.
-The call history list will be dis-
played on the screen.
-Press the [CALL] button again to
connect a call to the selected
number.
•Redialling the most recently called
number
-Press and hold the [CALL] but-
ton on the steering wheel con-
trols.
-The most recently called number
is redialled.
(5) Ends calls or cancels functions.
MENU : Phone
(Type A-1, Type A-3)
Press the [PHONE]button to display
three menus (Call History, Phone
Book, Phone Setup).
History : [1]Button
The call history is displayed and can
be used to select a number and
make a call.
If call history does not exist, a screen
asking whether to download call his-
tory is displayed. (The download fea-
ture may not be supported in some
mobile phones).
Page 291 of 571
4-42
Multimedia System
Setup Mode
(Type A-1, Type A-2, Type A-3,
Ty p e A - 4 )
With the Display Button
Press the[SETUP/CLOCK]button to
select [Display]
Mode Pop up
[Mode Pop up] !Changes [On]
selection mode
•During On state, press the
[RADIO]or [MEDIA] button to dis-
play the mode change pop up
screen.
Scroll text
[Scroll text] !Set [On/Off]
•[On]:Maintains scroll
•[Off]:Scrolls only one (1) time.
Song Info
When playing an MP3 file, select the
desired display info from ‘Folder/File’
or ‘Album/Artist/Song’.
Page 296 of 571
![Hyundai Elantra 2017 Owners Manual - RHD (UK. Australia) 4-47
Multimedia System
4
•Changing connection sequence
(Priority)
This is used to change the order (pri-
ority) of automatic connection for the
paired mobile phones.
Select [Phone List] !Select
[P Hyundai Elantra 2017 Owners Manual - RHD (UK. Australia) 4-47
Multimedia System
4
•Changing connection sequence
(Priority)
This is used to change the order (pri-
ority) of automatic connection for the
paired mobile phones.
Select [Phone List] !Select
[P](/manual-img/35/14544/w960_14544-295.png)
4-47
Multimedia System
4
•Changing connection sequence
(Priority)
This is used to change the order (pri-
ority) of automatic connection for the
paired mobile phones.
Select [Phone List] !Select
[Priority] !Select No. 1 Priority
mobile phone
➀Select [Priority].
➁From the paired phones, select
the phone desired for No.1 priority.
➂The changed priority sequence is
displayed.
Once the connection sequence (pri-
ority) is changed, the new no. 1 pri-
ority mobile phone will be connected.
When the no. 1 priority cannot be
connected : Automatically attempts
to connect the most recently con-
nected phone.
Cases when the most recently con-
nected phone cannot be connected :
Attempts to connect in the order in
which paired phones are listed.
The connected phone will automati-
cally be changed to No. 1 priority.
• Delete
Select [Phone List] !Select mobile
phone !Select [Delete]
➀Select the desired mobile phone.
➁Delete the selected mobile phone.
➂Deletion completion is displayed.
When attempting to delete a current-
ly connected phone, the phone is
first disconnected.
• When you delete a mobile phone,
the mobile phone phone book will
also be erased.
•For stable Bluetooth®Wireless
Te ch n o l o g y c o m mu n i c a t i o n ,
delete the mobile phone from
the audio and also delete the
audio from your mobile phone.
Phone book Download
This feature is used to download the
phone book and call histories into
the audio system.
Select [Phone book Download]
•The download feature may not
be supported in some mobile
phones.
•When downloading a new phone
book, delete all previously saved
phone books before starting the
download.
NOTICE
NOTICE